If there is a constant extraneous sound (hum) from the rear wheels when driving, you should pay attention to the condition of the wheel bearing. On the VAZ 2114, this part is quite durable and it happens that the bearing travels more than 200,000 km, but if it starts to howl, its replacement is required.
In order to replace it yourself, we need the following tool:
- Vise for more convenience
- Special puller with rotating jaws
- Circlip pliers
- Wood block
- Hammer
- Ratchet and crank
- 7 and 30 mm heads
At one time I did a video review on this topic, but due to the fact that at that time I did not have all the necessary tools and a vice on hand, which are very useful when performing this repair, everything did not turn out quite as I wanted. But the essence of working in a garage environment can still be understood.
A little about the device and functionality
The main purpose of the part is to ensure uniform rotation of the car wheels. Given the name of the part, it is easy to guess that wheel bearings are the connecting link between the hub and the axle to which the brake disc and wheel are attached.
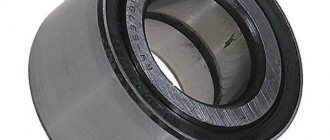
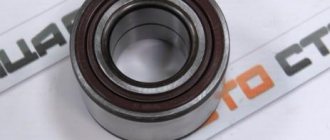
The design of the part fully corresponds to the classic type of rolling bearings. These are two metal rings into which conical rollers are pressed, protected from the body by a durable rubber insulator.
Unlike foreign competitors, domestic bearings are created using outdated HUB technology. They are quite difficult to install, require very precise tightening torque and require plenty of lubrication.
The operation of the mechanism lasts for several years. It is recommended to change a spare part for a VAZ 2114 approximately once every 100 thousand kilometers. But negative operating factors can accelerate the wear process:
- Bad roads. The entire force of the shock load falls on this mechanism of the system. Over time, the metal gets tired and the bearing begins to fail.
- Aggressive reagents. In Russia, in order to save money in winter, aggressive chemicals are often used to remove ice from roads.
- Sudden temperature changes. In winter, owners of warm garages unknowingly shorten the service life of many metal parts, for which sudden temperature changes when leaving and entering the garage create a large load.
Getting to know the journal bearing
To begin with, I suggest the simplest thing - getting to know the device. The support bearing (OS) is necessary to create a movable connection between the machine body and the shock absorber. On VAZ 2110, 2114 cars, models such as Grant, Kalina, Priora, as well as on all kinds of foreign cars Mitsubishi, Volkswagen, Fiat or Toyota, for example, the location of the OP is approximately the same - the upper part of the pillar. Install the bearing between the support and the upper cup (or cup, anyone) of the shock absorber spring.
If we look at it purely from a design point of view, then we have a variation of rolling bearings. But OP differs from them in the large thickness of the outer ring. The rolling bodies are cylindrical rollers. They are placed perpendicularly and separated from each other. Due to this design, the unit can take on loads from different sides.
The task of the OP is to provide the shock absorbers with the ability to rotate freely in the supports. In any car, be it a Ford Focus or Mondeo, Chevrolet Lanos, Cruze, Lacetti, Aveo, Daewoo Nexia, Hyundai Accent or Skoda Octavia, the OP will always be slightly higher than the front spring. The shock absorber rod will pass through the central cavity of the element. Shock absorber bodies are always mounted to the body where the OP is located. As a result, two types of loads act on the support - axial and radial.
Before you replace and buy a new element to replace the old OP, you need to understand their types. This is where we will start. Do you agree? Then go ahead.
Types of OP
It’s difficult to say for sure which OP is better to buy. Much depends on the specific car. How to check if OP is good or not? First, ask how much the bearings cost. Good parts cannot be cheap. But it’s not worth chasing the most expensive models if you have a budget car. Try to choose the golden mean.
Besides the fact that you need to look at the manufacturer, the specific type of bearing will be an important consideration. There are several varieties of this device.
- OP having a built-in inner or outer ring. For installation, mounting holes on the housing are used, so there is no need for clamping flanges.
- OP, in which the inner ring is separated. Structurally, the outer ring is connected to the body. It is important to take such devices in cases where you need to achieve the most accurate rotation of the outer ring.
- OP having a detachable outer ring. This is the opposite version of the previous bearing. Accordingly, they are taken if necessary to obtain precise rotation of the internal element.
- Single split bearings. The outer ring on such OPs is divided into one precisely. With their help, high rigidity values are achieved.
Sooner or later the fault will manifest itself. This mainly occurs due to dirt, sand and moisture getting into the unit. On average, the first signs of a malfunction appear after about 50-75 thousand kilometers. Replacement is recommended every 100 thousand kilometers.
Removing the rear wheel bearing
- Use a screwdriver to pry off the hub cap
- Bend the crumpled edge of the nut on the hub axle
- Take a 30mm socket wrench and loosen the nut
- Jack up the car and remove the wheel and brake drum.
- Unscrew the nut and remove the thrust washer
- Using a puller, press the hub from the axle along with the bearing.
- If the bearing has fallen apart, it can be removed with a two-jaw puller. There are special grooves on the bearing for this purpose.
- We install our hub in a vice
- Using a puller, squeeze and remove the bearing retaining ring.
- Using a cup puller, press out the bearing
Photo report on replacing the rear wheel bearing on VAZ 2114 and 2115 cars
So, the first thing you need to do is remove the cap of the nut and rip it off using a good wrench. Then lift the rear of the car with a jack, having first loosened the wheel bolts. And after that you can completely remove the wheel.
Next you will need to remove the brake drum. It is not necessary to remove the pads, although they have already been removed in this report.
Unscrew the hub nut completely, as shown in the photo below.
When the nut is completely unscrewed, you should also immediately remove the washer using a screwdriver or magnetic handle. And now, use a puller to remove the entire hub assembly from the axle shaft:
By turning the puller rod, the hub itself slides off the axle shaft and can be completely removed without any problems:
If the inner race of the bearing remains on the axle shaft, which sometimes happens, you can remove it using the same puller. Then we take the hub assembly and clamp it in a vice so that the inner side is directed upward. And using pliers, remove the retaining ring:
And then you can turn the hub over:
We take a drift of a suitable size and use it to knock out the old bearing. I did this using a large socket and wrench:
And after some work we get the following result.
We can say that the dismantling of the bearing was successful. Now we take the lubricant and apply it in a fairly generous amount to the inside of the hub.
And we align the new wheel bearing exactly in the center:
And in order to press the new one evenly without distortions, it is better to use the old bearing for this purpose. When it goes deep enough, you can finally press it in.
This must be done until a groove appears for installing the retaining ring.
After this, lubricate the axle shaft with lithol and put the hub assembly in its place. The price of a new bearing is about 300 rubles, but if assembled with a hub - at least 700 rubles.
Necessary tool
Before you start work, you need to prepare all the tools and assemble them in one place:
- Special puller for bearing removal.
- Collar.
- Head at "30".
- Keys or sockets for “17” and “19”.
- Mandrel for knocking out the hub.
- New wheel bearings.
The tool is assembled and ready to use
Preparatory work
Make sure that the workplace is well lit, and it is best if it is on a viewing hole or a lift. Because this is the only way to talk about high convenience when carrying out such work. It would also be a good idea to familiarize yourself with the detailed diagram of the location of the bearing on the front hub of the VAZ-2112.
Thanks to this illustration, the diagram becomes very clear.
Step-by-step work order
First of all, we place the car in a stationary state, put on the handbrake, and, if desired, install wheel chocks. And while the car is on the surface, we tear off all the bolts on the front wheels.
We unscrew the torn bolts and put them aside. We remove the wheel.
Next, we need to use a “30” wrench to unscrew the hub nut
Please note that during its dismantling, you will have to press the brake pedal, and for this we will need an assistant. Then, using a screwdriver, press out the calipers. When this operation is completed, having the key at “17” at hand, unscrew the calipers from the steering knuckles.
Then, using a screwdriver, press out the calipers. When this operation is completed, having the key at hand at “17”, unscrew the calipers from the steering knuckles.
- Carefully unscrew the brake disc from the hub.
- Then, making gentle blows, we release the hub.
- And then the CV joint from the bearing.
Replacing the wheel bearing
Then, when access to the hub bearing is completely open, there are several ways to replace it.
First way
In this case, it is necessary to have a special puller to remove the bearing.
- First you need to take care of removing the stopper.
- Using this device, you simply remove the old bearing and install a new one in its place.
- After this, we carry out the entire assembly process in the same order as removal.
- The advantages of this method include the fact that during this work there is no need to touch the wheel alignment bolt, therefore, you will not have to add additional work.
- The disadvantages of this method include inconvenience during the process. Because you have to contrive and take an extremely uncomfortable position.
Second way
To carry out this work, it is necessary to carefully dismantle the steering knuckle and completely remove the hub.
- Moving to the workbench, we replace the wheel bearing.
- To do this, dismantle the retaining ring and knock the bearing out of its seat, or press it out.
- Next, we perform the installation in reverse order, having previously cleaned the surface of the hub.
Advice! Before you begin removing the alignment bolts, mark their position with a marker or chalk. In this case, the marks should indicate the current position of the bolt on the rack and the previous location of the knuckles. Thanks to such marks, during assembly it will be much easier to navigate the position of these bolts. Although it will not be possible to return to the previous state, it will still be possible to minimize it.
How to check a wheel bearing?
The procedure is quite simple and banal: after a long ride, you need to touch the part of the wheel where the extraneous sound comes from. If it is hotter than the other side, this is the first sign that the bearing needs to be replaced.
It is possible to carry out diagnostics in more detail. Raise the car with a jack, first unscrewing the wheel bolts. Place the wheel chocks and fully raise the side you are checking.
Then you need to take the wheel and rock it with maximum effort. If there is a dull knock, you need to ask a friend to apply the brakes. Carry out the procedure again, if the knocking noise disappears, then the wheel bearing needs to be replaced.
Which bearing is better to choose?
This part can be either Russian or foreign made. Many craftsmen recommend Vologda bearings, which are not of poor quality, and Samara bearings.
The quality is not bad, and the price is much lower. It is not recommended to buy Chinese counterfeits. The wheel bearing measures 64/34/37 millimeters.
As for the tools, if you don’t have a puller for removing the front or rear wheel bearings of VAZ cars, and especially if you don’t have any repair experience at all, then in this case you shouldn’t start work and you need to contact a service station.
Although if you have at least some skills, then the bearing can be knocked out using improvised means.
You will also need a socket wrench (head) for thirty and keys for seventeen and nineteen.
How and which bearing to choose?
Choosing a new part is often quite difficult, because there are many nuances that play a big role
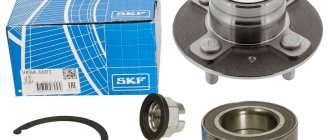
When choosing a new bearing, you should always pay attention to the quality of the product, technical specifications, certificate and packaging confirming originality. But in addition to the original VAZ2114 rear wheel bearing, there are many replacements that are also available and recommended for purchase
We advise you to familiarize yourself with all existing options for replacing a faulty part.
Original part
2108-3104020 and 2108-3104020-02 are the original numbers of the rear wheel bearing for the VAZ2114. This car part with this number is made at AvtoVAZ factories. It fits the seat exactly and its approximate price is 2000 rubles.
Analogue parts options
In addition to the original bearing models, there are many other equally high-quality options that are also suitable for installation. And these are the options that most drivers of VAZ 2114 cars choose, since sometimes the quality and service life of these parts exceeds even the original bearings. But it is not recommended to buy bearings from an unknown manufacturer.
Some nuances and recommendations for selecting, purchasing and installing a rear wheel bearing:
Replacing the rear wheel bearing on a VAZ 2114
If there is a constant extraneous sound (hum) from the rear wheels when driving, you should pay attention to the condition of the wheel bearing. On the VAZ 2114, this part is quite durable and it happens that the bearing travels more than 200,000 km, but if it starts to howl, its replacement is mandatory
In order to replace it yourself, we need the following tool:
- Vise for more convenience
- Special puller with rotating jaws
- Circlip pliers
- Wood block
- Hammer
- Ratchet and crank
- 7 and 30 mm heads
At one time I did a video review on this topic, but due to the fact that at that time I did not have all the necessary tools and a vice on hand, which are very useful when performing this repair, everything did not turn out quite as I wanted. But the essence of working in a garage environment can still be understood.
BEARING DIAGNOSTICS
Let's talk about how to check a wheel bearing.
An indirect sign that you need to pay attention to the bearing on the VAZ 2114 is the appearance of a characteristic hum or hum from one of the wheels while driving. Typically, the noise increases at high speeds, making it easier to hear on the highway.
The driver, being in the cabin, is not always able to correctly determine the source of the noise. For example, a hum from the left wheel may be perceived as coming from the right. Or vice versa. To accurately determine by ear where the damaged bearing is located, you need to watch how the sound changes when turning when the mechanism is subjected to a higher load. If the sound disappears when turning right, but appears when turning left, the right bearing has worn out.
Diagnostics is carried out in the following way.
- We raise the car so that the wheel being diagnosed is hanging out.
- We rock it with our hands, holding the top part.
- We turn the wheel by hand.
- Pay attention to the smooth deceleration of movement and to extraneous sounds.
- An emerging backlash may also indicate a problem.
Do-it-yourself technology for replacing the rear wheel bearing of a VAZ 2114
Removing the rear wheel bearing
- We start by loosening the wheel bolts and hub locknut before jacking up the car.
- Now we lift the car with a jack. Screw the hub nut all the way and remove the wheel. Unscrew the drum mounts.
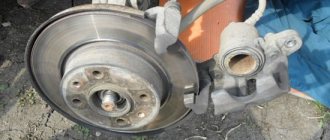
- We remove the drum. Try to loosen it with your hands first.
- If that doesn't work, treat the joints with WD-40.
- We gain access to the hub and locknut. Unbend the stopper and unscrew it. To enhance the torque, we use an extension for the wrench in the form of a pipe.
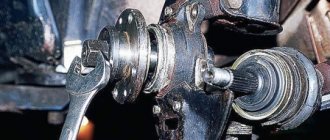
- We compress the hub. To do this, install a puller with paws, as shown in the photo. We grab the back of the hub, focusing on the end of the axle. We tighten the removable device, so the part will gradually be removed.
- Inside the housing there will be an outer part of the product with a separator and rollers, and an inner race on the shaft. If you are going to change the pads, then unscrew the axle shaft fastenings.
- Having unscrewed the bolts, we dismantle the structure (trunnion, brake flap with pads). We help by hitting the screwed hub nut with a hammer. Don't turn the axle shaft!
- The brake shield will be removed along with the axle, the rear part of which is usually stuck. We knock on it and dismantle it.
- We remove the wheel bearing race from the mounting surface of the axle using a puller. The same operation is also carried out directly on the car, without removing the axle shaft, if replacement of the brake system is not required.
- Now let's move on to the hub. We install it as shown below, for example, between two bricks or bars. We select a head to match the diameter of the inner race, with the help of which we knock the part out of the hub with hammer blows. Dismantling is complete.
Installing the rear wheel bearing on a VAZ 2114
- We clean the hub from dirt, wash it in gasoline, and do the same with the axle shaft. Next, lubricate the seating surface of the hub with thick lubricant. We place the ball bearing on the hub hole, evenly and without distortions, for this there are mounting chamfers.
- We press the new spare part with our hands and insert it 3 mm. Now you will need an old bearing, which we install on top.
- Using even blows from the side of the hammer, we gradually hammer the part into the hub. Make sure there are no distortions.
- After the ball bearing goes all the way, it becomes possible to insert the retaining ring; install it using pliers. We also lubricate the axle.
- We attach the assembled structure to the axle, evenly, without distortions. Next, we put the washer on the thread and screw on the hub locknut.
- Now we tighten the nut, with which we press the hub onto the axle, do not forget to lock it. The tightening torque is shown in the table below. After this, we install the drum, fasten it and screw the chassis.
Features of disassembling the rear wheel chassis
- After removing the wheel, the brake drum is unscrewed and removed, then the hub nut is unscrewed with a 30 mm socket.
- The hub can be pressed out of the seat by screwing others 130 mm long (M12×1.25) into it in place of the wheel bolts so that their ends rest against the fastening bolts. Tighten these bolts one by one and remove the hub.
Curved legs engage the clip on both sides, and the rod is screwed in the middle, resting against the center of the trunnion, thus the old part is pulled out of its seat. This type of puller with two or three legs is quite common; if desired, you can find it from familiar car enthusiasts or purchase it in a store. This device is multi-purpose and can subsequently come to the rescue in the most unexpected situation.
Sooner or later the time comes to change the front wheel bearing of the VAZ-2114. This procedure cannot be called simple, since many elements will have to be disassembled. Also, a very significant fact is the identification of the malfunction and the selection of the part. Therefore, this article will discuss exactly this.
Stages of self-repair
The entire process of self-repair can be divided into several stages, after carefully reading them, any owner will understand how to repair a car without having the skills of a professional car mechanic; it is enough to follow the following steps:
It is necessary to drive the car into a room with a flat floor, turn it off, engage first gear in the gearbox, place a stop under the front wheels for safety, remove the rear wheel from the desired side, first jacking up the car
It is important to take into account here that the vehicle cannot be put on the hand parking brake, otherwise it will be impossible to remove the brake drum and disassemble the rear hub assembly. Having removed the wheel, we proceed to unscrew the rear hub mounting nut, which tends to be very tight due to rotational axial loads, so you may need to apply the maximum possible force to break it off. At this stage, begin to remove the brake drum
Using a Phillips screwdriver, unscrew the screws that secure the drum. Then carefully (using a small block), knock on the drum with a hammer from the back side over its entire surface (before dismantling, it is advisable to treat its seat with WD 40 liquid and treat it with a brush, which will significantly simplify the removal of the part).
The next step is to remove the hub from its axis; to do this, you need to use a special puller that will carefully remove the part. Here it is worth considering that the inner race of the wheel bearing can remain on the axle, and it can be pressed out in two ways: using a wheel puller, or using a chisel and carefully knocking it down with a hammer.
Next, we proceed to pressing the oldest bearing out of its seat in the hub, for which we remove two retaining rings, and remove it from there using a press or using a specialized puller. If you don't have a press or puller, you can use a hammer to simply knock the old bearing out of the rear suspension assembly.
Having completely dismantled the old part, it is necessary to thoroughly clean all the seats and the axle on the axle (dirt-repellent shield of the rear brake pads) from dirt, after which everything is carefully inspected for various damages, and if any are found, the damaged unit must be replaced with a new one. The bearing seat is lubricated both in the hub and on its axle, then it is carefully pressed in or driven in with a hammer through a buffer (usually the old bearing race is used), the retaining rings are installed in their places, and the assembled unit is mounted on the axle, after which the locking hub nut is tightened . The remaining parts are assembled in the reverse order of disassembly.
- Also watch the step-by-step execution of the work with the explanation of the master in the video:
Selection of ZPS
When choosing a rear wheel bearing, you should focus on the required characteristics and manufacturers who today produce ZPS suitable for the VAZ 2109.
Let's start with the characteristics. The choice should be made in favor of bearings with the following parameters.
For the rear hub, a ball, angular contact, double-row closed type bearing is used.
Now let's talk about manufacturers. There are several of them, each of which has its own characteristics.
Replacement
Since the test results showed that the old rear wheel bearing has already served its purpose, it will need to be replaced.
Replacement procedure
Many people ignore the noise and hum of the ZPS until a certain time. But if timely repairs are not done, this can lead to serious problems that can result in the following consequences:
- Initially, hum and noise will cause discomfort due to their unpleasant sounds. Many motorists are accustomed to comfort, so they will do everything to get rid of the noise;
- If you continue to ignore the problem bearing, you will soon have to replace not only it, but the entire rear strut. And these are serious financial losses;
- Bearing wear leads to disruption of the running system. From here, the car can behave in the most unpredictable ways, increasing the likelihood of an accident.
Don’t joke with a problematic air conditioning system, but it is better to start repairing it immediately when you notice signs of its malfunction.
- After checking, lower the car to the ground, loosen the hub nut and bolts holding the wheels.
- Remove the decorative cap from the hub nut, then unlock the nut, loosen the tightening and use a socket with a lever to increase the force, remove the fasteners. Please note that these nuts are tightened with a large torque, so you will have to work hard.
- Loosen the tension on the wheel bolts.
- Use a jack to lift the side on which you will begin the repair. In this case, the car must be in the first gear position at the gearbox.
- Remove the wheel.
- Remove the brake pads and drums, which will allow you to completely unscrew the hub nut and put it aside along with the thrust washer.
- Now you have got rid of everything unnecessary, so you can arm yourself with a special puller to press the hub off the axle.
Removing an element
You will need a vise to hold the removed hub. Without them, removing the bearing will be quite problematic.
Don't forget to remove the retaining ring before doing this.
Using a mandrel and puller, press out the old bearing.
It is extremely important to treat the hub, wash it, removing all dirt. Only after the hub has been cleaned can a new bearing be pressed in that meets the parameters required by VAZ 2109
Only after the hub has been cleaned can a new bearing be pressed in that meets the parameters required by the VAZ 2109.
Replace the retaining ring. It is also better to replace it rather than use the old ring.
Press the hub into its rightful place using a mandrel of suitable diameter
The force must be applied to the inner ring of the new bearing, and not to the outer one.
All you have to do is assemble the knot in reverse order. There shouldn't be any serious difficulties with this.
The last step is the mandatory replacement of the old hub mounting nut. It is not advisable to use an old nut. After installing the fastener, lock the nut.
Carry out a similar operation with the second hub. Experts recommend replacing the rear hub bearings in pairs so that their wear is equal and uniform. In addition, if one bearing fails, the second will soon follow. Why put off already obligatory events?
A competent approach to replacement, the correct choice of rear wheel bearing in accordance with the stated parameters are a guarantee of successful repair of your VAZ 2109. Do not delay in solving this problem, otherwise it will result in serious financial costs for you or, God forbid, an accident.
Sources
- https://zamena-podshipnikov.ru/zamena-zadnego-stupichnogo-podshipnika-vaz-2114.html
- https://luxvaz.ru/vaz-2109/293-zamena-zadnego-stupichnogo-podshipnika.html
Self-replacement of the VAZ 2115 wheel bearing
2. Remove the mounting bolts.
5. Using a “30” wrench, remove the central nut securing the hub.
6. Disconnect the drive shaft CV joint from the hub and remove the caliper along with the disc.
7. Remove the two mounting bolts that secure the ball joint to the lower arm.
9. Using a suitable extension, knock the hub out of the steering knuckle. For this it is better to use a special puller.
Good advice: Fix the steering knuckle on the lower arm by connecting it to the ball joint arm, in this position it will not interfere with you.
11. Install a special puller on the steering knuckle.
12. Install the outer snap ring into the steering knuckle using pliers.
14. As a rule, when the hub is knocked out of the steering knuckle, the inner race of the bearing comes out with it. Therefore, if you have the necessary puller for this, then with its help you can easily remove the ring, but if you don’t have it, then you will have to use a grinder to remove it. In the second case, you need to be extremely careful not to accidentally damage the hub, otherwise you will have to change it as well.
15. Install the hub onto the puller, thread the puller into the steering knuckle. Place the puller against the inner ring of the bearing and press the hub into the bearing. If there is no puller, the bearing can be driven in using a tool and a hammer.
Replacement
First, let's set priorities. If you just want to save money, so you do the work yourself without any experience, then this is a wrong decision that can lead to dire consequences. If you have experience and certain knowledge, you can safely do the repairs yourself.
In any case, we recommend watching the training video instructions, where you will be told in detail about all the nuances of such work. This way you will gain additional experience and useful knowledge.
After this, we proceed directly to the work of replacing the wheel bearings. There are several ways. We will tell you about each of them in more detail, and you will decide for yourself which option suits your skills and capabilities.
- The first method involves carrying out work without removing the steering knuckle from the car. But here you will definitely need a special puller to dismantle the bearings. The advantage of the method is that there is no need for subsequent wheel alignment adjustment. But this is the most inconvenient way. To press out and reinstall the wheel bearing, we recommend driving the car into an inspection hole.
Puller
- The second method will require removing the steering knuckle. A workbench will also be useful for removing the bearing. In this case, you will definitely break the collapse. If you don’t want to go to a service station after repairing yourself, use a couple of tricky tricks: Before removing the lower bolt of the strut and steering knuckle, apply marks;
- One mark will allow you to determine the position of the bolt;
- The second mark will be responsible for the position in the steering knuckle strut;
- During the reassembly process, try to ensure that the marks match each other as accurately as possible. This method allows you to simultaneously make adjustments to the chassis and check the condition of the components.
The third method will require removing the bearing along with the stand and dismantling it using a vice. This method is complex compared to others.
It remains to press out the element
Before work, do not forget to turn on the handbrake and place wheel chocks under the wheels to avoid accidental movement of the vehicle.
- Remove the strut, knock out the tie rod ends and unscrew the fasteners of the upper support to the body of your car.
- Position the jack so that it does not become an obstacle during operation. It all depends on your personal understanding of comfort.
- The wheel bolts are unscrewed, after which the nut of the desired bearing is removed using a 13 mm wrench.
- Using a 17 mm wrench, you dismantle the caliper, which is secured with wire to prevent sagging on the brake hose.
Dismantling works
- After this, the brake disc and ball joint are removed.
- The hub will now be knocked out of the steering knuckle, giving you access to the damaged bearing.
- All that remains now is to press out our problematic element using a puller.
- If you do not have a device such as a puller, use a metal tube whose diameter is slightly smaller than the diameter of the bearing.
- Clean the landing site, treat it with lubricant, after which you can install a new spare part.
- Reassemble in reverse order. Do not forget to simultaneously check the condition of various components, lubricate, change gaskets as necessary.
As you can see, there is a lot of work to do. Do not rush to conclusions regarding the ease or difficulty of such a task. If you want to do everything quickly, efficiently, without having any experience, contact the service station. Otherwise, be prepared to spend a whole day, or even more, on repairs.
Loading …