You can often observe situations in which the driver does not know why the silent blocks creak. Sometimes they can even drown out soft music in the cabin, which causes a number of inconveniences. The “groaning” is especially noticeable on uneven roads. Even the most reserved driver’s nerves will not be able to withstand listening to such squeaks for hours, no matter how much you ignore them.
Sometimes many experienced car owners can argue that the creaking of silent blocks does not mean something strategically important: the wheels will not fall off, and the car will not stop moving. But in other cases, even the most inexperienced beginner tries to localize and eliminate the cause of the heartbreaking grinding noise as quickly as possible.
So what should you do to prevent blocks from creaking? Here the sequence of manipulations directly depends on the cause of the sound. There are not many of them, so it is quite easy to install and eliminate the unpleasant factor with your own hands, without resorting to an expensive inspection at a service station. And if you are used to repairing a car yourself, then you will find the process fun and interesting.
Wear of parts
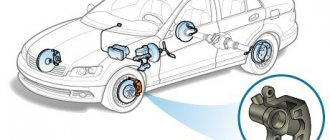
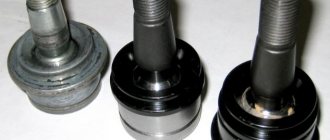
The most likely and obvious cause is wear and tear. What to do in such a situation? First, a little hardware: the silent block is a dense piece of rubber with metal spacers. Rubber dries out over time and this is a normal process. They are also systematically exposed to mechanical and chemical stress. The most critical period is winter , when roads are often thickly sprinkled with reagents that corrode even the thickest rubber.
The creaking is the first sign. The driver can observe a deterioration in handling, coupled with the appearance of vibrations in the cabin. Theoretically, one silent block can withstand about 100 thousand kilometers, but calculations were carried out in the west, where the roads are incomparably better. Considering the condition of our coating, feel free to reduce the resource of the block by half. It is worth changing at the inspection hole, or its equivalent:
- Unscrew all the nuts that secure the front arms;
- remove the nut that secures the stabilizer to the lever;
- remove the bolt by gently tapping it with a hammer, since it comes out extremely reluctantly with your hands;
- Loosen all the bolts on the wheel, first jacking up the desired side. Afterwards the wheel is removed completely;
- unscrew the nuts on the braces, but before doing this, thoroughly “blow” them with WD-40;
- the ball is moved away from the steering knuckle, then 2 more bolts are unscrewed and the lever is finally removed from the car;
- Now silent blocks are removed using a puller, which in no case can be replaced with a sledgehammer;
- clean the eyes from any deposits;
- It is necessary to thoroughly lubricate the silent blocks before pressing with any solution with a high soap content. Oil and grease are contraindicated as they will likely corrode the rubber;
- The collection procedure is performed strictly in reverse order.
How to determine if silent blocks are squeaking
The creaking in the suspension is impossible not to notice. The silent block of the rear beam creaks especially unpleasantly - usually the sound even resembles a crunching or grinding sound. Listen to how the creaking sounds in the video:
How silent blocks creak in the video (creaking can be heard from 0:45)
Front suspension silent block creaking
What should I do for diagnostics to determine if silent blocks or other chassis elements are squeaking? The simplest case would be if the creaking sound appeared immediately after replacement. Yes, this is very unpleasant, but it is clearly understandable - I installed new parts, it creaked, which means the problem is in them.
It’s more difficult if it creaked unexpectedly or some time has passed since the replacement. In this case, a method that can be used in a garage or on an overpass is suitable, but it is better to take an assistant to check.
Lubricate each silent block individually with a wedge or water, and then rock the car from side to side or press it up and down to simulate the operation of the suspension. Where the sound disappears during processing is where the culprit of the squeak is located. If the sounds do not disappear, it is probably not the silent blocks that are to blame. After all, besides them, it is also common for the strut or ball elements to creak. Silents, with their creaking like a “cart”, can irritate most often in the fall, when it’s dirty, or in the winter, when it’s cold. If you were unable to determine the source of the squeak yourself, go to a service station to diagnose the chassis.
The creaking of new blocks
You can often come across the following point: new components that have just been installed make an unpleasant sound. Perhaps they didn't really fall into place. To speed up the grinding, they must be lubricated. A special silicone grease is provided for silent blocks. But before lubricating, do the following check:
- drive the car into the inspection hole and jack up the problem wheel(s);
- loosen the fasteners on the blocks;
- place reliable wooden stops under the levers and release the jack;
- When the car sinks under its own weight, tighten all the bolts until they stop.
If the creaking is still felt, then the component was originally defective from the manufacturer. In this case, simply lubricating the silent blocks will not work. They will have to be changed completely.
FakeHeader
Comments 18
I'm interested in the price of the issue.) How much did the set of silent blocks cost?
I keep detailed records of all costs on this site. Look there for “Rear Suspension” and “Front Suspension”. Parts that end in “PU” are Polyurethane
Hello, Stanislav!) Great job! :) I’m very pleased with the approach!) This entry especially made me smile: “Thank you very much to vekmann for your help and patience! It’s not easy to bear my perfectionist antics :)))” I’m a perfectionist myself :)) I love it when the result of my work is close to ideal!) By the way, I have the same Legacy, ’90... only with mechanics. and the same color and also a sedan, only the headlights were intact... they were... I recently broke one:((
Thank you! But sometimes this perfectionism results in nothing but disappointment :)))
Hello, Stanislav!) Great job! :) I’m very pleased with the approach!) This entry especially made me smile: “Thank you very much to vekmann for your help and patience! It’s not easy to bear my perfectionist antics :)))” I’m a perfectionist myself :)) I love it when the result of my work is close to ideal!) By the way, I have the same Legacy, ’90... only with mechanics. and the same color and also a sedan, only the headlights were intact... they were... I recently broke one:((
There are plenty of headlights in Nakhodka on the drom. I took it there, though from a right-hand drive :(((
I also looked at the headlight on Drome. There are two offers for the left headlight I need, European. But the price of one of them is somehow dubious... it’s too cheap... 900 rubles in total. Mostly prices start from 2000 rubles. Doubts whether the parcel will arrive after payment for the order. And the other has defects: one fastening ear is soldered and a chip on the glass is caused by a stone. They are asking exactly 2000 rubles for such a headlight. PS I started writing something off-topic here along the way :)) Where can I write to you to discuss various issues regarding the car. so as not to clutter up comments on the main topic.)
Point to my nickname (stan31337) and select “Message”
Yes, damn it, 3 tons is not enough and he’s tired, that’s for sure)))
Yes, it still helps a lot! I'll try to press the bearing in with it tomorrow, maybe it will work