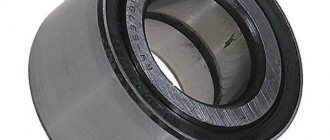
The front wheel bearing or rear wheel bearing is the main element that allows the wheel to rotate. In this case, the wheel bearings experience heavy loads. Also, moisture and dirt can damage the wheel bearing.
If problems arise with the hub bearings, they are replaced. On a Lada Kalina, you can replace the wheel bearing separately (replacing the entire hub assembly is not necessary). To replace the wheel bearing you must:
- remove the hub;
- press out the old bearing;
- Press in the new wheel bearing.
During the replacement process, you also need to take into account certain nuances in order to correctly install the new bearing. Read more in our article.
Front wheel bearing Kalina: signs of malfunction
As a rule, on the vast majority of cars, the front wheel bearing is the first to fail. This is due to the fact that the front wheels turn, impacts on the wheel can occur at different angles, etc.
In this case, a malfunction of the front wheel bearing on a Lada Kalina can be determined by a number of characteristic signs:
- when driving, a hum or howl appears (the intensity of the sound changes at different speeds);
- a crunching sound is heard when the wheel rotates;
- If you hang the wheel and swing it in different planes, you can feel some play; when rocking and unwinding, you can hear a tapping sound inside the hub.
Often the first sign of bearing problems is the humming noise that Kalina's hub makes, and the noise becomes noticeably louder when cornering. This is due to the fact that the weight of the car is redistributed; in a left or right turn, the noise can come more strongly from the left or right wheel.
Please note that if an increase in extraneous sound is noted when turning right, this indicates wear on the left wheel bearing. The opposite signs will indicate wear on the right wheel bearing. You can also hear extraneous noise from the wheel bearings when driving in a straight line, while driving over uneven surfaces, etc.
To more accurately check the bearings, it is necessary to hang the wheels to identify wheel play. The appearance of play will indicate that the clearance in the bearing has increased. To do this, the wheel is rocked, determining the play.
MrPodshipnik
Bearing replacement, repair
Enter the marking or size (for example: 8*22*7) of the product and the country of sale
New instructions
- How to make your own repairs and replace the bearing on the steering column in a ZOOM bicycle 10/09/2019
- How to independently, at home, replace a bearing in an electric motor of a Philips food processor 10/05/2019
- We repair a DAB heating circulation pump and change the bearing ourselves 10/04/2019
- How to repair a Shimano fishing reel yourself and replace a faulty bearing 10/03/2019
- We replace the bearing and repair the SBR_ 132_A concrete mixer ourselves 10/02/2019
How to replace the front wheel bearing on a Lada Kalina
Owners of a Lada Kalina car should know that the operational mileage of the front hub bearing is no more than 50,000 km.
Although adjusted for our roads, this mileage is significantly less. If your bearing has failed, then you have come to the right site! I will give you complete step-by-step instructions for replacing the bearing on the front hub of the Lada Kalina, with my own hands.
How to check the Kalina wheel bearing
If necessary, check the Kalina front wheel bearing, you must:
- raise the front of the car, tighten the handbrake;
- start the engine and engage 5th gear;
- Next you need to spin the suspended wheels to a speed of about 120 km/h;
- then you need to determine which wheel is making the noise;
- if the noise is weak, additionally listen to each wheel with a stethoscope.
This method allows you to quickly identify the problem bearing only if the wear of the latter is sufficiently severe. If the wear is insignificant and the play is weak, the lack of load on the wheels and the noise of the running motor and transmission can drown out minor bearing noise.
Moreover, after installing the wheels on the road and returning to the standard load, the driving noise increases. For this reason, it is best to check the wheel bearings for play. To check the front wheel bearing of Kalina, you must:
- hang up the front wheels;
- grab the top of the wheel with your hand, as well as the bottom;
- the wheel needs to be rocked, revealing any play;
- you can also spin the wheel by hand, assessing the smoothness and ease of rotation;
Taking into account the fact that the load on the bearing with this method of checking is also not high, it is recommended to additionally invite an assistant, who should lightly press the brake while rotating the wheel. If the noise disappears when the brake is pressed slightly, this may also indicate a faulty wheel bearing.
Let us add that if the Kalina front wheel bearing is faulty, there is no need to delay replacement. The fact is that the noise will gradually increase (deterioration in comfort), and at some point the bearing may jam. In turn, jamming of the wheel bearing can lead to loss of controllability, increasing the risk of getting into an accident, etc.
Causes of failure
The caliper as an element of disc brakes is subjected to significant temperature loads, as well as exposure to external adverse factors: dirt, dust, moisture, chemicals. All this happens due to the fact that his device does not allow him to be protected from these negative phenomena. If there is significant overheating, as well as if the boot ruptures, the lubrication of the guides may disappear.
Improper maintenance of the guides, in which some craftsmen manage to stuff inappropriate lubricant into their boots: graphite or similar, leads to their swelling and souring, after which they jam or knock when suddenly activated.
A rupture of the piston boot causes dirt and moisture to enter it. After which it stops working - it starts to jam or, conversely, knock.
Deformation of the sealing ring contributes to brake fluid leakage and oiling of the pads.
Which wheel bearing is better to choose?
Often the best option is an original wheel bearing for Kalina. You can also search for the front bearing among available analogues, which are widely presented in auto parts catalogs.
Among the various manufacturers, we can highlight wheel bearings from SKF, FAG, Moog, Optimal, Ruville, ABS, SCT, Febest, Profit, etc. The main thing is to purchase a branded and high-quality part. If installed correctly, the new bearing will last at least 60-80 thousand km.
DIY repairs: common problems
So, you don’t need to have a mechanic’s education to do some simple work with your own hands.
It is important to follow safety regulations. Always (in the case of a new car) when purchasing a Lada Kalina, it comes with detailed instructions that help you understand the intricacies of the process
The following features of doing it yourself can be highlighted:
- It must be remembered that the Lada Kalina is available with two types of engines and standardized units, so when starting repairs, you need to be 100% sure of the modification.
- If repairs are carried out related to the fuel system or engine, it is necessary to extract the treated gases.
- Oil and other liquids are added only according to the standards specified in the instructions, otherwise the filter will need to be replaced.
If you are going to paint the body, remember that it is better to do it in a ventilated area. You also need to have a paint sprayer; other equipment is not suitable here. Parts that will not be painted, such as headlights, need to be covered with paper.
Replacing the front wheel bearing
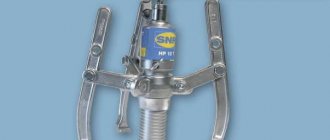
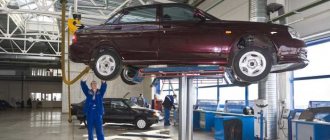
To replace the wheel bearing of a Lada Kalina, the car must be driven into a pit or raised on a lift. It is also necessary to prepare a special wheel bearing puller in advance.
To understand how to change the front bearing, you need to study the following:
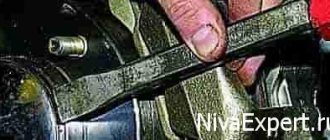
- first remove the hub cap;
- then, using a narrow chisel, the flange of the hub bearing nut is straightened in two places;
- putting the car on the handbrake, the gear is engaged, wheel chocks are placed under the wheels;
- now, using a 30mm socket, you need to loosen the hub bearing nut (the nut is tightened tightly, you need to apply a lot of force);
- then the wheel mounting bolts are loosened, after which you can hang the front part of the car;
- both wheels need to be lifted, since jacking only one side does not allow you to “relax” the anti-roll bar, which clamps the suspension and does not allow you to remove the hub;
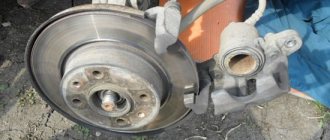
- Now you can remove the wheel, as well as the brake pad guide and caliper;
- then the brake disc together with the caliper must be tied with a clamp or wire so that these elements do not hang on the brake hose (to prevent damage to the hose);
- Having secured the disc with the caliper, the bearing nut can be completely unscrewed and the washer removed;
- now through two opposite holes in the brake disc you need to pass bolts (length 130 mm, bolt thread M12x1.25 mm);
- the specified bolts are screwed into the holes of the hub to a depth that corresponds to the thickness of the hub;
- using sharp blows on the heads of the bolts (you can hit them with a brake disc), the hub is pressed out;
- now you need to unscrew the fastening of the ball joint to the steering knuckle, after which the CV joint is removed from the bearing hole;
- Another way to remove the hub is to disconnect the ball, and only then remove the CV joint from the hub;
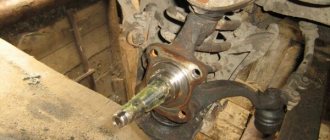
- using a soft steel drift and gradually turning the hub, it is necessary to knock it out of the steering knuckle;
We also recommend reading the article on how to replace the wheel bearing on a Chevrolet Niva with your own hands. From this article you will learn about the features of replacing a wheel bearing on a Niva Chevrolet. - then the retaining ring is removed, then using a puller the bearing is pressed into the cup, which is located outside the steering knuckle (it must be taken into account that the bolt puts pressure on the inner ring of the bearing through the washer inside the steering knuckle);
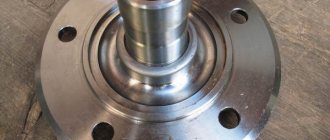
- As a rule, when pressing out the hub, the bearing ring remains on the hub (the ring is fixed tightly, which complicates removal);
It is optimal to have a puller, the legs of which will go into a pair of grooves on the hub (if the puller does not fit, remove the dirt ring with a screwdriver, after which the bearing ring is moved using a chisel). - Having removed the ring, use a file to clean out the nicks on the hub, and install a dirt ring that needs to be sealed on the hub. You also need to clean off dirt and lubricate the inner surface of the steering knuckle;
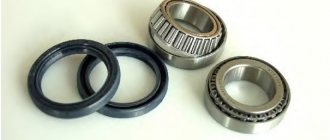
- then, using a puller, the new bearing should be pressed into the steering knuckle;
- It is important to consider that the large puller washer must rest on the steering knuckle from the inside so that the mud rings are not damaged;
- in parallel, during pressing, the new bearing should be pressed through the old bearing, which will transmit force exclusively through the outer ring;
- The final stage is installation of the retaining ring, pressing in with a hub puller, and reassembly of all previously removed elements.
Please note that the bearing nut must be tightened with the required torque, and do not forget to lock it by jamming the collar.
Description of the brake system repair process
It is necessary to jack up the car in order to be able to remove the necessary wheel. Next you need to inspect the pads, determining the level and uniformity of their wear. Then you should disconnect the caliper from the bracket and visually inspect the piston boot for damage. The piston should have an easy stroke when it is pressed into the body. It happens that even behind a seemingly intact boot there is hidden dirt and moisture, and therefore rust.
Therefore, it is worth looking under the boot, carefully using the tool. The piston surface must be clean and smooth. If any of these defects are detected, the caliper needs to be disassembled and restored using a repair kit. In addition, it is necessary to check the condition of the guides and the contact points of the pads for free movement.
Disassembling the brake caliper:
- Disconnect the brake hoses from the caliper. To prevent fluid loss, the hose should be squashed or the hole plugged.
- Remove the piston boot.
- Next, remove the piston from the caliper body.
- Removing the old cuff.
- Cleaning the boot seating area, as well as the cuff groove.
- Rinse the entire assembly as a whole and with clean hands
- Installing a cuff lubricated with brake fluid into the landing groove.
- Installing a cleaned or new piston. It is carried out vertically, using even hands.
- Putting on the boot in the middle of the piston path.
- After the piston enters the housing, it should be pushed out a little again, for example with air. This procedure will help ensure that the boot sits smoothly and is not damaged.
- The recessed piston can again be ready for the installation process.
It is also worth remembering to pump the circuit that has been subject to fluid leakage.
Do-it-yourself brake caliper repairs are easy to do with basic plumbing skills. The main thing is not to forget to be attentive and carefully carry out all the described nuances of the work. After all, the braking system is the key to the safe movement of a car.
Recommendations
If necessary, replace the Kalina front wheel bearing; all connections should be cleaned during reassembly. Removing dirt allows you to increase the service life and improve the quality of fit of parts and elements;
We also recommend reading the article on how and with what to lubricate a wheel bearing. In this article you will learn why you need to lubricate your wheel bearings, as well as how to lubricate your wheel bearing.
During the process of reassembling the connections, it is also important to fill them with lubricant. Graphite lubricant (graphite) is well suited for these purposes. Additional lubrication also increases the service life of parts, and also greatly simplifies subsequent disassembly.
Practice tips
Here they are:
— when purchasing a bearing in a car store, do not forget to ask for a quality certificate;
- it is difficult to find a mandrel - use the ring of an old part;
— throw away the old hub nut and replace it with a new one;
- it is advisable to change the bearing on the other side of the machine, even if it does not hum. Its service life is coming to an end. So replace both at once;
— if you want to speed up the process of dismantling the bearing and pressing it in, contact a service station. There is usually a press there. You will perform only this operation for a small fee, and do the rest in your garage;
— If you don’t have a torque wrench, do the following.
Tighten the bolts until they stop and then loosen them by turning the key back 20 degrees;
— pay attention when pressing the bearing so that there is no distortion. For easier entry, you need to heat the part, but not the bearing
For easier entry, you need to heat the part, but not the bearing.
I wish you success in your renovation.
But if you have any questions during the bearing replacement process, and you don’t know what to do, contact me in the comments.
Always happy to help with advice.
We expel air from the cooling system
The cooling system can become airy for various reasons, and first of all, the heater in the cabin stops blowing warm air, the temperature rises, and the antifreeze boils. If you squeeze the upper and lower radiator hoses, you feel that they are empty, there is no coolant in them. Often, “airing” occurs after replacing the heater radiator, and it is sometimes very difficult to remove air from the system. Alternatively, you can install an additional tee on the lower heater pipe under the hood, and lead the new hose into the expansion tank from above; a plug should be placed in the lower pipe from the tank to the lower radiator pipe.