Safety when driving a car is ensured by several systems, however, the main role is still assigned to the car's brake system. Timely braking saves you from traffic accidents, and the hand (parking) brake helps to secure the car on an inclined surface. It is these elements of the car that need to be given special attention. Timely diagnostics and repairs will help protect you and your car.
A properly functioning braking system is a guarantee of safety.
BRAKE SYSTEM DEVICE
Like any other mechanism in your car, the brake system consists of several elements that work together. The VAZ brake system is no exception. It is much simpler both in structure and functionality than in popular foreign cars, but it also deserves attention.
Its main elements are:
- Front wheel brake structures;
- Pipelines (both sides);
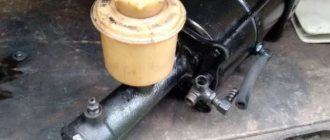
- Hydraulic drive main cylinder;
- Tank;
- An amplifier that has a vacuum structure;
- Braking mechanisms located on the rear wheels;
- Two pressure control levers;
- The hydraulic system also has a regulator that controls the pressure;
- Pedal;
- Hoses made of flexible material.
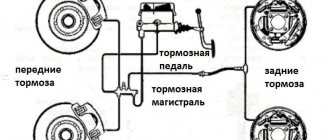
The system is designed so that if one of the circuits fails, the second will provide safe braking. This is done in order to make driving as safe as possible. The brake system of the VAZ 2115 works on the same principle.
The hand brake consists of:
- Lever with locking button;
- Cable in a protective sheath;
- Adjustment nuts;
- Equalizer;
- Locknuts;
- Protective cover.
The weak point of the handbrake is the cable . It requires constant attention. Its stretching or rupture can lead to disastrous consequences. It is also worth remembering that the pads are constantly worn out (especially with active use). It is important to pay attention to the brake force regulator of the VAZ 2113.
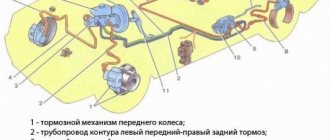
Diagram of the brake system of a front-wheel drive VAZ car (device)
These are the elements that make up the brake system of the VAZ 2114. Everything is quite simple, both in repair and in preventive maintenance. Any adjustments are also made without much effort. For example, you can adjust the handbrake in half an hour yourself, and adjusting the brake pressure regulator of the VAZ 2114 will not cause stupor even for a beginner. These are the key features of the domestic automobile industry - everything is easy and simple.
Installation process
If any difficulties arise during dismantling, then it is worth looking into the VAZ 2114 service manual, there is a detailed description of the removal and installation of all mechanisms. And now to work:
- The cable tension must be loosened and the rear pads must be brought together. After this, you can use the 12th key to remove the guide pins. The seat must be thoroughly cleaned with a metal brush, and then the drum must be knocked down. It is not recommended to use a metal tool for these purposes, as it can damage the seat. The best solution would be a rubber hammer;
- The caliper can be located in front or behind the wheel axle. This should not affect the operation of the mechanism in any way, but usually owners of the VAZ 2114 prefer to install it on the rear axles, since symmetry will have a positive effect on braking. The next step is to join the faceplate and hub. You should check that the centering has been carried out thoroughly. If there are defects, the docking must be repeated;
HOW TO ADJUST HYDRAULICS PRESSURE
As you know, hydraulic drives use fluids and pressure in the system instead of conventional mechanics, where any force is applied either directly or through transmission mechanisms. The key to clear hydraulic responsiveness is the presence of the required amount of brake fluid in the system and, of course, correctly adjusted pressure.
To properly adjust the pressure in the drive, you need to find an assistant. Doing this work alone is extremely inconvenient, and for the final test you will need an outside perspective.
The VAZ 2114 brake pressure regulator allows you to adjust the operation of the brakes to the required level. To do this you just need to do certain things:
- First you need to drive the car into the pit and rock its rear end. This will bring the suspension to the middle position, and this is exactly what needs to be achieved;
- Then slightly unscrew the front bolt on the VAZ brake pressure regulator mount;
- Using a screwdriver, make a small gap (2 mm) between the lever and the spring. For convenience, insert wire or whatever is at hand. A special protrusion on the lever allows you to move it to achieve the desired clearance;
- Tighten the previously loose bolt.
Now you need to check whether everything was done correctly. Accelerate to 35-40 km/h and brake. If the car does not drive away, then everything is done perfectly. In addition, you need to check the wheel locking sequence. Here you need a second person who will see how smoothly the brakes of the VAZ 2114 work. The whole point is that when working correctly, the front wheels should lock a little earlier than the rear ones. If this happens, then the system is set up with a bang.
If the front wheels lock later, the clearance must be increased. It is also possible that the rear wheels will be very late, in this case we reduce the gap. After completing all the work, securely tighten the regulator mount.
It is important to consider that all tests should not be carried out with flat tires. The result depends on this, and accordingly the brake system can be adjusted incorrectly. The tire pressure of the VAZ 2114 must meet the requirements specified in the vehicle documentation.
Operation diagram of the VAZ 2114 brake system
Installing rear disc brakes, adjusting braking forces on the rear axle
- First, the drum brake system is unscrewed and removed.
- Next, the four bolts are unscrewed and the hub is removed.
- After this, the brake pipe is unscrewed from the cylinder.
- Next, the hub is installed using the appropriate faceplates (left and right). The tabs on the adapter must be on the outside.
- There is no need to place a grommet under the bolt indicated by the arrow, as it will make it difficult to install the caliper.
- The hub bolts must be replaced with new ones, 5 mm longer than the old ones.
- Six bolts are needed on each side: four to secure the hub and two to install the calipers. A total of 12 new bolts will be needed. If it was not possible to find bolts of the required length, then you can take longer ones and cut them to the required length: the thread to the head should not exceed 13 mm.
- The corner of the beam will have to be crushed with a hammer, and, if necessary, the surface will have to be refined with a grinder. The metal here is soft enough, so there will be no difficulties. This is done in order to prevent the caliper from touching the beam. If rear 14-inch wheels and calipers are installed, then this operation is not necessary.
- There is a protrusion around the circumference of the hub that prevents the VAZ disk from seating. The internal diameter of the disc, like the hub, is 58 mm, but where there is a protrusion, the diameter is 60 mm.
DEVICE OF BRAKE MECHANISMS
Many people wonder what is the difference between the brake mechanisms of the front wheels and the rear ones. The fact is that when braking, they are subject to different loads, and they do not operate synchronously. But this is not the main reason for the differences.
The front mechanisms consist of:
- Brake disc of classic design;
- Direction pads;
- Calipers;
- Directly the pads themselves;
- Cylinder;
- Piston;
- Seal rings;
- Protection casing;
- Direction finger;
- And its cover, which performs a protective function.
The design of the front brakes is a little simpler than the rear, however, this does not mean that they play a lesser role in braking. After all, these are the mechanisms that work first.
The rear wheel brake mechanism consists of:
- Nuts that secure the hub;
- Actually, the hub itself;
- Tension springs (lower and upper);
- Brake pads;
- Directional springs;
- Wheel cylinder;
- Expansion bar;
- Handbrake lever finger;
- Handbrake lever;
- Mechanism casing.
As we can see, this difference in design is caused by the presence of parking brake elements in the rear mechanism. Therefore, the part itself looks much more massive. The operating principle of the hydraulic part is the same as in the front. The only difference between the rear brakes is this.
A simple diagram of the VAZ 2114 brake system allows you to easily carry out any repairs yourself. Spare parts for domestic cars are inexpensive and quite common, which greatly simplifies operation and repair work. This is why VAZ cars are in such demand and provide good competition to foreign cars.
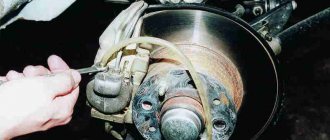
Where are the brake pads located and when to change them?
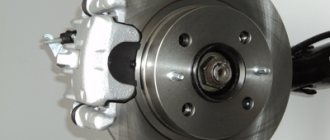
Front brake mechanism: 1 – brake disc; 2 – pad guide; 3 – caliper; 4 – brake pads; 5 – cylinder; 6 – piston; 7 – sealing ring; 8 – protective cover of the guide pin; 9 – guide pin; 10 – protective casing.
The brake pads are located in the caliper on the inside of the wheel. Inspection of pad wear is carried out through the inspection window in the caliper during seasonal tire changes; friction linings with a thickness of 1.5 mm or less must be replaced.
pads 1.5 mm or less must be replaced
All about the brake system of the VAZ 2114
There are many elements in the 2114 brake system, each of which is responsible for its own operation.
Their common goal is one - to reduce the speed of transport while driving. Any car has those aspects without which it is impossible to talk about the complete safety of the driver and people inside the car. A working brake system will be named one of the priorities in this regard. In order to have an idea of its work, you need to know the main components and their functionality. Each of the elements has its own purpose.
On the VAZ 2114, the braking system, like on any other car, is designed to change the speed of movement. Another of its tasks will be to hold the vehicle in place; this occurs due to the fact that the braking force that occurs during the interaction of the wheel and the road is used. It is called upon to create appropriate mechanisms. The brake system in each car is presented in working, parking and spare versions.
Useful video
You can get more information from the video below:
Published September 17, 2019Contents
The braking system is one of the most important in a car, because it ensures safety while driving and guarantees timely stopping of the vehicle. In today's article we will talk about how the VAZ 2114 brakes are designed, what main components they include and how to set them up correctly.
Brake system VAZ 2114
Operating principle
The brake in the VAZ 2114 will work on the hydraulic principle: when pressed, the liquid pressure will increase and the brake mechanisms will operate. As a result, the wheels begin to rotate more slowly and force appears at the point of contact of the tire with the road surface. And the harder the pedal is pressed, the faster the process will go. The forced-up pressure in this case will reach from 10 to 15 MPa. It will also increase in the drive itself: this will move the pads to the wheel rims.
Symptoms of a problem
With a calm driving style and regular maintenance of the brake system, the GTZ will serve without interruption for many years. Cylinder output increases with frequent vehicle use in city traffic.
Frequent and prolonged stops accelerate the wear process of the turbocharger, which is reflected in the manifestation of the following symptoms:
- When you press the brake pedal, the car stops slowly, although the fluid level and the condition of the discs and pads are normal;
- To effectively brake, you have to press the pedal with serious force;
- Short brake pedal travel is another sign of a worn cylinder;
- Sudden failure of the pedal and “grabbing” of the brake at the end of pressing;
- Incomplete disengagement of the calipers, which leads to friction of the pads on the discs.
The listed symptoms of a faulty master cylinder manifest themselves in different ways, but always mean there are problems with the braking system. The braking system in your car requires regular maintenance. Despite the simplicity of the design and reliability, diagnostics of the design should be carried out every maintenance. Regular replacement of pads, installation of new brake discs, replacement of fluid, elimination of leaks from pipes - all this ensures the smooth operation of the system as a whole. The GTZ plays a crucial role in this design, because Braking efficiency directly depends on the correct operation of the cylinder. In addition to the GTZ located under the hood of the car, there are other elements in the system that are responsible for stopping the car. Often, in addition to the main brake cylinder, it is necessary to replace the front brake cylinder on a VAZ 2114. It is located on each caliper and is responsible for actuating the pads.
A faulty front brake cylinder on a VAZ 2114 leads to a wedge in the mechanism and friction of structural parts. If the front TC fails, the car begins to move to the side when braking, and extraneous noise comes from the wheel.
Features of work
Both the VAZ 2114 and the AZ 2115 models use a braking system that has diagonal separation of circuits. Each of them is responsible for their own area of work: one is responsible for the activities of diagonal systems.
In the event that one of the circuits fails, the other is designed to ensure effective stopping of the vehicle. It should also be noted here that the parking brake system of the VAZ 2113, 2114, 2115 will be driven by mechanisms for the rear wheels.
Features associated with replacing a brake drum
Some of them (relating to annual prevention and the use of proper lubrication) have already been mentioned. Another important point is that if one of the drums wears out and is replaced, the second drum must be replaced (even if it has less wear). This rule is strictly mandatory and has no exceptions.
Brake drum installation
In addition, in case of almost all damage - cracks, chips, grooves, and others - the drum should be replaced; it cannot be repaired. The only case when the situation can be corrected is if there are small bevels (in this case, you can turn the part on a lathe until you get an even round shape). True, after this operation you should check its diameter - if after grooving it exceeds 201.5 mm, then such a drum can no longer be used.
System elements
The hydraulic brake drive of the VAZ 2114, 2115 will include the following components:
- brake mechanism from the front right wheel;
- pipeline from the brake circuit, front left-rear right;
- a pair diagonal to them;
- hydraulic main cylinder;
- tank from it;
- vacuum booster;
- brake mechanism for rear wheels;
- elastic lever that regulates pressure;
- pressure regulator;
- a simple lever to drive the pressure regulator;
- pedal;
- hoses for front and rear brakes.
Brake bleeding sequence
Bleeding the brake system usually starts with the longest pipe. As a rule, this is the rear right one (that is, to the working cylinder of the rear right wheel). Next - “in descending order”: rear left, front right, front left. As a rule, the procedure is duplicated “to be sure.” Do not forget to remove the cap from the brake fluid reservoir - you will have to add fluid as it decreases. The steps are simple:
- With all the fittings closed, the partner (the one in the cabin) “works” hard on the brake pedal. If after several presses the pedal remains “soft”, he, holding it in the squeezed position, gives a signal to another partner to open the fitting - there is simply too much air in the tube and it needs to be vented.
- The partner (the one at the wheel) closes the fitting and gives a signal to “pump” again.
- The procedure is repeated until air stops coming out of the fitting.
It is best to put a tube placed in a container onto the fitting - air bubbles will be visible and the brake fluid will not spill onto the floor. During leveling, it is important to coordinate the actions of your partners. That is, at the moment when the bleeder fitting is not yet closed, under no circumstances should you release the depressed pedal - otherwise air will be “sucked” into the cylinder again. After the rear brakes have been bled, you need to move on to the front cylinders. The front brakes are bled in the same way as the rear brakes.
We recommend: DIY car window tinting
However, in emergency cases - when, for example, it was necessary to urgently change a burst front brake hose, it is allowed to bleed only the front brakes - as a temporary measure. They are the ones that most influence braking efficiency - due to load distribution. But during the repair process, anything can happen - for example, a fitting breaks off. How to bleed the brakes if the bleeder fitting is broken? In such cases - if it is not possible to quickly purchase a new cylinder - it is pumped through a tube supplying liquid to the cylinder.
That is, they act in a similar way - they loosen the nut in order to release the air. In general, even the most “soured” fittings can often be successfully unscrewed. Tap the cylinder from different sides with a small hammer and try to turn it in one direction or the other. Sometimes, however, this procedure takes a lot of time and effort, but in most cases it leads to success.
Features of pedal settings
The driver controls this entire complex assembly using a single pedal. That is why it is very important to monitor the condition of these mechanisms and correct errors in a timely manner. It is necessary to pay attention to the following features:
- Each owner of this vehicle must remember that when the engine is not running, the pedal must have free play. The adjustment can be made with the vehicle turned off. This can be done by moving the brake light switch and lowering its nuts.
- When the switch at the brake light is very close to the pedal itself, this risks the fact that it will not return to its original state. But even here there is a possibility of only partial release of the wheels when the pedal is released.
- When it was not possible to correct errors using a brake light and eliminate incomplete release of the brakes, you can simply disconnect the master cylinder at the brake drive and double-check that the adjusting bolt is not too far from the plane to which the flange of this cylinder is attached (the difference can be from 0.2 to 0.25 mm). This size will be optimal for adjusting the pedal.
Features of operation and repair of car disc brakes
A disc brake system includes a brake disc and a caliper with one or more working cylinders. Brake calipers can generally be either floating or fixed. The floating caliper is attached directly to the steering knuckle or to a special bracket using guide pins. On one side of this caliper there are working pistons or only one piston.
When you press the brake pedal, the force is transferred to the brake fluid and then to the piston, which ultimately presses the inner pad against the disc. By resting on the brake disc, the piston allows the caliper to move along with the outer pad.
The fixed caliper has a different design. All vehicles are required to be equipped with them - from cars to airplanes. This caliper, which has pistons on both sides, is rigidly attached to the steering knuckle. The force developed in a disc brake is capable of completely braking a car weighing 2 tons from a speed of 100 km/h at a distance of 35 m. Thus, in comparison with floating mechanisms, fixed mechanisms create much more force, but their cost is much higher. In addition, the fixed caliper has quite a decent mass. But if fast and effective braking is of paramount importance, the choice is made in favor of a fixed mechanism.
Repairing any type of caliper involves the same problems. In both cases, the caliper is constantly in contact with water and dirt, which can lead to the destruction of the sealing cuffs in the pistons. This can cause the piston to seize in the disc brake caliper. For replacement, ready-made repair kits with a special high-temperature resistant lubricant are offered.
Brake pads are considered a consumable item. They consist of a metal plate and a friction lining glued to it. Although commercially available pads may vary in size and shape, their function is always the same. Friction linings are usually made of ceramic and carbon fiber.
Modern cars are equipped with a wear sensor, which is mounted on one of the internal brake pads. The sensor is an ordinary spring. As the pad wears, this spring eventually begins to come into contact with the brake disc, producing an unpleasant squeaking sound and warning that the disc brake needs to be repaired.
The brake discs themselves, in the cheapest version, are made of cast iron. For a budget car like the Hyundai Accent under standard operating conditions, this is a completely acceptable option. Cast iron discs have characteristic disadvantages - they wear out and warp. Wear, sometimes uneven, is caused by friction.
Over time, thin grooves form on the surface of the disk, created by abrasive friction of small dust particles. In this case, it is necessary to look at the depth of these furrows. If the depth exceeds the standard value, the disk will need to be ground, and if repair is impossible, the disk will need to be replaced.
Warping occurs as a result of temperature changes: heating and expansion of the disc material during braking and cooling when the brake pedal is released. The smooth and slight heating-cooling process does not have a strong negative impact. Prolonged and sharp braking and subsequent cooling of the disk, for example, by splashing water from a puddle, leads to irreversible deformation (warping). In the future, braking with such a disc will cause vibrations. If the warping is not critical, the warped brake disc can be straightened.
How to replace the parking brake cable
Handbrake cable
During the operation of the vehicle, the handbrake cable may rust, break or become very stretched. In this case, we will need to replace the handbrake (parking brake) cable. If you need to replace only one parking brake cable (2 parking brake cables, each of which goes to the rear wheel), still change both cables in order to avoid uneven wear and, soon, encountering the same problem.
Before you learn how to change the handbrake cable, read the article How to tighten the handbrake? to avoid unnecessary questions.
How to remove the parking brake cable?
- Removing the wheels
- Removing the brake drums
- Remove the rubber cushions (holders) of the muffler and manifold.
- Loosen the locknut of the handbrake adjusting nut on the cable equalizer.
- Using keys “13”, unscrew both nuts and remove them.
- We remove the equalizer and disconnect the cable ends from it.
Cable eyelet on the hook of the spacer lever
- From the rear wheels, use a large slotted screwdriver to move the spacer lever forward and remove the cable eyelet from the hook of the spacer lever.
- Using a “10” wrench, unscrew the nut securing the cable to the rear suspension arms.
- Remove the cable end from the hole in the body bracket.
- Next, having removed the additional holding mechanisms, we take the cable out of the hole in the support shield of the rear brake mechanism and remove it.
Which brake cylinder should I choose?
Before starting work to replace a worn part, you should decide on the choice of replacement. In addition to the original GTZ, there are other analogue parts.
Most often, 2114 owners prefer to buy factory spare parts, so first let’s look at the advantages of parts from LADA:
- Reasonable price – about 1700 rubles;
- Good quality. The factory version of the GTZ runs for 70-100 thousand kilometers.
The disadvantage is the large number of fakes. We recommend purchasing parts in packaging.
When choosing which brake cylinder to choose for the VAZ 2114, you should consider the option from HOFER. The German analogue differs from the factory version in the quality of the material and lower price. The part number is HF 244102. The price of the spare part is about 1200-1400 rubles. Reviews from owners of cars with an installed HOFER GTZ do not highlight the disadvantages of the spare part, so the option can be safely considered for purchase. Replacing a part is easy, so any of the GTZ options can always be replaced with a factory one. The abundance of analogue spare parts for VAZ allows you to choose parts in different price segments. For stock fans, we recommend taking the factory version from LADA.
Source
How to tighten the handbrake correctly
The handbrake, or in common parlance “handbrake”, is a “permanent brake” and is used when parking a car, parking on a slope, and is also used by masters to perform complex tricks.
The parking brake blocks any spontaneous movement of the vehicle. The handbrake is activated using the handbrake lever, which is mounted on the dashboard along with the gearbox. The handbrake is an important and irreplaceable thing, but still not all drivers use it. The fact is that the car can be put in gear, and then it will not roll away anywhere. But if the slope is very steep, then the gearbox is no longer able to help, and in general, many novice drivers cannot imagine normal driving without a handbrake.
Handbrake diagram (photo of handbrake)
Handbrake diagram
Handbrake device:
- Drive lever.
- Lever pawl pull.
- Traction spring.
- Lever button.
- Front cable axle.
- Bolt M6x14.
- Spring washer 6.
- Drive traction.
- Lock washer 6.
- Protective cover.
- Cable equalizer.
- Washer 8.
- Nut M8.
- M8 nut is low.
- Lever axis.
- Washer 10.
- Cotter pin 2x20.
- Lever right.
- Left lever.
- Right expansion bar.
- Left expansion bar.
- Nut M6.
- Lock washer 6.
- Cable clamp.
If the handbrake does not hold, then it needs to be tightened. The process of adjusting the handbrake is not very complicated, but it does require some equipment and suitable conditions.
So, before you learn how to adjust the handbrake, you should know the following: the working stroke of the parking brake should be 2-4 clicks, but the handbrake stroke of 8 clicks is not excluded - here you already need to adjust the parking brake stroke.
How to tighten the handbrake
- We park the car on an overpass or inspection hole. (You can also place the rear of the car on a curb or use a jack).
- We put the car in 1st gear.
- We put the car on the handbrake and count the number of clicks. If there are less than 2 clicks, then you need to lengthen the drive, if there are more than 6, then reduce it accordingly.
- Lower the handbrake all the way.
- Take 2 keys to “13”.
- We climb under the car.
- We remove the rubber holders of the muffler and manifold for convenience.
- We find the cable equalizer (number 11 in the diagram).
- Use one key to unscrew the lock nut, and use the other to secure the nut from turning.
- We adjust the stroke of the lever: when screwing it in, the stroke decreases, when unscrewing it increases. (remember that the lever stroke should be from 2 to 6 clicks).
- We hang the rear wheels of the car on a jack and check the rotation of the wheels. The brake pads should not interfere with the rotation of the wheels, and when the handbrake is raised, the wheels should stop firmly.
- Tighten the nut with a counter nut.
You will have to tighten the handbrake quite often due to the design of the handbrake. You will also have to adjust the handbrake when replacing the cable, repairing the handbrake, replacing brake pads (How to replace rear brake pads?) and replacing the rear brake cylinder.
It should be noted that the parking brake must be held on an uphill slope of at least 23%.
How to bleed the brakes on a VAZ 2107 yourself (Video, photo)
When is it necessary to pump the brakes of a VAZ 2107
It is necessary to bleed the brake system in four cases:
- Replacing brake fluid. Brake fluid has a limited service life. Over time, it absorbs moisture from the air, which can cause corrosion of the surface of the brake cylinders and their failure. Water also worsens the main property of brake fluid - it reduces the boiling point.
- The recommended service life of brake fluid on VAZ cars is 2 years, after which it is worth replacing it. This applies to standard glycol-based brake fluid.
- Troubleshooting the brake system. When replacing brake hoses and cylinders, brake fluid leaks and air enters the system. Therefore, after repair work, the VAZ 2107 brakes must be bled.
- Air ingress during operation. This manifests itself in deterioration in braking efficiency, a “soft pedal” or uneven braking of individual wheels.
What is needed to bleed the brake system
It is almost impossible to bleed the brake system yourself. The work is carried out by two people. One person (“mechanic”) works with the brake system, unscrews the fittings. The second (“partner”) is located inside the car and must press or release the brake pedal on command.
You also need the following tools:
- 8/10 socket wrench;
- a PVC tube or rubber hose, the inner diameter of which corresponds to the diameter of the fitting;
- container for collecting waste liquid.
- Brake fluid is also needed.
How to bleed the brakes on a VAZ 2107
For ease of work and to ensure free access to the brake cylinder fittings, you should use an inspection hole. The design of the front brake mechanisms requires removal of the wheels to bleed the brake system.
Before starting work, it is necessary to fill the brake reservoir to the maximum, and during bleeding, you must ensure that it is constantly filled with brake fluid. If you miss this moment, air will get into the working cylinder and you will have to start work again.
The procedure for each of the 4 working cylinders is as follows:
- Remove the protective cap from the fitting.
- Loosen the fitting using a spanner. If the fitting has not been unscrewed for a long time, significant effort may be required. You must be especially careful not to damage the edges, otherwise the work may become very difficult, even to the point that the brake cylinder will need to be replaced.
- Place the tube on the fitting and lower it into the brake fluid container.
Direct pumping is performed as follows:
- The “partner” sitting in the cabin, at the command of the “mechanic”, presses the pedal all the way.
- The “mechanic” unscrews the fitting half a turn so that the liquid, along with air bubbles, comes out into the container through the inserted tube. The brake pedal “sinks” to the floor.
- The “fitter” tightens the fitting, and the “partner” releases the pedal on command.
The procedure is repeated until no more air bubbles come out of the tube. During bleeding, the end of the tube must be constantly lowered into the brake fluid so that air does not enter the cylinder.
In this way, all four working brake cylinders are pumped. A certain sequence should be followed when bleeding the cylinders. They are pumped “from far to near”:
- Right rear.
- Left back.
- Right front.
- Left front.
After completing bleeding of each cylinder, it is necessary to tighten the fitting and put on the protective cap.
Bleeding the brakes of a VAZ 2107 is quite feasible at home and does not require expensive special tools and devices. No special qualifications are required either. Even a child can release and press the brake pedal at the “locksmith’s” command.
Often, owners upgrade the brake system by installing more efficient, high-quality and expensive parts. However, this does not change the bleeding method in any way and does not eliminate the need for periodic work to replace the brake fluid.
semerkavaz.ru
How to remove the handbrake handle?
- Before you start removing the parking brake handle, be sure to put the car in gear.
- We remove the cable equalizer from the adjusting rod (How to remove the equalizer, see here: How to replace the parking brake cable?
- Remove the rubber protective cover from the adjusting rod. A slotted screwdriver will help us with this.
- Then remove the decorative trim of the floor tunnel.
- Take a Phillips screwdriver and unscrew the self-tapping screw of the front mounting of the parking brake switch bracket.
- Using a 10mm socket wrench, unscrew the last 2 bolts securing the bracket.
- We take out the lever along with the bracket and the adjusting rod.
How to install the handbrake lever?
We install the lever step by step, reverse the disassembly process. Do not forget to apply grease to the threads of the adjusting rod. Litol will do. After this, install the equalizer, the adjusting nut and the control nut. Adjusting the handbrake: How to tighten the handbrake?
Sources
- vaz-2114-lada.ru/2012/08/kak-snyat-rychag-stoyanochnogo-tormoza/
- vaz-2114-lada.ru/2012/08/kak-podtyanut-ruchnojj-tormoz/
- vaz-2114-lada.ru/2012/08/kak-zamenit-tros-stoyanochnogo-tormoza/
- autodont.ru/brake-system/tormoznaya-sistema-na-vaz-2114
- drive2.ru/l/454855042223047995/
- autovaz-2114.ru/brake-system/tormoznaya-sistema-vaz-2114/
- nadomkrat.ru/ustroistvo-avtomobiley/tormoznaya-sistema/tormoznaya-sistema-vaz-2114