Hello, dear friends! I think many people are interested in an effective connection diagram for DRLs, that is, daytime running lights.
For several years now, there have been rules in the country according to which, when driving a car during the day, you should indicate your presence with the help of appropriate headlights. Fog lights, low beam headlights and the DRLs themselves are used as such lamps.
The use of fog lights and headlights has objective disadvantages. Therefore, it is best to connect the DRLs from the generator or battery yourself.
There are various ways and schemes for implementing the idea. Some do this without a relay, others combine DRLs with turn signals, others even control the daytime lights with a separate button, etc. To do everything right, you need to know some important points. And then automatic activation will be carried out without violating traffic rules.
Which shampoo is better for contactless washing: selection criteria
The regulations state that the circuit should be used in such a way that the drive wheels turn on automatically when the key is turned in the ignition switch. That is, when starting the power plant. But DRLs are also required to turn off automatically as soon as the main beam headlights come on. Here, as you understand, we are talking about the headlight unit (low or high beam). There is also a rule indicating that the head light should turn on only when the headlights turn on. The exception is short-term signals to warn other drivers.
Based on the above, we can safely say that you should not output the DRL through the button. The same as through the handbrake. But you can install it in turn signals, but you will need to connect 2 additional wires from each turn signal.
All this is extremely important to take into account when connecting the movers. After all, you should be concerned not only with the fact that the light bulbs do not burn out. Although this is an extremely significant point.
Without a well-thought-out and competent scheme, you will definitely not be able to install DRLs yourself. After all, everything should work with a shutdown when the high or low beam is turned on.
There are a number of schemes according to which, in theory, you can install DRLs on your car if they are not included in the standard configuration of your vehicle. The only question is which scheme is better to use.
An important role is played by the voltage stabilizer, which is a subject of much debate when using diode running lights. The DRLs themselves are equipped with resistors that act as a current limiter. But during voltage surges, they are not able to maintain the voltage at a single level. Therefore, it is correct to assume that the use of a stabilizer in such a scheme will be mandatory and necessary. Otherwise, the service life of the DRL will be significantly reduced due to regular voltage drops. Although some still believe that the connection can be made without a stabilizer.
It is worth considering several schemes separately, drawing appropriate conclusions from them and making a final decision for yourself.
Self-installation of DRLs
Before you start installing DRLs, you need to decide on the location and take measurements. According to the recommended placement of running lights, the distance between them should be at least 60 cm, the minimum and maximum height of placement should be 25 and 150 cm, respectively, and the minimum distance to the headlight should be at least 40 cm. In addition, the running lights themselves should be placed under an angle not exceeding ten degrees so that the illumination complies with GOST standards. The recommended installation location is at the level of the fog lights.
Once the location of the DRLs has been chosen, you can begin installing them on the car. Installation of navigation lights is carried out as follows:
- If they are mounted on a grille, then it must be removed.
- You can attach the DRL using self-tapping screws, or using glue or double-sided tape, having previously degreased the area where it is glued.
- Pull the wires through the clamp hole.
- Install the running lights control unit.
- Connect the wires to the DRL control unit by placing the cables in the special connector.
- Attach the modules and wires in the engine compartment, except for the wires for connecting to the power source, and then finally secure the housing.
Reference! It is not recommended to glue the wiring to the radiator, fuel line or hose. It’s best not to rush into attaching the DRL housing to the car and install it only after all the wires have been routed under the hood.
It couldn't be simpler
This is the simplest scheme, which involves connecting to a battery or generator as a power source.
The scheme provides that the DRLs will be activated simultaneously with the engine starting. The point is to connect the plus to the positive terminal from the ignition switch of your Renault Logan or the same Lada Largus, and fix the minus on the car body in any convenient place. Everything looks simple and extremely logical. But you should not rush to conclusions, nor should you make such a connection. After all, it has an obvious drawback.
If the system is assembled according to this scheme, the diodes from the DRLs will start working constantly while the key is in the ignition switch. There is no question of any coordination with other headlights here. Therefore, such a connection contradicts GOST and traffic regulations.
What do you need to install DRL yourself?
To install DRL, you need to stock up on the following set of tools:
- Pliers (or wire cutters);
- Soldering iron;
- Lighter;
- Insulated two-core wire;
- Insulated sealed contact;
- Single-core wire (length 3 meters, diameter 1.5–2.5 mm);
- Clamps;
- Relay (12V);
- Actually, a set of daytime running lights;
- Glue, screws, double-sided tape;
- Drill and screwdriver.
After selecting the tools, you need to drive the car to a clean and dry place for installation.
Low beam or dimensions
You can also connect to the side lights or low beam headlights. In theory, everything here also looks quite simple, interesting and promising. The first of the schemes under consideration provides that you will use an electrical circuit that powers the size lamps. Here the plus from the DRL is connected directly to the battery as a power source. But the minus goes to the plus of the dimensions. At such a moment the latter will be electrically neutral. Thus, the current flows from the plus of the battery through the diodes to the dimensions, and then through the lamp to the housing, where the latter acts as a minus of the created electrical circuit.
Since the level of current consumption will be small, the diodes will start to work, but the size lamp will not turn on.
As soon as the driver switches to the dimensions, a voltage of 12V will appear on its positive side, the potentials will be equalized on the DRL wiring and the diodes will go out. The circuit will begin to operate in normal mode, supplying current to the dimensions.
Everything seems to be fine. But again, conclusions were drawn hastily.
The scheme is simple and working. It just has a few drawbacks:
- The drive trains will remain active when the engine is switched off. This directly contradicts current laws;
- If the dimensions are equipped with LED lamps, such a circuit will immediately become inoperative;
- Operation will not be correct when using powerful SMD diodes as part of DRLs;
- To provide additional safety, you will have to add a fuse to the circuit.
To avoid the first drawback, the circuit is slightly altered. The positive from the LED module is taken not from the positive of the battery, but through the positive of the ignition switch.
The second scheme involves activating the DRL using a low beam lamp. The point is that when the low beam is turned on, the walkers are turned off, and the rest of the time they work.
There are the same disadvantages here as for the previous scheme. That is, it contradicts GOST and traffic rules.
How not to do DRL?
Some people think that a regular LED strip can be used as a full-fledged DRL. Or they buy ready-made cheap running lights, in which the light source is an LED strip that shines well only at night and not during the day. But you can’t simply use an LED strip without appropriate optics and parameter calculations. This is not DRL. The same can be said about neon tubes, which are also classified as accessories rather than actual DRLs.
How to learn to drive a car on your own
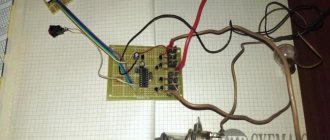
These are two more methods worth considering. A 4-pin relay, a generator and an oil pressure sensor will be used here. But not in a single chain.
Both schemes assume that the DRLs will turn on only when the engine starts. The system is powered by a generator and is based on switching a 4-pin switch and a reed switch.
The connection of the relay contacts looks like this:
- Pin 30 goes to the plus of the LED module;
- Contact 85 goes to the plus of the wire to the dimensions;
- Contact 86 is required for any output from the reed switch;
- 87 contact to the positive terminal from the battery;
- Also, the second terminal from the reed switch goes to the battery plus.
After connection, configuration must be carried out. Here you need to start the engine and start moving the reed switch near the generator in order to get the movement and stable operation of the movers. Then the reed switch should be removed into a special thermal tube and fixed.
If there is no reed switch, then power for the DRL can be supplied through the oil pressure sensor. Then contact 86 goes to the pressure lamp, but otherwise the circuit remains in its original form.
The schemes are excellent in many ways. But they cannot be used in situations where the dimensions are based on LEDs. This is the only significant drawback.
State standard requirements
GOST clearly regulates how DRLs are installed. Installation is considered correct only when the minimum distance from the lights to the ground is 200 millimeters, and the maximum is 1500 millimeters. Between dimensions, the distance cannot be less than 600 millimeters (if the width of the car is less than 1300 millimeters, then this gap is 400 millimeters).
In addition, the rules also describe the principle of operation of lighting equipment. So, the DRL lamps light up simultaneously with the engine starting. Well, such devices should go out when the main lighting fixtures of the car are turned on.
Driving and turning around at an intersection on the main road: what you need to know
To get rid of the disadvantages of previous schemes, a connection option via a 5-pin relay is used.
The relay is connected as follows:
- Contact 87 is not connected and is simply isolated;
- 87a goes to plus to the ignition switch;
- Pin 86 is needed to connect to the housing;
- 85 goes to the positive wire from the side lights;
- Pin 30 is output to the plus of the DRL LED module.
By turning the key in the lock, 12V begins to flow to the DRL, which allows the running lamps to light. When turning on the headlights or headlights, the relay opens contact 87a and closes contact 87. Thus, the running gears turn off and the other lights turn on. This scheme is good because it complies with GOST and traffic regulations. Plus you can use diode dimensions.
Here it is recommended to use a voltage stabilizer. The only drawback of the scheme is that when you turn the key without starting the engine, the DRLs will light up.
Necessary components and assembly of DRLs
Depending on your skills, you can buy ready-made DRLs or make them yourself. The most common components for homemade running lights are cheap fog lights, LED strips, aluminum plates, sealant and a soldering iron. All components must ensure the operation of the DRL in accordance with the requirements and GOSTs. The assembly proceeds as follows:
- An old or purchased fog lamp is disassembled and its filling is taken out.
- Next, a plate is cut from a piece of aluminum to the size of the flashlight body.
- Pieces of either one piece of LED strip or single LEDs are cut to fit the size of the plate.
- After degreasing the plate, a sealant is applied to its surface, to which the LEDs are attached.
- Connecting LEDs or LED strip using a soldering iron with wires.
This is one of the easiest ways to assemble DRLs yourself. There are other assembly methods, which can be found in other sources of information.
What is the punishment now for non-standard headlights?
The devices themselves can be of various types. These are halogen lamps, LEDs or regular incandescent lamps.
To stay within the dimensions, you may have to cut the bumper. Or fix the lamps in the air intake niche of the false radiator grille if its dimensions are sufficient. Let's direct the horizontal axis parallel to the road surface.
If there are no DRLs, the driver has the right to install them. Today there is a huge selection on sale. There are lights with LED lamps, with conventional incandescent lamps. LED lights are the most popular because they are very economical in terms of energy consumption.
Since Russia has accepted the terms of the European Convention on Road Traffic, the requirements of UNECE Rules No. 48, reflected in GOST R 41.48-2004, which replaced the outdated “uniform regulations” 41.87-99, apply to the Russian vehicle fleet.
LED lamps and the law in
The main regulatory framework has not changed: 12.5 of the Code of Administrative Offenses of the Russian Federation, part 1,2,3, 12.20 of the Code of Administrative Offenses of the Russian Federation, TR CU 018/2011 clause 77, Traffic Regulations, clauses 19.6, 3.7 and 3.8 of the Code of Administrative Offenses of the Russian Federation.
LED lamps are installed in standard headlight locations instead of halogen lamps. It is quite difficult to notice the replacement with an LED when the light is correctly adjusted.
Lamps must have a certificate from the manufacturer that this lighting device has all acceptable characteristics. LED is not xenon and is classified according to 2.5 Code of Administrative Offenses of the Russian Federation, part 1 with a fine of 500 rubles. A fine is issued only at the initiative of the inspector (in rare cases). There is no legislative framework for LED with deprivation of rights. When drawing up a protocol, be sure to record the color of the glow and the certificate of conformity of the lamps, then any Resolution under 12.5 Part 3 of the Code of Administrative Offenses regarding LEDs can be challenged.
The condition for a quiet ride is a correctly adjusted light with a glow color that is not prohibited by traffic regulations.
I will quote once again the Russian Traffic Regulations “Appendix. List of malfunctions and conditions under which the operation of vehicles is prohibited:
3.6. The vehicle is equipped with: front lighting devices with lights of any color other than white, yellow or orange, and retroreflective devices of any color other than white.
Don't use over-powered bulbs, adjust your headlights, and be respectful of other drivers on the road at night.
8(800) 350-34-54
Requirements for DRL according to GOST
In order not to have to deal with regulatory documentation, you can study the basic GOST standards, collected in one section:
- The vehicle must use two identical light sources . You cannot place one element.
- The minimum distance between DRLs should not be less than 60 cm . It is this parameter that most often causes difficulties, since the width of passenger cars is small and there is not much space for installation. It is necessary to take measurements in advance to choose the optimal location option, if possible.
- The height of the location is at least 25 cm from ground level and no more than 1.5 m (requirements for buses, freight and large vehicles). For this reason, running lights cannot be installed on the lower edge of the bumper.
- The light source should be located no further than 40 cm from the edge of the machine. At the same time, there is no minimum indicator; you can set it anywhere, which is also worth remembering.
- When installed, the emitter is oriented so that the light is directed straight forward. It cannot be placed upwards, downwards or to the sides.
- Only sources with white or yellowish light are suitable for use as DRLs. Colored options are not allowed. At the same time, there are also requirements for brightness; the minimum should not be less than 100 candelas, the maximum should not be higher than 400 cd .
- The daytime running lights should light up automatically when the ignition is turned on. But it is not forbidden to display them on a separate button; the main thing is not to forget to turn on the light at the beginning of the movement.
- The scattering angle in the horizontal plane (outward and inward relative to the position of the DRL) should not exceed 20° . And the angle in the vertical plane is limited to 10°.
It is difficult to check the brightness of equipment. Therefore, we can assume that the running lights should be clearly visible - at least twice as bright as their dimensions.
This diagram will allow you to clearly see the basic standards for installing DRLs on a car.
What are daytime running lights?
A car with daytime running lights attracts much more attention than one without them. It is for this reason that we decided to make changes to the traffic rules.
Daytime running lights have certain advantages over conventional headlights. To operate the headlights, you need electrical energy, which is produced by a generator. While the car is moving, the generator charges the battery due to the high speed of movement. In this situation, the headlights will not require much energy. But if the car has to travel in constant traffic jams and traffic lights, the battery will gradually discharge. And the generator will not have time to recharge the battery. As a result, the load on all enabled devices will be felt.
It will be difficult for an old car to cope with the increased load, and as a result, its battery may simply fail.
Daytime running lights consume less energy than headlight bulbs. In this regard, many car factories began to build DRLs into cars. If we talk about side lights, they are not very bright and therefore are practically invisible. Accordingly, they have no effect. They cannot be used in place of DRLs.
Connecting DRLs from the generator
The easiest way to install a DRL is to connect it directly to the generator. This scheme is simple and inexpensive. With this scheme, the negative charge is connected from the ground - the car body, and the positive charge - from the generator through the power button located in the cabin. With this device, the lights will only work when the engine is running. It is the simplest and at the same time reliable, since it does not involve additional devices and the on-board electrical network.
Important! Cheap DRLs can be connected without a controller and control module. However, the car's power supply is not of high quality, and the led optics elements are very sensitive to the slightest voltage surges.
It is better to install models with either a 12-volt stabilizer (functioning only when the engine is running) or a control unit (powered by the battery). Moreover, the latter can be divided into two modifications - they turn off automatically when the engine is turned off and as the voltage drops below thirteen volts (which, with a new battery, does not always coincide with the moment the unit is turned off).
Pros of using DRL
The advantages of using DRLs can be considered using two examples:
- Most cars in use have fairly high power and torque. All this allows them to quickly accelerate to high speeds and perform various maneuvers. If, while one car is performing a dangerous maneuver, the other driver does not notice the vehicle coming towards you, an accident may occur.
- It seems that during the day in the sunshine the car is clearly visible. But the glare from the windows and mirrors of cars coming towards you dulls visibility. In this case, DRL can protect you from an accident.
This is interesting: What are calipers on a car?