During the investigation with the cooling/heating system, I came to the conclusion that in order to increase the temperature in the cabin in winter, it is necessary to replace the stove. The thermostat is new (the old one seemed to be hanging), the antifreeze has been replaced, as it recently turned out - the expansion tank is intact and without any hints. And he let the air out repeatedly.
But in winter, in my opinion, it’s still not warm enough, especially when I read how others’ Logans are burning hot. I decided to at least give the stove a whirl, maybe it had clogged up in 8 years.
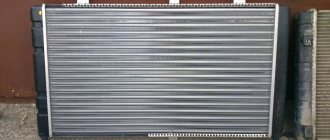
Initially, I was tormented by a dilemma: flush the system and replace only the stove, or also replace the main radiator, since one of its top fastenings is broken and the seal is ensured by a cold-welded seal, and a steel tension wire is responsible for its position in space.
Step-by-step instruction
1. Pull the lower casing off the latches and remove it. We take it as shown below and pull it to the sides (towards the doors).
2. Remove the clip to move the carpet aside. The clip can be pryed out with a flat screwdriver.
3. We gained access to the bolts for fastening the strip that supports the rack, and the torpedo is already attached to this rack. The bar must be removed to gain access to the radiator.
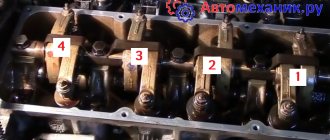
Unscrew the two bolts that are marked in the photo below.
4. Squeeze on the sides and push the clip marked below inside. The wiring harness is secured to this clip.
5. Remove the ignition switch connector from the strip. We press the latch and tighten it.
6. After removing the connector, we gain access to the nuts securing the bar. Unscrew the fastening nuts and remove the bar.
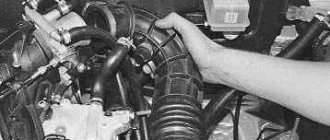
When you remove the bar, don’t rush, you still need to disconnect one wiring harness.
7. After removing the strip, we had access to the heater radiator.
8. Unscrew the three Torx T20 screws.
9. Place a rag under the pipes and take them out.
10. Bend the latches and remove the radiator.
The latches literally do not bend, you just need to press them and remove the radiator.
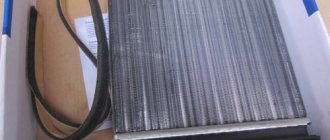
11. Before installing a new radiator, it is advisable to blow out the seat with compressed air or clean it manually.
12. Replace the O-rings on the pipes. After replacing the rings, lubricate them a little so that they fit into the radiator easily.
13. Install the radiator.
14. Fasten the radiator with two screws.
15. Insert the pipes into the radiator and secure the retaining bar with a screw.
16. Next, fill in the coolant, bleed the system, and remove air. We check for leaks in the pipes.
17. If there are no leaks, install a metal strip and the rest. I don't think this needs any details.
Video lesson
During the investigation with the cooling/heating system, I came to the conclusion that in order to increase the temperature in the cabin in winter, it is necessary to replace the stove. The thermostat is new (the old one seemed to be stuck), the antifreeze has been replaced, as it recently turned out - the expansion tank is intact and without any hints. And he let the air out repeatedly. But in winter, in my opinion, it’s still not warm enough, especially when I read how others’ Logans are burning hot. I decided to at least give the stove a whirl, maybe it had clogged up in 8 years. Initially, I was tormented by a dilemma: flush the system and replace only the stove, or also replace the main radiator, since one of its top mounts is broken and the seal is ensured by a cold-welded seal, and a steel tension wire is responsible for its position in space. The nuance is that when flushing, the stove radiator is most likely clogged, since it has the narrowest channels. So it’s worth flushing with the old stove radiator. Again, factory-made flushing compounds are added to the antifreeze, which implies its irreversible loss and the addition of a new one. But on the other hand, I have no complaints about the main radiator other than unaesthetics and improper mounting, but the budget for the event increases rapidly when replacing both radiators. Although on a trip to the south in Volgograd traffic jams a couple of times the temperature crawled by 6 notches, it was over 35'C. I'm sinning with a fur coat between the Conder radiators and the main one, especially since the distance between them is minuscule - the Conder radiator is dented inward. You need to remove the bumper, disassemble them and see what’s there, wash them. Judging by the video watched today, the condenser is attached to the main one with two Torx screws from the bumper side. And today, while torturing a search on logan.ru, I came across an interesting idea - when replacing the stove, you don’t need to drain the antifreeze, you just need to clamp the pipes. Brilliant! The dumbest and simplest option, just for me, especially since I have something to clamp. I received the ordered radiator, a clip to replace the one that was broken for lining the rack, and I bought a liter of antifreeze and a bottle of distillate on the way.
Heating radiator Luzar 954 RUR Front pillar trim retainer 190 RUR Antifreeze total 360 RUR Distilled water 40 RUR
Main radiator (with conder up to 08g) luzar
1600 + 3l of concentrated antifreeze, flushing and a lot of hemorrhoids waiting for the coolant to cool down three times.
Removing the heater radiator Renault Logan
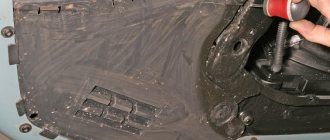
We remove the heater radiator for replacement if a coolant leak is detected through the radiator. Drain the coolant (see “Replacing Renault Logan coolant”). We remove the instrument cluster (see “Removing the Renault Logan instrument cluster”). Remove the lower trim of the instrument panel console (see “Removing the Renault Logan instrument panel”). On the left side of the console, remove the piston securing the carpet to the cross beam bracket...
...and bend the edge of the covering.
Using a 13mm socket, unscrew the two bolts of the lower fastening of the transverse beam bracket (for clarity, the instrument panel has been removed).
Through the hole in the instrument panel (under the instrument cluster), using a 13mm wrench, unscrew the two nuts for the upper fastening of the cross beam bracket.
We remove the wiring harness from the holders located on the inside of the bracket and remove the cross beam bracket.
Using a Torx T-20 wrench, unscrew the screw securing the pressure plate of the heater radiator tubes.
We remove the tubes from the holes in the heater radiator tank.
Rubber O-rings are installed on the tips of the tubes.
Using a Torx T-20 wrench, unscrew the two self-tapping screws securing the radiator.
Having pressed three latches...
...remove the radiator from the heater housing.
Before installing the radiator, replace the rubber O-rings on the tips of the tubes. Install the heater radiator in reverse order
What does the replacement sequence look like?
How to change the fog light bulb step by step:
- Replacing a fog light begins with dismantling the mud shield, which is attached to the surface of the bumper on the side where the fog light is to be replaced.
- After this, disconnect the plastic clamp of the wires leading to the lighting fixture.
- We disconnect the electrical connector for the power supply of the socket with the PTF lamp.
- Using a Torx-20 wrench, unscrew the two screws that secure the fog lamp unit to the bumper.
- Now the headlight can be freely removed, and a new analogue lighting device is installed in its place.
Sometimes it is necessary to replace the fog light, but not the entire one, but only the burnt out lamp. The PTF light bulb is being replaced - it's not difficult at all. After disconnecting the connector, rotate the socket at a slight angle counterclockwise and remove it together with the lamp from the fog light housing.
Regardless of the PTF model and the type of lamp used in it, installation work looks identical and is carried out traditionally in the reverse order of dismantling operations.
After completing the assembly, we check the operation of the Renault Logan lighting device and make sure that there are no side effects (flashing lamp, etc.).
Removing the heater core Renault Logan, Sandero
We remove the heater radiator for replacement if a coolant leak is detected through the radiator.
Drain the coolant (see “Replacing engine coolant 1.4-1.6 (8V)”; “Replacing engine coolant 1.6 (16V)”).
We remove the instrument cluster (see “Removing the instrument cluster”).
Remove the floor tunnel lining (see “Removing the floor tunnel lining”).
On the left side of the console, remove the piston securing the carpet to the cross beam bracket...
...and bend the edge of the covering.
Using a 13mm socket, unscrew the two bolts of the lower fastening of the transverse beam bracket (for clarity, the instrument panel has been removed).
Through the hole in the instrument panel (under the instrument cluster), using a “13” wrench, unscrew the two nuts of the upper fastening of the cross beam bracket.
We take out the wiring harness from the holders located on the inside of the bracket and remove the cross beam bracket.
Using a Torx T-20 wrench, unscrew the screw securing the pressure plate of the heater radiator tubes.
We remove the tubes from the holes in the heater radiator tank.
Rubber O-rings are installed on the tips of the tubes.
Using a Torx T-20 wrench, unscrew the two self-tapping screws securing the radiator.
Having pressed three latches...
...remove the radiator from the heater housing. Before installing the radiator, replace the rubber O-rings on the tips of the tubes.
Install the heater radiator in reverse order.
Video on the topic “Removing the heater radiator Renault Logan, Sandero”
Replacing the heater radiator for Renault Logan, Sandero, Largus Replacing the heater fan (stove) for Renault Logan, Sandero, Duster, Lada Largus The reason for poor operation of the heater in Renault Logan, Sandero, Duster, Largus
Causes of failure
There are three main reasons why a radiator can fail. The first and simplest is elementary pollution. The honeycombs regularly become clogged with dust and small debris. This leads to worse heat transfer. The simplest solution to the problem is to clean the radiator. You can use a regular stream of water. If you want a better result, resort to chemical compounds. The main thing is that they do not destroy the metal from which the radiator itself is made. Naturally, for the highest quality cleaning, it is recommended to completely dismantle the unit.
The second problem is clogged channels. If you use low-quality coolant or a composition not recommended by the manufacturer, various deposits will appear on the walls. You can get rid of blockages using special cleaning products. However, the blockages can be so large that in some situations replacing the Renault Logan air conditioner radiator or stove radiator will be easier and more profitable.
The third and most dangerous malfunction is cracks, ruptures and other types of damage. Many auto repair shops offer restoration services. Small holes can indeed be “patched”, although the quality of workmanship is important. But to fully guarantee performance, it is recommended to purchase a new radiator and replace the damaged one.
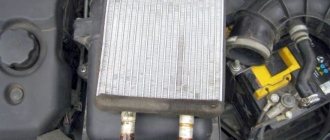
Location of the heater radiator in Renault Logan
The stove (heater) in a Renault Logan car is located in front, in the center of the cabin, under the dashboard. The radiator is located inside the heater at the bottom, but it can only be seen after removing the decorative plastic trim.
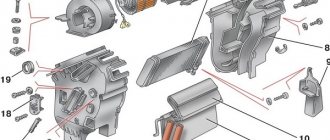
Renault Logan heater device
The diagram shows the main elements of the Renault car heater, the location of which every driver should know:
- Distribution block.
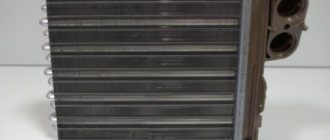
- Heater radiator.
- Heater pipes.
- Passenger compartment fan resistor.
- Front left air duct for heating the footwell.
- Air recirculation control cable.
- Air distribution control cable.
- Air temperature control cable.
Adjustment
https://www.youtube.com/watch?v=VEceeYd_ie8
Replacing the headlight alone is not enough. Its main feature is that some Logan models can emit white light (usually LED models), and some can emit yellow light. The main point is that you need to set up the PTF correctly. So, you can be sure that the flow of light is directed exactly where it is needed, and not up or to the side. During the adjustment process, the following rules must be observed:
- Adjustment of the boundaries of the light beam emitted by LED PTFs must be performed as accurately as possible. Remember - light from a given source should never be directed above a certain horizontal plane;
- The installation of such PTF headlights on Logan should be carried out as close to the road surface as possible. This will allow you to accurately determine the boundary of the light beam emitted by LED models.
Only in exceptional cases is adjustment required at a service station. In most cases, this work is done independently, since the principle of disassembly and assembly is quite simple. However, if you see that problems arise with adjusting the fog light on a Renault Logan car, you will most likely have to visit a service center.
To complete the full list of work described above, a maximum of one hour of free time is required. At the service center, this time may be longer, depending on the queue for repairs of other vehicles. Replacing the PTF on a Renault Logan car should be carried out if the fog light is unstable in its seats, the lamp has burned out, or the protective glass has cracked.
Diagnosis of heater radiator malfunction
Replacing the heater radiator may be required in two main cases:
- radiator leak. Signs of a leak are the appearance of antifreeze on the carpet in front (under the feet of the driver and passenger), as well as a drop in the coolant level in the expansion tank;
- ineffective operation of the radiator caused by its clogging. In this case, with the engine warmed up to operating temperature, the heater heats up weakly, and the air flow from it becomes hot only at high engine speeds.
If you identify these malfunctions, you should not be upset; you can do the work of replacing the stove radiator yourself in a garage.
You will need: TORX T20 and “13” keys.
1. Drain the cooling system (see “Replacing the coolant”).
2. Remove the lower trim of the instrument panel (see “Removing and installing the instrument panel”).
3. Under the instrument panel, bend the edge of the floor mat and remove the two bolts securing the panel cross member reinforcement to the base of the body.
5. Through the window in the instrument panel, which opened after removing the instrument cluster, unscrew the two nuts of the upper fastening of the instrument panel cross member amplifier.
For clarity, the operation is shown with the instrument panel removed.
6. . and remove the amplifier.
7. Remove the screw securing the pressure plate of the fluid supply pipes to and from the heater radiator.
8. . and disconnect the pipes from the radiator.
Residual coolant may leak from the pipes and radiator. Take precautions to prevent it from contaminating the floor mat.
Please note that the pipes are sealed with rubber rings. Replace heavily compressed, hardened or torn rings.
9. Unscrew the screw securing the radiator to the heater body, press out one plastic radiator clamp from the top and two from the sides from the bottom.
10. . then remove the heatsink from the housing.
11. Install the heater core and all removed parts in the reverse order of removal.
We fix the hose with a worm clamp with a diameter of 40 mm. Removing the radiator To access the heater radiator, you must first remove the lower trim of the instrument console. The console is secured on the sides with two spring latches.
How to Change the Heater in a Renault Logan Video
To remove it, we proceed as follows: By prying the lining on both sides by the lower edges, we snap them out of the mounting sockets. We pry out the lower edges of the instrument console trim from the mounting sockets. We remove the lower trim and gain access to the heater radiator. We remove the lower trim of the instrument console. Use a flat-blade screwdriver to remove the plastic latch that secures the carpet on the left side under the radiator, then move it to the side.
We unscrew the bolts securing the cross beam bracket. We take out the wiring harness from the plastic holder in the upper part of the bracket and move it to the side. In the previous figure, the plastic holder is visible, but without the wiring harness.
When you remove the bar, don’t rush, you still need to disconnect one wiring harness. After removing the strip we had access to the heater core. We unscrew the three screws under the Torx T. Having placed a rag under the replacement of the heater radiator for Renault Logan video, we take it out.
We bend the latches and remove the radiator.
Video Review of Renault Megane Hatchback New Renault Megane - premiere is just around the corner The debut of Renault Megane will take place on September 15 this year at the Frankfurt Motor Show. The car will be presented personally by the company's CEO, Carlos Ghosn.
In the meantime, Renault has made an easy and, admittedly, not entirely planned announcement of a new product that will soon be presented. VAZ Rear hubs and their replacement Rear wheel bearing On a VAZ, the bearings of the rear assembly play an important role, and without them, about any normal functioning of the car, I think it’s not worth it.
On the VAZ rear hub bearings, over time, they are out of order, and then you need to replace them, which can be safely done by yourself. An air lock in the heat exchange system does not heat the radiator. The thermostat is faulty, the engine does not heat the fluid. The water pump is not working properly.
Logan's heater radiator is clogged. Engine malfunction. Weak air flow or no heat. The fan motor is faulty.
The main part of the work to replace this device involves dismantling the cladding. Leaks in heating radiators occur due to mechanical damage or corrosion. Most often, a leak occurs where the heat exchanger tubes are soldered to the radiator tank.
But if the radiator is subjected to shock or very strong and prolonged vibration, then cracks can occur anywhere in this device.
It takes a lot of time for these channels to become clogged with dirt to the point of complete obstruction, and this malfunction can only be identified by elimination. A gap opens, into which we penetrate with our hand and find the heater fan.
Stages of replacing coolant in a Chevrolet Lanos
Replacing the coolant is divided into several stages; in addition to the main ones, which include draining and filling, it is recommended to flush the system. Since it is not possible to completely drain the old antifreeze from the system.
This model was produced in different countries under different car brands, as well as with different model names and minor design differences. Therefore, the replacement instructions will be applicable for the following varieties:
- Chevrolet Lanos;
- Daewoo Lanos;
- Daewoo Sens;
- FSO Lanos (FSO Lanos);
- ZAZ Lanos;
- ZAZ Sens;
- ZAZ Chance;
- Doninvest Assol.
The most popular is the 1.5 liter petrol engine. But you can also find cars with 1.6, 1.4, 1.3 liter engines installed, also running on gasoline.
Coolant drain
To accurately drain coolant from a Chevrolet Lanos, it is better to perform work in a pit or overpass. This will make it easier to remove the engine protection so that the drained antifreeze does not splash around, but flows smoothly into the container.
If there is no hole and you are not very worried about the fact that the protection will be in traces of smudges, then you can reach the drain plug from the engine compartment. Therefore, we put the car on a flat surface, wait for the engine to cool down and start draining:
- We find the drain plug, unscrew it, after placing a container under it (Fig. 1). The drain hole is located on the left side, at the bottom of the radiator, when viewed from the pit. Accordingly, if you stand facing the car and do everything from the engine compartment, the traffic jam will be on the right.
- As soon as the antifreeze has flowed, you can unscrew the filler cap on the expansion tank. Thereby increasing the flow of drained liquid (Fig. 2).
- It would be a good idea to remove the hose from the heating of the throttle assembly and blow it out; another small part will drain out (Fig. 3).
- It is also recommended to remove the expansion tank for flushing; sediment often accumulates at the bottom, and the walls become overgrown with plaque (Fig. 4). It is easy to remove, just unscrew 2 nuts and disconnect the fittings that go to it.
Unfortunately, it will not be possible to drain antifreeze from the block on a Chevrolet Lanos with a popular 1.5 liter engine; it does not have a drain hole. Therefore, about 2 liters of old fluid remains in the cooling system.
By following these instructions, you can drain the antifreeze as completely as possible. It is recommended to remove old residue by rinsing with distilled water.
Flushing the cooling system
Flushing with distilled water is necessary to completely remove old antifreeze, as well as to flush out deposits in the cooling system. Without performing this procedure, the properties and service life of the new liquid being poured may deteriorate.
To perform this operation, it is necessary to close the drain valve and put the expansion tank in place. After this, you can pour distilled water into it until it comes out of the removed hose going to the throttle assembly. This is necessary to allow air to escape from the system.
Next, put the hose in place and add water to the middle of the tank. We start the engine and wait until it warms up to operating temperature. After reaching temperature, the thermostat will open and water will flow through a large circle of the cooling system.
That's it, the liquid has passed through the entire system, now you can turn off the engine, wait until it cools down and drain it. We repeat this operation several times until the drained water is clear.
Usually, to achieve a good result, 4-5 repetitions of this simple operation are enough. But some motorists describe having to wash it 8 or even 10 times.
Filling without air pockets
The flushed system is completely ready for filling with new antifreeze. But since it is impossible to drain completely distilled water from the Chevrolet Lanos system, it is best to use a concentrate as a new fluid. It can be diluted, taking into account the remaining residue.
After diluting the concentrate with this in mind, we begin pouring it. The filling steps will be exactly the same as we did when washing. That is, we fill it into the expansion tank until new antifreeze flows from the pipe going to the throttle.
This will prevent the formation of air pockets in the cooling system. Next, put the hose in place and continue to fill to the middle level in the tank. After that, we start the car, warm it up, and turn it off. After cooling, check the level again and top up if necessary.
This completes the replacement. The process itself is not complicated, so doing it yourself will not be difficult.
Replacing the heater radiator for Renault Logan
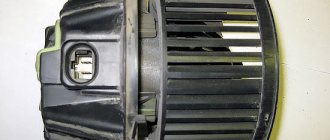
The element is equipped with a round body. It is not possible to inspect it, so we carry out all actions by touch. Not entirely inconvenient, however.
To remove the fan, rotate its housing in the direction of the clock hand. Disconnect the power supply connector.
Replacing the heater radiator for Renault Logan
We remove this unit from under the dashboard and check it visually. There are two types of fans in Renault Logan, which differ slightly in the wide or narrow connector. What are the fan malfunctions and how to eliminate them? But in winter, it’s still not warm enough for me, especially when I read how other Logans are burning hot. I decided to at least give the stove a whirl, maybe it had clogged up in 8 years.
Initially, I was tormented by a dilemma: The nuance is that when flushing, with a high degree of probability, the stove radiator becomes clogged, since it has the narrowest channels. So it’s worth flushing with the old stove radiator.
There are many manuals on the topic, so there is no point in describing everything and I will not refer to materials on standard operations on the internet.
The manuals recommend draining the coolant, but it’s easier to drain the coolant only from the stove
We remove the clamps from the stove pipes in the engine compartment. If the clamps are not spring but crimp, they will have to be replaced after removal (already replaced in the photo)
We remove and move the hoses to the side, lifting them up so that the rest of the coolant does not drain from the system
After draining the coolant from the radiator and stove personally, I put a hose on one of the pipes and carefully blow out the radiator from any remaining coolant. So that when the radiator is dismantled, the coolant does not spill into the cabin.
Let's move Now to the salon and remove the tunnel lining here, no tricks https://www.renault.ru/autoprospect/logan/11-13-snyatie-i-ustanovka-oblicovki-pola-tonnelya.html We remove the radio, or if There is no radio cover. Remove the lower console and the instrument panel trim. It’s the same here without any special problems https://www.autoprospect.ru/renault/snyatie/11-16-1-logan-i-ustanovka-paneli-priborov.html
It turned out that, as when removing the radiator for the first time, the trim on the central instrument panel is also better. remove improve instrumental and visual access. Remove the cover.
You don’t have to unplug the plug and just pull it to the side.
Remove the upper casing of the steering key. columns or T-15 branch, two screws in the bottom trim.
And remove the top
We remove the instrument panel of the combination and the combination itself https://www.renault.ru/autoprospect/logan/10-15-2-snyatie-i-ustanovka-kombinacii-html.priborov Everything is simple in the manual, but the realities of the steering column switches interfere with the plugs remove Disable
cover the plug by pressing the latches on the sides
We remove the trim and the combination; in the opening we see two fastenings for the instrument panel amplifier nut. unscrew Next.
A couple of “little things” for the html, because we didn’t remove the panel as in the manual.
Unscrewing the bolt of the mounting pipes is not so easy with the panel not removed.
everything I assembled the extension cords and unscrewed them through the window in the center console (which is why the trim was removed)
One more hitch, about which there is not a word anywhere. except for the fact that the radiator is screwed onto screws, latches and onto the heater housing.
One on top with pipes above
We squeeze them out, take them out and put them on. and the radiator is new.
Renault oven does not work Logan
Despite the fact that the Renault Logan is a fairly reliable car, some owners may still complain that the stove does not warm up in winter. Design of the idle speed sensor and Renault Logan, how to replace the sensor. Naturally, there are reasons for concern, and they are due to the fact that in the terrible Russian winter you need warmth in the cabin. Have you been looking for how to remove a bumper on a Renault Logan video? Watch the detailed video and read useful information here! How to remove a fan for Renault Megane 2. Renault owners are concerned about a number of defects associated with a poorly functioning heating system. Now we will study all the prerequisites for defects in the heating system, and also try to give advice and ways to eliminate them.
Causes of heater malfunction
If the inside of your Renault Logan is getting colder, you don't have to feel depressed or anxious as most furnace faults can be fixed independently. So let's find out which harms are most common among older people. Renault Logan related to the operation of the interior heater.
- The air seal in the heat exchange system does not heat the radiator.
- The thermostat is faulty, the engine does not heat the fluid.
- The water pump is not working properly.
- Logan's hammer began to hammer.
- Engine malfunction.
- Low air flow or no heating at all.
- Faulty fan motor.
- The fan speed controller has failed.
- Renault mixer does not work.
The most common malfunctions in the heating system are listed above. Renault Logan . Next we will talk about each problem separately.
Problem solving
To troubleshoot the heater heater , we will try to reveal the essence of each of them.
- An air gap in the Renault heating system can be caused by early replacement of antifreeze. As a rule, the cooling system of a Renault Logan car is designed to automatically remove air pockets. The video guide shows how to replace the timing belt and drive belt for the Volga Cyber with your own hands. Despite the perfection of this design, air pockets still appear, usually during cooling. You can remove the air lock on Renault Logan in one simple way. Removing the front bumper on a Renault How to securely fasten the bumper, part 1, p. No. 196. Disconnect both pipes from the internal heat exchange, and then, connecting each pipe in turn, pour coolant into the expansion tank. After such manipulations, the antifreeze should flow through the opposite tube, after which the second hose should be inserted. How to remove and install thresholds on Renault Duster: photo. Usually after such actions the oven heats up noticeably better.
- If the thermostat does not work on the Renault Logan, the engine does not receive the desired operating temperature and the coolant cannot heat the heater core. It is enough to solve this problem by changing the thermostat, fortunately it is not difficult. The thermostat housing is located at the bottom of the cylinder head next to the gearbox housing.
Replacing a radiator for Renault Logan, Sandero, Largus
replacement
heater radiator included
Renault Logan
, Sandero, Lada Largus Kaifu Knowledge Renault
Replacing the heater fan (hob) for Renault Logan, Sandero, Duster, Lada Largus
Video details
- instructions for removing and installing a heater fan (
furnace
, air conditioner) without disassembling.
Warning! Before performing this work on the Renault Logan, you must first pour the antifreeze into a separate container.
- If the Renault Logan water pump is not working properly, it does not create the proper pressure, the coolant cannot enter the radiator and therefore does not heat the air. A detailed article on how to replace a low beam headlight on a Renault Duster can be found in the following articles: video and photos, tips on replacement and selection. This problem usually causes the engine to overheat, so the water pump needs to be replaced immediately. Make a video review of how to remove and install the front bumper on Renault Logan and Lada Largus cars. In order to change the water pump, it is necessary to disassemble the gas distribution system in advance and drain the antifreeze.
- If the vehicle has not previously been used properly and water has been added to the system instead of antifreeze, corrosion products can clog the cabin heater core, which in turn will negatively affect its operation.
Unfortunately, cleaning the radiator of the Renault Logan heating system is impractical. How to replace generator bearings on Renault Logan 1.4-1.6 (2008-2014). Replacement instructions, catalog number, dimensions. Video description of how to replace all the lamps in an improvised Renault Logan headlamp. This part needs to be changed.
To replace this part, it is necessary to disassemble the cabin heater housing, having first removed the cooling system from the antifreeze.
- This malfunction can cause air locks in the cooling system. According to the video for the Renault Logan fan and also for Renault, you need to remove the fan later. If the engine overheats, the cylinder head gasket may be damaged, allowing gases to enter the water supply. With the engine running, open the filler neck of the expansion tank and pay attention to the condition of the antifreeze. If air bubbles enter the tank, this indicates a bad cylinder head gasket.
- This problem. poor conductivity of the air filter in the Renault cabin. »Video gallery» Rock rock »eyelashes on the Nissan Tiida (russ-artel.ru), remove the headlight on the Nissan Tiida, video on how to remove the bumper on the Nissan Tiida, eyelashes on the headlights right now and your car will be. Hi all! In today's post I want to tell you how to replace rear brake pads on Renault Megane 2. You can replace this problem by replacing this filter.
- If there is no airflow when the cabin heater is turned on, the heater motor will likely be turned off. Unfortunately, this device cannot be repaired and needs to be replaced.
- The speed controller is directly connected to the fan motor using an electrical circuit. So it's worth checking first. (Ovens) in Renault Logan This video is about how to remove and repair the Renault heater fan. The controller may not work.
- If the above problems do not affect your car and the stove still does not heat the air, check the valves. It is possible that the valves that allow antifreeze into the furnace radiator are not working.