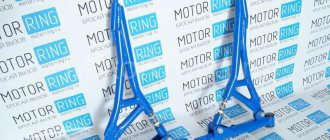
Replacing the rear wheel bearing on a VAZ 2108 (eight) and VAZ 2109 (nine) with your own hands
02/06/2019 mr.Podshipnik 0 Comment
HOME »
- Car brands » Replacing wheel bearings
»
Cars of the VAZ 2108 or 2109 brand are unpretentious to our domestic roads. However, like any mechanism, its parts wear out and require replacement. In this article you will find out why the rear hub bearings break in “eights” and “nines”, and I will also tell you how to replace them with your own hands.
What factors influence the durability of VAZ 2108 and 2109 bearings
The timing of replacement parts is influenced by a number of factors:
— bad roads in the first place;
— driving over bumps and holes, especially at high speeds;
— vehicle overload above the permissible limit;
— the quality of the bearing itself, which was previously installed on the machine;
- driver's driving style. Gentle or aggressive;
— climatic operating conditions. In winter, with roads sprinkled with salt. In the summer outside the city, dust, sand, dirt.
Believe me, just one point is enough for the bearing to fail. And with all of them together, this will happen very quickly. Although the operation of the rear hub bearing is designed to last up to 100,000 km.
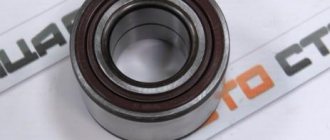
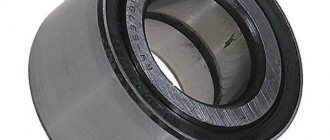
Bearing Specifications
The product catalog number is 256706, it has the following characteristics:
- The diameter of the inner race is 30 mm.
- The diameter of the outer ring is 60 mm.
- Weight – 400 gr.
- Bearing width – 37 mm.
- Inside there are 28 balls with a diameter of 9.525 mm.
- Dynamic load capacity of at least 30.1 kN.
- Static load capacity 25.9 kN.
- The bearing operates normally at 6500 rpm.
There are only four manufacturers of these products in Russia:
- JSC SPZ (Saratov). Produces the highest quality and durable bearings. The cost is quite low.
- GPZ-23 (Vologda). It produces very good elements, which are slightly inferior to those from Saratov (denoted by the abbreviation VBF).
- Samara SPZ-4. The quality of the products does not differ, but the cost is very low.
- GPZ-20 in Kursk. The plant was engaged in the production of high-quality products; currently only copies of previous years of production can be found on the shelves.
How to determine bearing failure on a figure eight or nine
I would advise you to use the old, proven old-fashioned method.
It is as follows:
— get behind the wheel of your car. You accelerate to a speed of 40 km/h and listen to the noise from behind with the windows open. If you hear a whistle, grinding or howling, this indicates that there is a strong suspicion of a breakdown;
- increase speed. The howling will stop, and then periodically appear with renewed vigor;
— when turning, you will hear vibration and an imbalance in the rear of the cabin;
All this indicates bearing failure.
Place your palm gently on the brake drum. You will feel an increased temperature. The part is heating up.
To make sure, jack up the car and spin the wheel manually.
If you feel play and buzzing, this will confirm that you need to replace the rear wheel bearing.
The product needs repair and replacement. Let's prepare for this. First, you need to choose the right quality part.
Front hub wear
- The bearings are “humming”. While driving, strange sounds are heard coming from the wheels. As a rule, with increasing speed they become even more pronounced. After this, when the speed decreases, the noise does not become less quiet.
- Bearings heat up quickly. This can cause the caliper to overheat as well, causing it to fly off as well. In addition, the brake fluid also boils too quickly. This leads to rapid failure of the braking system.
Causes of hub wear
Usually there are the following reasons due to which the hub wears out:
- The wheel bearing has completely fallen apart. Perhaps it is only in the early stages of destruction. In any case, it will have to be changed, but after appropriate diagnostics.
- The wheel bearing nut is not tightened properly. Such an oversight can cause backlash. In this case, you can get by by simply screwing in this nut all the way. That is, you should not change the hub or its bearing.
- The steering tip does not work well.
- There are shortcomings in the operation of the upper or lower ball joint.
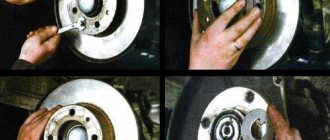
Step-by-step steps to replace a part
We prepare a flat area. We install the car on it.
Using stops, we stop the wheels on both sides. If there are no stops, we use ordinary bricks.
We engage first gear. With the wheel standing on the ground, we “tear off” the bolts. We remove the wheel.
For safety reasons, do not forget to place a stop under the side member of the car. Use the spare tire. This is necessary to avoid injury if the car slips off the jack.
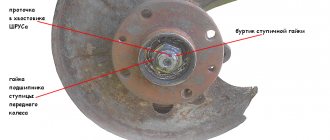
Using wrench No. 12, unscrew the pin guides. To make removing the brake drum easier, spray it with Vedashka lubricant.
Wait about 30 minutes. Then the drum can be easily removed. Unscrew the hub nut.
You can remove the hub in two ways:
- using a puller;
- an easier way - put the wheel back and then, shaking it sharply, pull it off together with the hub.
There are cases when the bearing race that is located on the shaft remains on it when the hub is dismantled.
This of course adds extra work. But nothing. What do we do in this case?
We remove the brake pads. We take a hammer and chisel and knock down the clip. Removing the bearing from the hub can be done in several ways.
Let's consider the simplest method if you have a limited number of simple tools and devices.
Use pliers to remove the retaining ring and remove the oil seal.
We place the hub vertically on the cheeks of a vice or two wooden blocks.
We install the metal mandrel on the holder and knock it out with precise, not strong blows.
We clean the inside with sandpaper to remove rust. We remove the dirt, rinse with diesel fuel and wipe with a rag.
Lubricate the hole and bearing with lithol. We place the part in the hole and carefully press it into it.
We do this by hitting a hammer through a wooden board or thick sheet rubber. Make sure there is no distortion.
When the clip has entered the hole 10mm, you can hit harder.
Install the oil seal and then the retaining ring.
The same operations for dismantling and installing a bearing can be performed with a puller or press. It is easier.
We clamp the hub vertically in a vice. Using a puller or press rod, we squeeze out the old part through a metal mandrel.
We also clean the inner surface of rust and lubricate it. We install the new product and press it in.
The great thing about this case is that you cannot damage the clip. And when hit with a hammer, in some cases this happens.
And in the second case, the process is less labor-intensive and safe.
When you have pressed in the new part, we begin installation.
We do everything the same way as during dismantling, only in reverse order.
As I told you before, in the absence of a torque wrench, we tighten the bolts as usual until they stop. We tighten it and then lower it, turning the key 20 degrees.
One more nuance when installing the bearing in the hub. There may be internal wear in the hub seat such that the bearing fits in easily and wobbles, which is unacceptable.
It's nothing you can do. The entire hub needs to be replaced. The process of dismantling and installation is exactly the same.
Important points
The wheel nut on the VAZ 2109 is tightened very tightly, and in addition, it is often covered with rust. It may take a huge amount of effort to move it. In such a situation, WD-40 liquid can help. If you don’t have this liquid on hand, you can generously pour oil on the nut and wait 10 minutes. Not every car owner has a wheel bearing puller at hand. In this case, to remove the bearing, you can use a hammer and a piece of steel pipe of suitable diameter (about 4.5 cm). The main thing is not to damage the inner surface of the hub with the pipe.
If scratches and gouges remain there after pressing out, the new bearing will quickly fail. When reassembling the hub, special attention should be paid to tightening the hub nut. If it is loosely tightened, play will occur, which will again lead to bearing wear.
Therefore, with a 30 socket head, you should use the longest wrench so that the force when tightening the hub nut is maximum.
Replacing wheel bearings is a procedure that every owner of a “nine” will sooner or later encounter. The only question is whether he will be ready for this. If the driver prefers to repair his car himself, then it makes sense to purchase a puller for hubs and bearings in the store. This simple tool will greatly facilitate the work and also save the car owner a lot of time and nerves.
Copywriter with five years of experience.
Practice tips
I want to give you some practical tips that I hope will simplify the task of replacing the bearing on the rear hub of a VAZ 2109-2109:
- buy bearings only at a car store. I don’t recommend using your hands;
- do not spare money and purchase a high-quality branded part. You will not regret. And it will serve you for a long time without creating problems with repairs.
— you can do the repairs yourself much cheaper than by going to a service station;
— depending on your financial condition, I recommend immediately replacing the rear wheel bearing on the other side of the car. It wore out at the same time as the first part and will also soon become unusable;
- if you have already dismantled the hub, pay attention to the nodes around it. If there are defects, proceed to eliminate them.
I hope this short article will help you make the necessary repairs yourself.
If you have any questions during the work, write in the comments. Always happy to answer and give advice.
Manufacturers
Many motorists do not know which VAZ-2108 front wheel bearing to choose for their car. Now you can find several manufacturers on the market:
- GPZ-23, Vologda, has the abbreviation VBF. The plant has earned the trust of motorists and is one of the best manufacturers of wheel bearings for domestic cars. Due to the relatively low cost, these parts are practically not counterfeited.
- SPZ, Saratov - according to many experts, the bearings of this manufacturer are the most reliable, durable and high quality. And most importantly - the very low cost of parts.
- GPZ-20, Kursk is no longer engaged in the production of wheel bearings, but you can find products in stores and warehouses.
- Experts do not speak very well of the Samara SPZ-3. The cost of the bearings is very low, but the quality is not great, the service life is very short.
Some auto stores try not to deal with little-known companies that produce low-quality products. Therefore, on the shelves you can only find bearings from Saratov and Vologda.
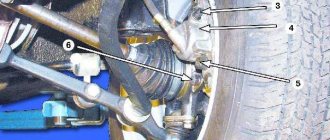
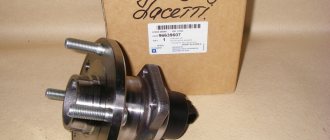
How to remove a rear wheel hub and install a new one
The replacement procedure looks like this:
1. The car is installed on a lift. 2. Next, unscrew the nuts and remove the caliper. 3. Remove the hose, brake disc, and steering lever. 4. Release the hub from the ball joints and remove the strut fasteners. 5. Install a new bearing, return all parts to their place.
Important! For diagnostics, you can contact a service station, but according to reviews from car owners, the quality of the repair will depend on the responsibility and skill of the specialist, so in some cases you can repair the part yourself, but you should be extremely careful.
Kinds
The following types of hubs exist:
- driving unsteered wheels;
This type is suitable for rear-wheel drive cars and is installed on the rear wheels.
- driven uncontrolled;
Designed for the rear wheels of front-wheel drive vehicles.
- leading managed;
Used in the front wheels of front-wheel drive cars.
- slave managed;
This type is needed for the front wheels of rear-wheel drive cars.
Tools
The “package” of tools includes:
- hammer, pry bar;
- socket wrenches (for drum pins), spanner wrench;
- passages (for rings).
Note! You can use an additional wooden block to soften the blow, and it’s good to add a long pipe to the socket wrenches.
Appearance of socket wrenches
Causes of problems
The hub is a very durable part of a car disk, so breakdowns rarely occur. But still sometimes deformation of the spare part occurs. In addition, the rear hub is more wear-resistant than the front hub, since it is less subject to heavy loads.
"Road factors"
Ingress of moisture and dust eventually displaces the lubricant, and the disc begins to overheat as a result of excess friction.
Insufficient lubrication
It ranks first among the causes of failure of this spare part.
Important! Sometimes it is caused by poor-quality lubricant material.
Excessive loads
In the average area this is unlikely. Usually found in mountainous areas.
Strong “tightening” of fasteners
It often happens that the bolts are screwed in more than necessary - this is how the threads wear out.
Important! If the hub and bearing are an inseparable connection, then there is almost no risk of wear of such a structure.
Structure
The part has a fairly simple structure. Essential elements:
- outer rim (used for screwing in bolts);
- internal part (for bearings);
- holes with slots (for CV joint);
- protective caps;
- sensor (it is sometimes included in the design).
CV joints are constant velocity joints; their main task is to transmit torque.
Note! The set of fasteners for this part consists of two nuts and one washer.
Hubs for different purposes have different technical characteristics. Hubs for passenger cars have the form of a hollow, lightweight cylinder, while for “heavyweights” the diameter of the part is larger.
Preparation for repair
All work must be carried out on an inspection pit or overpass. But if you do not have such amenities, you will have to hang the rear of the car so that it is above the ground. The procedure for carrying out preparatory work:
- Place the car on a level surface.
- Place blocks under the front wheels.
- Turn on first speed.
- Loosen the nut that tightens the handbrake actuator (optional).
After this, it is necessary to loosen the bolts securing the rear wheel on which the repair is being carried out. It is also advisable to unscrew the nut on the hub, and then rip it off using a “30” wrench. You can then hang up the side of the car to make further repairs.