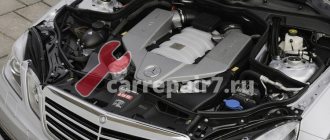
Almost all external surfaces of the engine and its components can be painted. Typically the valve cover and plastic casing are painted, but the cylinder block, intake manifold and exhaust manifold guard can also be painted. A well-painted engine will improve the appearance of the engine compartment. In addition, there are several practical advantages. For example, a cylinder block made of cast iron will be protected from rust by paint. On an engine painted in a light color, any leaks will be clearly visible.
In this article we will figure out how to paint the engine, how to properly prepare the engine and its components for painting.
Why do you paint the engine block?
A car engine (internal combustion, diesel, electric) consists of various elements and components. Most of them wear out during operation and are replaced with new ones. Some worn-out parts of a car engine can be painted on the outside. It is allowed to paint the following elements of the engine compartment: valve cover, cylinder block, outer surface of the intake and exhaust manifold.
Metal parts are usually painted to provide them with additional protection against corrosion and to extend their service life. You can use paint to update the appearance of the plastic elements of the engine (paint the plastic casing). The main thing is to choose the right coatings (depending on the type of surface to be painted and the operating temperature of the part).
The main reasons for painting a car engine:
- making external surfaces decorative (before selling the car);
- extending the service life of metal elements;
- protection of metal from moisture and corrosion.
It is better to combine painting with major repairs. Before painting, it is recommended to remove and completely disassemble the engine. The outer surface of each part is painted separately. For any engine element, select the type of paint that is suitable for its performance characteristics.
Painting a car engine: features and nuances
As a rule, it is better to disassemble the unit to paint the engine. For this reason, it is much less common to paint an internal combustion engine that was simply removed from the car for various reasons, but was not disassembled for repair. In other words, painting the engine can be considered a logical conclusion as part of the overhaul before final assembly.
In other words, painting an already assembled engine with just one type of paint is strongly not recommended. Moreover, if you want to not only “refresh” the appearance, but also protect the engine from corrosion, then this issue must be approached with special responsibility.
You also need to understand that the materials used to paint the engine must meet a number of requirements, taking into account the characteristics of their location in a particular environment. Let us add that the final result and service life of the applied paint coating highly depend on the equipment with which the paint was applied, as well as on compliance with the requirements when preparing surfaces for painting and the characteristics of applying the material itself.
Rules for choosing a coloring composition
To paint hot engine parts, it is recommended to buy heat-resistant paint. This type of paint and varnish material can withstand temperatures up to +400…+600 °C. The surface of the motor parts, as a rule, heats up to 105 degrees Celsius during operation. The valve cover can heat up to +120 °C. The exhaust manifold heats up to +500 degrees Celsius. The zones next to it are up to +200 degrees. The intake manifold is not exposed to strong heat.
Engine paint requirements:
- strength (after application and drying or heat treatment, the paint layer should become hard and resistant to mechanical damage);
- heat resistance (after hardening, the coating must withstand high temperatures);
- fire resistance;
- moisture resistance (the paint layer should not allow moisture to pass through);
- corrosion protection;
- the coating must be resistant to the effects of fuels and lubricants and salts;
- The hardened layer of paint should not crack with frequent decreases and increases in temperature.
Paint and varnish materials for painting the engine:
- silicone thermal paints based on silicone and solvents (for metal) - applied with a paint sprayer and brush, harden after heat treatment;
- dry powder heat-resistant compounds (epoxy, alkyd, polyurethane) for metal - sprayed with an electrostatic sprayer and require “baking”;
- aerosol cans (acrylic) for plastic - sprayed over the surface, dry naturally;
- aerosol (on silicone resins) for metal - sprayed over the surface, heat treatment is required;
- two-component (epoxy, alkyd) paintwork materials with a hardener (for elements that do not heat up too much) - two parts are mixed before painting, the mixture is applied with a brush or a paint sprayer, hardens in the open air as a result of a chemical reaction.
Powder coatings are considered the most heat-resistant and durable, but their application requires a special tool, and for heat treatment (“baking”) you will need an oven or infrared lamps. But such paints do not contain water, which can penetrate inside the engine and lead to corrosion.
Putty and primer
If there are defects on the surface of the motor, you will have to putty. Only special compounds sold in construction or automotive stores are suitable for this purpose. Before work, the base of the putty mixture is combined with the hardener strictly according to the instructions, and applied with a spatula to the problem area. If the crack is significant, work in several layers with complete intermediate drying of each layer.
After final polymerization of the putty, the surface of the area is sanded with fine sandpaper or a special grinder wheel. As a result, the problem area should become perfectly smooth. It is degreased again and a primer is applied.
Coloring order
It is recommended to paint engine parts only when disassembled. Before painting, the surface must be carefully prepared. The final result depends on preparation.
Removing and cleaning the engine
First of all, you need to remove the engine from under the hood. It is recommended to disassemble the engine into its component parts before painting. For spare parts that will be painted, you need to unscrew all small elements and fasteners.
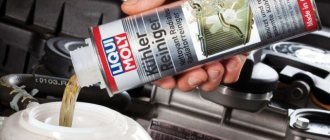
First, the surface to be painted should be washed with ordinary dishwashing detergent and a sponge or brush. You can use a sandblasting sprayer to clean the engine. After washing, metal parts must be thoroughly dried and treated with a rust converter. Then clean it again. Oil stains can be removed with acetone or solvent. After cleaning, it is recommended to dry all parts thoroughly before painting.
Putty and primer
The next stage of preparatory work is putty and primer. These activities are carried out to paint parts that do not heat up very much during operation. To correct defects on the surface, automotive putty and special primer (epoxy, alkyd) are used. The type of primer must match the paintwork. Before using heat-resistant powder paints, the surface is not puttied or primed, but only degreased, that is, wiped with acetone or solvent.
Sealing
If a dry powder composition is used, then sealing, that is, protection against moisture penetration into the engine, is not necessary. Before painting the surface with liquid paints and varnishes, first, using masking tape or film, you need to close all holes through which paint can get inside the motor.
Coloring
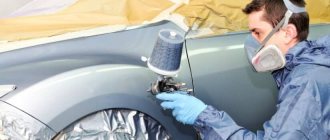
The painting method depends on the type of paint material. Painting of engine elements is carried out at positive temperatures. To protect your respiratory system, it is recommended to wear a respirator.
When using thermal powder paint, a special tool is required - an electrostatic sprayer. Paint the surface in one layer. After painting, it is necessary to “bake” the coating, that is, subject it to heat treatment. When heated to 200 degrees, the coating layer hardens during the polymerization process. Heat-resistant paint can additionally be activated by heating the engine at high speed.
Valve cover painting
It is advisable to remove the valve cover from the engine before painting. It is better to paint on a surface covered with plastic film. The valve cover is often made of aluminum and coated with protective paint. The coating deteriorates over time. It is advisable to remove the old layer of paint using a chemical remover. Before painting, the surface must be washed with water, dried, sanded with Scotch Brite, and wiped with acetone or solvent. Before applying the primer (epoxy), the lid must be thoroughly dried.
Only completely dry surfaces can be painted. To paint the valve cover, you can use silicone, heat-resistant aerosol paint, or two-component compositions. It is recommended to apply paintwork with a thin spray of 1-2 layers. Allow the coating to dry thoroughly before screwing the cover into place. New caulk may need to be installed to ensure a strong, airtight connection.
Painting the casing
The plastic casing can also be painted. Before painting, this part is removed from the car engine. The surface of the casing must be washed, dried and sanded with Scotch Brite. It is recommended to cover elements that are not to be painted with masking tape.
The surface to be painted must be degreased. Once dry, the casing can be primed with a plastic primer. The surface is painted with ordinary aerosol automotive paint for plastic.
Preparing the engine for painting
Before painting, you will have to disassemble the engine and remove it from the engine compartment. Beginners are advised to take photographs of all stages of work and number the cables from the spark plugs so that the assembly goes without any problems. Each part that will be painted is cleaned of dirt and degreased with a solvent, otherwise the paintwork will not adhere to the surface.
To be sure to get rid of grease, oil, and dirt, you can use sandblasting. With it, all manipulations will go faster, and the quality of base preparation will increase. If this is not possible, sand the areas where there is corrosion with fine sandpaper or a grinding wheel. Areas of bends and recesses are treated especially carefully.
Folk “craftsmen” use an original method of cleaning the engine:
- boil water;
- pour washing powder into the water;
- lower the motor into the soapy solution;
- allow the liquid to boil again;
- remove the clean part.
After drying the unit, an epoxy or other heat-resistant primer is applied, although some craftsmen skip this step due to the risk of overheating the motor in the future. In any case, you should not apply more than 1 coat of primer on the main engine components.
Additional tips and tricks
Important tips to keep in mind when painting your engine:
- engine elements are painted during overhaul;
- painting of parts is carried out before assembling the unit, and not after it;
- metal and plastic are painted with different types of paints and varnishes;
- parts that heat up during operation are painted with heat-resistant paint (heat treatment is required for activation);
- To obtain an even and homogeneous coating, it is recommended to use sprayers;
- Before painting, the surface must be cleaned of loose particles, rust and degreased.
Source
Purposes and features of painting
Often those who want to achieve an external transformation of this part of the car resort to painting the engine. After applying the paint, the entire space under the hood will look stylish, will attract attention and look more well-groomed. A big advantage of painting is when selling a car - after it you can even slightly increase the price of the car or sell it faster.
A painted engine is a very popular “highlight” among cars that participate in various shows. In addition, the color of the engine also has a practical function. It eliminates incipient corrosion and prevents metal rusting in the future, increasing the service life of the unit.
Engine painting has a number of features. This is done only after removing the element, because otherwise high-quality paint application will be impossible. Before painting, it is advisable to overhaul the engine in order to immediately get rid of existing technical problems. To work, you will have to buy special types of paintwork materials, a spray gun or a roller, and also thoroughly prepare the surface first.
How to paint the engine?
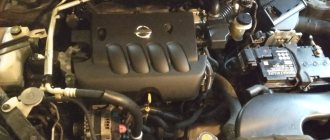
Almost all external surfaces of the engine and its components can be painted. Typically the valve cover and plastic casing are painted, but the cylinder block, intake manifold and exhaust manifold guard can also be painted. A well-painted engine will improve the appearance of the engine compartment. In addition, there are several practical advantages. For example, a cylinder block made of cast iron will be protected from rust by paint. On an engine painted in a light color, any leaks will be clearly visible.
In this article we will figure out how to paint the engine, how to properly prepare the engine and its components for painting.
To what temperature does the engine heat up?
For most vehicles, the normal operating temperature of a gasoline engine is between 90 and 105 degrees Celsius. When the temperature exceeds 110 degrees, the engine overheats. Above 120 degrees damage may occur. The engine oil can heat up from 150 to 200 degrees.
The engine temperature on the dashboard refers to the coolant, but the outside surface of the engine and its components are at a completely different temperature. Heating may vary. Areas distant from the exhaust manifold will have a temperature close to the coolant temperature, which is about 100 degrees. The valve cover can heat up to 65-120 degrees Celsius, depending on engine speed. The areas near the exhaust manifold are significantly hotter, around 200 degrees (the manifold itself heats up to around 500 degrees Celsius or more). Much also depends on the type of engine and weather conditions. A powerful V-twin engine in a car driving on the highway in the heat can get much hotter outside than a low-power engine in a car moving slowly on city streets in winter. Heat from the engine is dissipated by the cooling system and air flowing through the engine compartment.
Thus, we can conclude that automobile gasoline engines do not heat up too much, except in the area around the exhaust manifold. So, what should you paint your engine with?
How to paint the engine?
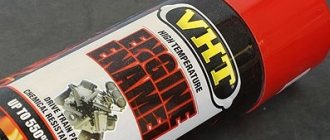
You can find a wide range of high-temperature paints on sale. This paint is sold in both cans and cans for brush application. Reputable brands of foreign manufacturers: Duplicolor, Plastikote, Krylon, Rust-Oleum, POR-15, VHT (Very High Temperature), Valspar. There are also many other both foreign and domestic manufacturers. Both heat-resistant paints of different colors and special high-temperature primers and varnishes are sold. Heat-resistant paints are marked by the range of temperatures they can withstand without losing their protective and decorative properties. Engine Enamel paints, varnishes and engine primers are typically labeled 350-550F (350-500 degrees F equals 176-288 degrees C). Considering the above data on engine heating, this paint is suitable for most external surfaces. In addition to elevated temperatures, engine paint must withstand exposure to fuels and lubricants and salts. High-quality engine paints have good protective properties. When the temperature rises and falls, they do not change their protective and decorative properties.
Heat-resistant paints can be based on silicone or epoxy resin, or can be multi-polymer and include both components. Some paints contain ceramic particles, which give the paint heat resistance and wear resistance (withstands 1000 degrees). This paint can be used to paint the exhaust manifold or manifold guard, or even the exhaust pipe. Powder paints can be considered the most heat-resistant, but their application requires a special spray gun and subsequent high-temperature drying.
Many high temperature paints require heat activation (“baking”). It is necessary to clarify the need for this process in the instructions for the specific paint. This improves the appearance and activates all the unique protective properties of the paint. The curing (activation/baking) process must occur slowly.
This can be done by infrared drying, in the oven (if the size of the part allows), a hair dryer, a propane torch, or by natural heating of the engine.
Heating should be done after the paint has dried (usually within a day, it is better to check the instructions). If you heat it with the flame of a propane torch, then you do not need to heat the paint very much, you just need to quickly, superficially apply the flame. Same thing with a hairdryer. There is no need to heat the paint in one place for a long time; you need to evenly move it with an industrial hair dryer, having previously adjusted it to the desired temperature. You need to heat and cool the painted surface several times.
The manufacturer recommends the following process for heating high-temperature paint for its complete polymerization:
- Activation of a painted part removed from the machine . Heat to 350 degrees F for 30 minutes. Let cool for 30 minutes. Heat to 204 degrees for 30 minutes. Let cool for 30 minutes. Heat to 343 degrees for 30 minutes.
- Activation by engine heating . Start the engine, let it idle for 10 minutes, cool for 20 minutes. Start and let run for 20 minutes, cool for 20 minutes. Run for 30 minutes and you can drive the car to warm up the engine more.
Is it possible to paint the engine with plain car paint?
Oddly enough, a simple two-component automotive paint (with a hardener) sprayed with a spray gun gives good results when painting an engine. Two-part paint cures through a chemical process rather than simply drying like canned spray paint. Thus, the paint coating is stable. Cured paint shows good resistance to fuels and lubricants.
As was written above in this article, most of the engine surfaces heat up to a temperature of about 100 degrees. In the area close to the exhaust manifold it heats up more, but not above 200 degrees. For comparison, the body temperature of a black car in hot weather can reach 70–80 degrees. And if you add heating of the hood from the engine, the temperature may be higher. At the same time, the car paint on the body is not destroyed. While car paint is not specifically designed for the engine, quality two-part paint can withstand temperatures in excess of 100 degrees. The main advantage is the curing properties of two-component paint. Moreover, we already had practical experience in painting engines with two-component automotive paint with positive results. It is best to paint the exhaust manifold or exhaust manifold guard with a special high-temperature paint designed for the temperature range to which these surfaces reach.
Selecting paint
Engine painting is done using various compounds. This allows you to obtain different strength and durability of the coating.
The best option would be to paint the body with powder paints. They are applied to the surface using special devices and then heated. In this case, the powder melts and evenly adheres to the engine. This procedure can only be performed with expensive equipment.
An alternative would be to use heat-resistant paints. It is important to give preference only to these types, since the engine gets very hot during operation.
There are paints that can withstand temperatures of about 1 thousand degrees. But at the same time, not all parts heat up so much, so you can use several types of mixtures for certain areas of the system.
Popular products include thermal paints and enamels from Body and Abro. Many car enthusiasts prepare mixtures themselves from several components:
- aluminum powder;
- drying oil;
- epoxy adhesive;
- solvent.
By mixing them, you can get a relatively good liquid for painting an engine. But still, experts recommend using only ready-made mixtures, which behave much better.
Underrated art. And why, really, decorate it? To be honest, sometimes you don’t even want to clean it of oil and dirt once again. Well, why is this necessary? The engine is still hidden from prying eyes and most of the time it sits in the dark under the hood and doesn’t bother anyone.
However, it is a serious misconception that the appearance of the engine does not need to be monitored. For example, when it’s time to sell a car, you go to the next potential client, and he asks you to open it under the hood. If everything is covered in dust and dirt, and perhaps with peeling paint in some places, you will be ashamed, and the buyer will understand that a sloppy owner may have more than just an engine in a neglected state, and will begin to look for breakdowns in the car so that there is a reason for bargaining . Do you need this? Not sure.
To prevent this from happening, before selling or just for yourself, you should take care of painting the engine elements using a special heat-resistant and wear-resistant paint. For example, repainting a valve cover is a great way to add life to a car, because even on an old car, a well-maintained and sparkling engine looks amazing, adding points to the car owner’s treasury. Here is a video guide that shows us step by step how to proceed correctly when repainting the power unit on our own.
The transition from the old rusty engine compartment to the prepared and updated one was especially impressive:
Step-by-step instructions were provided by a YouTuber named Chris Fix, who, judging by his channel, really likes to tinker with his car and has a wide range of different tricks for inexpensive operation and repair of cars. It’s also surprising how clearly this English-speaking guy with a camera on his forehead talks about the renovation. Everything is available even without translation...
In general, here are instructions on how to paint a car valve cover yourself. Believe me, even if you don’t need the elements of your car, the video is still a must-watch, because it is very instructive, informative and simply aesthetically pleasing, as if something old and unpleasant turns out to be almost new and shiny.
However, we provide our readers with a short video translation of what is happening:
First of all, for the work you will need a special tool, paint, degreasers, with the help of which three stages will be completed: 1. Removing parts (painting a part without removing it from under the hood is a bad idea), 2. Preparation (an important element, without which will be impossible to achieve even coloring), 3. Painting the part and applying a protective varnish coating.
And so, take the valve cover and remove it from the car. Please note that on some machines access to the cover is easier, on others it is more difficult. The four-cylinder power unit of this Honda (Civic or Del Sol) is easily accessible and small in size, so it was not difficult for the blogger to twist the “head” out of it. The process of removing the valve cover is shown in the second minute of the video.
Naturally, it's worth checking your vehicle's owner's manual before you begin removing the cover. There is nothing difficult about this, but it is better to be on the safe side if you are doing this for the first time.
What do you need to know? Don't forget to number the spark plug cables. Which cable goes to which cylinder, otherwise the engine will not start or will run intermittently.
How to paint an engine?
It is convenient to paint the engine when it is removed from the car, and possibly disassembled. For example, the engine was removed for repairs. However, this is not always possible, so you need to look locally to see what access is available, what can be removed to improve access, or whether it will be possible to paint only individual engine elements.
Preparing the engine for painting
The key to any quality paint job is thorough surface preparation. In order for paint to adhere well to a cast iron engine block, the metal must be clean and dry. The cast iron surface has many small irregularities and pores that need to be thoroughly washed.
Use dish soap and a brush to remove oily stains. After this, use Scotch Brite to matt all painted surfaces.
Clean the surface with white spirit or another similar solvent.
It is necessary to remove not only dirt from the surface of the engine, but also traces of rust, if any. In some places you will need to use a wire brush and a drill attachment.
After the engine surface is cleaned, it needs to be dried. If possible, you need to blow out all areas of the engine with compressed air, or use a vacuum cleaner set to blow air. Before painting, you need to thoroughly degrease the engine surface.
Masking the engine compartment
After cleaning the engine compartment and drying it thoroughly, you can seal all the elements that cannot be painted. To do this you need to use masking tape. For larger areas, you can use newspaper or polyethylene. It is also necessary to cover all places where paint can get inside the engine.
It is not necessary to remove all components of the attachment, but it is better to remove the drive belts and spark plug wires. It may also be necessary to remove pipes that interfere with painting.
Let's sum it up
As you can see, the decision to paint the engine not only significantly improves the appearance of the power unit and attachments, but also protects the internal combustion engine from corrosion.
Also, less dirt accumulates on painted parts; such an engine is easier to clean from drips of engine oil and technical fluids, that is, the process of forced or preventive engine washing is as easy as possible.
Boosting the engine. Pros and cons of modifying an engine without a turbine. The main methods of boosting: tuning the cylinder head, crankshaft, compression ratio, intake and exhaust.
How to properly make noise insulation of the engine and engine shield of a car yourself. Materials for processing, elimination of noise and vibration. Tips, recommendations.
Insulation of the engine compartment. How and how to properly insulate a car’s engine and hood before winter: materials for insulation. Tips and tricks.
How to choose and install engine sump protection yourself. Selection of manufacturing materials, main parameters, features of protection installation.
What is a car blanket for an engine: when is it needed and the main features. How to make a car blanket yourself, selection of materials, production. Useful tips.
Features of choosing a car blanket for an engine. Materials for making engine insulation: felt or synthetic. Basic properties and parameters, other criteria.
Few car owners think about the need to paint the engine. To some, this may seem like a ridiculous idea that is not worth wasting time on. Believe me, this is not true. During our conversation, you will change your mind and seriously think about transforming the engine.
Various circumstances may force a car owner to think about painting the engine of his car. This process is by no means easy.
It requires compliance with a number of mandatory requirements, fulfillment of conditions, careful selection of paint (different for each engine compartment) and strict adherence to the work schedule. We have to study all this.
Engine painting
So, we figured out how to prepare the engine for painting and what to paint the engine with. Now you can move on to painting.
The paint layer should be thin so that the heat from the engine dissipates quickly. Automotive paints require prior application of primer to obtain good adhesion. It is better to use epoxy or special heat-resistant primer. 1-2 thin layers will be enough. No need to use filler primer.
Ensure good ventilation when painting. The surface to be painted should not be hot. You need to paint at a temperature of 19–35 degrees.
Before spraying the paint with a spray can, you need to shake it well so that all the paint components are mixed. Hold the can approximately 25–30 cm from the surface. If you hold it closer, smudges may form; if you hold it too far, the paint will fly dry and not spread.
The first layer is applied very thin, with a light spray. This layer will create the base for subsequent layers. After the paint has dried, you need to spray 2 full layers over the entire surface of the engine, with an intermediate drying period of 20 minutes between layers.
If a special high-temperature paint was used, it may require exposure to temperature to acquire all its unique properties. Methods for activating high temperature paint were described in this article above.
Choosing paint and applying it
Oven for auto painting. Click on photo to enlarge.
The initial question of how to quickly and cheaply paint your engine is decided by everyone in their own way. The ideal way to paint parts that are most exposed to heat would be to paint with powder paint using a tribostatic gun and then polymerize the paint in a hot oven.
This paint can withstand temperatures over 1100 degrees Celsius. But how many car enthusiasts who want to do this job themselves have $15,000 worth of equipment in their garage? And without him it is impossible to do this.
Before you properly paint the engine of your car, you need to choose paint and varnish materials with which you, using available equipment, can properly paint all components and parts. It is necessary to select coatings that are both heat-resistant and those that do not have such properties. It is not necessary to use the same paint for the intake manifold as for the exhaust manifold, and for the oil pan the same as for the fuel pump. Spending more expensive heat-resistant or powder paint on parts that are less susceptible to heat is simply irrational.
For the job, it is better to use ready-made paint, but you can make it yourself. This process consists of preparing a mixture of individual components in a certain proportion. One of the simplest compositions is silver (silver). Its components are sold in hardware stores.
Aluminum powder, drying oil, varnish, epoxy glue and solvent - this is an almost complete list of ingredients. If necessary, painters sometimes add fine powder of another metal—usually zinc. The average proportion of the components of the mixture can be considered the number 2/5, where 2 is the amount of aluminum powder, and 5 is drying oil (varnish, epoxy glue). Zinc or other metal powder can be a substitute for aluminum, but not more than 30% by volume.
The need to paint the engine can arise for various reasons. For some car owners, the aesthetic component is extremely important, while others specially prepare the car for various shows, displays, etc.
As for ordinary drivers, the idea to paint the engine usually arises when the engine had to be removed from the car to repair the unit itself or as part of body work affecting the engine compartment.
If you want to reduce work time, you can use the sandblasting service. This method allows you to remove remnants of old paint, as well as clean parts from rust and dirt. If you don’t want to pay for sandblasting, you can make the device yourself. The main thing is that there is a compressor in the garage.
As a rule, high-quality sandblasting cleans parts very well. The only thing you need to remember is that during such work it is necessary to seal the engine holes so that the abrasive does not get inside. To do this, you can use masking tape to seal all the holes.
More serious defects in the form of corrosion areas must be sanded separately. This work can be done either manually (with medium-grit sandpaper) or using a grinding wheel. As for applying putty and further sanding the putty surfaces, as well as using a primer before painting, this approach is not often used when painting an engine.
However, if such actions have been performed, then the parts and all holes must be blown out with air from the compressor. This will remove all particles from hard-to-reach cavities, channels, etc.
Also, before painting, repeated and more thorough sealing of the holes is necessary, since paint should not get there. If the holes have threads, then you need to screw the corresponding bolts or studs into these places. In those holes where there are no threads, wooden “chops” are carefully inserted or similar plugs are made.
As a last resort, you can use tape again. If this is not done, then after painting the cylinder block, head and other parts, the paint will get into the holes, and after it dries, there is a high probability of clogging various channels.
How to paint a valve cover?
It is better to remove the valve cover and then paint it, but you can do without removing it.
To remove the cover, you need to remove the spark plug wires and unscrew the cover fastenings. You will need to pry up the valve cover with a flat-head screwdriver, first from one edge, then from the other. It may be necessary to apply force to break the gasket seal. If the gasket is rubber, the cover will come off easily. The sealant will then need to be restored. After removing the valve cover, it is better to cover the top of the engine with polyethylene or a clean rag so that nothing gets in there. Once removed, place the valve cover on a clean surface.
The valve cover is made of aluminum and covered with a protective coating that may be partially destroyed.
It is better to remove it with paint remover (see the article on paint removal, which describes in detail the use of remover). Spray or spread the remover until the old coating is saturated. Give the remover at least 10 minutes to work. Next, use a wire brush to remove any remaining coating. After removing the paint, rinse the surface of the valve cover generously with water and wipe dry with a towel. Preparation for painting is very important. Any missed, poorly prepared area will cause the paint to peel off. In addition to cleaning, you need to treat the surface with red Scotch-Brite. Paint removal helps to easily remove the old coating.
To ensure that all oil contaminants are removed, saturate the surface of the valve cover with solvent. Spray the solvent and let it sit for 10 minutes. Then you need to wipe off the solvent and thoroughly wipe the surface with a degreaser. It is necessary to close all holes where paint and primer should not get in. Use masking tape for this.
Now you can move on to priming and painting. It is better not to paint under the scorching rays of the sun, but to do it in the shade or indoors. To paint, the valve cover must be placed on a hard, clean place; it is better that it rises slightly. You want all sides of the lid to be easy to paint.
It is better to apply a special high-temperature epoxy primer (Engine Enamel Gray Primer) to the aluminum valve cover. This will greatly increase the adhesion of the subsequent coat of paint by spraying 2 thin coats 10-15 minutes apart.
After the primer has dried for 30 minutes, begin painting.
Apply the paint in thin layers, with intermediate drying between layers for 5–10 minutes. It may be necessary to apply up to 4-5 coats, depending on the hiding power of the paint. For better shine, the paint can be varnished. The first layer is a special primer, then layers of paint.
After painting and drying, the valve cover must be replaced and screwed. If sealant was installed, new sealant must be used to ensure a tight and airtight connection. If you install an old rubber gasket, you need to clean it and coat it with a thin layer of oil.
You need to be careful not to overtighten the bolts and tighten the valve cover so that the gasket fits snugly. If the valve cover bolts are loose or too tight, oil may leak through the gasket.
How to prepare paint for painting the engine and valve cover with your own hands
To make your own paint, you need to mix several components, maintaining the proportions. For example, the composition of silver paint includes solvent, epoxy paint and varnish (drying oil), and aluminum powder.
Please note: Rules for choosing paint and processing the muffler
For proper preparation, the ratio of the latter with drying oil is 2 to 5. The solvent is added to the desired consistency. The finished composition can be used to treat areas on the engine where there is practically no heating.
On the remaining surface exposed to heat, it is better to apply heat-resistant compounds that can withstand up to 400°C. And to treat the exhaust manifold, you need a mixture that does not lose its properties even at 1100°C. For colder areas, you can choose a different composition, after consulting with a specialist.
How to paint a plastic engine casing?
The plastic casing is painted in the same way as all other engine parts. The difference lies in the use of a special primer for plastic (adhesion enhancer).
It is better to remove the casing from the engine. This will make it easier to prepare and paint. The plastic must be thoroughly washed and treated with gray Scotch-Brite and dried. If there are elements that cannot be painted, they need to be covered with masking tape. Before painting, you need to degrease the surface.
The first layer you need to spray is primer for plastic (one thin layer is enough), wait 10-15 minutes, then spray regular primer, then paint, then varnish (if the paint requires varnish).
Source