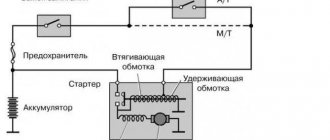
The need to improve the engine starting system of some models of VAZ cars produced before the early 2000s was identified during operation, which showed relatively low operational reliability of the control circuit for turning the starter on and off. To solve this problem, the designers went to some extent to complicate the circuit solutions and introduced a forced limitation on the operating time of this unit. The modification consisted of introducing an auxiliary relay into the starting circuit, the contacts of which can withstand a current of 50 A and forcibly break the circuit 12 seconds after the starter starts operating
.
How to install an additional starter relay on a VAZ 2110 Assembly diagram
Until the year 2003, the ignition system of VAZ cars was one of the weakest points in the on-board electrical network. This is due to the generation of high voltage and the inability to unload the starter unit. To solve the problem of a weak starter, vehicle designers and developers adopted the VAZ 2110 auxiliary starter relay.
What exactly does installing an additional relay do?
- Relieves the contact group in the ignition switch
- Prevents sintering of starter contacts due to prolonged ignition
- Opens the electrical circuit when the engine has already started and the ignition key is in the “starter” position
Of course, the additional starter relay for the VAZ 2110 (diagram in the photo) is not a panacea for all the ills of on-board electronics. Experienced experts recommend modernizing the electrical network comprehensively. The list of work may include installation of capacitors, installation of an auxiliary battery, replacement of mass, and other, other work.
To this we can add that not even all the latest modifications of this car have a wiring diagram for the VAZ 2110 starter. If the on-board electrical circuit is well balanced and designed, then an additional relay is not needed at all.
How to check for the presence of an additional relay in the starter?
If you depress the gas pedal and turn the key to the “starter” position, after 12 seconds the starter will automatically turn off. This activates the cylinder purging mode. That is, fuel is not supplied to the working chamber.
If the starter does not turn off, then the relay is missing. In this case, it is advisable to install an additional VAZ 2110 starter relay (the connection diagram is noted in the instructions for this review).
What is needed to install an additional relay?
- Relay with 4 contacts with current strength from 30 to 40 (A). The most commonly used is the 30 amp relay.
- Reinforcement with a cross-section around 1.5 (mm2)
- Flat female connectors (5 pcs)
- Flat male connector (1 pc)
- Ring connectors for 6 and 8 (mm)
When the materials are prepared, let's look at how to connect the starter relay. By the way, there is an intelligible video on this topic:
Please note that car dealerships sell ready-to-install additional relay kits. This set contains both good wire and high-quality ring connectors
All elements are marked and made in the same style. It is easy and pleasant to work with such materials yourself.
Improvement of the starter blocking relay and contact protection in VAZ 2110, 2111, 2112
Based on the operating experience of VAZ (first the classic 21011, then 2111), it has long been noticed that very often the ignition switch contacts (ISC) that control the starter solenoid relay burn out and become unusable. The current through these contacts reaches 20A. We have to replace the entire contact group. So I decided to fix this problem immediately on a new machine, without waiting for it to appear. A common option is to install an additional relay in the power circuit and control it with 3Z contacts. Everything is simple, but as it turned out, this is not at all necessary, because... you can use an existing starter interlock relay, retaining its original functions completely. As analysis of the circuit showed, the starter lock relay is powered from +12V from the main relay of the ECU, and the minus is supplied from pin 50 of the ECU (January 7.2), and is controlled by an “open collector” key in the ECU. When the ignition is turned on, the ECU sets the “low level” (shorts to ground) on contact 86 of the locking relay. The relay is activated, completing the circuit between the ignition switch and the starter solenoid relay. When you turn the key ZZ from pin “50”, 12V is supplied to the starter solenoid relay. As soon as the engine starts, the ECU removes the signal from pin 86 of the relay, it is de-energized, breaking the circuit, and thereby blocking the starter. The blocking works! Fig. 1 shows a fragment of the circuit in the basic version, and Fig. 2 - after modification. As you can see, the changes are minimal: 1. The pink-black wire is disconnected from the pin. "85" and isolated; 2. The power wire from the ignition switch is connected to pin. “85” relay 3. Added a power wire (30 cm) from the connector from which the CB is powered (2-pin connector to the front harness) - with a cross-section of at least 4 mm2, connected to the pin. 87 relays. Now the power circuit is controlled through a relay, and the current through the 3Z contacts does not exceed 0.2A. The modification was completed in 2009. Pros: minimal alterations, no need for another relay, saving space in the control unit Cons: not found in 6 years.
This is interesting: How to adjust the carburetor on a trimmer
Below is a fragment of the diagram.
Well, the final option. Starter relay and additional relay for “unloading” the ignition switch contacts
The final diagram with unloading of the lock contacts along the ignition circuit
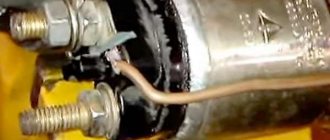
But that's not all! The next weak point: the power contacts of the starter solenoid relay. Due to high currents, they receive an even greater electrical load, and as a result, erosion. You can protect them from sparking, especially when opening, by connecting one powerful diode in parallel with the starter and the control winding of the solenoid relay. The essence of the modification is to suppress the “self-induced emf” - the main cause of contact burnout. I used fairly common diodes, KD2998 - high pulsed and direct current, and they had sufficient quantities on hand. You can use rectifier diodes from computer power supplies rated for a forward current of at least 30A. The diodes are placed in 2 layers of heat shrink and connected directly to the starter on short wires. The connection diagram is shown.
Elimination of voltage drop in VAZ 2110, 2111, 2112
Much has been written about the rather unsuccessful and dim rear lights of the VAZ-2111. This problem becomes especially relevant
Looking for a starter relay
If any devices on the car fail, then first of all you need to check the relay or fuse in the circuit. Therefore, as soon as after diagnosing them, it will be possible to draw conclusions about the problems as a whole.
As you know, on a VAZ-2112, even when the engine is not running, all devices are powered directly from the battery, and when it is started, the energy comes from the generator. And when the current in the circuit increases or there is a short circuit, the fuse simply blows, and a relay is provided for the most powerful devices.
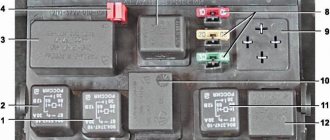
Photo of the starter relay in the fuse box
In order to get to the fuse and relay box in which the starter relay is installed, you need to find the cover on the underside of the dashboard. Then, press the locking button and fold it down.
The starter relay is marked with a red arrow
Replacing the old element with a new one must be done in the reverse order of removal.
Please note that in various vehicle configurations, additional relays can be installed on top of the unit, which are intended for certain groups of devices. But the starter relay is always installed second, on the right
What is a relay for?
Replacing the starter relay on a VAZ 2110
The traction relay ensures that the drive gear starts. Starting occurs in clutch with the gear mechanism of the crankshaft flywheel. It also provides power to the starter motor. When the starter is turned on, energy begins to be transferred from the battery. The energy path passes through the ignition switch.
This is interesting: The starter spins for a long time when starting
VAZ 2110 additional starter relay
In this way, power is supplied to each winding of the traction relay. Windings have two types:
As soon as the process of closing the relay contacts takes place, the retractor winding is turned off. A working relay has a voltage limit that should not exceed 8 V. The temperature during this process should not exceed 25 degrees Celsius. If the voltage when starting the relay exceeds this indicator, then you should pay attention to the drive and the traction relay itself. They may become damaged or stop working. The traction relay can be visually examined. Perhaps the breakdown can be seen with the naked eye, but the starter will have to be dismantled and disassembled.
VAZ 2110 starter lock relay
Malfunction of the starter retractor relay
So, if, nevertheless, a shadow of suspicion after checking the ignition switch, battery, and also the starter switching relay falls on the starter itself, it is necessary to dismantle it for further “inspection”. Although it is possible to check the functionality of the starter and relay even before removal.
Using a screwdriver, you need to close the two contact bolts located on the back side of the assembly. In this way, voltage is supplied directly to the starter windings, bypassing the solenoid relay itself. In the case of rotation of the starter itself, the cause of the breakdown is really in the retractor. If the relay is working properly, after turning the key in the ignition switch, it will click, but the starter will still refuse to turn.
The operating principle of the solenoid relay itself is based on the phenomenon of electromagnetism. When voltage is applied to the coils of the solenoid relay, it attracts the armature. The latter pushes out the Bendix gear until it engages with the flywheel crown. At the same time, the contacts through which voltage is supplied to the windings of the starter motor are closed. Interestingly, all the above processes are carried out simultaneously. And the loss of any of them will cause the starter to become inoperable.
It is worth noting the main reasons why the starter solenoid relay malfunctions:
- Long service life of materials, and as a result their destruction;
- Burnout of the so-called nickels - contact plates located inside the retractor relay;
- Failure of the winding of the relay itself or the starter.
In any case, to correct the malfunction of the starter solenoid relay, it is necessary to dismantle it. Of course, you will first need to remove the starter itself from the car engine.
It is worth noting that in the vast majority of cases, the solenoid relay is made non-removable. In this way, manufacturers are trying to increase its reliability and extend its service life. Therefore, in such cases, the only way out of the situation can be a complete replacement of the solenoid relay with a new unit. This procedure is not at all complicated and will take a little time even for a novice motorist.
If the solenoid relay installed on the starter still has a collapsible design, then you can try to restore it. To do this you will need to remove it from the starter and disassemble it.
Basic starter malfunctions
The traction relay does not operate after the ignition key has been turned, and the armature does not rotate.
In this situation, it may be due to the following possible problems:
- the battery is broken or discharged, the solution to this problem is to buy a new battery or charge it;
- the positive contacts have oxidized - you just need to clean them;
- it happens that an interturn short circuit occurs on the winding of the traction relay - to correct this situation, you need to install a new relay;
- the circuit that powers the traction relay has broken - you need to check the wires for integrity, and whether they have become disconnected from the circuit?
- contacts “30” and “50” do not close - you just need to change the contact part of the ignition switch;
- The traction relay armature does not work well - you need to remove it and disassemble it, there may be a lubrication problem.
After turning the key, the starter does not start, the armature rotates slowly, and a click is heard in the traction relay.
This situation may arise due to previously similar situations:
- the battery is discharged or disconnected - you need to check and correct the situation;
- the winding of the traction relay is shorted or broken - you also just need to change the relay;
- the ends of the wires have seriously succumbed to oxidation - they need to be checked and cleaned, starting with the battery.
After turning the key, the starter armature spins, but the flywheel does not spin.
This situation arose due to the fact that:
- the freewheel is slipping - you need to diagnose the starter at the stand and replace the clutch if it is faulty;
- The gears on the gearbox are worn out - you just need to replace them.
The starter makes a lot of noise when the armature is spinning.
This problem arose because:
- The liners on the armature or drive shaft bearings have served their service life - you just need to replace the parts that have failed;
- the starter is not secured properly, and the cover could have broken - you just need to secure it or change it;
- the gears on the gearbox, flywheel crown or drive have failed - you just need to change them, or immediately replace the non-functioning parts entirely.
- the gear is constantly engaged with the flywheel; if the clutch on the shaft splines is stuck, it is possible that the armature of the traction relay is stuck - to solve this problem, you need to lubricate the splines with oil. And if the traction relay is stuck, then you need to either change it or use certain methods to get rid of the jam.
Sequence of work performed when replacing a relay
First, you should turn off the power from the battery, because while the electrical circuit is connected, it is prohibited to dismantle or disassemble the starter, otherwise a short circuit may occur and you will burn all the wiring.
- Before disassembling, thoroughly clean the starter from dust and dirt so that dirt does not get inside.
- Unscrew the brush assembly nut from the traction relay bolt and remove the contact from the bolt.
- We unscrew the coupling screws securing the relay to ground and pull it out.
- Unscrew the nuts from the end and divide it into two parts
- We take out the old core and replace it with a new one
- Reassemble everything in reverse order and install the retractor
- We check the entire mechanism and install it on the car
After all the parts have been installed on the car, we check them again for functionality, to be sure that we did everything correctly and everything is working properly for us.
VAZ starter connection diagram
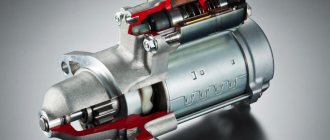
VAZ cars use starters, which are a DC electric motor with an electromagnetic two-winding traction relay and a roller freewheel clutch (overrunning clutch). Starters are used to provide the minimum crankshaft speed required to start the engine. The starter is powered in starting mode from the battery.
The starter relay is connected to the power circuit, thereby closing and opening the circuit, depending on how fast the crankshaft rotates. The starter design on all cars is the same, with only minor design differences. If you understand how the starter works in one car, you can easily figure it out in another.
To prevent a starter failure from taking you by surprise, let’s look at how to replace it yourself. But first, read the theory and study all the options for starter connection diagrams for different models of VAZ cars, collected by the editors of 2 Schemes.ru from familiar auto electricians.
Purpose and principle of operation of the solenoid relay
On most vehicles, the retractor is mounted in the same unit with the starter, and is designed to control the freewheel. At the end of the clutch there is a gear that rotates the engine flywheel at the time of starting, but during its operation such rotation is not allowed, as it leads to breakdown of the starter or on-board electrical network if the starter starts working in generator mode.
To do this, the retractor extends the clutch only when it is necessary to start the engine, after which it returns to its original position, removing the gear from engagement with the flywheel. The peculiarity of the solenoid relay is that the starter can only operate when it is activated. This is done to prevent tooth fractures when the rotating gears of the clutch and flywheel meet.
Inside the relay there is a coil with an armature, which is acted upon by current after the circuit is closed. The magnetic field that arises around the coil moves the armature towards it, compressing the return spring and pushing the lever, which moves the freewheel. When the engine starts, the electrical circuit of the coil opens, the magnetic field force disappears, and the return spring pushes the armature with the clutch to its original position.
What is a relay
Fuses and relays VAZ 2107. Electrical faults
The first relay was invented in the mid-19th century by Joseph Henry, the same Henry after whom we now name units of inductance. Nowadays, relays are quite common, they can mainly be found in cars, various household tools, in production, etc.
A relay is an electromagnetic switch designed for switching in electrical circuits when the input value changes abruptly. At first glance it sounds scary, but I assure you, it only seems so. A relay is an ordinary switch, only it is triggered by any influence, for example, when a current appears in the circuit (an abrupt change in the input value). The circuit through which the current flows, causing the relay to operate, is called the control circuit, and the circuit through which the relay switches is called the controlled circuit. A relay is a kind of amplifier because it requires minimum values of current and voltage to operate, despite the fact that in the controlled circuit these values can be much higher.
There are DC and AC relays. AC relays operate when a current of a certain frequency flows. Structurally, they are almost no different from DC relays, except that the core is made of sheets of electrical steel in order to reduce losses due to hysteresis and eddy currents. DC relays are either neutral or polarized. Neutral ones are triggered when current flows in any direction, and polarized ones only in one specific direction.
Device
The simplest relay is a mechanism consisting of an armature. electromagnet and contacts. The principle of operation is that when current passes through an electromagnet, an electromagnetic force is generated in it, which causes the armature to connect the contacts. After the current in the circuit becomes less than the required value, the spring returns the armature to its place, thereby separating the contacts. The relay itself may contain other elements, such as a resistor, which serves to more clearly turn on the relay, or a capacitor that is connected in parallel to the contacts and serves to reduce interference and sparking.
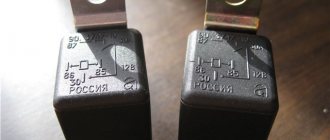
For a clear example, consider a domestically produced automotive relay 75.3777-10.
External inspection does not present anything interesting, except for the relay diagram, which actually shows which winding contacts (86 and 85 are the control circuit) and which are connected. (87 and 88 controlled circuit). The maximum current for which the relay is designed (30A) and the rated voltage at which it operates (12V) are also indicated. By the way, the manufacturer indicates that the winding current should not exceed 0.2A. As you can see, the current in the control circuit (winding) is significantly less than the current in the controlled circuit.
After carefully studying the exterior, let's move on to the most interesting part - the insides.
As you have seen for yourself, the relay is a fairly simple, but very useful device.
Thank you for your attention
VR device
As it becomes clear, it is the VR that directs the bendix into engagement with the flywheel crown. The entire cycle of actions is based on the principles of electromagnetism.
The VR design includes a housing, an armature, a magnetic winding, contacts and a spring.
The anchor sits inside a hollow tube (core). The armature winding is a coil of wire. It enters the tube after an electromagnetic field is created in the bobbin. If the current stops flowing, the armature moves unhindered.
The magnet inside the VR is a pair of coils. One of them performs the function of a retracting element, the other - purely retaining functions. The first retractor coil is connected directly to the electric motor and the control terminal, and the second, the holding coil, is integrated with the fuselage and the control terminal.
It is clear that a magnetic field appears in the coil after a pulse arrives at the control terminal from the battery. As mentioned above, the armature begins its work from this, compresses the spring and at the same moment the bendix is pushed out, which engages with the flywheel crown.
After the engine starts, the power to the starter stops, and the armature returns to the initial exposure under the influence of the spring. The contacts open and the bendix disengages from the flywheel.
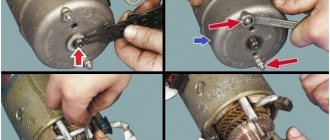
Removing and replacing the starter relay
Before disassembling the starter relay, it must be removed along with the starter itself. In some cars this can be done from the hood side. Sequence for removing the starter relay:
- put the car on the parking brake;
- disconnect the negative terminal of the car battery;
- provide access to the starter;
- remove the conductors connected to the starter located on the relay;
- unscrew the three (usually) starter mounting bolts;
- remove the starter;
- unscrew the screws holding the starter relay to the housing (usually also 3, located at the end of the relay);
- Carefully disassemble the starter relay while holding the plug.
The starter relay is installed and connected in the reverse order. Before connecting the starter to the car, it is necessary to check the serviceability on a stand, or simply on a table, by connecting a battery to it and briefly applying positive voltage from the battery to the solenoid relay. After this, the starter is installed in its regular place and connected to the on-board equipment.
How to get to the relay
The process of dismantling the relay and the starter itself cannot be called complicated. Even a person who has never had to repair their car before can handle it.
Scheme
To remove the retractor, follow the instructions:
- First, turn off the power to the car; to do this, remove the negative terminal from the battery.
- Look a little to the left and below the battery, next to the gearbox you will see the starter you are looking for. To get to it you will need to remove the air filter.
- There are several wires leading to the retractor, disconnect them.
- The tip of the power wire is secured with a nut; it can be easily removed with a 13 mm wrench.
- The starter is secured with nuts of larger diameter - they are unscrewed with a 15mm wrench. The hardest thing to unscrew is the lower fastening.
- The lower terminal of the retractor is also secured with a nut; remove it and disconnect the wires. Using a size 8 wrench, remove the remaining fasteners and pull out the relay.
Installing a new retractor is quite simple - follow these instructions in reverse order. You can also watch the video, which describes in detail all the stages of dismantling the relay. It will help you understand more clearly how to find the relay and replace it with a new one.
Checking with the starter removed using a multimeter
This test of the solenoid relay allows you to very accurately perform internal diagnostics and determine the condition of the windings and contacts. Dismantling the starter, depending on the make of the car, is carried out in various ways. For VAZ 2110, this procedure is carried out from below from the pit. Before unscrewing the fasteners, remove the wires (it is better to mark the terminals so as not to confuse them during assembly); you may need to remove the crankcase protection.
How to check the starter solenoid relay
As mentioned above, the operation of the solenoid relay, as well as the starter itself, is based on the principle of electromagnetism. When voltage is applied to the windings, the relay acts on the armature. This, in turn, changes the position of the Bendix gear so that it engages with the flywheel ring. At the same time, the contacts close, providing voltage to the starter windings. In order for the car engine to start, all this must happen very quickly. If at least one of the elements does not work correctly, you will not be able to start the car.
To check the starter relay, you do not need to remove this element from the car. Experts advise closing the contact bolts located on the back of the relay using a piece of wire or metal.
As a result of this, you will ensure the supply of current to the starter windings. If this caused the starter to rotate, you can conclude that the starter is working normally, and the problem lies in the relay itself.
If the retractor clicks and the starter does not turn, this indicates that the relay is probably working, and the cause of the breakdown must be looked for directly in the starter.
Some design features
The part in question consists of the following elements:
- Steel electric motor. Its purpose is to remove heat. In addition, it is characterized by water-repellent characteristics. This circumstance ensures that there is a situation in which you can wash the engine without any fear. Water will not be able to penetrate current-carrying parts, and therefore will not cause harm.
- The housing is the location of the solenoid relay. The flywheel and gear are fixed using its lever. This ensures that torque is transmitted. Copper contacts are connected to the core. They transmit voltage from the battery.
- The anchor is the attachment point for the commutator elements, windings, and gears.
- When the car is started, the flywheel is connected to the starter via a bendix. As soon as the car starts, all elements return to their original position.
- The brushes are fixed with holders and allow them to be quickly replaced if necessary.
The starter is fully functional thanks to the presence of two relays. They should be clearly distinguished from each other. The first element is used to turn on the starter. The second device is a pull-in relay. It is located directly on the starter. For VAZ 2110, the starter relay is of great importance for the operation of the tens.
This device is intended for the following purposes:
- Thanks to it, after starting the engine, the gear returns to its original position.
- The energy required by the starter motor and the electromagnetic relay is redistributed.
- The bendix gear is fed.
- Thanks to the device, all parts work synchronously when the engine starts.
It should be said that this part fails quite often, so the VAZ 2110 starter relay needs to be replaced. But getting to it is not so easy. In this case, you will need to disassemble the starter itself.
Signs of relay failure and their causes
The relay fails due to mechanical wear and jamming, burning of contacts, breaks in current-carrying circuits. The following indicates a malfunction of this unit:
- when trying to start the engine, the starter spins without turning the engine crankshaft;
- an attempt to start the engine is accompanied by a characteristic click without rotation of the starter, or the starter does not develop the speed required for starting;
- After the engine starts running, the starter does not turn off and again operates with a characteristic high-pitched sound.
Reasons for starter relay failure:
- breaking the current transmission circuits to the pull-in and holding windings;
- the return spring has weakened;
- burnt contacts;
- the winding is damaged;
- destruction of the hull.
VAZ 2101 starter connection diagram
- starter;
- holding winding of traction relay;
- ignition switch;
- generator VAZ 2101;
- fuse box;
- pull-in winding of the traction relay;
- accumulator battery.
Under normal loads, the current generated by the starter is 150 A. When heavy loads occur, for example in winter, the resulting current can reach 500 A. This is a serious test for this electrical unit, so it is not recommended to keep the key on the start for more than 10 seconds, and repeated starting attempts must be made with a break of at least a minute.
How to make a start button instead of an ignition key in a car with your own hands
In older cars, often the wires from the starter itself are connected directly to contacts inside the contact group, which close when the ignition key is turned. When the starter is activated, a very large amount of energy is consumed, which means a large current flows (the contacts strike a spark). Over time, a burnt deposit forms on the contacts or they completely burn out, no longer providing reliable contact. Newer vehicles have a separate relay that closes the starter contacts when the ignition key is turned.
The main advantages of using a relay in the starter power circuit:
- Such a system is more reliable, since the relay is designed for high currents and lives much longer. - The relay can always be replaced - The contact group behind the ignition key works for a very long time, since it turns on only the relay that takes the main load.
Regardless of whether your starter is turned on by a relay or directly by a contact group, all operations to connect the starter are still performed by turning the key.
First you need to determine which contacts are responsible for the start and connect them to the start button.
To do this, you need to disassemble the plastic protection under the steering wheel of your car. Very often, a connector with all the necessary wires is connected to the contact group of the key well at the back. There should be locking tabs on both sides of this connector. You need to press on them and pull out the connector.
Installation process
- We prepare the wiring. We crimp the connectors.
- The new VAZ 2110 starter relay must be mounted under the hood in a place so that it is definitely not flooded with water from puddles and rain. Many specialists install the relay on the stud of the washer reservoir.
- We bring the wire from the relay to the starter and connect it to the place of the red wire (it is with the “dad”). This is the connection point for the traction relay. This way we energized the coil of the new relay.
- We put a new wire with an 8 (mm) ring connector onto the positive terminal of the starter and tighten it tightly with a bolt. This wire goes to pin 87 in the new relay. I hope the VAZ 2110 starter connection diagram is clear to everyone.
- From the new relay on pin 30 we pull a wire with a “female” connector to the starter, to the place where the traction relay is connected.
- We connect the lead from pin 85 on the new relay to ground.
- We cover all wiring with a corrugated sleeve and thoroughly insulate it so that the wiring and contacts are not exposed to moisture.
- We do a test drive.
That's it, the additional VAZ 2110 starter relay (diagram attached) has been successfully installed.
Starter diagram VAZ 2108, 2109, 21099
Electric current enters the starter circuit from terminal “30” of the generator. Next, through block Ш8 (Х8) of the mounting block (pins 5,6), block Ш1 (Х1) - pink wire, to the ignition switch. The driver turns the key in the ignition to turn on the starter (position 2) and closes the contacts (50, 30). After which the ignition switch, through the red wire, current flows to block Ш1 (X1) of the mounting block (pin 8), then block Ш5 (Х5) (pin 4), starter switch relay (pin 85). The relay is activated. From terminal “30” of the start relay, current flows to terminal “50” of the starter traction relay, energizing its winding. The traction relay is activated, activating the starter.
The starter electrical circuit uses a switching relay 111.3747-10.
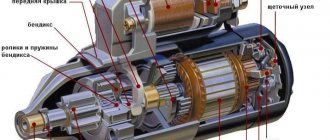
- Screw securing the protective cap.
- Protective cap.
- Retaining half ring.
- Rear cover fastening nut.
- Back cover.
- Brush springs.
- Brush guides (outer part).
- Brushes.
- Stator.
- Anchor.
- Drive lever.
- Drive unit.
- Restriction ring.
- Retaining ring.
- Drive lever axis.
- Screws for securing the traction relay.
- Front cover.
- Plastic sealing ring for the lid.
- Tie rods.
- Rubber plug.
- Traction relay core.
- Return spring.
- O-ring for traction relay.
- Traction relay.
- Sealing washer.
- Adjusting washers.
Where is the Starter Relay for VAZ 2115 Injector?
Starter relay VAZ 2115
The most likely cause of starter failure is electrical damage.
When the engine starts unsuccessfully for the first time, most people look for a problem in the starter, which is not always correct. The operation of the starter directly depends on the relay, contact connections and the availability of the necessary electricity. To check if the electric starter is working, it can be powered directly from the battery by connecting the positive wire from the terminal.
This way, you can start the engine to continue driving with a faulty starter power system. Many people try to find a VAZ 2115 starter relay in a car, where there is a component of the car’s electronic system, but the search does not produce results. This happens for the simple reason of its absence.
Perhaps the VAZ manufacturer is already equipping the new series of cars with a starter relay, but previous versions of these cars were manufactured without it. This is not critical, since the cost is negligible and the benefits are immediately visible; you can install it yourself, without the skills of an electrician.
Why is it necessary to install an additional VAZ 2115 starter relay? An additional relay ensures more stable operation of the starter with additional electrical equipment. Thus, the starter works even with a weakly charged battery, the backlight on and at low temperatures.
VAZ 2115 does not turn the starter, fix the problem
Installing the relay
for
starter
and 2110.
Do not confuse the VAZ 2115 starter relay with the repeater, which is located on the starter and performs the function of pushing and retracting the mechanism for engaging the starter teeth and the flywheel. Thus, a normal car start. Retractor malfunctions are expressed in the following manifestations:
- After the engine has started successfully, you may hear the starter whirring.
- Turn the ignition key with a simple click, the starter does not work
- try to start the engine with the key
Such manifestations are characterized by a violation of the starter and replacement of the relay.
Repair of the retractor starting relay VAZ 2115
First remove the starter by unscrewing the mounting bolts and before disconnecting the battery. Remember. The main thing. ensure the safety of repairs. After successfully removing the electric starter, you need to unscrew the solenoid relay bolts.
In most cases, the relay relay will not fold, but it can still be repaired. To do this, you will need a screwdriver, a soldering iron, a copper winding, a core, which, if you look, may turn out to be intact. In this case, you don't need to change it.
When soldering the wire with a soldering iron, you can move on to expanding the coil body. By separating the coil, you can determine its damage and replace the necessary elements.
Read the same, other reviews
- Replacing a VAZ 2114 cluster starter
The most common breakdowns
One of the most common problems is the loosening of the power cable tip. Simply tighten it and check all the other nuts at the same time. The second popular reason for the failure of this unit is considered to be oxidation of contacts. If you notice a problem at an early stage, then just clean the contacts and the unit will work properly. If cleaning doesn't help, you will need to replace them.
Scheme
Oxide often occurs on the winding, making it impossible to block. You can try to clean the winding, but experienced motorists recommend replacing the relay immediately, this way you will be able to drive your car much longer without problems.
Another probable cause of problems with starting the engine is a break in the retractor power supply circuit. You will have to find them and fix the problem. Find the broken wires and place new ones in their place. Upon completion of work, check the relay power circuit again. One way to check the functionality of a disassembled relay is to check it with an ohmmeter. To do this, you need to place the probes of the device on the turns of two windings.
Sometimes it is enough to replace the anchor. This must be done when it operates slowly or is idle. These signs directly indicate a malfunction of the anchor itself. It will be quite difficult for a car enthusiast with little experience to identify problems with this element.
Repairing a relay is more expensive than replacing it, so the easiest way is to immediately replace the faulty part. This will save your time, because it is unknown whether repairs, which are often very labor-intensive, will help. An attempt to restore the unit is fraught with danger - if the relay is repaired incorrectly, you can be left without a car for a long time, since engine starting will be blocked. In this case, you will need to carry out more complex repairs, which cannot be carried out without the participation of specialists.
Communities VAZ Repair and Modification Blog Installing an additional starter relay
I read on the forums, I’m not the only one with a similar problem, maybe it will help someone else. I suffered for a long time with the problem of starting the car while it was hot. The problem was especially noticeable in the summer. At times the starter simply refused to turn, you turn the key, there’s a click, the instrument panel dims a little and that’s it... the starter is silent. The problem is not constant, this can happen once a week, maybe every other day. You can drive the car all day, turn it off, start it, everything works, and at some inopportune moment it stops responding to the key. You stop at a gas station or at a store and that’s it. You start running with a screwdriver into the hood and closing the contacts on the retractor, and it starts with a screwdriver. If you start it with a screwdriver and then turn it off, you can start it with the key without any problems and again you can drive for an unknown number of days or hours, etc. To. The problem is floating and intermittent. During the search for the cause, I went through the starter, changed the brushes, installed a new retractor (but in vain), cleaned all the contacts, cleaned the contact group of the ignition switch. I did all this in stages because After each action, the problem seems to disappear, but only for a while, you drive for a month and again it’s unexpected. As I found out, the problem arose at the slightest drain of the battery, like turning on a Carlson, when the engine warms up or listening to music with the engine off. After that, there was simply not enough voltage through the ignition switch, somewhere there was apparently a voltage loss from bad contacts, perhaps the contact group needed to be changed and not cleaned (but it’s not a fact that a new one would have lasted a long time). I decided to install a starter relay and at the same time I made additional mass .I bought a 4-pin 30A relay, five female connectors, one male connector and a couple of ring connectors.
I took out the BPVL 4.0 cable from the cradles. I made it in three layers, crimped it and tinned the contacts and covered everything on top with corrugation. I threw the mass onto the generator and onto the starter. I also replaced the original mass of the body, it was too flimsy.
What could indicate a malfunction?
Various “symptoms” can signal a problem.
If the winding wears out, it may simply burn out. At the same time, at the moment when the car is started, the driver will hear clicks. Despite this, the car still does not want to start. In addition, a breakdown may indicate the following symptoms:
- The driver does not hear the usual click.
- No contact.
- When you turn the ignition switch for the first time, the car does not want to start.
- The car starts running unintentionally.