The timing chain is the driving device for the engine's gas distribution mechanism. It is used to synchronize the operation of the crankshaft and camshaft on VAZ-2101-2107 vehicles, as well as on some foreign-made vehicles.
Replacing the timing chain and replacing the VAZ-2106 chain tensioner, as well as other “classics”, is a responsible procedure. Errors in its implementation cause serious malfunctions of the power unit.
WHY does the timing chain wear out?
Natural wear and tear
Consequences: As a result of natural wear and untimely replacement of the timing belt, the timing chain is stretched, which can lead to serious engine malfunctions.
Destruction of timing stars
Consequences: Due to the destruction and wear of the timing sprockets, there is a high probability that the chain will jump (in some cases, the timing chain will fall off), which leads to unstable engine operation and breakdown.
Incorrect installation
Consequences: Incorrect installation of the timing chain is immediately noticeable through unstable engine operation; if you delay repairing the timing drive system and replacing the timing chain for a long time, this can lead to serious technical malfunctions of the engine and costly repairs.
Low quality spare parts
Consequences: Using low-quality spare parts is an unsafe lottery; at best, it means a short operational period, and at worst, it means the chain will fly off and costly repairs of the internal combustion engine.
Tensioner wear
Consequences: As a result of tensioner wear, chain tension decreases and accelerated wear of the timing drive system occurs. If the tensioner is completely destroyed, the chain will jump, which will lead to serious engine damage and major repairs.
Wear of timing chain guides
Consequences: As a result of wear of the damper, the degree of chain tension decreases, and accelerated wear of the timing drive system occurs.
When is it time to change your engine chain drive?
During everyday use of the car, the chain mechanism is subjected to the most stress and wears out. Therefore, it is important to know when it fails in order to make a replacement in time.
Each timing chain has a certain service life, during which, according to general rules, replacement is not necessary. However, there are cases when the chain drive (CD) suddenly breaks or some of the links become unusable, causing unstable operation of the entire engine.
In order not to miss this moment, it is recommended to periodically check the CPU for mechanical damage, and always before long trips over long distances, and replace it strictly according to the technical data and recommendations of the car manufacturer.
At the same time, it is worth noting that experienced car enthusiasts are able to detect a breakdown of the CPU mechanism by ear.
So, for a faulty CPU, the following sounds are characteristic when the engine is turned on:
- the appearance of a characteristic ringing noise in the area of the chain mechanism;
- periodic knocking and knocking sounds coming from the area where the CPU is located in the engine;
- shots and micro-explosions in the exhaust system and muffler.
If you need to check the performance of the CPU visually in order to accurately verify its (mal)functionality, then you need to open the engine.
HOW TO UNDERSTAND THAT THE TIMING DRIVE IS FAULTY
Unstable engine operation
Causes: Unstable engine operation occurs as a result of the chain being displaced from the marks (jumping)
Solution: Replacement of the timing drive kit (chain, gears, tensioner, dampers)
Extraneous sounds from under the front timing cover
Reasons: When the timing chain tension is weak, a characteristic knock appears under the timing cover
Solution: Check the tensioner (if necessary, replace the timing chain tensioner), replace the timing chain
Engine won't start
Causes: If the engine does not start due to a faulty timing system, most likely the timing chain has fallen off or broken, resulting in serious engine damage
Solution: Engine overhaul
Replacing the chain tensioner in Toyota through the eyes and hands of car enthusiasts
- Replacing the tensioner is not a panacea “I wondered how the chain should behave after replacing the tensioner? The other day I made a replacement on my Toyota, and strange sounds appeared when I pressed the accelerator pedal. Then the noise disappeared, but I'm wondering if everything is okay? A friend says there will be problems with the timing belt. After all, if the chain is stretched, the new tensioner will quickly fail.”
- Changing the tensioner yourself is scary
“I picked up a tensioner for Toyota today.” But I'm afraid to replace it myself. I've read reviews from car owners who change them themselves. Often, after such intervention, even more problems appear. I studied the instructions on how to make the replacement, everything is shown there, how to and how not to change, but I didn’t see the difference.” - There's nothing scary
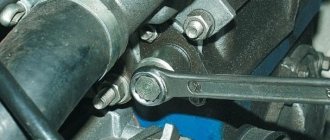
Replacing the tensioner in a Toyota with your own hands is easy; even a beginner can do it. Personally, I installed the tensioner on the hook and applied sealant to the gasket. I installed the part, tightened the bolts, took a 19mm socket and a ratchet. Then he rotated the crankshaft in the opposite direction to rotation. I heard a click - it was the tensioner that jumped out. Then he scrolled again, but this time in the direction of rotation. Everything is perfectly audible and understandable.”We recommend
“Replacing an automatic transmission in a Toyota Corolla: at a service center or on your own” Read more
- I replaced it, but nothing is clear
“I encountered the following problem when replacing the tensioner in a Toyota: I turn the crankshaft clockwise, but I don’t know how many turns I need to make. I clicked twice in 1 revolution; when I started the engine, there were 2-3 more clicks. That is, when the crankshaft rotates clockwise, it tensions the chain when starting the engine?When I started the car another time, nothing clicked. I turned the crankshaft - nothing. There are no noises, everything seems to be fine.”
TO REPLACE THE TIMING CHAIN
Timely replacement of the timing chain and timing drive system will ensure uninterrupted operation of the car and save you from expensive engine repairs. It is recommended to make a one-time replacement of the entire timing drive system, since the rollers, sprockets, tensioner and dampers wear out over time; worn sprockets can also jam or accelerate chain wear.
The cost of the timing chain and other spare parts of the timing drive system directly depends on the manufacturer and the quality of their manufacture; you should not skimp on such an important engine part; low-quality spare parts wear out faster and can break at the most inopportune moment, leading to engine breakdown and expensive repairs.
Proper selection of spare parts is the key to high-quality repairs and a long service life of the vehicle.
TOR MOTORS car service specialists will select the necessary spare parts for replacing the timing belt, as well as carry out a complete repair. Always in stock:
- Timing Drive System Kits
- Timing tensioners
- Timing chain dampers
- Timing stars
- Timing chains
Diagnostics of the condition of the chain and tensioner
There are two ways to determine the degree of chain wear: visual and computer. Computer inspection is mainly used for engines where inspection is physically inaccessible. The main and most accurate method is to read the number of locking protrusions on the tensioner plunger.
| Diagnostics takes about 30 minutes and costs 1000 rubles. Based on the reading results, a conclusion is drawn about the further progress of work. A detailed description of how to carry out diagnostics using the example of the 1.8 TSI Skoda Octavia engine is here. |
WHY TOR MOTORS?
Our company is a leader in engine repair and timing chain replacement in the Krasnodar region. We are so confident in the quality of our repairs that we offer a 6 month guarantee. We also have a large warehouse of spare parts for engine repairs and timing chain replacement.
The masters of the TOR MOTORS service center in Krasnodar will perform high-quality repairs of the internal combustion engine and replace the timing chain, taking into account the regulations of the manufacturer's plant. Our service center has all the necessary equipment to diagnose and service gasoline and diesel power units. All work is carried out in boxes with modern equipment.
Untimely replacement of the timing chain can lead to serious damage to the internal combustion engine and expensive repairs: the cost of engine repairs can reach up to 250,000 rubles. To find out the cost of replacing the timing chain on your car, make an appointment for diagnostics.
We change timing chains on 42 car brands
Why is a chain needed in the operation of the gas distribution mechanism of an internal combustion engine?
The gas distribution mechanism provides the intake and exhaust of working fuel in an internal combustion engine using a valve system. The engine camshaft, rotating, creates continuous operation of the timing valves, thereby starting the entire internal combustion process.
You need to know this: What is a timing belt and when should it be changed?
Camshaft rotation The shaft is ensured by the operation of the crankshaft, the torque from which is transmitted using a chain or toothed belt.
At the ends of both shafts there are sprocket gears on which the chain or belt is attached; they create the tension and the required rotation speed.
Schedule and frequency of work
The timing chain, like any other car part, has its own working life. Its duration is affected by operating conditions, the model and brand of the machine and the type of motor. On average, the life of a chain is 60 thousand kilometers or two years, but you should not delay too much with changing parts. There is also no need to wait until it wears out to such an extent that it begins to fall apart. Many modern vehicle models have integrated sensors that notify the driver when a given part is due to be replaced.
The timing chain also has its own service life. After 100 thousand kilometers, it stretches out and sags. The reason for this is wear of the hinge joints and an increase in the distance between them. As a result, despite normal compression, adjusted valves and serviceable ignition and power systems, the power unit operates intermittently at idle. The chain jumps one or two teeth. This can provoke either a simple stop of the power unit, or jamming of the valves and a major overhaul of the engine.
Spare parts for changing the timing drive
To upgrade the timing unit on the Korean Kia Rio, you will need the following consumables:
Timing chain kit
- current KiaRio 3 timing chain (the original comes with article number 24321-2B200);
- tensioner (catalog number of the original part 24410-2B700);
- pump DOLZ (number H226);
- pump housing gasket (25124-2B000);
- guide strips - right (24420-2B000) and left (24431-2B000);
- cover gasket with spark plug well rings (22441-2B000);
- cylinder block o-ring (21142-2B000);
- front crankshaft oil seal (21421-2B020);
- Abro gasket sealant (13ABR).
Here is an extensive list, since the work of replacing the chain is labor intensive and allows you to update multiple worker nodes at the same time. If some parts are suitable for the car owner in terms of resources and degree of wear, they cannot be changed.
After replacing the timing chain or belt, the engine does not start: main causes and troubleshooting
Before starting diagnostics of the timing drive, it is recommended to immediately check the proper operation of the ignition system, the condition of the battery, the correct connection of power system elements, electronic ECM sensors, etc. If no malfunctions are identified, then we move on to the gas distribution mechanism drive.
In the list of the main reasons why the car does not start after replacing the timing belt or problems appeared after the chain drive was changed, experts identify possible damage to the valve mechanism and misaligned valve timing as a result of improper installation.
Similar faults can occur on different car models.
First of all, it is important to know that errors when replacing the timing drive can lead not only to failures, but also to subsequent breakdowns. You also need to separately take into account the reason why you had to change the drive elements
The engine does not start: the valve is bent
For example, if the timing belt breaks, then the belt is changed and the car does not start, then bending of the valves after such a break should not be ruled out. The fact is that at the moment the belt breaks, the valve timing on many engines is disrupted, the camshaft does not rotate, and the timing belt stops working. This means that the valves no longer open and close in a timely manner.
However, the pistons in the cylinders still continue to move. It often happens that the valves remain open, causing the pistons to hit them. In this case, the valves become bent, and the pistons can also be damaged. At the same time, replacing the timing belt alone cannot solve this problem, since the engine requires separate expensive repairs.
Note that previously, internal combustion engine manufacturers took into account the risk of bending and machined special recesses for the valves on the piston surface. At the same time, the presence of such grooves reduces engine power, as a result of which such a solution was abandoned on modern engines.
The valves can be checked in the field by removing the valve covers, after which the engine is cranked by hand and the operation of the mechanism is assessed. If it is noticed that any valve is not working, then it is bent. Please note that such a check is just a superficial diagnosis, since even with bent valves the mechanism will often visually work normally.
For this reason, to accurately assess the condition of the valves, it is preferable to remove the cylinder head. Once removed, bent valves can be quickly identified and the procedure for replacing them can begin immediately.
Please note that it is recommended to replace all valves immediately with new ones, and not replace only bent ones. Also, during the installation process, it is necessary to grind in the valves.
Timing belt replacement performed incorrectly
Unqualified replacement of the timing drive often leads to the fact that after replacing the timing chain, the engine does not start well, a belt-driven motor does not start, etc. The problem is that the timing belt may not be aligned and the phases may not match.
The result is that the operation of the gas distribution mechanism and the ignition system is not synchronized, the mixture is compressed in one cylinder, and a spark is formed in the other.
For these reasons, an important point is the exact match of the marks on the pulleys
During the replacement process, special attention should be paid to the position of the marks. The engine is set to the end position of the compression stroke in the first cylinder, after which the position of the marks is checked
If a deviation is noticed, then this is the reason the engine refuses to start. In such a situation, the timing belt must be removed and the camshaft pulley must be correctly aligned taking into account the marks. Let us add that many car models also have a special mark on the flywheel, which must also match.
It should be noted that the flywheel is usually dirty. In many cases, this makes the tag difficult to detect. As practice shows, on the flywheel, in addition to the mark that needs to be set, there may also be characteristic indentations-pits. If you mistakenly replace the mark with the edge of the hole, which is visually similar to the mark, then the engine will not start.
Also, during the process of replacing the timing drive on cars with a carburetor, the ignition may go wrong. Quite often, a violation of the spark supply to the cylinders can be determined by installing the spark plug armor wire of the first cylinder to the fourth, and the wires from the fourth cylinder to the first. In some cases, after such a rearrangement, the engine can be started.
If such a failure is detected, then the gas distribution mechanism drive must be set correctly, and if necessary, additional adjustments and adjustments to the ignition system are also made.
Signs of a timing belt malfunction
External signs of timing belt malfunction and their causes are presented below.
- A metallic knock is heard in the cylinder head at low and medium engine speeds. Engine power decreases. Such malfunctions arise due to a violation of the thermal clearance of the valves and wear of the bearings and “cams” of the shaft, which serves as a distributor.
- A metallic knock in the cylinder head comes from a cold engine. Engine power is also reduced. This occurs due to a malfunction of the hydraulic compensators.
- Noise is heard in the camshaft drive area. Popping sounds are heard from the muffler. Look for the cause either in wear of the drive chain or in wear of the drive toothed pulley.
- The exhaust gases released have an uncharacteristic blue tint. The oil level in the engine crankcase is reduced. Engine power is reduced. This occurs due to wear of oil seals, valve stems and guide bushings. The reason may also lie in damage to the crank mechanism.
- Ringing metallic sounds are heard when the car accelerates. The engine runs intermittently. This occurs due to the formation and deposition of carbon deposits on the valves, malfunction of the crank mechanism and the use of fuel of questionable quality.
- Short-term dips occur in the operation of a cold engine. Engine power decreases. The engine overheats very quickly and severely. The reason is a decrease in elasticity, breakage and hanging of valves.
The most serious timing fault is stuck valves.
This often leads to breakdown of the entire engine. Fortunately, this malfunction in modern cars is taken into account and is quite rare. Malfunctions of hydraulic compensators deserve a separate topic. If you use too thin or dirty thick oil, the hydraulic compensator stops eliminating gaps in the timing belt. This leads to jamming of the hydraulic compensators.
Violation of the thermal clearance on engines with adjustable clearance can occur not only due to bearing wear, but also due to incorrect clearance adjustment.
Diagnosing timing belt faults is difficult due to the similarity of their symptoms. Diagnostics is most often carried out by removing the cylinder head cover and inspecting the structural elements.
Additionally, we recommend reading our specialist’s article, which describes how the timing belt is replaced.
Detailed description of replacing the timing drive
Replacing the Kia Rio 3 timing chain involves using the following tools:
- keys (14, 17, 19 and 22);
- taken (14, 17 and 19);
- flat head screwdrivers;
- extension;
- crank.
- The procedure for replacing parts of the main operating units of the Kia Rio 3, which are responsible for gas distribution, will be presented below.
Removing the cylinder head cover (and installing it during assembly)
Replacing the Kia Rio 3 chain involves removing the cylinder head cover. First, the ignition coils are removed. There are four of them on the car. First, unscrew the bolts securing the spark plug well cover. Each coil is secured with a bolt that needs to be loosened. The parts are removed one by one from the wells, the blocks with wiring are disconnected from them, then we remove the two pipes responsible for ventilation of the engine crankcase (fastened with clamps with lugs).
Removing the cylinder block cover
The cylinder head cover is screwed on with sixteen bolts, which must be unscrewed strictly according to the diagram. When tightening bolts after assembly, the tightening torque must be observed. For the first pass it should be equal to 3.9-5.9 N * m, for the second - 7.8-9.8 N * m.
When disassembling the cover, it is necessary to remove the gasket from its grooves, and also remove the gasket from the spark plug wells. Dry the remaining oil, install new seals in place of the old ones and carry out final assembly (after replacing worn-out parts).
Setting the first piston to top dead center
The piston of the first cylinder must reach the TDC (top dead center) position so that the valve timing is not disturbed later.
Putting shortcuts
TDC is set according to the marks on the camshaft sprockets. The mark on the crankshaft pulley should coincide with the “0” mark on the protrusion of the cover behind which the chain is located. Otherwise the engine will not work properly. You also need to focus on the location of the serrations on the sprockets (they should be flush with the surface of the cylinder head and opposite each other). The Kia Rio 3 chain, if it is installed incorrectly after replacement, must be removed and the crankshaft turned to the desired position.
Drain the oil and remove the right support bracket
On Kia Rio 3 cars, the timing belt and its parts are changed when the oil is drained and the right engine mount bracket is removed. A container is required to drain the contents of the lubrication system.
Drain the oil
First, unscrew the oil filler cap, then (after preliminary cleaning with a brush and rag) unscrew and completely unscrew the drain plug in the oil pan. The oil will be hot, so precautions must be taken.
Disassembling the bracket is carried out as follows:
- A support is placed under the crankcase (through a wooden plate).
- The mounting bolt and two nuts on the studs are unscrewed.
- The nut holding the bracket in the holder is loose. The part has been removed.
Remove the attachment belt and tensioner
The Kia Rio 3 belt is necessary for the operation of additional equipment (for example, a generator). The belt can be easily removed; to do this, just lift the car, remove the right wheel and turn the tensioner pulley counterclockwise with a wrench. A loose belt can be easily removed from the tensioner pulley. Signs of wear, oil and cracks indicate the need to replace the belt.
The next step is to release the power steering pump (unscrew the top bolt) and move it to the side. Then the belt tensioner mounting bolt (has a reverse thread) is unscrewed. The fastenings of the lower bracket of the right support are also unscrewed. The part has been removed. The intermediate roller is released. The procedure is necessary to get to the cover behind which the Kia Rio 3 distribution network is located.
Dismantling the pump
Replacing the timing chain on a Kia Rio 3 involves removing the water pump. To disassemble, you need to unscrew the fasteners that prevent rotation of the pump pulley. The pump is attached to the power unit with five bolts. They are turned upside down, the body is pushed out and removed from the seat.
Disassemble the pump
The old gasket must be removed and replaced.
Removing the crankshaft pulley and generator
The next step when replacing the timing belt on a Kia Rio 3 is to remove the crankshaft pulley and disassemble the generator. The pulley must be held with a special device. It is fixed in the center with a bolt.
Crankshaft pulley
As for the generator, work must be done with the wire disconnected from the negative terminal. At the first stage, the wiring blocking is disabled. Then the protective cap is removed and the power cord is released. The lower and upper bolts securing the generator are unscrewed. The device has been completely removed.
Replacing the crankshaft oil seal
The crankshaft oil seal is installed in a cover behind which the chain is hidden. It will need to be replaced. You can remove the part with a flat screwdriver. But if this does not work, screws are screwed into the cage and the Kia Rio 3 crankshaft oil seal is pulled out with pliers.
Crankshaft oil seal
The new oil seal is lubricated with oil (the working edge entering the engine is processed). Crimping is done with a suitable mandrel (you can use a head from the kit) using a hammer.
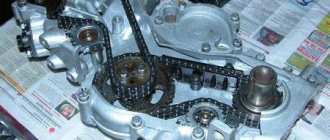
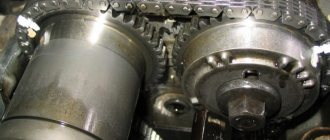
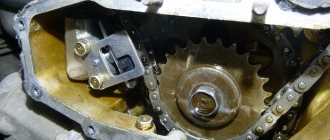
Removing the timing cover and timing chain of Kia Rio 3
The cover is secured with fourteen bolts that must be unscrewed. The Kia Rio 3 timing chain tensioner has a shoe that is retracted and secured with a pin. The tensioner fastener is unscrewed and the part is removed to the side. The exhaust camshaft is turned clockwise so that the chain can be removed from the sprockets. Replacing a chain involves installing a new part according to the instructions.
Sources
- https://autonissancar.ru/kia/rio/rio-3/menyaem-tsep-grm-kia-rio-3
- https://g-light-auto.ru/shhetki-stekloochistitelya/remen-ili-tsep-grm-kia-rio-3-zamena.html
- https://artikul-cars.ru/kia/rio-3-sedan-2011-2015/engine/cep
- https://www.autoservice-korean.ru/inf/rio/zamena-remna-grm/
- https://kiarioinfo.ru/ekspluataciya/zamenit-remen-ili-cep-grm.html
- https://rad-star.ru/pressroom/articles/zamena-tsepi-na-grm/
- https://razborov.net/kia/kogda-menyat-cep-grm-kia-rio-3.html
Does chain wear depend on the type of engine - turbocharged, naturally aspirated, in-line or V-twin?
Depends. The main load on the timing chain falls at the start, when it needs to move all the shafts. The larger the volume and size of the motor, the correspondingly greater the load and the higher the wear. V-twin engines have two cylinder heads, which also add load. But the presence of turbocharging has almost no effect on the timing belt, since the turbine starts working when the engine is already running. Except that due to the lower compression ratio on turbo engines, starting is a little easier. Actually, at a uniform speed, the wear of both the chain and the belt is minimal.
Do not forget that the timing mechanism consists of more than just a chain. Various plastic elements of the timing belt structure also wear out, since they also resist the temperature and chemical environment, and therefore also require replacement.
How to determine system wear and when replacement is needed
During operation, the timing chain is in a bent position and constantly heats up. Operating in such conditions causes stretching and sagging. This also affects strength. Gradually, the chain begins to sag due to wear of the hinge joints of the links, and as a result, it begins to jump one or two teeth. The cause of malfunctions and breakage is depreciation wear.
Timing chain slack due to wear
It is virtually impossible to detect chain wear visually or by the sound it makes. In addition, it is also impossible to conduct such an inspection with the naked eye. Therefore, when replacing a part, only its resource is taken into account. The service life depends on the vehicle’s power unit, operating conditions and mileage.
The manufacturer gives recommendations on changing the timing belt for each power unit. However, in practice, the actual service life of the chain can differ significantly and vary depending on the conditions of use of the car. The manufacturer makes its recommendations based on tests carried out at the test site, and everyday driving in city mode destroys the part much faster. In addition, replacement times may also change depending on climatic conditions, which is typical for Russia.
Possible faults
In the family of cars of the Volzhsky Automobile Plant, which are called “classics”, the timing drive is made in a chain version. The service life of a good double-row chain is longer than any belt, and the chain is better protected from any external influences while being inside the engine block. Instant stretching of the chain is excluded; moreover, the chain, unlike the belt, will not slip when the engine is suddenly revved up. The downside: noise and some cumbersomeness are not so noticeable when operating the VAZ-2107.
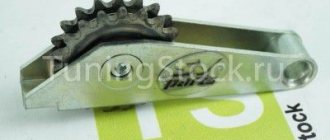
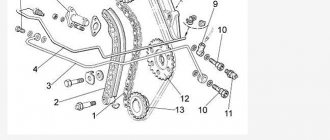
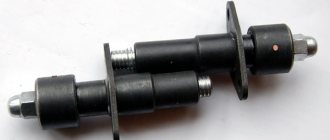
Tensioner diagram: 1 — camshaft sprocket; 2 - timing chain; 3 — chain damper; 4 — auxiliary drive sprocket; 5 — crankshaft sprocket; 6 — tensioner shoe; 7 — hydraulic chain tensioner; 8 - oil line fitting
Unfortunately, the chain also does not last forever. It also stretches - only not immediately, but gradually, as a result of the metal fingers working against the gear teeth.
Signs that the chain has stretched and you need to diagnose the degree of its serviceability are the following:
If the chain has only slightly stretched, you can compensate for the sag by increasing the pressure with the tensioner shoe. When the limit of adjustments has been exhausted, only replacing the chain can help.
Chain stretch even of a few millimeters is noticeable to the eye
In order to better understand when you can get by with little blood and when to change the chain, the manufacturer has established the approximate resource for normal operation of the timing drive, which on the “seven” is 60 thousand kilometers. When used beyond the specified period, there is a risk of not just stretching, but the teeth jumping during operation, or the unit breaking.
Jumping the chain by one or two gear teeth leads to a violation of the valve timing, which will affect malfunctions even at idle speed, not to mention operation under load.
An open circuit leads to the disappearance of synchronization between the revolutions of the crankshaft and camshaft. As a result, the pistons, by inertia, hit the valves open inside the cylinder, deform themselves and deform them. The pistons of the “seven” engine have special grooves that protect the valves from bending. But if the engine has undergone a major overhaul with the replacement of the cylinder-piston group, the pistons may well not have recesses, then the risk of serious damage increases. Monitor the drive chain and change it on time.
Timing chain: how it works and how to change the chain
There are no more or less critical elements in the engine, but there is still a mechanism, the incorrect assembly of which can only be discovered after installation is completed and an attempt is made to start the engine. Yes, just an attempt - and often unsuccessful. “Jump” the master by one tooth or make a mistake in at least one mark - and hello, disassembly! It’s good if the timing belt drive is a belt drive - and if it’s a chain that is enclosed in a housing and covered with a lid... But first things first.
Why is a timing drive needed?
For those who came here to educate themselves, we will traditionally give a brief excursion into the structure and purpose of the gas distribution mechanism. In short, its role is to provide communication between the opening/closing of valves and the movement of the piston (and with it the crankshaft), for which it is necessary to connect the crankshaft to the camshaft. In terms of the gear ratio, the connection is rigid: it is always 2 to 1 - that is, for every two revolutions of the crankshaft there is one revolution of the camshaft.
In general, the timing drive ensures compliance with the valve timing. Does it sound scary? In reality, everything is not so scary, it’s enough to start with the basics. The engines we are considering are four-stroke, that is, during their operation four strokes are constantly performed: start - compression - power stroke - exhaust. Phases are the valve opening moments expressed in the angle of rotation of the crankshaft. Yes, that’s what they write: the opening angle of the intake valve is 12 degrees before TDC (top dead center, where the piston stops before going down). This means that the valve will begin to open thanks to the camshaft cam when the piston slightly reaches TDC. A little - these are the same 12 degrees of crankshaft rotation. Another 12 degrees clockwise and the piston is at TDC. Well, the phases are a schedule for the opening of valves.
If the engine is equipped with phase shifters (for example, the VANOS system from BMW), then the angles of these phases can change. But valve opening angles do not exist in isolation from the system: the fuel injection system and ignition system (if the engine is gasoline) operate depending on them. It turns out that if the master made a mistake when installing the timing drive, the valve will begin to open not at 12 degrees, but, for example, at 14, but the injection and ignition will work in the hope that everything is correct. Valves that are opened and closed at the wrong time will result in unstable engine operation, and if the “jump” turns out to be significant, then the meeting of the valve with the piston will not be far away.
Articles / Practice The evolution of the timing belt: gears, chain and belt Do you like to argue on the automotive topic and argue which is better - a belt or a chain? Nothing makes a debater more important than knowing the history of the development of mechanisms! We will tell you how... 87497 3 15 12/26/2014
What types of drives are there?
There are several ways to connect the crankshaft to the camshaft: belt, chain, gear and combined (this is exactly our case). In general, from their descriptions everything is already clear - at least with the first three. In the latter case, gear and chain types are often combined.
Each type of drive has its own advantages and disadvantages. The belt is easy to maintain and relatively inexpensive, the chain is more reliable than the belt, but requires lubrication, the gears are almost perfect, but their weight and installation during assembly are a living hell. They combine different types if it is necessary to achieve the required result for less money.
What can go wrong?
Of course, for different types of timing drives, possible malfunctions and breakdowns also differ. Let's look at them all in order - and start with the belt. The very first and main problem here is the wear of the belt itself, expressed in its fraying and stretching. Belt teeth can also be sheared. Well, the second “weak link”, of course, is the tensioner and intermediate rollers. They, like the belt, wear out and therefore often require replacement along with the belt. At the same time, when replacing the belt, the wear of the teeth on the toothed pulleys of the camshaft drive is also checked.
If the timing belt is driven by a chain, then there are two main types of problems: either the chain is stretched, or the teeth of the sprockets are worn out, or both occur. The most common option is the first. If the chain is replaced, the tensioner shoe and damper are replaced along with it. These two parts are necessary to align the operation of the chain. After all, the belt is elastic in itself and stretches due to its own elasticity. The chain is devoid of such properties - and therefore, so that during operation and changes in speed the chain links do not bite, a damper is installed, which is a metal plate with a plastic working part, against which (of course, not without lubrication) the chain “rubs”. Well, for constant tension of the chain, a tensioner and a shoe are installed, similar to a damper, but fixed only on one side (to be able to move it).
The chain is metal and therefore requires constant lubrication. Because of this, it is located in the housing and covered with a metal lid. In some cases (as in ours), to improve its lubrication, an oil sprayer is additionally installed, aimed directly at the chain.
If we talk about maintainability - that is, the ease of replacing the chain, then everything depends on the manufacturer. For example, Mercedes “loves” to replace the chain without removing the cover - moreover, they indicate this as the main replacement method. This method has been known since the appearance of the chain and consists of the following: using a special device, the chain is opened - the axle is pulled out from one link. It turns out there are two ends, to one of which a link of the new chain is connected, after which the crankshaft is turned and the new chain is “driven” in a circle, while at the same time pulling out the old chain. Then all that remains is to connect the links of the new chain with an axle. It seems to be nothing complicated - but only in theory. In fact, the probability of “jumping a tooth” with this method is the highest.
The regulated service life of the chain also completely depends on the manufacturer: someone says that after 150 thousand kilometers it is time to change it, and someone (Honda, for example) declares its service life “for the entire service life of the engine.” It happens that to improve performance, the drive is divided into two circuits (Hyundai loves this). In this case, replacement will have to be performed exclusively by removing the front cover.
Articles / Practice Timing chain or timing belt - which is better? Perhaps this question is one of the ten most philosophical questions in the automotive industry, along with right-hand drive and left-hand drive, diesel and gasoline, manual and automatic. Finally, we will decompose the d... 228826 26 20 12/30/2014
The timing gear drive is the oldest. Of the obvious advantages, it is worth mentioning that it is free from such diseases as a belt or chain. Nothing in the gears stretches or delaminates, the teeth do not jump, a tensioner is not needed... True, in this case it is necessary to closely monitor the quality of the engine oil - but this is not the most important thing. The main difficulty of the gear drive is that if for some reason it had to be disassembled, then putting it back together while maintaining all the marks will be quite problematic. Moreover, there are engines (for example, 2.5 TDI from Volkswagen) for which it is impossible to assemble the timing drive or check the correct valve timing without a set of special tools! They simply don't have the appropriate markings on the gears. So if you have an engine from this particular concern, and it has a gear drive, then before asking for help from a mechanic, make sure that the latter has a set of special devices - otherwise you will simply get stuck at the station.
Combined drive: it was already indicated above that these are often gears plus a chain. Our “patient” has exactly this scheme. Here, the crankshaft gear drives: the camshaft drive gear, the oil pump, the right and left balancer shafts, the high-pressure fuel pump, the vacuum pump and the power steering pump. However, in order not to add even more bulk, the designers decided that it would be better to connect the camshafts via a chain - then there would be no need to install additional intermediate gears and complicate the life of repairmen. In addition, if necessary, the chain can be replaced in the old-fashioned way that Mercedes-Benz loves. Fortunately, Mitsubishi decided not to disturb the imagination of the craftsmen and carefully marked the relative positions of the gears relative to each other (this will be clearly visible below).
What is good about the described type of drive? The fact is that to transmit rotation to such a quantity of equipment one would have to have a chain several meters long or install several chains (some, however, do this), and this would significantly increase the cost in case of repairs. In addition, gears are still more reliable, and only specific elements can fail, for example, an oil pump or a vacuum pump, and the drive gears themselves only in exceptional cases. As for problems with the chain, replacing it will not be difficult.
What is checked during a major overhaul?
Articles / Practice Overhaul of a Mitsubishi turbodiesel with a mileage of 500 thousand kilometers: cylinder head No one can avoid this. Sooner or later He will knock on your... cylinder head or cylinder block. It is a major engine overhaul. The times of “millionaires” have long since sunk into oblivion, and large-scale... 12831 0 1 09/28/2016
With the belt, everything is very clear: due to its relative simplicity and low cost, the matter is limited to replacing all the parts - the belt and rollers. If the timing drive is chain driven, first measure the length of the chain - sometimes factory manuals provide data on the diameter of the chain wrapped around the sprocket. The sprockets themselves are checked for chips and tooth wear: these parameters are enough to understand whether the chain requires replacement.
If the timing belt is driven by gears, then during repairs the technicians measure the gap in their engagement. Two gears are placed on the shafts, one of them is blocked, an indicator is installed on one tooth of the second and, moving it, the gap is measured. If the wear is excessive, the gears must be replaced, both of them. The teeth are also visually checked for wear and chips: if everything is in order, the gear returns to its place. The combined type of timing drive does not need description - it combines the diagnostics of the types included in it.
Working with the timing drive of Mitsubishi Pajero Wagon
We described the entire biography and characteristics of the engine and model of this specimen in the previous article - let me just remind you that it is 550 thousand kilometers old, and it was “fed” with exceptionally good oil. Having disassembled the engine and dealt with the cylinder head, we proceeded to the timing drive.
When disassembling the mechanism, there were no particularly interesting procedures that deserve description, since there are practically no such crucial moments as with the block head, such as unscrewing the bolts in a certain sequence. The most important thing when disassembling is simply not to lose anything. But for the sake of clarity of information, I will still clarify that the thermostat, water pump (pump), crankshaft pulley, air conditioning compressor and generator had to be dismantled. The rest, as mentioned above, is driven by gears.
1 / 3
2 / 3
3 / 3
Having finished with the above, we unscrewed the mounting bolts and removed the vacuum pump, followed by the power steering pump. After that, after a fair amount of work, we removed the fuel injection pump. Note: this is where the length of the fastening bolts is often not the same, and in order to save yourself from unnecessary double or even triple work, all bolts must be marked. Having removed everything unnecessary, we unscrewed the bolts securing the timing mechanism cover and, with extreme caution (since everything is installed on a sealant), separated the cover from the cylinder block.
Having got to the bottom, we dismantled all the drive elements one by one - the removed cylinder head makes this possible and a much less difficult step. They didn’t even inspect and measure the chain - the mileage left it no chance, and it was immediately sent for replacement. Everything else after removal was spent on washing and subsequent inspection.
And this inspection revealed the amazing ability of all elements to resist wear - no chipping of teeth, no extreme gaps in the gears.
The condition of the teeth and body of the oil pump means that the master and I will remember the oil used for a long time. I repeat: although the pump looks like new, in fact it was just washed!
A special plate is installed between the timing cover and the cylinder block, and it is quite massive. Without going into its insulating and strengthening functions, it was simply sent for cleaning and washing.
But another piece of good news came from checking the diameters of the bearing journals of the balancer shafts - everything turned out to be in order here too. It is not surprising that the ever-present smile of the owner of this “Bolivar” illuminated the service area throughout the entire troubleshooting.
Assembly compared to disassembly left a more vivid impression. First of all, we apply sealant to the surface of that same intermediate plate, place it on the cylinder block and tighten the bolts that secure it.
1 / 4
2 / 4
3 / 4
4 / 4
The main thing here, in fact, is the crankshaft, so we put the gear on its shank first. We put it on the key by hand, then just tap it a little with the handle of a hammer to make sure it is completely seated.
1 / 3
2 / 3
3 / 3
Then we align the marks and install the camshaft drive gear. There is a sprocket on it, on which the camshaft drive chain will be placed.
1 / 3
2 / 3
3 / 3
We mount an oil sprayer on the axis of this gear, which additionally lubricates the chain.
After it there is an intermediate gear, from which the gears of the power steering pump and vacuum pump will rotate.
Having prepared and installed the first balancer shaft, install the intermediate gear between the camshaft gear and the balancer shaft gear. The location of the balancer is extremely important, therefore it is necessary to carefully install the gear, clearly aligning the applied marks. Here, I repeat, a special thank you should be given to the manufacturer - they are clearly visible and make the work much easier.
1 / 2
2 / 2
After that, we try on the chain. It also has marks - painted links. These marks are combined with the marks on the sprockets. Next comes the turn of the oil pump - it was disassembled for inspection.
The second balance shaft passes through the oil pump housing. Why they did this is an interesting question, but we won’t get an answer to it. Well, well, that means it’s like this - we install the drive gear of the balancer and the pump, aligning the marks. The shaft takes up space in the pump housing, and the entire assembly is placed into the cylinder block by the master.
The main parameter of the pump is the gap in the engagement of the teeth of the drive and driven gears - and here, as we remember, there were no problems, and the pump was assembled. True, then for some reason the design idea took a path that was incomprehensible to us.
It is worth noting that before the “capital” a full set of gaskets and seals was purchased, including for the oil pump. Installing this assembly took a lot of time and nerves, since it turned out to be very difficult to align the marks of the pump gear and the crankshaft.
Having finished with this troublesome task, we put the new tensioner shoe and chain guide in place, then finally installed the chain and secured it with a plastic clamp.
Not without some pains, they installed the drive gear for the high-pressure fuel pump - and that’s all! Everything that could be placed under the cover is mounted!
1 / 4
2 / 4
3 / 4
4 / 4
Now it's the turn of the lid. After admiring the cleanliness of its surface, we thoroughly dried it and degreased it, preparing it for installation. A special sealant was first applied to its mating surface. You need to cover the surface with it so that the sealant itself does not get into the holes - in this case, there is a possibility of making a mistake with the tightening torque of the fastening bolts. It’s even worse if the sealant gets into the oil channels: it will immediately clog them, and you can “earn” oil starvation.
1 / 3
2 / 3
3 / 3
After applying the sealant, the cover was placed on the cylinder block and the cover fastening bolts were evenly tightened - not forgetting that the length of the bolts here may vary. Having completed this operation, you can sigh with satisfaction and say that we are done with the timing belt. External elements remained: a new pump, a power steering pump and a vacuum pump - but that, as they say, is a completely different story.
1 / 5
2 / 5
3 / 5
4 / 5
5 / 5
After installing the cylinder head and camshafts, be sure to check that the marks match.
To do this, we turned the crankshaft two full turns and, seeing the painted chain links opposite the marks on the camshaft sprockets, finally exhaled with relief. This check, by the way, is applicable to all types of drives: after complete assembly, you need to turn the crankshaft two full turns, and God forbid, if the marks “float”, it means that the assembly was broken, and you will have to disassemble everything and reassemble it again. In our case, everything turned out to be in order as expected - all that remained was to put in place a new thermostat and generator (they were replaced as a precaution), as well as all the removed attachments.
At this point, the work on reassembling the gas distribution mechanism was completed. In the next part we will tell you about what kind of work the block required - although there, admittedly, everything turned out to be even better.
Survey
Have you ever had to repair the timing belt on your car?
Your voice
Total votes:
How long does a chain last?
It's amazing how many different myths and fairy tales you can learn about the chain:
- The chain is unreliable and stretches up to 100,000 (in fact, the original chain does not expand, but counterfeits and duplicates do).
- In Rio this is a weak point, you need to constantly check the chain tension. (It is not true).
- Easily torn. (Only if on a car before 2013, when accelerating until it turns off, a downshift is accidentally engaged. And this is not a fact).
- Easy to jump. (Isolated cases).
- The chain likes to shake. (No).
In practice, since 2012, ONLY more than one chain has broken, and with one skid - only a few cars.
By modern standards, the chain is eternal. I don’t remember any other machines with a similar resource. Today there are already many Rios with huge tracks and still with a home track. If in numbers, then up to 300 thousand km is not even worth thinking about. About 450 thousand km you can already try out the scheme. We focus on these numbers only if you are sure of the mileage. If the car is purchased, but you should not be guided by the odometer numbers. Today there are many cars with winding paths. Such a service on the market costs only 500 rubles. Twist, usually in the middle of the stroke. Therefore, it is necessary to check the condition of the circuit.