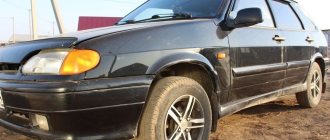
Steering ends: signs of malfunction
Steering ends are replaced when the following symptoms are observed: when driving over uneven surfaces, when accelerating or braking, a knock is felt, the steering wheel begins to vibrate and shake, play is noticed in the steering rod, and kickback is observed in the gas pedal. You can fully check the serviceability of the tips by checking the integrity of the anthers, etc.
Since these parts affect wheel alignment, they must be replaced on time so that the rubber does not start to wear unevenly.
The steering tips are changed on both sides at once (if one breaks, then after a while the other will break too).
When performing repair work to replace VAZ 2114 tips, the following tools are used:
- The key is “19”, the key is “24”, the key is “27”.
- Calipers.
- Press-out puller or mounting tool.
- Hammer.
- Brake fluid or chemical WD-40.
All work related to replacing tips on a VAZ 2114 can be performed either on a lift, or, as in this case, using a jack.
Replacement
Replacing tie rod ends involves performing the following actions:
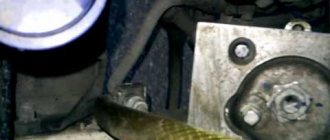
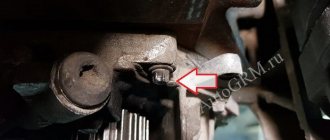
The machine is fixed in a stationary state (using wheel chocks and a hand brake); The car is raised to a height, the wheel is removed from the side where the replacement will be made; The steering wheel is turned as far as possible in the opposite direction to the wheel (left or right, depending on where the repair is being made); Next you need to remove the cotter pin, using a key set to “19”, unscrew the nut securing the tip; Using a special tool, you should press the finger out of the lever. If you don’t have a tool, you can use a hammer or a pry bar; Angles are also measured using a caliper to speed up the installation of wheels; Fixing the position of the coupling with a key set to “24”, you need to unscrew the lock nut with a key set at 27 (clockwise rotation). It is often twisted tightly (perhaps rusted or stuck). To make the nut start to unscrew, you should spray brake fluid or WD-40 on it.
You can also use a hammer - gently tap it on the nut; The steering tip must be unscrewed with a universal key, moving counterclockwise;
- Then a new steering tip is installed on the VAZ 2114, the parts are pre-coated with engine oil;
- Installation is carried out in reverse order.
Such manipulations help eliminate knocking and creaking, as well as improve vehicle control. If after replacement the car's handling is unsatisfactory, and vice versa, it has only worsened, you need to adjust the wheel alignment. Sometimes experts advise performing a comprehensive replacement: replacing the tie rod ends and tie rods, since they have approximately the same service life.
To prevent such malfunctions from occurring, tie rod ends should be replaced at least once a year.
If you find an error, please select a piece of text and press Ctrl+Enter.
source
Peculiarities
VAZ 2114 cars have many innovations compared to 2109, in particular, this concerns electrical wiring.
Whether injector or carburetor, 2114 is in:
- vehicle interior;
- in the engine compartment;
- behind the car body.
It should be noted that carburetor VAZ 2114 were produced only from 1997 to 2000, then they were equipped with carburetors from the VAZ 2108.
But new engines have a more powerful ignition system; accordingly, the electrical control circuit is also characterized by certain features, for example:
- A new harness has appeared for connecting to the terminal. This component sends signals to the spark plugs through high-voltage wires.
- Another harness was added to allow mounting of the switch.
- Additional wiring has appeared to connect the adsorber valve to the injection system controller.
Wiring and equipment diagram 2114
Many VAZ 2114 car owners mistakenly believe that thanks to the ignition module, they don’t have to use a coil. In fact, this device is equipped with two coils and two switches. One of the coils transmits the signal to the first and fourth cylinders, and the second - to the second and third.
The equipment system of VAZ 2114 cars with an injector engine has undergone certain innovations not only due to the addition of new electrical equipment, but also as a result of modernization of the car as a whole:
- it is possible to mount the device;
- you can connect the system;
- VAZ 2114 car owners can install PTF, etc.
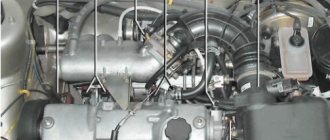
Engine compartment
So that a VAZ 2114 with an injector engine can operate on a lean combustible mixture, the car is equipped with:
- forced gasoline injection system into each individual cylinder;
- connecting an improved ignition system characterized by higher power;
- added ECM - injection engine control system.
BC display on a car dashboard
As is known, to ignite a lean combustible mixture there must be a more powerful spark transmitted through high-voltage explosive wires. A spark is transmitted through the explosives of the VAZ 2114 injector when the piston is located at top dead center. This control scheme was implemented thanks to the installation of the module.
The operating principle of the device is as follows:
- a generator is used to generate alternating electric current;
- the current passes to the control unit, where it is converted into direct current;
- further, the current flows to the windings of the coils in accordance with the control circuit;
- the secondary winding begins to generate high voltage for transmission through high-voltage explosive wires;
- then, through the same high-voltage explosive wires, the voltage passes to the spark plugs.
Salon
As for the interior, the manufacturer replaced the center console in the VAZ 2114, which has certain differences:
- there is no longer a glove compartment in the upper part, it is installed lower;
- was produced;
- an on-board computer appeared in the VAZ 2114.
Diagnostics of resistance with a multimeter
As a result of such changes and the replacement of old elements with new ones in the VAZ 2114 engine, the injector has changed and:
- another harness appeared for connecting the on-board computer;
- a sensor for monitoring the temperature level outside the window has been added, which is mounted in front of the radiator;
- A voltmeter relay has been added.
In addition, another block of wires was added to the control circuit to control the power windows.
Installation Rules
How to replace a wheel with your own hands
Installing the steering wheel is a dismantling process in reverse order. If you can handle the removal, then you will be able to install it.
- Installation begins by transferring the mark from the old steering wheel to the new one. Be extremely precise: the correctness of further control of the machine depends on this. The mark on the new part should be exactly in the same place as on the previous one.
- Put the steering wheel back in place. Make sure that the mark on it and on the front panel match the same as in the case of the old part.
- Replace the central nut and tighten it. If it does not fit tightly in the socket head, insert the wire strands between them. When the nut is in place, remove the wires and secure the nut tightly.
- Replace the steering wheel cover and tighten all screws.
- Make sure the steering wheel is straight. If even a slight displacement is observed, the part will have to be reinstalled.
- Replace the battery terminals and test your new steering wheel by driving it away from major roads. At first, its diameter may be unusual, but the ease of driving should remain the same.
if the nut falls out of the socket, use the wire strands
The most difficult thing in the process of replacing the steering wheel on a VAZ 2114 and 2115 is choosing the right parts
Pay attention to the markings on the steering wheel, covers and, if necessary, adapters. In some cases, it may be necessary to replace the steering column switches
But dismantling and installing a new steering wheel itself will not cause you any particular difficulties if you strictly follow all the instructions.
Lighting in the trunk using the example of Lada Samara
DIY lighting in the trunk using the example of Lada Samara.
Making LED lighting in the trunk using the example of Lada Samara. (Vaz 2114).
The issue of lighting the trunk of a VAZ 2114 car has been very poorly resolved; according to the operating manual, when the side lights are on and the tailgate is open, the trunk is illuminated by license plate lamps. However, the direction of the light does not cover the luggage compartment in the desired manner. So I decided to make forced lighting from a button.
This required:
- button with indication – 1 pc.;
- waterproof LED strip 120 light d/m – 1m;
- wire sections;
- heat-shrink tubing;
- a piece of corrugated tube;
- fuse 5A.
Connection diagram:
What kind of steering wheel can I install?
How to remove the steering wheel on a VAZ 2114 with your own hands and replace the steering rack
If you decide to replace your old steering wheel, it means that its appearance did not suit you in some way. Of course, the issue may be a breakdown or external damage, however, even in this case, you should consider installing third-party models. What if you like one of them much more than the previous steering wheel?
Sports models
When tuning their iron horses, car enthusiasts often look at sports steering wheels. Their appearance helps create the image of a fashionable racing car. The sports steering wheel has a smaller diameter than a regular steering wheel, which significantly improves maneuverability. In addition, it saves space inside the car. And various design options give room for creativity when styling the rest of the interior.
The design of a sports steering wheel can refresh the interior of the car
Unfortunately, sports steering wheel models have as many disadvantages as advantages. It is not as safe in a collision as the stock steering wheel. Its construction uses metal, so upon impact, the risk of serious injury increases. In addition, sports steering wheels are not equipped with airbags.
To install such a steering wheel you will need special adapters. They can be divided into two categories:
Moreover, the latter are much safer, since in the event of an accident they can fold up and absorb part of the energy.
The corrugated adapter for the sports steering wheel can fold upon impact, therefore it is considered injury-proof
Buy a sports steering wheel from trusted stores and from well-known manufacturers. Make sure you have the appropriate certificate. A poor-quality steering wheel, even with a corrugated adapter, can play a cruel joke on you if you get into an accident.
Steering wheels from other VAZ car models
Steering wheels from more modern models of VAZ cars, such as Lada Priora, Kalina or Granta, look prettier and are much more comfortable in the hands. Installing them will not be difficult, provided that you replace not only the steering wheel itself, but also the steering column column. Otherwise, the hub size will not match.
The Lada Kalina steering wheel looks more stylish and presentable than the standard part from a VAZ 2114 or 2115
Read on to learn how to choose the right steering wheel for the VAZ 2114 and VAZ 2115.
What you need to know when installing
Please note that not every steering wheel is suitable for installation on VAZ 2114 and VAZ 2115 cars. You need to choose a steering wheel with the same contact group as the original part
choose a steering wheel with the same contact group as that of the VAZ 2114 and 2115
This is quite easy to do if you plan to install a steering wheel from other VAZ models. For example, a steering wheel with a Europanel from a VAZ 2110 is ideal for these purposes.
If you have chosen a Lada Kalina car, then its steering wheel should be marked 1118–3402010. With it you will also have to install the upper casing marked 2110–3403070–30, as well as the lower casing 2110–3403072–30.
To install a non-standard steering wheel on a VAZ 2114, use the steering shaft housing 2110–12
If you like sports models, then you will have to purchase a special adapter designed for VAZ 2113–2115 cars. This adapter is installed on the steering shaft, and the steering wheel is mounted on top. An adapter model suitable for this purpose is PROSPORT RS-04282.
for installing a sports steering wheel on VAZ 2114 and 2115 cars, the PROSPORT RS-04282 adapter is suitable
What kind of charging should go to the battery from the generator?
It is traditionally believed that 13.5-14.5V should be supplied by the generator to the battery and this is absolutely enough to replenish the battery costs.
It is worth considering that using a battery with a higher power in a car than the manufacturer recommends also requires the installation of a more productive generating device.
It is necessary to take into account the load that the generator must withstand - it is calculated based on the maximum indicators of all electrical appliances and car systems.
Do not forget that the charging current from the energy-generating device will allow you to start the car in the cold season. In order to avoid problems with starting the car, we recommend purchasing generating equipment, the charge current of which will be approximately 10% of the capacity of the power source. That is, for a 100 A/h battery you need a generator that can produce 10 A
Please note that for many cars, 100 amp equipment will operate at its maximum capacity, because the power consumption of the automotive system is in the region of 80 amps. Therefore, the choice of a source generating energy must take into account both the battery capacity and network consumption
VAZ 2114: adjustment and tightening of the steering rack. Replacing tie rod ends
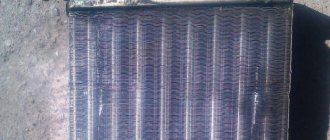
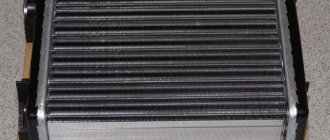
How to change the radiator of a VAZ 2114 (2115) stove with your own hands
The steering rack is an integral part of the steering mechanism with which the car is steered. This device has a long service life and a significant level of reliability. If problems arise with the steering mechanism, sometimes it is enough to tighten the steering rack.
Symptoms of a problem
Competent drivers know that power is transmitted to the wheels through a spur or helical gear, which interacts with the rack. Backlash in the rack is eliminated using pressure springs. When there is a knocking sound from the steering mechanism, which is noticeable when hitting an obstacle or driving over uneven surfaces, it is necessary to adjust the rack.
Some VAZ 2114 drivers do not know that play and creaking in the rack can be eliminated; they believe that it is impossible to tighten the steering rack in a VAZ 2114 car. Adjustment helps to get rid of backlash and ensure high-quality control of the machine. It should be understood that incorrect adjustment of the VAZ rack can lead to poor steering rotation. This is caused by overtightening of the adjusting screw.
Adjustment
The adjustment is performed in this way: you can remove the rack from the vehicle or adjust it on it. The first method is used after repairing the machine, before installation. To simply adjust the rack, the work is done directly on the machine.
To carry out the work, you must have a 17 mm universal octagon and an adjustable wrench. All work related to troubleshooting is carried out on a lift or inspection pit:
- First, the car must be put on the handbrake, some kind of support must be placed on the rear wheels;
- Then you need to lock the steering wheel and turn off the power to the car’s on-board network (remove the negative terminal from the battery);
- Then you need to find the nut with which the steering rack is adjusted. It is located on the opposite side, facing the body, of the rack mounting side. Sometimes it is mistaken for another part;
- First you should wash the bottom of the car. In this case, use a suitable device (Kärcher, for example). This is done in order to clean the nut from a layer of dirt. After cleaning the part from contamination, a wrench is inserted into it to tighten the rack and its position is adjusted. The tool rotates clockwise.
Thus, the adjustment is considered complete. If, after the work done, the control of the car is unsatisfactory, the play and knocking does not disappear, you should check the condition of the steering tips; they may need to be replaced.
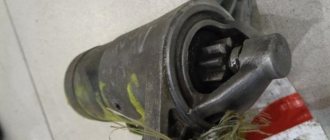
How does a generator work?
When the engine is stopped, the rotor winding is powered. Therefore, there is a magnetic field around it. But since the rotor does not rotate, the field is stationary. Therefore, one of the mandatory operating conditions of the generator set is not met - the magnetic field must be constant and moving. All conditions are met only when the starter begins to spin the crankshaft. In this case, the generator generates voltage supplied to the battery.
But the design feature of any car generator is that it produces alternating current. Moreover, three phases appear at the output, and alternating direct current is needed to power all consumers. Otherwise, all the sub-panel wiring of the VAZ-2114, the diagram of which is presented below, will simply burn out.
To rectify alternating current, a block of semiconductor silicon diodes is used. The design of a generator with three phases at the output is used for one simple reason - there is much less ripple. A capacitor is installed at the output of the rectifier - with its help it is possible to get rid of the entire alternating component of the current.
Replacement procedure
Replacing steering wheels will require not only your hands, but also a couple more to help. So, agree in advance with a friend that he will help you solve the problem of faulty steering.
In addition to a helper and new slats, you will also need a set of tools and materials. Be sure to include in this list:
- Set of wrenches;
- Jack;
- 17mm hex wrench;
- Balloon wrench;
- Bricks or similar materials (to support the front of the car without wheels);
- Puller for steering rods (not necessarily needed, you can do without it);
- Dry rags;
- Litol type lubricant;
- The almighty WD40.
Now you can proceed directly to replacing the steering racks. We strongly recommend that you follow the established procedure for conducting operations.
- Place the car on a level surface. No, a simple floor in your garage is enough, it is not necessary to level it with cement.
- Apply the parking brake to keep the car from moving.
- Raise the car on a jack, place logs or bricks under the front, and then remove the wheels.
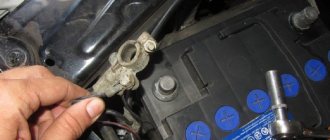
- Remove the negative cable from your battery for safety reasons. Nobody needs electric shocks today.
- On the driver's side inside the passenger compartment, near the pedal block, unscrew the locking fastening bolt of the cardan of your steering shaft.
- Remove the adsorber directly from the engine compartment. You can put it aside for now.
- Remove the cotter pins, which will allow you to then remove the mounting nuts from the tie rod ends.
- Using a rod puller, the ends are removed from the racks. If for some reason the puller is missing, it can be replaced by gentle, successive blows to the tips. Don't damage their threads just by doing this. They usually lend themselves, so many people do without pullers.
- Treat the rack clamp fixing nuts with an anti-rust agent. Now we are talking about the almighty WD40. Wait a while for the composition to be absorbed.
- Using a wrench, unscrew the fastening nuts. Processing with a Vedash should greatly simplify this task for you. There are four nuts in total.
- Remove the rack by pushing it through the passenger side, that is, the right side of your VAZ 2114.
- We recommend replacing the boot at the same time as replacing the racks. Over time and during the period of operation, the steering boots seriously wear out, so it is hardly worth trusting old boots to work with new racks.
- The tips are removed from the slats. At the same time, try to count the number of turns with which the nuts were tightened. This will allow you to fasten them back as close to precision as possible at the reassembly stage and, with peace of mind, go to the service station, where they will adjust the wheel alignment.
- Take your new rail, remove the plugs from it.
- Next, take Litol or a similar lubricating liquid into your hands and fill the body with this composition as much as possible.
- The ends are mounted back onto the rods. Try not to mix up the places of the nodes, although they are different from each other. However, as practice shows, this does not prevent many do-it-yourself repairmen from confusing them.
- The new rail is placed in its rightful place. To do this, the nuts are attached to the studs of the clamps.
- Now you will need your friend, comrade, assistant. Ask him to help guide the shaft drive gear to the seat located directly on the rack housing. The splines must line up exactly. Be sure to check this moment.
- A locking bolt is fixed on the cardan.
- You can safely perform all other work in the reverse order of the dismantling described above. In this case, each thread must be treated with Litol. This event will allow you to more easily deal with disassembling the elements during subsequent repairs. Or it will be a pleasant surprise for the new owner of your VAZ 2114.
Obviously, replacing steering racks yourself is not the most difficult task, but it must be done clearly, consistently and accurately.
Loading …
Other causes of low voltage
A small potential difference in the system is not always associated with a breakdown of the generator or a bad battery
If the diagnosis of these elements does not reveal any problems, then you should pay attention to the following:
- condition of the battery terminals - connection density and oxidation;
- electrical wiring problems - oxidation, violation of its integrity;
- output contacts to electrical appliances;
- correctly selected energy consumers.
Each contact must be tightly adjacent and intact, that is, there must be no formations (for example, sulfation) that will disrupt the flow of current. Incorrect connection of contacts leads to accelerated battery discharge even when the car is not running.
To improve the connection of the elements of the car's electrical system, it is necessary to clean all contacts and restore the integrity of the wires by replacing them or connecting them and wrapping them with insulating tape.
In conclusion, I would like to repeat that stable operation of the car requires constant monitoring of all elements, and the generator should attract special attention. The battery is charged from it and provides electricity to the entire car system
Pay attention to all elements: generator brushes, slip rings, voltage regulator, equipment winding.
The most correct measurements should be carried out when the battery is fully charged and in various modes. Remember that the manufacturer links the characteristics of the generator to the number of engine revolutions - they help produce a certain current.
Detailed video on how to check the generator:
Symptoms of a problem
The first enemy of VAZ 2114 tips is dirt. They are a hinged element, so breaking the integrity of the boot causes solid particles to enter the mechanism. Due to friction, increased wear of the part and destruction of moving elements occurs.
The second “killer” is bad roads. Constant impacts from driving over bumps have an extremely bad effect on the condition of the part: the hinge wears out and vertical play occurs.
Defective parts must be replaced immediately.
People often ask what signs indicate that a tip needs to be changed. It is easy to check their condition. Turn the wheel all the way in one direction and carefully remove dirt from the boot. If breaks are visible or the rubber is cracked over time, the part needs to be replaced. Repeat the operation for the second wheel.
Even if there are no visible integrity problems, insert a pry bar between the rod and the steering knuckle and try to move them relative to each other. There should be no vertical play. If it is present, the part needs to be replaced.
Reasons for part failure
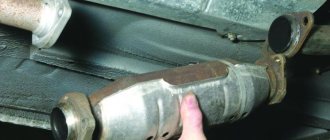
The muffler is affected by several different factors that can lead to failure, these are:
- Atmospheric precipitation, dirt. Precipitation means the occurrence of rain and snow. A mass that periodically falls on a hot pipe causes temperature changes, destroying the strength of the metal. Unfortunately, it will not be possible to protect the muffler in any way; moisture will in any case affect the metal. A smart solution would be to avoid driving through deep puddles and drive slowly on contaminated sections of the road. If the muffler and pipe are dirty, it is necessary to clean it with water (you can use a pressure jet from a hose). After cleaning, it is recommended to start the engine so that any water that has entered the muffler evaporates.
- Condensate. When the unit is idle for a long time, condensation forms in the muffler, causing a corrosive process. This leads to inevitable destruction of the internal parts of the muffler. This happens extremely rarely, but before the trip it is recommended to increase the operating speed by pressing the accelerator several times. The flow of exhaust gases removes moisture from the silencer.
- Chemical influence. As a result of the release of exhaust gas, a lot of toxic chemical particles settle on the walls of the muffler, destroying the metal, and allowing road reagents to get into the muffler.
- Physical influence. Hitting stones and blows from the muffler when driving on roads also lead to a lot of damage.
The chemical and physical effect on the muffler metal is a natural process
It will not be possible to disassemble and clean the muffler, since the container cannot be opened, and only the attention and professionalism of the driver on the road will help protect it from impacts and stones. Diagnosing and eliminating minor damage at the initial stage will help to avoid serious problems in the future.
The influence of various negative factors can lead to damage to the corrugation or other parts of the muffler
Extraneous sounds in the jammer
The causes of various noises and knocks in the muffler can be:
- Fastening the muffler to wire or ties. You should not wrap the muffler on a wire, otherwise rattling and knocking will occur. Use only rubber cushions.
- Foreign objects entering through the exhaust pipe. When driving over rough terrain, deep puddles, or driving in reverse, you should not forget that the exhaust pipe is literally 20 cm from the road surface, which means that various masses and stones can be thrown into the muffler. They often knock and rattle.
- Peeling of burnt metal inside the muffler. As a result of chemical exposure, a layer of soot forms on the walls of the silencer. For this reason, over the years, rattling noises can be heard inside the muffler due to peeling metal.
- Condensation also affects the exhaust sound. Condensation forms as a result of prolonged idling while the engine warms up. Ringing and gurgling are signs of accumulated moisture in the muffler. By increasing the speed several times, the condensate comes out and the signs of the malfunction disappear.
These points are possible factors influencing the exhaust sound of a muffler and are considered the most common.
Repairing and replacing the muffler on a VAZ 2114/2115 is available to every car enthusiast; the only question is confidence and time. It is easy to replace an old part with a new one if you have the tools at hand, but it is recommended to entrust the troubleshooting of the muffler to professionals. Any auto repair shop does this type of work. For little money and a short period of time, your muffler will be repaired. Remember, prevention is a reliable method of treatment!
Installation instructions
When installing an electric power steering, it is necessary to take into account that it will be necessary to replace the steering column of the VAZ 2114 with an “electrically driven column”. To do this, let's start with the wiring. You will need to deal with the pads. There will be no need for any “twists”. There is a terminal in the block that we need to remove and insert into the block in the harness.
We insert the free terminal of the harness exactly into the place where the standard wire was. You don't need a special harness for this. Connect two 4 square wires to the battery. Don't forget to connect a 50A fuse. The “weak point” will connect to the tachometer, speed sensor, ground, K-line and wiring to the warning lamp. Don't forget to check the presence of speedometer and tachometer signals.
- Remove the casing with switches and ignition switch.
- Unscrew the bolt on the rail and remove it. We need to determine how much larger the “native” part is than our new one.
- We install the shaft on the EUR. After this we attach the shaft itself in its place.
- Setting up the wiring. We stretch two cables to the battery from the passenger compartment, preferably through the left wing. To conduct wiring you can:
- First remove the washer fluid reservoir.
- Take a solid wire and drag it through, trying to get to the hood.
- As soon as it appears near the hood, we attach our wires to it.
We pull it out together with our wire.
- We connect the EUR electronics. There is a red connector under the instrument panel with an orange wire in it. It is to this that you need to connect the electric amplifier.
- Similar procedures must be done with the gray wire.
- We connect the power ends. In the battery we connect the pink one is a plus, and the black one is a minus.
The installation is now complete. If you did everything carefully according to the instructions, you will enjoy the ease of driving the VAZ 2114.
Electronic control unit
The wiring diagram of the VAZ-2114 ECU turns out to be very complex, since a large number of sensors are connected to it and
- Housing made of plastic and metal.
- At the heart of the circuit is a microcontroller.
- Sensors are connected to the microcontroller inputs via
- Signal amplifiers, electronic keys and relays are connected to the controller outputs.
The microcontroller allows you to send signals to the actuators, depending on how the engine is operating. The ECU memory contains the algorithm for the operation of all systems. Moreover, the wiring diagram of the VAZ-2114 (injector) 8 valves differs from the V16, since a little more parameters are needed to control the engine.
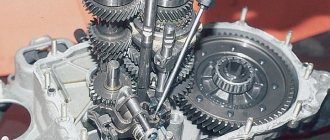
We check the steering rack on a VAZ-2114 with our own hands
Original steering rack made by AvtoVAZ
Before proceeding directly to the verification process, you need to know the design features of the steering rack. Let's look at what elements it consists of:
Steering rack device
1 – protective cap; 2 – steering gear housing; 3 – rack; 4 – drive gear; 5 – inner tie rod end; 6 – spacer sleeve; 7 – tie rod mounting bolt; 8 – connecting plate; 9 – support sleeve; 10 – steering gear support; 11 – rack support sleeve; 12 – protective cover; 13 – clamp; 14 – rack restrictive ring; 15 – sealing ring of the rack stop; 16 – nut; 17 – rack stop; 18 – roller bearing; 19 – ball bearing; 20 – retaining ring; 21 – nut sealing ring; 22 – gear bearing fastening nut; 23 – boot; 24 – lock washer
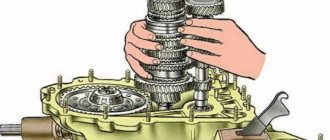
General steering diagram, including racks
Checking the rack
So, to check the steering rack you need to measure the gaps in it.
This can be done either on a removed mechanism (which is even better) or directly on the car. Now let's move on to the process:
Set the mechanism to the middle position. It can be determined by its dimensions - (87±0.25) mm from the gear axis to the rack end. Using a special device, we load the unit to a force P = 500 ± 20 N (51 ± 2 kgf). The distance from the gear axis should be – 84 mm.
The maximum permissible movement of the rack “X”, measured through the relative movement of the pressure punch 1, should not exceed 0.12 mm. After assembly, the torque of the gear in the area of the rack stroke should be in the range of 50–200 N·cm (5.1–20.4 kgf·cm) at a rotation speed of 30 min-1.
Steering rack test diagram
Reasons for failure
When the issue of rack adjustment has been sorted out, you can consider the reasons for its failure:
- Wear. Each car mechanism has its own running life.
- Due to uneven roads, the pressure on the rack is significantly increased.
- Inadmissible acceleration when the wheels are in the extreme position.
- Mechanical damage caused during operation.
Symptoms of failure
Diagnostics of knocks in the rack showed that the bushing was loose.
How can you actually determine that the rail is already on the verge? For this there are direct and indirect indicators. So, let's look at the main ones:
- A knock is the first indicator that the rack needs to be repaired or replaced.
- Biting the steering wheel when turning to one side.
- Steering play to the right or left.
- Vibration when driving on a flat road.
- The camber angle is broken.
When is it time to replace the rack?
Since the steering is involved in driving the car, and is directly responsible for the safety of not only those in the car itself, but also pedestrians outside, it is recommended to diagnose and repair this unit in a timely manner.
So, there are several options for troubleshooting the VAZ-2114 steering rack:
- Adjustment (detected during on-line diagnostics).
- Repair (possible cheap option for restoring the unit).
- Replacement (when it is not possible or advisable to repair the unit).
Checking the presence of grease on the rack and pinion teeth. If there is no lubrication, the teeth will break off.
If the service life is more than 100 thousand km without repair, it is usually recommended to replace the unit. because, as practice shows, repair kits do not save the situation, and after 5-10 thousand km the rack will knock again or leak.
The VAZ-2114 steering rack must be checked regularly. It is recommended to do this operation with in-line maintenance.
If a car enthusiast is not able to determine the malfunction, then you should not skimp and contact a car service, because not only the life of the driver, but also those around him depends on it.
Experienced car enthusiast. I have an automotive education, namely: an engine repair mechanic. At the beginning of my career there was a VAZ-2107, then a BMW 5-series, a Toyota Supra and a right-hand drive MARK-2. Now the family has 2 cars: Peugeot 407 and Dodge Challenger 2016. I study each car from “A” to “Z”. I have a lot of experience and try to repair everything with my own hands.
Dismantling process
There is electronics inside the steering wheel - the signal of a VAZ 2114 car, so first of all you need to disconnect the negative terminal of the battery. By turning the front wheelset to the “straight” position, you can begin dismantling:
- The first step is to unscrew the seven screws on the covers located under the steering wheel. Once the fasteners are removed, the lower casing can be detached. The top section should only be removed when the steering column is pointing down;
Important! The steering wheel in the VAZ 2114 sits tightly on the spokes, so with a sharp jerk the parts may be damaged. When the hub is removed from the spokes, you can finish the fastening nut.
Installing the steering wheel is done in the reverse order. An important point is the pointer switch ring. When installing, it must be rotated so that the pin can fit into the groove of the ring. If a non-standard product was purchased as a replacement, then the process is the same; the only differences can be in fastening and fixing.
What kind of steering wheel can I install?
If you decide to replace your old steering wheel, it means that its appearance did not suit you in some way. Of course, the issue may be a breakdown or external damage, however, even in this case, you should consider installing third-party models. What if you like one of them much more than the previous steering wheel?
Sports models
When tuning their iron horses, car enthusiasts often look at sports steering wheels. Their appearance helps create the image of a fashionable racing car. The sports steering wheel has a smaller diameter than a regular steering wheel, which significantly improves maneuverability. In addition, it saves space inside the car. And various design options give room for creativity when styling the rest of the interior.
Unfortunately, sports steering wheel models have as many disadvantages as advantages. It is not as safe in a collision as the stock steering wheel. Its construction uses metal, so upon impact, the risk of serious injury increases. In addition, sports steering wheels are not equipped with airbags.
To install such a steering wheel you will need special adapters. They can be divided into two categories:
Moreover, the latter are much safer, since in the event of an accident they can fold up and absorb part of the energy.
Buy a sports steering wheel from trusted stores and from well-known manufacturers. Make sure you have the appropriate certificate. A poor-quality steering wheel, even with a corrugated adapter, can play a cruel joke on you if you get into an accident.
Steering wheels from other VAZ car models
Steering wheels from more modern models of VAZ cars, such as Lada Priora, Kalina or Granta, look prettier and are much more comfortable in the hands. Installing them will not be difficult, provided that you replace not only the steering wheel itself, but also the steering column column. Otherwise, the hub size will not match.
Read on to learn how to choose the right steering wheel for the VAZ 2114 and VAZ 2115.
What you need to know when installing
Please note that not every steering wheel is suitable for installation on VAZ 2114 and VAZ 2115 cars. You need to choose a steering wheel with the same contact group as the original part
This is quite easy to do if you plan to install a steering wheel from other VAZ models. For example, a steering wheel with a Europanel from a VAZ 2110 is ideal for these purposes.
If you have chosen a Lada Kalina car, then its steering wheel should be marked 1118–3402010. With it you will also have to install the upper casing marked 2110–3403070–30, as well as the lower casing 2110–3403072–30.
If you like sports models, then you will have to purchase a special adapter designed for VAZ 2113–2115 cars. This adapter is installed on the steering shaft, and the steering wheel is mounted on top. An adapter model suitable for this purpose is PROSPORT RS-04282.
Pasting plastic trim and trunk lid
Before proceeding with the direct soundproofing of the trunk of the VAZ 2114, it is necessary to remove all the trim and clean them of grease, dust, dirt and anti-corrosion treatment using ordinary rags, a vacuum cleaner and White Spirit. Then small pieces of soundproofing material are glued to the skin
It is worth paying attention to the fact that you should not get too carried away with this, since the finished structure will turn out to be heavy
Next, the entire surface of the skin, both the space for the spare wheel and the trunk, and its lid, is covered with sound-absorbing material, namely Bitoplast or Accent. It is best to use Splen around the spare tire, as it does not accumulate moisture. In addition, the vibration-absorbing material must be glued with a small margin, since it is subsequently cut off along with the edge of the skin.
AUTOFIZIK.RU / auto repair
The car is equipped with a steering column with the ability to adjust the position of the steering wheel in height. The operations are shown on a car with a model 2114 instrument panel. Remove the steering wheel (see Removing the steering wheel), steering column switches (see Removing the steering column switch) and the ignition switch (see Removing the ignition switch).
Using a 13mm spanner, unscrew the bolt of the terminal connection between the intermediate shaft elastic coupling flange and the steering gear.
Remove the bolt and spring washer.
Using a chisel, loosen the bolt (with shear head) of the left front fastening of the steering column bracket to the body...
...and unscrew the bolt with pliers.
Using a 13mm socket, unscrew the nut securing the left rear steering column bracket to the body...
We move the intermediate shaft from the splines of the steering gear shank.
Remove the steering column.
. Using a “13” wrench, unscrew the nut of the bolt of the terminal connection of the intermediate and upper shafts, holding the bolt from turning with a wrench of the same size.
...and move the shaft from the splines.
To adjust the tightening force of the steering column clamp, use pliers to separate the locking ring and remove it.
Remove the locking lever from the slots and move it to the required position.
Required Tools
The steering wheel is usually removed in two cases: it needs to be repaired or completely replaced. It is not recommended to choose sports models, as they will not allow you to pass a technical inspection of the car. If the choice was made towards a third-party manufacturer, then you need to buy the steering wheel in a car store - the product must have a warranty.
To work you will need:
- Phillips and flathead screwdrivers, as well as an extension for them.
- Set of keys and sockets.
- Rubber hammer.
Important! Before removing the steering wheel, you need to make sure that the wheels of the VAZ 2114 are level and, most importantly, straight. If the front wheel set is turned to the left or right, the steering wheel parts may be damaged during removal.
Replacing the steering rack on a VAZ 2114
Now let's proceed directly to the procedure. If the operation is not carried out on a lift, then you need to hang out the entire front part and use some kind of stands or pedestals. It is imperative that the car is stable.
Next, use a 22mm wrench to unscrew the steering ends, then knock down the bipod with a hammer. If you plan to install the tips in the old places, then under no circumstances should you use all kinds of pullers, because the fork will pull out the finger, and the thread puller will ruin the thread, you will have to either go through it with a hole saw or change the tip.
Now you need to unscrew the four nuts securing the rack to the body. This must be done from under the wheel arch, otherwise you won’t be able to reach it. It is advisable to use a ratchet with a long head of 13. After this, we crawl under the driver’s feet and unscrew the bolt of 13 from the steering shaft. To loosen the clamp, you can insert a sharp chisel and hit it with a hammer several times. At this time, it is advisable to pull the rack from the shaft; this can be done well using a crowbar.
The rack is installed in the reverse order. After replacement, it is imperative to adjust the wheel geometry, otherwise goodbye, tires.
Video: replacing the rack on a VAZ 2114
As you know, the performance of any vehicle depends on the serviceability of each component. If one element is faulty, soon the next one will not function in a chain reaction, and so on until the fault is repaired. If the problem is not resolved in time, it will not only entail additional costs for spare parts, but will also significantly affect traffic safety, on which your life and health depend. Therefore, you should not neglect replacing parts, especially if this VAZ-2114 is no exception: spare parts here fail in the same way as on any other car.
How is this element dismantled and how to adjust it? We will consider the answers to all these questions in our article today.
Possible problems
When installing music devices, vehicle owners face various problems. Because of them, the radio for the VAZ-2114 does not turn on or any of the functions do not work.
Most common problems:
- Burnt fuse. This situation occurs due to connecting additional amplifiers or any other equipment to the radio, as well as listening to music at high volume.
- Network short circuit. It appears due to errors made during wiring.
- Oxidized contacts. During operation of the device, moisture may enter its housing. It will damage the contacts and prevent you from using the radio.
A radio is a useful device that should be in every car. Even a novice car owner can connect it on his own. To do this, he will need patience, the correct implementation of all the provided actions and several hours of free time.