If you are planning to change the interior design of your car, then you cannot do without reupholstering the front panel, or, as they call it in everyday life, the dashboard. You can choose a new color scheme and texture for it. Or you can use materials similar to the previous ones and only slightly refresh the scratched and worn-out coating. Many motorists do not risk re-tightening the panel with their own hands for fear of ruining the appearance of the interior. However, the biggest difficulty in this process is deciding to start work. In addition, if you already have experience in reupholstering other interior elements, this task will not cause you any difficulties either.
What is dashboard tuning like?
Tuning this element of the car can be conditionally classified as either functional improvements or aesthetic ones. Often, motorists who are thinking about improving their car dashboard have both goals and want to make the panel both more beautiful and more functional.
A rather complex but interesting process of tuning the dashboard in detail:
Functional tuning is primarily aimed at either replacing vehicle controls or instruments with more advanced analogues, or simply involves adding additional instruments or controls. The main goal of such tuning is to improve the quality of obtaining information about the condition of the car or about weather or other conditions outside. Aesthetic tuning, in turn, is aimed solely at improving the appearance of the dashboard. Naturally, such improvements can be made even at the expense of functionality, which does not always have a good effect on the car, but if a person wants to do something with his car, it is difficult to stop him.
This is interesting: Self-replacement of the front wheel bearing of a car
Sound insulation of the panel from the inside
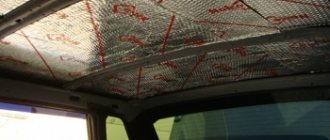
After vibration insulation, we proceed to gluing the second layer - sound insulation:
Instrument panel covered with sound insulation (sound absorber) from the inside
- Anti-noise, included in the second layer and on the internal insulation of the dashboard, 5-10 mm bitoplast is recommended
- it is much better to use thicker material for the panel, sound insulation will give a better effect
- The entire area from the inside of the panel skin should be covered.
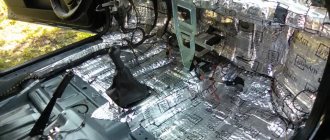
- Exclusively for the most complete coverage of the entire territory, Bitoplast will be able to simultaneously perform two functions
- The first is a sound absorber for the hum coming from the engine compartment (the implementation of an “acoustic screen” is achieved), as well as a gasket that prevents the internal “stuffing” of the dashboard from beating inside the plastic case
- Bitoplast is a very elastic material with expansion and contraction properties, which allows it to adhere very well to uneven textured surfaces
- And then you can carefully trim off the resulting excess material around the edges with scissors.
Difficulties of functional tuning
Often, functional tuning is limited only to replacing older or faulty car devices with newer and more modern ones. However, we should not forget that functional tuning also includes the installation of additional vehicle control elements such as an immobilizer, on-board computer or built-in additional devices. The main problem with such modification is not so much the choice of components as their proper installation. Most often, novice tuning enthusiasts who want to carry out such an installation at home will have to face such a problem as difficulties in calibrating devices. Imagine that the speedometer will show an inadequate speed of the car or the fuel gauge will deceive you at the most inopportune moment.
Separately, it is necessary to say about such a point as the legality of modifications. That is, if the design of the car provides for a speedometer or tachometer of the exact model that is installed at the factory, it will be quite difficult to explain its replacement during maintenance. Therefore, it is better to carry out aesthetic tuning of devices that have already been installed on the car, and place additional ones either on top of the dashboard or in those places that are still free. Aesthetic question
When carrying out aesthetic tuning, you need to carefully plan everything, because you will need no less skills than when carrying out a functional improvement of the dashboard, and in addition to it you will also need an excellent sense of taste. If you yourself know what you want, all that remains is to prepare the necessary materials and elements, and we’ll talk about this a little later, but if you don’t have a clear plan, then it’s worth developing it in advance.
First of all, look for inspiration on car forums or ask for advice from motorist friends who have tuned their cars. Naturally, each person has his own taste, but someone’s ready-made improvements may well lead you to an interesting solution that you can later implement. In addition, knowing what you want to achieve with your car, you can easily select the necessary materials and apply certain solutions related to the manufacture of elements necessary for tuning.
Features of the VAZ 2114 torpedo
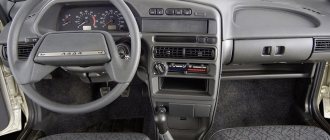
In addition to its main functions, the torpedo also has an aesthetic one, because it is on her that the eyes of the driver and passengers are directed. Before you start tuning the VAZ 2114 panel, you need to familiarize yourself with the main components of the dashboard, its characteristics, as well as the information that is displayed on it.
The five-door hatchback "Samara-2" was one of the very first cars produced by the Volzhsky Automobile Plant, whose torpedo was equipped with an electronic combination. But unlike its predecessor VAZ 2109, the instrument panel is illuminated from the inside and not from the outside. The dashboard of this car displays 19 parameters, the main ones being the speedometer, coolant and fuel level sensors, and tachometer.
The sensor containing information about the coolant temperature is located on the left side of the dashboard. Next to it is a tachometer, which informs about the engine speed, and a speedometer.
Why do you need to reupholster your car dashboard?
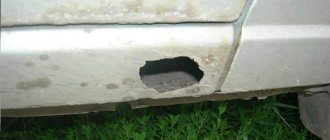
The front panel of the car is always open. Many drivers use it as a table. Therefore, the surface wears out over time, and the former gloss disappears. Ultraviolet rays do not spare plastic, which is why cracks appear. And after a strong frontal accident, holes gape in the panel from deployed airbags. To bring back aesthetics to the interior, you can reupholster the car dashboard with your own hands.
Even if the panel is in good condition, a change in style, i.e. tuning, will create a new atmosphere in the cabin. Here you can combine colors at your discretion. Emphasize the accents of the body color, or refer to the brand colors of the car brand. For example, black, white and blue BMW, yellow and red Ferrari, white and green Land Rover and others.
Interior tuning
For reference. Don't be tempted to use the material for furniture. It's cheaper, but not suitable at all. For cars, a special structure of matter is used that can withstand severe temperature changes without any consequences.
Painting
You can paint the torpedo using special paints for plastic or paint compositions for car bodies. The paint is sprayed from a spray bottle at a distance of 20 cm from the surface of the part. Restoring a car dashboard is rarely done with spray paints because they cannot achieve a uniform color. Such compositions are usually used to paint individual panel elements.
Painting is carried out in a ventilated area, protected from dust and direct sunlight. The paint is applied in three layers:
- The first layer, the thinnest, is called exposed, since after its application the errors made during grinding are emphasized. Any defects that appear are carefully sanded with fine abrasive sandpaper. The first layer of paint is applied with minimal overlap, that is, adjacent stripes overlap only along the edge, and unpainted areas of the surface are not allowed.
- The second layer is applied on top of the first wet one. Adjacent stripes of this layer should overlap each other by half.
- The third coat of paint is applied in the same way as the first.
The dashboard can be matte or glossy. Experts advise not to open the dashboard with varnish, as the glare of light creates an additional strain on the driver’s vision and distracts him from the road.
If you want the surface of the devices to be shiny, varnish. The varnish is applied in 2 layers, 20 minutes after painting. For plastic parts that come into contact with the hands of the driver and passengers, two-component polyurethane varnishes are suitable. They form a smooth, shiny surface, but do not leave fingerprints, which is important for a part that often comes into contact with the hands of the driver and passengers.
It takes several days for the board to dry completely. After this time, it is inspected, defects that appeared during painting are eliminated, and installed in the salon.
Adjusting the brightness of the backlight
Most often, to adjust the brightness of the backlight located behind the device, you need to assemble it, but if something does not suit the brightness, the device will need to be disassembled and adjusted again. In order to avoid wasting time on such actions, we advise you to connect the backlight through a variable rheostat, which can be used to control the intensity of the glow by simply turning it up. Naturally, it is best to carry out the adjustment 3 times - during the day, at dusk and at night, to understand whether it is convenient to look at the devices.
Tools and materials
Before you begin the process of soundproofing your entire dashboard, you need to gather the tools and materials needed for soundproofing. Required material:
- Vibration damper type Vibroplast M1 (silver thickness)
- Sound-absorbing - Bitoplast, thickness 5-10 mm
- Non-slip – Madeleine
From the tool we take:
- Rotating roller
- Tape measure and long ruler
- Sharp knife
- Wipe down rags to remove lint.
- Sharp scissors
- White spirit for degreasing surfaces
- Screwdriver Set
Comprehensive tuning
Quite often, motorists who improve their dashboard with their own hands modify several instruments at once or the overall lighting of the dashboard to make it look more stylish. In this case, it is better to prepare in advance the same templates for the instrument scales and the same color LED backlights. In the same case, if you do not have access to LEDs of the desired color, you can get by with ordinary white LEDs and simply stick a translucent film of the desired color to the desired places. This film will be a regular light filter, and you will achieve the same effect as when using LEDs of different colors.
This is interesting: We diagnose the brake system with our own hands
Tuning techniques
To successfully complete any modification to a car or its dashboard, you need to know a few simple techniques that will allow you to perform the necessary actions. We have already talked about how to properly stick tint film, and these are the same techniques that are used when gluing translucent films to the back of the device display with slots so that the divisions and numbers glow with the right light. Another no less interesting technique is the use of fluorescent paints to paint the needle or scale divisions of the device. To apply this paint evenly, it is enough to use either a simple template over which you can safely paint, or simply carefully apply it with a thin brush. Also, do not forget about the need to correctly calibrate the pointer after removing it, because an incorrectly calibrated device is a very serious problem that can only be solved in a service center.
Do-it-yourself car torpedo reupholstery
Reupholstering the front panel begins with its dismantling. This is a rather labor-intensive process. In addition, the pattern of fasteners and clamps is not the same on different car models. There are a large number of wires connected to the panel, and if you are afraid of damaging them, contact a car service center for help.
If you want to do this yourself, do not neglect the car’s operating instructions: all parts and fasteners are described in detail there. Removing a torpedo always begins with disconnecting the battery terminals. Once you have de-energized your car, you can begin dismantling.
Before you start reupholstering the panel, it should be dismantled
Video: how to remove a torpedo
As a rule, dismantling the steering wheel takes longer than reupholstering itself. Be careful and remember to disconnect any wires you encounter.
Tools
In order to retighten the torpedo, you will need the following tools:
- set of screwdrivers for dismantling;
- sandpaper (both coarse and fine grain);
- degreaser;
- antistatic cloth;
- self-adhesive interlining or masking tape;
- marker;
- sharp tailor's scissors;
- roller or spatula with a plastic sheet;
- a sewing machine with a foot and a leather needle (if you chose this material);
- special glue for leather (or the material you are using);
- hair dryer (preferably a construction hair dryer);
- material for upholstery.
Preparatory stage
When the torpedo is dismantled, it is necessary to prepare it for reupholstery with new material. This is done as follows.
- The part is degreased with a special product. It is not recommended to use acetone-based products for this.
- The surface over the entire area is sanded first with coarse-grained sandpaper, and then with an abrasive with a finer grain.
- The remaining dust after sanding is removed with an antistatic cloth.
If the case is severely damaged, you can putty the panel using a special compound for plastic. After the surface has completely dried, you can begin making patterns and reupholstering the part.
Your further actions will depend on the shape of the panel. If it is quite simple, with right angles and unexpressed bends, you can try to cover the torpedo with a single piece of material. But if the shape is complex and has many curves, you need to make a cover in advance. Otherwise, the coating will form wrinkles.
The cover is made as follows:
- Cover the surface of the panel with transparent non-woven film or masking tape
- Carefully inspect the shape of the part. All sharp breaks must be outlined with a marker over the film (adhesive tape). At this stage, you mark the locations of your future seams. Don't make too many of them: it can ruin the appearance of the panel.
- Remove the film from the torpedo and lay it on the material from the wrong side. Transfer the contours of the parts, paying attention to the seams. Do not forget about an increase of 10 mm on each side of the part. This will be needed when stitching.
- Carefully cut out the parts.
- Attach the parts to the control panel. Make sure the dimensions and shape match.
- Sew the pieces along the seams.
If you don't have a suitable sewing machine, you can go a slightly different route and glue the parts directly onto the surface of the panel. But in this case, you should act especially carefully: this approach is dangerous due to the appearance of gaps at the joints. If you fail to properly stretch and lay the material, it will come apart and peel off from the dashboard.
Making a cover for the front panel
To sew together pieces of material, use specialized threads for natural and artificial leather. They are quite strong and elastic, so the seams will not tear or become deformed.
Constriction technology
If you decide to reupholster the panel with a single piece of material, get ready for painstaking work.
- First of all, apply special glue to the surface. You need to wait a while for the composition to dry, but do not dry it completely.
- Place the material against the top edge of the panel and press lightly.
- To replicate the shape of a torpedo, the skin needs to be warmed with a hairdryer and stretched. Do this as carefully as possible so as not to damage the material.
- Before pressing the material firmly to the surface, make sure it has taken the desired shape. This approach is convenient when working with deep pits and holes: first stretch the skin, and only then fix the edges.
- In the process of leveling the surface, you can help yourself with rollers or plastic spatulas.
- Fold the edges inward and glue them. Cut off the excess.
carefully stretch and straighten folds when re-tying with a single piece of material
Video: how to reupholster a panel with a single piece of material
If you have prepared the case in advance, the reupholstery process will go much faster and easier. You will just need to attach the workpiece to the surface with glue, make sure that all the bends are in place, and then press and smooth the surface.
Video: useful tips for correctly covering panel parts
The cost of reupholstering the front panel of a car yourself
The amount you spend on reupholstering a torpedo directly depends on the cost of the material. The average price for high-quality natural perforated leather is about 3 thousand rubles per linear meter. A standard size panel will take no more than two meters.
Eco-leather is already much cheaper: it can be found for around 700 rubles, although there are more expensive options. The price of vinyl film ranges from 300–600 rubles, depending on the type and quality. As for Alcantara, its cost is comparable to genuine leather, so you won’t be able to save on artificial suede.
High-quality high-temperature glue will cost you 1.5 thousand rubles per jar. We do not recommend using cheap superglue or Moment glue: you will be bothered by an intrusive smell, and the coating itself will deteriorate if the car heats up too much. Threads for leather products are sold at a price of 400 rubles per spool. Let's assume that you already have a hair dryer and a sewing machine at home, which means there will be no additional expenses for equipment.
Thus, we receive from 1.5 to 7 thousand rubles for the material, plus 2 thousand for consumables. As you can see, even when choosing expensive leather, you can spend 10 thousand rubles. In the salon, the price tag for this procedure starts from 50 thousand rubles.
The process of re-upholstering a car dashboard with your own hands has many nuances. However, the difference in price between do-it-yourself work and the service of a car workshop is so great that you can spend time studying the instructions, and then on the reupholstery itself. In addition, it will not take much time: the panel can be dismantled in 1.5–2 hours. It will take the same amount of time to reupholster. And if you find an assistant, then things will go much faster.
A car's dashboard or dashboard is a panel located in the front section of the cabin that houses instruments, controls and a steering wheel. It is made from high density plastics.
A torpedo in a car is damaged as a result of an accident, from constant contact with the hands of the driver and passengers, or from various objects that are carelessly thrown at it. If the front panel of the car has lost its appearance, it can be replaced or restored. These parts are expensive at salvage yards and in stores; moreover, it is not always possible to select suitable components for older car models. There are several methods used to restore the instrument panel with your own hands, let's look at them and dwell in detail on the most popular option - painting.
Important points
- If the folds of leather formed on the cover after putting it on the dashboard cannot be smoothed out with your hands, you should use a rag soaked in hot water. To avoid burning your hands, this operation should be performed only with thick rubber gloves;
- Care should be taken to ensure that drops of glue do not fall on the front side of the leather. If this happens, you need to let the drop dry and carefully cut it off with a knife. And the stain remaining on the skin can be erased with a regular eraser.
So, all a car enthusiast needs to re-tighten a dashboard is patience. The only difficulty may arise at the stage of stitching the fragments, especially if the car owner has little idea how to work with a sewing machine. If this is so, then before working with leather, it is worth practicing on ordinary matter.
Copywriter with five years of experience.
The best materials for reupholstery
The Russian car accessories market offers an abundance of materials for reupholstering dashboards and car door panels. Here you can find modest styles with a rubber or synthetic base, which are identical to the previous coating. And there are luxurious canvases made of genuine leather. It is better to entrust working with such material to a specialist; cutting and sewing skills will be required. In any case, the car owner will have plenty to choose from. Here is a list of the most popular materials for car panel reupholstery:
- Genuine Leather;
- vinyl;
- eco leather;
- Alcantara;
- carpet;
- flock
Make your choice responsibly. After all, the front panel is visible. It says a lot about the owner of the car. About his character. About taste.
Genuine Leather
An ideal material for decorating the interior of luxury or premium cars. The fiber structure is strong. Temperature changes are absolutely indifferent to them. The surface is resistant to mechanical damage, but only if treated with care. Of course, you can scratch the skin with the same nail or other sharp object.
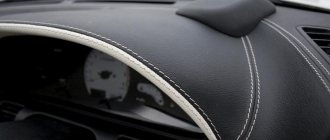
Covering the torpedo with leather
The material is easy to clean and retains its luxurious appearance for a long time. The sun's rays are not harmful to natural leather. To care for the surface, you will have to buy moisturizing compounds and various cleaners. If you are determined to reupholster your car's dashboard with leather, then experts recommend having it done in a specialized workshop. Then the appearance will really be chic.
Vinyl
A very interesting synthetic material. It includes:
- polymer rubber mixture;
- various resins;
- special glue;
- paints;
- plastic mass.
This is a modern tool that will allow you to qualitatively change your car's dashboard. Vinyl films can be plain or multi-colored.
Vinyl film for car interior wrapping
You can find an imitation of the coloring of animals, for example, python, leopard and others. Among others, there are materials that imitate chrome, carbon or nickel-plated metal.
The basic advantage of vinyl is its low maintenance requirements.
It is resistant to mechanical damage and retains its beautiful appearance for a long time. And most importantly, you can reupholster the car’s dashboard with your own hands.
Eco leather
Using natural leather is not always cost-effective or humane. But if you want to make the interior rich, then you can take eco-leather. This is not the leatherette that appeared in our country in the early 1990s. Now it is an advanced synthetic material without emissions of harmful substances. It is quite strong and retains a representative appearance for a long time.
Eco-leather samples
In terms of its characteristics, it is practically not inferior to natural leather. But to reupholster a car's dashboard, experts recommend looking for a professional studio. After all, it is impossible to do a beautiful job with your own hands without learning the stitching and long practice. This is the main disadvantage of eco-leather.
Alcantara
The material is better known as faux suede. Developed in the 1970s. Japanese chemist Miyoshi Okamoto. The soft velvety surface gives the car's interior a premium effect.
Alcantara does not require complex maintenance and is resistant to mechanical damage. Does not fade in the sun and is not afraid of temperature changes.
Sometimes the material is used in combination with eco-leather for a contrasting effect. The main advantage of artificial suede is that you can re-stretch the dashboard yourself.
Carpet
Non-woven synthetic material with various surface types. Often used for finishing cabinet subwoofers and interior parts. Carpet has good antistatic properties, does not fade in the sun, and is not afraid of moisture and mold. Well absorbs acoustic noise and knocks.
Automotive color carpet
It is environmentally safe, durable, does not require complex maintenance, and is inexpensive. The price depends on the structure, thickness, ductility and brand. Unanimously recognized by the owners of “nines”, “ten” and “fours”.
Flock
Velvety powder (powder). It is based on a pile made of cotton, viscose and polyamide. The material is sold in various colors. To apply the powder, a special tool is required - a flocator. The powder is sprayed onto the torpedo, previously lubricated with glue.
Suitable for processing complex panels with multiple corners and niches. Can be used for both full and partial coverage. Not suitable for torpedoes with cracks and holes from AirBag, as it repeats all surface defects.
Auto panel flocking
Before applying flock, careful preparation of the panel is required. It is almost impossible to make a high-quality suede cover yourself without experience.
Long experience required. Therefore, experts advise entrusting this type of tuning to professionals.
Knock of stabilizer struts: how to identify and eliminate it yourself
- masking tape;
- scissors;
- brushes;
- fine-grained sandpaper;
- sewing machine;
- threads;
- paper for patterns;
- universal glue;
- primers;
- degreaser;
- marker;
- construction hair dryer.
When choosing a material, be sure to select the appropriate adhesive composition for it, and also learn about the key features of working with it. Not all materials can be heated too much.
Step-by-step instruction
Now you can start working directly on the old and worn-out dashboard, turning it into a new and nice panel in the interior of your vehicle.
Since each machine has its own nuances, I will not focus on some of the subtleties of dismantling. Just look at the manual and do everything according to the manufacturer's recommendations.
The step-by-step process for re-stretching a torpedo can be described something like this:
- First, the torpedo itself is removed. It will need to be cleaned using fine-grained sandpaper;
- After cleaning, you need to cover the dismantled element with masking tape;
- Next, a layer of paper intended for the pattern is applied. Outline it with a marker. In all directions there should be a margin of about 15 mm in the length of the material;
Which material to choose
This is a crucial stage of work, and it is also complicated by the fact that you cannot trust pictures on the Internet. You must definitely look at the material, and most importantly, feel it directly in the store.
Thinking before this not only about decorative qualities, but also taking into account color shades, tactile sensations, and also remembering practicality, it is undesirable for the material to be difficult to clean and constantly take on all the dirt.
A natural skin
Good, proven material. It perfectly isolates all unwanted sounds, has heat-insulating properties, is resistant to stains and is easy to use with simple cleaning methods.
At the same time, high-quality leather is expensive and, if we talk about fashion, it is somewhat outdated, but it is a classic, and it always has its connoisseurs.
It is especially worth noting the durability of the leather covering. From the point of view of mechanical effects, there is a large margin here, because even the constantly worn seats and steering wheel are covered with leather.
For a dashboard, resistance to solar radiation is important, and here the leather is also at its best, but the disadvantage will be the high price of such a coating.
Leatherette
The days of cheap leatherette or leatherette for student briefcases are long gone. Nowadays it is usually called eco-leather, and if you don’t find fault, then in all respects this material is not particularly inferior to a natural product.
At the same time, it will cost much less. It is quite strong and durable, resistant to influencing factors, although the variation in quality between different samples is very large. You will have to collect more information on the selected material.
Autocarpet
The advantages of autocarpet will be its low price, heat-insulating properties and excellent ability to absorb noise.
Decorative abilities and durability can be considered satisfactory, as well as the appearance, which can be described as “not for everybody.”
But this material is easier to work with and can be recommended for novice owners of inexpensive cars who have lost the appearance of a premium car due to age or deployment of airbags.
Vinyl film
A characteristic feature of vinyl is the wide choice of color shades and textures. Sometimes it is simply impossible to realize the whimsical fantasy of an amateur designer in any other way.
The same leather will not be able to create an imitation of neoclassical carbon fiber, or even mirror chrome or metallic. Which is as spectacular as it is dangerous. Still, the panel is always in the driver’s field of vision.
The low price of vinyl trim allows you to experiment, mastering the difficult art of reupholstering the interior, and the lack of strength and durability of the coating will be compensated by the ability to quickly replace it as the decorative effect is lost. And vinyl film will not require any special care.
Alcantara
An excellent coating that perfectly imitates suede, while being ordinary synthetics. Creates a calm, almost homely atmosphere in the salon, especially pleasant to the touch.
Automotive Alcantara is well suited for covering complex surfaces, is time-resistant and durable. Very often used in factory interior trim.
What to consider when creating a salon project
As you probably already guessed when choosing the material, the calculation part of restoring the interior of your car does not end there. Order material in excess and use the rule “measure seven times and cut once.” Because if 20 cm is not enough for you, keep in mind that the sale of material for car interior trim is carried out on the principle of the minimum available length and you will be lucky if this length is only one meter.
The choice of glue can be a problem, because it often happens that at the first contact, the glue sets perfectly, but in the morning it comes off in the corners. Or maybe the whole piece will come off. Remember that for the glue to harden, you need a dry and warm air atmosphere. It wouldn’t hurt to have a proven product on hand—Moment glue.
When planning to reupholster the entire car interior, you have the opportunity to create your own unique style. All methods are good for this. By combining two different materials and colors, you will create a harmonious look. The combination always has an advantage: black, gray, brown with small inserts of bright colors such as yellow, red, white, etc.
To achieve maximum color harmony, consider peripheral colors. For example, the colors of the backlight of the instrument panel and tape recorder. In some situations, you can highlight the look you are creating with chrome or wood accents.
Reupholstering a car interior with your own hands is a very labor-intensive process; this can be a particularly difficult task for those people who have never done anything with their own hands before. This activity is quite interesting for those who are used to doing everything for themselves, taking into account only their preferences, so this work will allow you to solve individual wishes. In this article we will tell you in more detail about what material should be chosen for reupholstering the interior, how to calculate the required amount and how the work process should proceed.
Without proper care, leather upholstery will eventually begin to crack from drying out and also fade when exposed to direct sunlight. During hot seasons, seats with leather surfaces will quickly heat up, which significantly reduces passenger comfort. This material is more suitable for expensive cars with air conditioning and tinted windows.
One of the most suitable materials for upholstering the interior of a car is Alcantara (artificial suede). This material is soft, ergonomic and pleasant to the touch. Alcatanra is a complex composite material that has high wear resistance, is resistant to high humidity, as well as fading due to prolonged exposure to sunlight.
It is much cheaper than genuine soft leather. Also, the advantages include a wide range of colors of this material. In this regard, the situation with leather is quite complicated, since the required shade may not be found on sale at all.
It’s much easier to choose the right Alcantara color. This option is the best choice considering price and quality. To reupholster the car interior, you can purchase almara, special automotive leather or fabric, leatherette or natural leather, carpet, flock, corduroy and others. Often the choice will be based on the price per square meter of sheathing.
How to extend the life of car door seals
- If you use leather, then remove the created pattern from the torpedo, apply it to a piece of material, and outline the borders with a marker;
- Appropriate pieces of leather are cut out to the desired shapes and sizes;
- The 15 mm left as a reserve needs to be folded, after which the cover is sewn with a machine;
- The panel that you previously cleaned now needs to be degreased. Once the degreaser has dried, go over a coat of primer;
- After the primer has dried, apply a thin layer of glue to the panel;
- Another layer is applied to the back of the leather workpiece;
- The cover is carefully pulled onto the panel. Using a hair dryer, straighten out all the resulting wrinkles;
- Now you can use a hairdryer to go over all the surfaces of the dashboard so that the glue is fully distributed and set.
Wait for it to dry completely, cut off all excess, after which you can safely return the torpedo to its place, following the reverse sequence of dismantling.
Before you apply any adhesive, primer or degreaser, make sure it is safe for the trim material and panel you are using.
I can’t say that it’s incredibly difficult to pull a torpedo. Much depends on how complex the shape of the panel is. Sometimes you can just pull it over with a solid piece, cutting out all the excess. In more complex situations, patterns are made, and blanks are created from them.
What the experts say
Professional auto shop craftsmen have accumulated extensive experience in reupholstering car panels inside and out. Here is a short list of tips from experts:
A cracked or shabby torpedo is not a death sentence. It is easy to put in order, capable of bringing joy to the car owner and arousing the interest of passengers. It is enough to select the appropriate material and allocate some free time for the event.
How to upholster a car dashboard yourself
You should not expect that all the work can be completed without disassembling the interior. The entire front panel will have to be removed to provide full access.
Tools
You will need both a standard plumbing tool for assembly and disassembly work to remove the torpedo, and a more specialized one directly for tightening operations.
- A set of screwdrivers and wrenches for working in hard-to-reach places. Mirrors, flexible holders and gimbal extensions may be required.
- A special device for removing plastic clips and latches.
- Industrial hair dryer with adjustable air temperature.
- You may need a sewing machine for working with leather.
- Marker, knives and scissors. The cutting tool must be of high quality and sharp.
- Spatulas, rollers and brushes.
You should not hope that a cheap and low-quality tool will allow you to get a decent result.
Even in skillful hands, they can ruin everything, after which they will have to start over, suffering material losses.
Consumables
The list of consumables is determined by the selected material. But some list items will become common to all coverages:
- liquid and wipes for degreasing surfaces, used in painting;
- sandpaper of varying degrees of grain, very fine is not required here;
- glue for the selected covering material;
- non-woven fabric for creating a model - patterns, preferably with spot application of glue;
- threads for stitching leather, here you cannot skimp on quality and decorativeness;
- directly the covering material itself, preferably with a reserve.
You will also need disposable gloves to protect your hands and antistatic wipes to remove dust from the part.
Preparation (removing the dashboard)
You must work in accordance with the repair manual for a specific car, since not all fasteners are visible to the eye.
Plastic elements, especially those that have already served, must be handled with care; they become brittle over time, and if broken fastening points are not restored, in the future this place can become a source of annoying noise. Moreover, the mass of the torpedo will increase noticeably.
Constriction technology + video
Work on the removed parprise begins with the preparation of patterns. The locations of the seams are determined, and a decision is made on the size of the pieces of material. Various options are possible, starting from a single cover and ending with pasting in small fragments.
Non-woven blanks are glued to the workpieces and seam tolerances are determined.
Non-woven fabric, unlike paper, has increased strength and is used in the sewing industry as a lining material. After complete pasting, the patterns are carefully separated from the parts of the torpedo.
Note: What does the Knock Sensor affect and how to check it
The removed patterns are placed on the wrong side of the material lying on a flat surface. The boundaries, taking into account the seams, are outlined with a marker, and the parts are cut out.
For the final check, sheets of material are once again applied to the dashboard, and the entire geometry is checked. After this, the cover can be sewn, if required by the technology of the specific material.
Before pasting, the surface of the torpedo must be prepared. The parts are sanded, degreased, and dust and other contaminants are carefully removed from them. A layer of primer is applied, which can be primer or glue. The same is done with the details of the tight material.
A layer of glue is applied to the dried material, in accordance with its technological features. After this, you can proceed directly to pasting.
It is necessary to carefully monitor the elimination of air bubbles, so it is better to work from the center to the edges. All seam locations must be aligned and located along the intended lines.
The glued parprise is blown with an industrial hairdryer to ensure uniform shrinkage and complete distribution of the glue over the surface; at this stage, it is still possible to smooth out the resulting folds and bubbles. A rubber roller is used to roll out the material. Complete polymerization of the glue usually occurs within a day.
Preparing for painting
Restoring a torpedo begins with the preparatory stage, which includes disassembling and preparing the surface of the part for applying paint.
In order not to stain the interior and to protect from the unpleasant smell of solvents and paint, the dashboard was removed. Perform work on disassembling the dashboard in the following sequence to avoid damaging the part:
- Disconnect the negative battery terminal.
- Disassemble the removable elements: steering wheel, plugs, decorative elements.
- Loosen or open the clasps.
- Carefully move the panel to the side and disconnect the electrical wiring from the power supply devices.
- Pull the panel out through the front door of the cabin.
- Disassemble devices and buttons.
The torpedo in the car is constantly in contact with the hands of the driver and passengers, which causes dirt and grease to accumulate. These contaminants contribute to the peeling of new paint, so the panel is thoroughly washed with soapy water, dried and degreased. For cleaning, you can use household detergents: special car shampoo, laundry soap solution, dishwashing liquid and others. Suitable solvents for degreasing are acetone, technical alcohol or white spirit, as well as special car sponges and wipes soaked in degreaser.
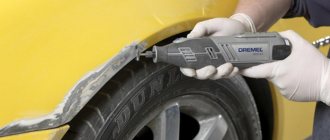
A clean, grease-free torpedo is polished to eliminate irregularities. If this step is done poorly, layers of paint will only highlight cracks and scratches on the surface of the part. Sanding is done with sandpaper of varying abrasiveness. You need to start sanding with a coarser sandpaper and finish with the finest sandpaper.
Clue! Sandpaper is a hard abrasive material, so if you work carelessly, you will not only not remove roughness, but also cause new scratches. To protect the surface from damage, use paper with the least amount of sand. Soak the sandpaper for 15 minutes in cold water to give it elasticity.
After sanding, process dust forms on the surface of the panel, which spoils the painting result. It is carefully wiped with a rag or a special sticky napkin. The polished, dust-free surface is primed for better adhesion of paint and polymer. It is better to use an aerosol primer for plastic surfaces, which is easy to apply and contains a plasticizer that extends the life of the panel. The primer is applied in 2 thin layers with an interval of 15 minutes. Before painting, the surface is degreased again.
Repair methods
There are three main approaches to repairing a dashboard after airbag deployment:
- Functional repair of instrument panels includes mechanical restoration. The dashboard and steering wheel are installed in place, and new airbags are mounted under them. After this, the program resets information about airbag deployment;
- A complete interior dashboard repair includes not only mechanical repairs, but also aesthetic ones. The console is dismantled, a complete reupholstery is carried out using selected materials, a new SRS complex is inserted under the steering wheel and covers and reprogramming is carried out. This method makes it possible not only to recreate the transport security system, but also to change its internal appearance;
- A rough repair is suitable for cases where the car has received minimal damage and does not require major restoration procedures. In this case, the holes where the pillows used to be are filled with polyurethane foam, and the covers are installed in their original place. This method is bad because in the event of a new accident, the SRS complex will not work, because there will be nothing to work. By resorting to the third type of repair, you endanger not only your life, but also the lives of your passengers.
Pros and cons of leather interior
When, depending on the life of the car, you need to undergo technical inspection
. A variety of materials are used for the interior interior of modern cars, but leather interior has always been and is considered the most prestigious and expensive, especially when imported leather is used for upholstery of seats and other elements. The advantages of a leather interior include:
- high resistance of the material to abrasion;
- good skin resistance to mechanical damage;
- resistance of the material to dirt.
Leather does not absorb odors, it is very easy to wash off dirt and dust, and it is not so easy to burn it with cigarette ash. But this material also has disadvantages:
- in hot weather, leather seats get very hot, and in cold weather they cool down;
- The cost of reupholstering, even with your own hands, is not cheap.
Errors
You don't gain experience right away. Therefore, for the first time, you can get air bubbles, uneven seams, and unnoticed defects in the original surface.
There may also be errors when choosing the material. You should especially remember about the persistent odor in the cabin if substances not intended for this purpose are used.
Note to you: How long does alcohol last in a driver’s blood?
Cheap, widely used glue can take years to wear out, so it is better to purchase all consumables from a specialized supplier as a single package.
The importance of carefully performing assembly and disassembly operations has already been mentioned. At the installation stage, you may encounter a changed panel geometry; you need to think about this when marking the patterns.