Repair / From Alexander Smirnov
- Types of heater radiators installed on the VAZ 2114/15
Table: comparison of the main characteristics of aluminum and copper heater radiators for the VAZ 2114/15 - Radiators DAAZ
- Symptoms of a problem
- Replacing the radiator without removing the panel
Video: replacing the VAZ 2214/15 heater radiator without dismantling the panel
The heater radiator is the main element of the vehicle interior heating system. Its failure leads to unpleasant consequences for the driver. In winter, the car interior becomes cold, and the windshield becomes covered with a layer of ice. Therefore, timely identification and elimination of radiator malfunctions becomes relevant.
Tips for purchasing and replacing pipes on a VAZ2115
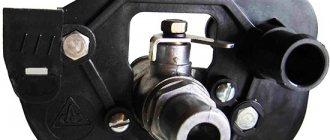
As with any car, a moment arises when it becomes necessary to replace the pipes of the ventilation and heating system of the car interior. Malfunction occurs for various reasons. Pipes get cracked due to frequent temperature changes. Sometimes the ingress of oils and gasoline also leads to malfunction. Usually cracks and holes form in the pipes under the fastening clamps. If the pipes are of poor quality, a sharp increase in pressure in the cooling system (ICE) of the car engine also leads to malfunction of the pipes.
Saving tip
There is a need to replace the pipes with new ones. You should not spend money on new pipes manufactured specifically for the cooling and ventilation system of the VAZ2115. In a year they will crack and tear. It is better to buy a heater hose from a gazelle car with a diameter of 16mm. A 3 meter long hose will be sufficient. According to the outer diameter of the hose, clamps are purchased for mounting on fittings.
To replace faulty pipes, the machine is placed on an overpass, in an inspection hole. The car engine must cool down for at least an hour.
Cooling system design
When the engine is running, a lot of heat is generated for removal, which is used by the car’s cooling system, consisting of the following components:
- 1 - Heater radiator.
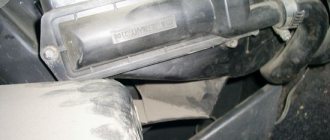
- 2, 3 - Outlet, underwater pipes of the heater.
- 4 - Pump hose.
- 5 - Pipe coming from the expansion tank.
- 6, 12 - Steam removal hoses.
- 7 - Tank cover.
- 8 — Expansion tank.
- 9 - Thermostat.
- 10, 19 - Outlet pipes.
- 11, 13 - Supply pipes.
- 14 - Cooling radiator.
- 15 — Radiator drain plug.
- 16 — Radiator blower fan.
- 17 - Pump
You need to drain the coolant from the system. Open the expansion tank cap. Remove the sides of the instrument panel in the cockpit. Open the liquid supply valve to the stove radiator. Drain the coolant into a 10-liter container by loosening the clamp on the liquid supply to the stove radiator and disconnecting the pipe itself. In this case, you need to be careful not to let the coolant get into your eyes. Direct the end of the pipe into the container, since the liquid from the container, after replacing the pipes, will need to be poured back into the cooling system. For ease of operation, remove the air filter.
First remove the external pipes, then the pipes from the stove radiator in the cabin. The heater hose is cut to fit the size of the nozzles. For ease of fitting onto the fittings, lightly lubricate the surface of the fittings with grease or lithol. First, attach the hose to the fittings of the stove radiator, then to the tap tubes, not forgetting to first put clamps on the hose. Clamps secure the hose to the fittings and tubes. The same actions are performed on the outside of the pipes and fittings. After assembly, check the tightness of the hose clamps on the tubes and fittings.
Pour coolant into the expansion tank, only up to the maximum mark, and replace the air filter. The expansion tank cap is closed. Start the car and warm it up until the cooling fan comes on. Check to see if there are any coolant leaks from the cooling system. With proper repair, there are no leaks. If necessary, add coolant to the reservoir until the average level between the minimum and maximum marks is reached.
What are the advantages of ordering pipes and other auto parts online?
First of all, I would like to note how convenient it is to sit on the couch at home and choose the necessary auto parts for your car. It doesn’t matter what the weather is like outside at that moment. In addition, using the Internet it is possible to buy parts for cars at work. This is explained by the fact that ordering goods online does not require much time. A few clicks of the mouse and products from the virtual car store will be ordered, all you have to do is wait for it to be delivered.
It makes no difference what make and model of the car. There are auto parts for all cars on the Internet. This purchase is beneficial for those who value their time. If necessary, it is always possible to order auto parts from any city. There is no need to worry about their delivery, because this is handled by the courier service. Usually the goods are delivered to the buyer as quickly as possible.
In conclusion, it remains only to clarify that the cost of parts in virtual stores is affordable. The car owner will not have to worry about this. When making a purchase in this way, he will have the opportunity to save money.
What is a stove fan
A fan is a functional element that drives air through the heater radiator and into the cabin. The fan, along with the radiator, pipes for refrigerant circulation, liquid regulator and air duct, is part of the heating unit. Its purpose is to drive cold air through a heated radiator, creating heat exchange.
We recommend: Secrets of the masters - all the ways to straighten a dent without painting
Node functions
The heater fan is a motor that supplies air. You can imagine its operation in more detail only during the operation of the entire heating system:
- As the car engine heats up, liquid enters it, cooling the walls of the cylinder block and taking away heat.
- Hot antifreeze enters the heater radiator, and the latter quickly heats up.
- A motor (fan) is turned on, supplying flows of cold air, thereby cooling the element.
- The interior of the car begins to warm up.
The heating diagram of the VAZ 2113–2115 clearly shows the purpose of the motor
Where is the VAZ 2113-2115 heater motor located?
On VAZ 2113-2115 vehicles, the heater motor is located in the engine compartment. It is covered with a protective casing secured with four screws. The fan itself is also supported by bolts and nuts and is connected to the body of the car.
Causes of radiator failure
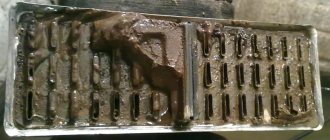
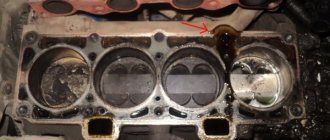
The need to replace the stove radiator arises in several cases. If the heat exchanger remains cold even when the heat supply is set to maximum, it is highly likely to become clogged. The reason is scale that forms at high temperatures and settles in the radiator tubes or pipes connected to it. The second reason is a burst and depressurized radiator or pipes. When this breakdown occurs, antifreeze begins to flow into the passenger compartment on the passenger side, the mats become wet, and a characteristic unpleasant odor appears in the car.
In both cases, be it a cold heater radiator or an antifreeze leak, this unit will need to be replaced, since it cannot be repaired. Copper heat exchangers can be temporarily soldered, but this will not solve the problem for a long time; the part will still need to be replaced. This must be done as quickly as possible, since driving a car with a damaged heating system is uncomfortable and can be dangerous, since fogged or frozen windows impair visibility.
Cleaning and flushing the radiator of the VAZ 2114/15 stove
You can increase the efficiency of the stove by cleaning and flushing the radiator. The procedure can be performed without dismantling the radiator or with dismantling it. In the first case, you will need to remove the outlet and inlet pipes from the heater and pour a cleaning solution into it. Citric acid, plumbing cleaners (for example, “Mole”), etc. are used as such a solution. Then the radiator is washed with running water and coolant is added. You can clean the radiator better by removing it from the car. This will allow you to wash it not only from the inside, but also from the outside, removing dirt between the honeycombs. Washing is usually carried out with running water.
If after performing these procedures the stove does not work better, the radiator must be replaced.
Video: flushing the stove radiator
Thus, diagnosing a malfunction and determining the cause of poor heating of the VAZ 2114/15 interior with your own hands is quite simple. Self-repair and replacement of individual elements of the heating system are also not very difficult. It is enough just to strictly follow the recommendations of specialists.
With the onset of cold weather, car owners often find that their car's interior heating system is not working efficiently. Everything seems to be fine, but the air coming from the deflectors is not warm enough. This problem may be an indication that the car’s heater core is clogged and cannot pass the required amount of heated coolant through it.
What to do in such a situation: replace the heater or try to repair it? Do not rush to resort to radical measures. If the heat exchanger does not leak, it can be repaired.
In this article we will talk about how to flush the heater radiator without removing it from the car. In addition, we will discuss which products are best suited for this procedure.
Classification of radiators
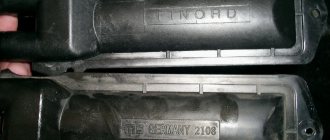
Radiators for the VAZ 2114/15, installed by the manufacturer, are made of aluminum; they are replaced after 3-5 years (at the end of their service life). For Samara cars, two types of radiators are produced:
- 2108-8101060
- 2108-08101060-00
The dimensions and installation method are the same for both models.
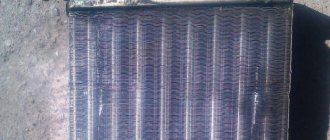
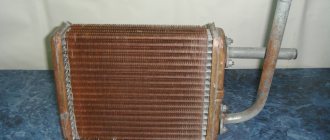
You can also install a copper radiator for the interior heating system on a VAZ 2114/15. Its advantages over aluminum: longer service life, higher heat transfer and more suitable for repair. However, the price is almost twice as high.
Resistor fault
Despite the fairly simple design of the heater, some of its elements may fail over time. At the same time, the probability of failure of the heating system as a whole is quite small. The most common stove failures include:
- problems with the radiator;
- faucet leak;
- wear of pipes;
- resistor failure;
- switch malfunctions.
Let's look at each fault block in more detail.
As noted above, the resistor is designed to change the level of resistance of the current supplied from the generator to the heating system fan. In the VAZ-2114, using a switch, you can ensure the fan operates in three modes. In the extreme position, the fan is powered by a voltage equal to the nominal voltage of the vehicle's on-board network, providing maximum power output.
If the windings burn out, regardless of the switch position, the fan operates only at full power. The inability to switch fan operating modes is evidence of a resistor malfunction.
A faulty resistor may be indicated by the fan operating in one mode, when manipulations with the switch do not affect its blowing speed. To replace the resistor, you need to prepare a screwdriver with a Phillips head, fine-grain sandpaper and a multimeter. Algorithm of actions:
- disconnect the negative terminal of the battery;
- unscrew the screws that secure the right console cover;
- Use a screwdriver to unscrew the screws securing the right cover of the center console;
- you will have access to the resistor, from which you need to disconnect all the wiring and evaluate the contacts for burning. If the contact surface is oxidized, use sandpaper to clean it down to metal;
- It may well be that the resistor has lost its functionality precisely due to burning/oxidation of the contacts, so we assemble everything in the reverse order and check whether the fan will work in all normal modes;
- in case of a negative result, again remove the negative terminal, the panel cover and unscrew the screw that secures the resistor to the body;
- We remove the resistor and use a multimeter to measure the resistance at the resistor inputs and at the inputs of both windings. In the latter case, the indicator indicating the working condition of the additional elements is 0.2 Ohm. For the entire resistor, the standard resistance should be 0.8 ohms. If the multimeter readings do not match the specified values, replace the resistor with a new one, and then reassemble in the reverse order.
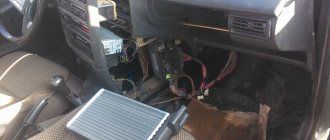
Removal and replacement instructions
If you need to dismantle the heater, you will need to completely remove and disassemble the dashboard. As for directly replacing the radiator device, it will be enough to only partially disassemble the console. Repairing such a plan is not a particularly simple undertaking, however, if you have patience and strength, you can do everything yourself. To perform the work, you will need standard plumbing tools, including screwdrivers, wrenches, and pliers.
Replacing the VAZ 2114 heater radiator is performed as follows:
First of all, the antifreeze is drained from the heating system. To do this, you need to unscrew the filler cap of the expansion tank and drain the consumables from the main radiator assembly into a previously placed container under the drain hole. When the liquid from the radiator is drained, it is necessary to unscrew the cap in the cylinder block, which will allow the liquid to be drained from the BC. If you notice that the antifreeze has become dark and contains sediment and deposits, then most likely the consumable has already reached the end of its service life and it’s time to change it. Next, you need to remove the audio system from the center console. Remove the frame, pull out the radio itself and disconnect the connectors and wires from it, after which the device can be dismantled. Next, remove the plug and unscrew the screws of the frame that secures the dashboard - in total you need to unscrew 4 screws - two on top and two on the bottom. It is not necessary to dismantle the device itself. After completing these steps, you will need to remove all control levers and sliders from the heating system control unit. Next, the protective cover on the steering column is dismantled; the clamps are located at the top and bottom. The next step is to remove the diagnostic connector cover; it is located in the center console, under the cigarette lighter. To do this, you need to unscrew the screws that secure the connector itself, after which the cover can be removed without any problems. During this step, be careful not to damage the connector. Having done this, you can disconnect the connector from the cigarette lighter. After completing these steps, you need to disconnect all connectors and plugs that are on the center console. At this stage, be careful - it is better to mark all the connectors in advance, otherwise you can confuse them during panel assembly. Next, the signaling unit is removed; to do this, you need to unscrew two screws. This will leave the center frame of the dashboard free so it can be removed. Having done this, you will be able to get to the cigarette lighter illumination connector; it will also need to be disconnected. The next step will be to dismantle the glove box. It is attached to six self-tapping screws; they need to be unscrewed. There are fasteners on the sides of the control panel - self-tapping screws; they will also need to be unscrewed. Remove the screws that secure the ECU mount. Then unscrew a few more screws that secure the heating system control unit. Next, there are plastic trims on the A-pillars; they will need to be dismantled; to do this, again, you need to unscrew the screws. There is a special screw between the steering column and the panel, which also needs to be unscrewed. Having completed these steps, you have loosened the center console, now all that remains is to lift it up and towards the seats. It is not necessary to completely remove the console - you just need to have it pulled back enough to remove the radiator. The panel must be fixed to the side. Now you need to get to the clamps installed on the hoses of the heating unit; use a screwdriver to loosen them. Remove the hoses, but before doing this, wrap them with a rag, since they will most likely release residual antifreeze.
Pay attention to the condition of the pipes - if you see that they are worn out or heavily clogged, or there are signs of damage, then it is better to replace them immediately. The radiator is directly fixed to the heater body using three self-tapping screws - they need to be unscrewed, and the device itself must be removed
After dismantling, the device is replaced with a new one, the assembly procedure is carried out in the reverse order.
Price issue
Prices for radiators vary, but they vary roughly within the same range. The cost of devices depends on the quality of the product, the manufacturer, and the place where it is purchased. For example, Luzar products for the VAZ 2114 on average cost on the market from 900 to 1300 rubles. Aluminum radiators from the manufacturer DAAZ cost on average about 1 thousand rubles.
Loading …
Replacing the heater motor
The following sequential steps must be performed:
- The electrical network is completely de-energized.
- The positive wire should be disconnected from the motor. It is located under the dashboard.
- It is necessary to unscrew two bolts located in the engine compartment. They serve to hold the stove casing.
- Then you need to disconnect the mass.
- Unscrew and remove two bolts that serve to secure the fan to the heater housing.
- The air duct grille is being dismantled. To do this, the element is rotated 90 degrees and removed from the casing.
- The device should be assembled using the reverse sequence. The power supply contacts must be securely fixed. Otherwise, the assembly will have to be disassembled a second time.
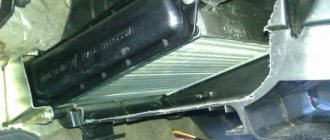
Location and principle of operation of the car heater radiator
The radiator is the main component of the heating system of the car and is located in the heater housing. It is responsible for heating the air in the cabin. This is both a free flow of air and forced from a fan. The radiator, passing coolant, heats up and heats the air passing through it.
Many drivers prefer to use the services of a car service to repair the radiator, although it is quite easy to dismantle it yourself. The fact is that at first glance, its location suggests a complex repair process.
Instructions for replacing the heater radiator VAZ 2114
From the manual for operation, repair and maintenance of VAZ 2113-2114-2115
- Disconnect the negative terminal of the battery.
- Open the tap and drain the coolant from the system.
- Remove the instrument panel.
- On the right side of the stove, loosen the clamp of the heated glass damper rod.
- Unscrew the three screws that secure the heater radiator.
- Remove the radiator from the heater body.
- Loosen the clamps and disconnect the hoses from the heater tap pipes in the cabin, under the panel.
- Loosen the hose clamps and disconnect them from the radiator.
- Installing a new radiator is done in the reverse order.
For more information on this procedure, we recommend this video.
Usually they start replacing the heater radiator when the problem is already obvious, coolant is pouring into the cabin and this is not good, as you yourself understand.
First you need to drain the coolant. Unscrew the screw under the plastic plug.
Unscrew the 2 upper and 2 lower self-tapping screws located at the instrument panel.
Remove the steering column cover by unscrewing 3 screws and three self-tapping screws from the bottom.
Disconnect the connector going to the cigarette lighter.
Disconnect and remove the radio
Now we can unscrew the screw fastening the plastic console from both sides. They are located symmetrically.
Then remove the adjustment flags and the heater fan mode switch.
Now we can detach the console from the panel.
We disconnect the terminals from the buttons on the console; it is advisable to mark them so as not to confuse them later.
Disconnect the plug for the ashtray light.
Unscrew the screws from the diagnostic connector.
Now the console is completely free and can be moved to the side.
We unscrew the 2 screws that attach the metal base to the floor, you can see the first one in the photo, the second one is located symmetrically to the first one on the left side.
Now we need to unscrew the 4 screws securing the torpedo, 2 of them are located on the right, and 2 symmetrically on the left.
We unscrew the two self-tapping screws embedded in the iron base.
We disconnect 2 self-tapping screws located in the iron structure.
We unscrew 2 more screws and remove this structure by pulling out the ECU.
We lift the dashboard and access to the heater radiator is free.
Just in case, place a rag on the floor, since coolant may leak from the radiator. Unscrew the clamps of the heating system.
We drain the antifreeze from the stove and hoses. We remove the old current heater. We reassemble everything in the reverse order.
voice
Article rating
Preparatory work
Now we will look at how to replace the part without having to remove the torpedo.
The first step is to disconnect the negative terminal of the battery and drain the coolant.
To merge everything without loss, do the following:
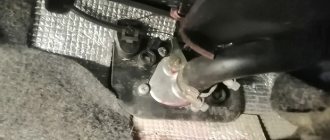
- Unscrew the drain plug on the cylinder block with a 13mm head. The location of the bolt is slightly lower under the ignition unit. There are times when it is better to remove the ignition to gain access to the desired location.
- To collect the coolant, place any container under the car and unscrew the cap.
- Remove the plug from the expansion tank - this is necessary to remove the vacuum, which will prevent antifreeze from leaving the system.
Main causes of malfunction
There can be several reasons for such problems, but the most common are:
- Worn or damaged pipes.
- Incorrect connection of pipes.
- Broken stove tap.
- Radiator failure.
The first of these reasons - wear of pipes - can occur for natural reasons during operation, since the chemicals contained in coolants have a corrosive effect, which is complemented by the influence of high temperature.
In addition, the hoses of the VAZ 2114 stove can be easily damaged by over-tightening the clamps on them. When such damage occurs, fluid leaks from the system.
In total, VAZ 2114 cars have 4 pipes. Two of them are located under the hood and two in the cabin.
Their damage, which led to a coolant leak, can be judged by the following indirect signs:
- there is a constant drop in the liquid level;
- a specific smell appeared in the cabin;
- A puddle of coolant forms under the car or in the passenger compartment while parked.
If at least one of these signs is observed, then urgent diagnostics of the pipes should be carried out and their replacement.
The design of the heating system VAZ-2114
The design of the heating system for cars of the Samara-2 family, including the VAZ-2114 and 2115, was unified to reduce the cost of production and the cost of cars. It is simple and reliable, but from time to time some of its elements fail. The heating system consists of:
- radiator-heat exchanger with connected pipes;
- faucet that shuts off the coolant supply;
- air duct systems with dampers;
- fan for air supply;
- control block.
The air is heated by feeding it through the honeycomb of the stove radiator. The flow is forced by a fan and directed through the air ducts by dampers. The entire system is controlled by a special unit from the driver's seat. In the warm season, the tap allows you to shut off the supply of coolant through the heat exchanger. If the radiator of the VAZ-2114 stove leaks or remains cold when the tap is open, the only solution is to replace it.
Symptoms of a problem
The main reason why probably 90% of people who want to replace the stove radiator turn to a car service center is the following: “the stove is not heating well, what should I do?” In this case (at least in a normal car service, where the mechanics’ task is to solve the client’s problem, and not to fulfill “any whim for your money”), first of all, the cooling system is checked for problems.
Problems that cause this symptom include:
- faulty thermostat;
- air lock in the cooling system;
- the heating radiator is clogged;
- The stove tap is closed.
Let's look at each in more detail below.
Thermostat
One of the reasons for poor heating of the stove in the cold season may be the thermostat being stuck in the open position. In this case, the coolant immediately goes into a large circle when the engine starts. As a result, the car takes a very long time to warm up, the engine does not warm up properly, and the heater does not heat up either.
If in your case poor heating of the interior in winter is combined with slow warming up of the engine, pay attention to the thermostat. By the way, in the hot summer this problem may not be noticed
The engine warms up more slowly than usual, but only an experienced car enthusiast will notice this.
It also happens that the thermostat gets stuck in the closed position. In this case, the stove also does not work, and the engine, on the contrary, boils faster than usual. In cold winter, the problem may not be noticed if you only drive short distances and avoid traffic jams.
Airlock
An air lock most often forms after replacing antifreeze. But there may be other reasons for airing the system. We have a special material on our website completely devoted to this issue. If necessary, we recommend contacting him. It’s easy to check the system: you need to warm up the car until the fan turns on and carefully probe all the pipes
Pay special attention to those connected to the radiator valve fittings. By feeling an area whose temperature is different from the neighboring one, you can verify the presence of this problem.
Heating radiator clogged
Another reason for a poorly functioning stove is this. The radiator clogs for a number of reasons:
- antifreeze does not change at the correct frequency, which is why deposits appear on its walls, which clog the channels;
- there was a breakdown of the pump impeller, particles of which got into the radiator;
- destruction of the inner surface of the radiator due to age-related reasons.
If there is a suspicion of clogging (and there should be, if all other elements of the cooling system are working normally), you should use special means for flushing the cooling system.
Stove tap
It may clog or sour in the half-closed position. Or is it simply covered up? Perhaps the previous owner preferred to drive cool. Check how it opens and closes and whether there are any leaks.
And finally, if all of the above didn't work, congratulations. It begins...
What will be needed for repairs?
Please note that replacing the VAZ 2114 stove can be done in 2 ways: with removing the dashboard and without dismantling the dashboard. Professionals prefer the first method
That is, master mechanics of any service station replace the radiator with a 2114, having first disassembled the top down to the screw. Only someone who has already assembled and disassembled the dashboard with their own hands can handle this work. There are a lot of subtleties and nuances.
Speaking for us, we will replace the VAZ 2114 stove radiator without removing the dashboard.
But again, only highly qualified craftsmen can qualitatively change the design of the machine. We won't interfere there, out of harm's way.
For this job we will need:
- Screwdriver Set
- A set of keys
- A pair of new clamps for the diameter of the radiator pipes
- New radiator. By the way, it’s better to take something imported, for example, Fenox RO0004C3 (it costs twice as much as the original)
- New antifreeze for the heating system
By the way, pay attention to the article about the advantages and disadvantages of various types of radiators. Now let's look at the question of how to replace a VAZ 2114 stove without removing the panel (only the radiator)
Now let's look at the question of how to replace a VAZ 2114 stove without removing the panel (only the radiator).
Tools and materials
To replace the heater radiator in a VAZ-2114 you do not need expensive and complex tools or equipment. It is enough that almost every car enthusiast has a new spare part in his garage. To complete the job you will need:
- new heater radiator - aluminum or copper;
- a set of ring and open-end wrenches, you can use a set of sockets with a ratchet;
- curly screwdriver;
- set of hexagons;
- container for draining antifreeze;
- fresh coolant, no more than 4 liters.
Additionally, it is better to stock up on rags to wipe off antifreeze that has spilled into the cabin; in addition, you will need a stop for the torpedo - a wooden block of 50x50 mm, about 40 cm long, is perfect.
Removing the heater radiator on a VAZ-2114
The design and structure of the VAZ-2114 heater is fundamentally no different from any similar one. If it is definitely established that it is the heat exchanger that is leaking (or clogged), then you need to change it. This can be done without removing the tidy or by removing it.
Replacing the heater core without removing the instrument panel
- Remove the terminals from the battery to avoid shorting the wiring.
- Drain the coolant into a separate container (this fluid can be reused, so do this as carefully as possible).
- Unscrew the screws securing the glove compartment and console.
- Remove the steering column cover.
- Unscrew the screws that hold the front dashboard (so that you can move it freely).
- Remove the heater operating mode control cables, which are located on the driver's and passenger's sides.
- Disconnect the cigarette lighter connector.
- Disconnect the center console connectors, first marking them (1, 2, 3, etc.) to facilitate reassembly.
- After unscrewing the two screws, remove the signaling unit.
https://www.youtube.com/watch?v=GcNZ7y50KQ4
- Remove the plastic ends from the heater and damper adjustments.
- Remove the central frame of the tidy, then disconnect the cigarette lighter illumination.
- Unscrew the fasteners on the sides (one screw at the top and bottom).
- Unscrew the bolts securing the engine control unit.
- Unscrew the bolts securing the iron frame to the bottom (on the left and right sides).
- It is better to remove the trim of the front pillars so that they do not interfere.
- Remove the screw between the dashboard and the steering column.
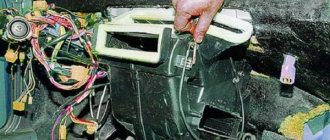
- Remove the cover from the heat exchanger.
- Unscrew the two screws closer to the passenger door and the one on the panel in the upper right corner, it is closed with a plug near the buttons.
- Carefully move the dashboard towards the seats, lift it up a little and lock it in such a position to easily remove the heat exchanger (you need to pull it out very carefully so as not to break anything).
- Remove the clamps and disconnect the rubber ones (place a container under them so as not to spill the “precious” coolant).
- Remove the heat exchanger by unscrewing the three screws securing it to the housing.
Replacing a radiator with complete removal of the dashboard
This method is suitable for those who, in addition to replacing the heater, plan to take care of the appearance of their car’s dashboard (switching to modern devices, installing LED lighting, etc.) or gluing additional sound insulation. This method is much more labor-intensive than the first and requires additional skill and skill. Well, the result, of course, can be noticeably better: not only will the interior heating improve, but the appearance will also change. This method is also suitable for those whose dashboard squeaks and at the same time you can glue the tidy and get rid of the squeak.
Let's start in order:
- Disconnect the equipment from the power supply (by disconnecting the terminals on the battery).
- Remove the side trims.
- Remove the radio (if you have one).
- Turn off the cigarette lighter and remove the ashtray.
- Disconnect the stove control levers.
- We unscrew the two screws on the right and left sides of the tidy.
- Remove the plastic trim by unscrewing the screws from the top and bottom of the dashboard.
- We unscrew the screws securing the tidy in the area of the center console.
- Remove the plug in the upper right corner of the dashboard and unscrew the screw.
- To remove the cover, you need to unscrew the two screws holding the bottom of the cover.
- We move the cover and after marking the connectors, disconnect them.
- Remove the steering column trim by unscrewing the fastener.
- Unscrew the lower bracket fastening.
- We remove the intermediate housing from the torpedo socket.
- Unscrew the holder and controller of the fuel injection system relay.
- We pry up the dashboard and press forward. There is a cable coming from the speedometer, it needs to be pulled out.
- Remove the decorative inserts on the dashboard.
- Now you can remove the torpedo carefully, checking again to see if everything is disconnected.
After removing the heat exchanger, you need to purchase a new one. It can be: copper (brass) or aluminum. Which one is better is up to you to choose; we will only tell you about their qualities.
Reassembly Features
When reassembling the car after replacing the heater core, pay attention to the following nuances:
- Pay attention to the seal in the windshield area - it must be in place.
- The center nozzle body must be in its proper place without deviation.
- Place the wiring in the same openings where it was before disassembly, so as not to do unnecessary work several times.
Once assembly is complete, tighten the drain plug and fill in with new antifreeze. You can use the old one, but it is better to use a new consumable. After completing all this work, start the car until the radiator fan starts working.
After this, check all connections for leaks. Make sure the heater and dampers are working as they should.
The final step is to check for proper operation of the electrical equipment of the dashboard.