Causes of toothed belt wear on VAZ 8 valve engines
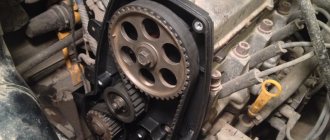
- Wear of the timing belt on the front side is the main cause of a worn pump, but sometimes it can also be the tension roller stud and, in very rare cases, the camshaft sprocket. To eliminate this problem, replace the worn part.
- Wear on the rear side is much less common. The main reason is the bolt on the oil pump. Over time, the belt tension weakens a little and, vibrating, it begins to reach this bolt. It’s very easy to fix this problem; we replace the Torx sprocket bolt with a regular 10mm socket, its head is smaller and the timing belt is no longer missing. The photo shows wear from the belt.
Diagnostics
Diagnostics must be carried out every 20,000 km of the vehicle. To do this, remove the protective cover and inspect the belt. The belt should not have chips, tears or cracks. Also, it should not have unraveling threads, etc. After inspecting the belt, it is necessary to inspect the rollers and listen to them with the engine running for noise.
Old cracked timing belt
It is necessary to inspect the alignment of the belt relative to the camshaft pulley, crankshaft, pump and rollers.
Install a new belt and tension it
Work order
1. We put on the belt, starting with the crankshaft gear.
2.Having passed the belt through the fluid pump gear and tension roller, we put it on the timing shaft gear.
3. To tension the belt, a special key is usually used to rotate the tension roller. If you do not have such a tool, you can use ordinary self-tapping screws, screws or bolts. We insert them into the holes in the roller body (2 pieces), and by passing a screwdriver between them, rotate the roller counterclockwise, tensioning the belt. Periodically check the belt tension.
4. The belt tension, without using a special tool called a strain gauge tester, can be checked by rotating it around its vertical axis. To do this, grasp its surface with two fingers (thumb and forefinger) at the point between the timing camshaft sprocket and the fluid pump gear, and rotate the belt around its vertical axis. If its plane rotates more than 90 degrees, tighten it further. The tension can be considered optimal when the belt rotates 80-90 degrees. But do not overdo it: too much tension will wear out both the belt and the pump bearing.
5.If the timing belt tension is normal, tighten the nut securing the tensioner pulley (13 wrench). We pull out the screws (screws, bolts) from the roller body.
6. Throwing a 19mm wrench onto the crankshaft pulley mounting bolt, turn the shaft 2 turns. Check to see if the marks have gone astray. If everything is normal, we continue installation. If the marks are lost, you will have to remove the belt and repeat everything again.
7. On the crankshaft, unscrew the generator drive pulley bolt again (19mm wrench). Install the previously removed pulley onto the crankshaft. Fix the flywheel with a screwdriver and tighten the bolt.
8. We put on the generator belt and tension it.
9. We check the results of the work done. We start the engine and listen to its operation. If the engine runs normally, then you have done everything correctly.
10.Put the protective cover of the timing drive in place, tighten the 3 bolts securing it (10mm wrench).
11. Bend the engine protection and use the same wrench to tighten the 2 bolts securing it to the body.
12.Mount the right front wheel.
13. We lower the car, do not forget to securely tighten the bolts securing it.
This, in principle, is the entire algorithm for replacing the timing belt. As you can see, it is not as complicated as it might seem at first glance. Of course, it is impossible to foresee all the nuances that may arise during the replacement process, but the information provided should be sufficient to cope with this task. Moreover, in the event of an error, the engine will not be damaged in any way.
If you still have questions or need more detailed information, watch a video about how the process of replacing the timing belt on a VAZ 2115 car takes place
A broken timing belt while on the road can cause a lot of inconvenience. On a VAZ-2115, this breakdown can lead to bending of the valves, which can lead to more expensive repairs. An unpleasant situation can also arise if a breakdown occurs on the road. Below we will look at the causes of this malfunction and provide instructions for eliminating it.
Installing a new belt
Installation of the timing belt VAZ 2113, 2114, 2115 8 valves is carried out in the reverse order of removing the worn part. Before starting work, carefully check the position of the timing marks in the timing mechanism drive again. Failure to perform this check may damage valve train components in the cylinder head. There are known cases where, in addition to valves, pistons and, in some cases, connecting rods were damaged. Install the adjusting washer first, then the tensioner roller, screw the nut onto the bolt securing it, but do not tighten it. When the engine cooling system pump is changed, a new spare part is installed. Next, the order of work will be as follows:
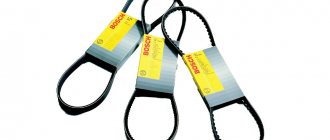
Which timing belt to choose
To make it easier for you to find the answer to your questions about which belt to choose or which belt is suitable, we have prepared a table for selecting timing belts for different brands and models of cars:
| Brand, model | Original code | Code analogue |
| Renault timing belt | ||
| Timing belt Logan | 7701477024 130C17480R 130C10178R | K015662XS 130C17529R |
| Timing belt Logan 2 | 130C17480R 130C10178R | K015662XS 130C17529R |
| Timing belt Largus | 130C17480R 130C10178R | K015662XS 130C17529R |
| Timing belt Duster | 130C11551R 7701477028 130C13130R 130C10178R | 130C17529R |
| Timing belt Renault Clio | 7701469776 7701472726 130C10178R | 130C17529R |
| Timing belt Sandero | 130C17480R 130C10178R | K015662XS 130C17529R |
| Timing belt Sandero 2 | 130C17480R | K015662XS |
| Timing belt Sandero Stepway | 130C10178R | 130C17529R |
| Timing belt Sandero Stepway 2 | 130C10178R | 130C17529R |
| Timing belt Symbol | 7701477024 | |
| Timing belt Megan | 7701469776 7701472726 130C10178R | 130C17529R |
| Timing belt Megan 2 | 130284231R 7701063999 130C13130R 130C13191R | CT977 |
| Timing belt Megan 3 | 130C13191R 7701477028 | |
| Ford timing belt | ||
| Timing belt Focus 2 | 1672144 | VKMA04226 |
| Timing belt Focus 3 | 2045356 | KTB764 CT881K5 VKMA04226 530049510 KD452.24 |
| Fusion Timing Belt | 1672144 1672143 | |
| Daewoo timing belt | ||
| Timing belt Nexia | 1987948226 530 0332 10 5900270 | |
| Timing belt Opel | ||
| Timing belt Opel | 95516740 | |
| Chevrolet timing belt | ||
| Timing belt Lacetti | 93185845 93746917 | |
| Timing belt Cruz | 95516740 | |
| Hyundai timing belt | ||
| Timing belt Accent | 24312-26001 | |
| Solaris timing belt | 24321-2B200 | |
| Timing belt Elantra | 24321-2B200 | |
| Timing belt Skoda | ||
| Timing belt Octavia | 06A198119D | |
| Timing belt Fabia | K035565XS | |
| Kia timing belt | ||
| Rio timing belt | 24321-2B200 | |
| Timing belt Soul | 24321-2B200 | |
| Timing belt LED | 24321-2B200 |
Timing belt options for VAZ
- Timing belt VAZ-2110, VAZ-2112
- Priora timing belt
- Granta timing belt
- Timing belt VAZ-2108, VAZ-2109
- Timing belt VAZ-2105, VAZ-2106, VAZ-2107
If you can’t decide where to buy a timing belt in Volgograd, Volzhsky or another city in the region, contact us, you can’t go wrong.
Pay special attention to how to set the timing marks
. We suggest taking a little more time to watch the video of replacing the timing belt on a VAZ with a 16-valve engine.
Replacement frequency
Natural wear, improper operation or other reasons lead to failure of the timing belt and the need to replace it. At the same time, there is no need to take the situation to the extreme: it is enough to carry out regular diagnostics and visual assessment of the part. Such a check will help to avoid a break at the wrong moment.
Abrasions indicate obvious wear on the timing belt.
The frequency of replacing the timing belt depends on the specific brand of car and is indicated in the vehicle’s operating manual. Despite the standards established by automakers, many experts advise changing the spare part every 50 thousand kilometers.
When buying a used car, you will have to check the condition of the timing belt yourself - a visual inspection of it for wear is enough. Clear signs of wear are abrasions or cracks on the surface of the belt. However, the presence of such defects does not mean that the belt will immediately fail, since inside it there is a base consisting of metal rods. Thanks to them, the part can withstand shock loads and maintain its working condition throughout its entire service life.
A cracking timing belt is another clear sign of wear.
Some cars are equipped with timing belts with reinforced metal cord, which affects their service life, increasing it by an average of 30%. Modern car models are equipped with belts made of rubber and metal, which have a limited shelf life.
Such parts cannot be repaired; if they fail, they are simply replaced. The decision to replace the belt is made not only if it breaks, but also if it sag, stretches or reduces the tightness of the fit, which negatively affects the synchronous operation of the valves. As a result, this can lead to malfunctions in the functioning of the entire car, the main symptom of which is engine malfunction.
Visible traces of belt stretching, as well as abrasion along with cracks, indicate that it has worn out
Almost always, the water pump or water pump is replaced along with the timing belt. On most cars, this device copes with its duties perfectly until the car dies, however, in some situations it needs to be changed ahead of schedule. For this reason, experts advise changing the pump at the same time as the timing belt.
The water pump is a part that is replaced along with the belt
Step-by-step replacement instructions
We will learn how to properly tension the belt and how to set the marks from the video from the channel In Sandro’s Garage.
Tools and materials
To replace a belt on a 16-valve, you will need the following tools:
Replacing the timing belt on a VAZ twelfth model
Algorithm of actions
Installing and tensioning the timing belt on a VAZ 2112 occurs as follows:
- We put the car on a horizontal surface and open the hood.
- We remove the ground terminal from the battery to de-energize the on-board circuit.
- We unscrew the 6 fastening bolts of the belt drive casing to the left of the cylinder head.
- We disconnect the contacts on the crankshaft sensor and check the synchronization of the marks on the camshaft gears with the marks located on the rear surface of the casing.
- There should also be similarities in the marks on the flywheel crown. To check whether it is there, use a screwdriver to unscrew the plug on the crankcase under the thermostat. Above the plug there is a flywheel gear, and on it there is a mark. If the mark aligns with the cut on the crankcase on the left, then everything is in order.
- We adjust the belt tension so as to loosen it and check the crankshaft pulley mark. We remove the belt from the pulley and secure the current position of the flywheel by holding a screwdriver between the crown and the crankcase.
- Use the seventeenth key to remove the generator pulley bolt and check whether there is any similarity between the crankshaft gear with the mark and the mark on the surface of the oil pump.
- We remove the tension roller with the fifteenth key and the support roller; Next we remove the timing belt. We replace the removed rollers and install a new belt.
- Installation begins with the crankshaft pulley. When tensioning the belt, turn the tension roller clockwise, using a special key prepared in advance. You can use pliers with curved ends instead of a wrench. We adjust the tension until it is the best. The best belt tension is when, when grasped with your fingers, it rotates 90 degrees - no more.
- Collecting parts occurs in reverse order. At the last stage, remove the screwdriver clamped in the crankcase. After watching the video from the VAZ 2112 Repair channel, we will learn how to change the belt.
Timing belt breaks: how to set marks
The timing belt plays an important role in the operation of the gas distribution mechanism (GRM) of a car, namely: it serves to transmit the moment of force from the crankshaft to the camshaft, as a result of which fuel and air are distributed in the engine cylinders. If the timing belt is faulty or worse, broken, this leads to various engine malfunctions. The most serious consequence is the result of a timing belt rupture when the engine valves bend. Then, to bring the engine back to normal, a major overhaul is required.
To avoid this, if the timing belt slips or breaks, it needs to be changed immediately, and the most important point here is to set the marks correctly, since when replacing the belt, the marks often get lost. If the timing belt marks, when replacing it, are not set correctly, then the gas distribution mechanism, and accordingly, the camshaft will also not function correctly.
In detail: Read and see about replacement timing, signs of timing belt wear, and replacement here.
Tools you will need to replace the belt: a jack, a socket wrench, small screws or drills, a socket wrench, spanners, and a screwdriver.
How to set timing belt marks before replacing it?
Before removing the old belt, you need to set the engine to the TDC position (the so-called top dead center). This will help save time and not waste it on tuning the engine after installing a new part.
Labeling is possible in one of the three available ways. Choose which one you like best:
- Align the o on the flywheel with the tooth located in the window on the top of the gearbox.
- Align the notch on the pulley with the arrow on the timing belt housing. As a result, the notch should be vertical and the arrow should point down.
- This method is not safe; it is better to prefer the first two. Remove one spark plug and insert a long metal object in its place, pressing it against the piston. Then, while turning the engine, find the point where the piston is as high as possible. The piston must be left in this position to replace the timing belt.
Setting valve timing by marks on VAZ 2113, VAZ 2114, VAZ 2115
Welcome! Valve timing - thanks to these phases, the engine operates synchronously and there are no malfunctions in its operation, but if the valve timing is disrupted, then either the piston will reach the top point at the wrong time when it should, or the valve will lag, and therefore it will be very pronounced engine operation with interruptions at idle, well, the engine will not really run, so to prevent this from happening, the valve timing should always be set according to the marks and the engine will thus work correctly and synchronously, by the way, when everything is set according to the marks (Camshaft , crankshaft), then you automatically have all the parts of the Gas Distribution Mechanism set to “TDC is the Top Dead Center” and to “BDC is the Bottom Dead Center”, for example, you set the crankshaft according to the marks, then the pistons of the first and fourth your cylinder will automatically rise to the very end and will be at TDC, and the pistons of the third and second cylinder will lower and will be at BDC, so that you can clearly see what it looks like from the side, look at the photo just below, in which those same pistons are located like we said it in this article (That is, some are in the NMT, while others occupy the top point).
Note! To make this installation, you don’t need a lot of tools, of course, if everything is set up correctly, if your phases are all out of order (that is, the marks are not evenly aligned, for example, the mark on the camshaft matches, but not on the crankshaft), then you will need more tools, because the timing belt will have to be removed, in general, to carry out all the work, stock up on: Spanners, spanners, screwdrivers, as well as small screws, or instead of screws, you can take thin drills, you can also stock up on a wrench with spanner heads, Well, that’s all, if you just need to set everything according to the marks, then you won’t even need screwdrivers with drills (This is if you remove the timing belt), ring wrenches and wrenches will be enough, by the way, you completely forgot, also stock up on sockets if you have them (You can use them instead of a socket wrench)!
How often to change the timing belt and pulley?
There is no clear answer here. The fact is that all car mechanisms constantly wear out and are subjected to excessive loads.
Therefore, you can pay attention to the recommendations of the manufacturer only if the car is new - up to 5-7 years. In this case, replacement is carried out every 55-60 thousand
km. If the car is old, then reduce it by 15 thousand km. this figure is bold. The fact is that only engines with a volume of 1.5 liters will survive the break calmly and without consequences. But on eights, for example, they installed 1.3 engines, in which the valves bend.
Very often the timing belt on the VAZ 2114 and similar models wears out. This happens due to severe wear of the liquid pump. Its resource is no more than 90 thousand km. And then only if it is of high quality. What if you come across a defect or an obvious fake? Then it can break down even after half an hour of driving. When the pump wears out, the roller eats rubber from the outside. And the more wear on the pump, the more visible the damage to the belt. So, the conclusion is this: change the timing kit (roller and belt) every 40-45 thousand km, install a new pump every second.
Consequences of incorrectly setting timing marks
If the ignition is set incorrectly, the following negative aspects are possible:
- If the engine has 16 valves, then they become deformed or bent during operation, accumulating damage.
- The previous problem causes damage to the cylinder head.
- The guide bushings may also become unusable.
- Cracks may appear in other engine components.
Crack in the cylinder block
- The motor overheats.
- The engine piston mechanism can burn out.
- Oil residue may appear on the spark plugs.
Oil deposits on spark plugs
- The fuel mixture loses its ignition moment.
Note! If the engine has 8 valves, then the consequences are not so critical - traction disappears, the belt quickly wears out and breaks.
After repairs, the following factors most often indicate an incorrectly set ignition:
- The car accelerates worse.
- Frequent overheating of the motor.
- The craving became much worse.
Installation process
The timing belt itself is a rubber product closed with teeth inward, which synchronizes the torque between the camshaft and crankshaft. Ignoring its wear will not lead to anything good, because in the best case, your engine will stall while driving, and in the worst case, the entire wheelbase will jam, which can lead to the most unpredictable incidents on the road.
The replacement and debugging itself is carried out in two stages, in the first stage the main repair and debugging work is carried out, and the second stage carries the function of monitoring the work done.
First stage
- The assistant gets into the car and puts 5th gear in the gearbox, and at this time you remove the front belt protection.
- Insert the ratchet into the place allocated for it and begin to turn the crankshaft, you need to do this until you see that the mark located on the camshaft has not moved to remove several teeth from the control antenna of the rear cover. (this action is necessary to reduce the degree of belt tension).
- We dismantle the drive pulley on the crankshaft and return the mounting bolt to its place.
- The assistant switches the gearbox to “neutral”.
- Again, we begin to carefully turn the crankshaft until the mark on the VAZ 2114 flywheel is in the central position.
Coincidence of the mark on the flywheel with the slot in the bar
- We check that the installation mark of the rear cover matches the mark located on the camshaft pulley; if they match, then you can unscrew the roller nut, then remove the belt itself.
- We install a new belt - we start with the roller, then we put it on the pump pulley and lastly on the crankshaft pulley.
- We adjust the tension by turning the adjusting roller counterclockwise.
- Carefully turn the crankshaft again so that the marks are in their previous position (they will 100% go astray when putting on a new belt and adjusting the tension).
Mark on the crankshaft pulley
Second stage (control-final)
- Before checking the timing marks on the VAZ 2114, you need to fix the pulley on the generator and tension the belt with a roller to the maximum.
- Now we check all the matches, if nothing is wrong anywhere, then we install the protection back and clean the workplace.
Looking under the hood of your car, with knowledge of this information, you will understand that there is nothing difficult in this procedure, but its success is quite dependent on the skill of the performer. Therefore, if something doesn’t work out the first time, just repeat the operation, you may even need to do it twice. Don’t be discouraged, because after the difficult first time it will only take you a few minutes, like a seasoned professional.
Timing marks VAZ 2114: install correctly
There is nothing difficult in the work - there are only three marks that you need to focus on. The preparation stage for replacement is as follows:
- Place the car on a flat surface and place chocks under the left rear wheel.
- Loosen the front right wheel bolts.
- Raise the right side with a jack.
- Completely unscrew the bolts and remove the wheel.
- If present, remove the protection.
- Remove the timing belt compartment protection cover - three bolts with a “10” socket head.
“If you do all the work carefully and fix the shafts, then there is no need to set marks” is a standard misconception, but it does exist if certain conditions are met. In most cases, this “trick” does not work; the shafts still need to be installed. Further work takes place in several stages:
- Remove the generator belt.
- Turn on the fifth gear and have an assistant sit behind the wheel and hold the brake pedal.
- Using a 19mm wrench, unscrew the crankshaft pulley bolt.
- Using a key set to “17”, loosen the tension roller.
- Remove the VAZ 2114 timing belt.
That's all, now you need to turn the crankshaft until the mark on the flywheel matches the slot in the bar. You observe this through a special window located in the clutch housing. If you make the adjustment yourself, first rotate the crankshaft and watch when the notch on the pulley points up. After this, make an accurate installation through the viewing window. And don’t forget about the camshaft - there is a mark on its pulley that aligns with the bar located on the cylinder head.
Having set the VAZ 2114 timing marks, you can install the belt. And don't forget to change the video! The old one will quickly become unusable and, at best, will begin to make unpleasant sounds. At worst, the belt will jam and break. Installation is carried out in reverse order. After tightening, it is extremely important to make sure that all marks match - turn the crankshaft several turns. Check the marks on the flywheel and camshaft. If they match, then you can put the wheel and casing in place.
VAZ camshaft drive diagram: 1 — crankshaft toothed pulley; 2 — toothed pulley of the coolant pump; 3 - tension roller; 4 — rear protective cover; 5 - camshaft toothed pulley; 6 — toothed belt; A - installation ledge on the rear protective cover; B - mark on the camshaft pulley; C - mark on the oil pump cover; D - mark on the crankshaft pulley
This replacement of the timing belt on the injection engine of the VAZ 2111 family, VAZ 2113, VAZ-2114, VAZ-2115
Using a 10mm wrench, unscrew the bolts of the front timing cover: two on the side and one in the center.
Removing the VAZ timing cover
To adjust the belt tension, turn the crankshaft counterclockwise so that the mark on the camshaft pulley moves down from the rear cover antenna by two teeth.
How to change it yourself?
You can replace the belt on an 8-valve VAZ 2114 with an injector engine yourself or by ordering the appropriate service at a service station. During the shift process, there are nuances that must be taken into account when performing the task. If you make mistakes and do not change the strap correctly, this can lead to rapid wear and breakage. Below are instructions for replacing the belt in a VAZ 2114 8 valve.
Tools
If you change the belt yourself, prepare the following:
- a set of open-end wrenches, you will need tools for 13 and 17;
- long flat blade screwdriver;
- 10mm ring wrench, you can use a ratchet head;
- key for installing the tension roller;
- wheel wrench;
- jack.
User Pro Remont shared a video that describes in detail the procedure for replacing the timing belt pulley and timing belt in a VAZ 2114 car.
Algorithm of actions
How to change a belt correctly:
- Drive the car into a garage with a pit. The surface on which work is performed must be level. Switch the gear selector to neutral position.
- Loosen the bolts on the front right wheel. Place this part of the car on a jack so that the wheel can be rotated.
- Open the hood of the car. Using a 10mm wrench, remove the three screws that secure the plastic strap protector.
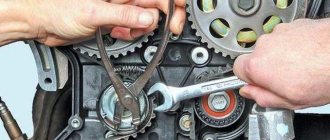
- Using a 13mm wrench, you need to loosen the bolt that secures the tension roller. Remove the device.
- You can see a mark on the camshaft gear; it is made in the form of a rectangular protrusion on the edge. When performing work, it is necessary that this mark coincides with the protrusion located on the fastening of the strap casing. If these marks do not match, you need to turn the wheel until they match.
- Then find the rubberized plug installed on the top of the clutch housing; it is located to the right of the power unit’s BC. The part is carefully pryed off with a screwdriver and removed from the seat. Under the plug you can see the flywheel crown; there is a mark on this device. It should be opposite the triangular protrusion located on the left. If the marks do not match, then take a 17mm wrench and loosen the tensioner. Using a pulley removal wrench, turn the device counterclockwise to loosen the timing belt.
- When the upper part of the belt is removed from the gear assembly, take a 17mm wrench and turn the crankshaft until the flywheel marks are opposite each other. The flywheel itself must be secured in this position; to secure it, use a screwdriver and install it between the teeth. If you have an assistant, ask him to hold the tool to prevent it from turning.
- Now you can remove the right wheel. Unscrew the screws that secure the arch protection and dismantle it.
- Using a 17 mm wrench, unscrew the nut securing the generator set pulley. When unscrewing, make sure that the flywheel does not turn.
- Dismantle the generator pulley and remove it from its seat.
- Remove the timing belt from the crankshaft disc.
- Using a 17mm wrench, completely unscrew the tensioner pulley lock and remove it from its seat. If you loosen the fastening, the belt can be removed.
- Install the new product onto the crankshaft disc. When installing, make sure that the marks are not broken. Install the generator set drive pulley by first placing a strap on it.
- Place the product on the gear of the mechanism. Install the tension roller.
- The strap is being installed. During installation, the tension roller must be turned with a special tool purchased in advance at the store. If you don't have one, you can use two self-tapping screws and a screwdriver. Self-tapping screws are installed in the grooves, and a screwdriver secures them. Turning is done counterclockwise. Tension the belt using the tension roller and tighten the screw that secures the roller.
- It is necessary to set marks if they are lost during the work process. The installation procedure for all components is performed in reverse order.
Photo gallery
Photos of belt replacement are shown below.
Remove the screws securing the timing belt guard.
The mark on the camshaft gear must coincide with the mark on the housing mount
Loosen the strap tension roller by turning it counterclockwise
Remove the belt from the pulleys and install a new product
Unscrew the nut securing the generator shaft
Put on the new belt and tighten the roller
Checking the set ignition
To check the ignition on an 8-valve engine, an injector, you should prepare:
- Multimeter.
- Set of keys and screwdrivers.
- Pliers (necessarily with insulated handles).
Attention! Due to the lack of special equipment, the described method can only test the operation of the circuits. Diagnostics of the microprocessor part will not be available.
The process is:
- When the ignition is turned off, check how tightly the high voltage wires are seated and what contact is in the module.
- Remove the connector from the module, connect a multimeter (monitoring mode should be low AC) to pins C and B, make sure there is voltage. Check the coil (2nd and 4th contacts).
Checking the presence of power on the ignition module
- Check the functionality of high-voltage wires. Install a working spark plug in each cap in turn, attach one end to the block and crank the engine with the starter. The presence of a spark signals that everything is normal. Its absence on each wire means the module is faulty.
Checking high voltage wires
If you managed to set the ignition correctly on the VAZ model and this was confirmed by the test, but problems are still observed, you need to check the power system.
Timing belt on a VAZ 2115 car
The belt drive on the VAZ 2115 is identical in size to the VAZ 2110 - 2114. Technical characteristics of the drive: length 1306 x number of teeth 116 x width 9.5 mm.
| Name/article | Price in rubles |
| Original | |
| VAZ-2112 / 2110 engine 16 valves, 2112-1006040-83 | From 1600 |
| VAZ 21120 (2110)-1006040-00 | From 1600 |
| VAZ 2112 (2110)-1006040 (16 valves) | From 1600 |
| GATES K015644XS | From 2000 |
| GATES K015536XS (16 valves) | From 2000 |
| GATES K055781XS, K015587, K015564 | From 2000 |
| Analogs | |
| BOSCH 2112-1006040 | From 1200 |
| INA 530055410 | From 1200 |
| CONTITECH CT996 | From 1200 |
| GATES 5539 | From 1200 |
| BOSCH 1987948286 (16 valves) | From 1300 |
| BOSCH 1987946329 | From 1300 |
| CONTITECH CT527K2 | From 1800 |
| CONTITECH CT1137K1 | From 1800 |
| LYNXauto 137FL22 (16 valves) | From 1500 |
| Hola TH1372 (16 valves) | From 1500 |
| BOSCH 198798527 (tension rollers) for VAZ 8 and 16 valves | From 450 |
We recommend: How to drain the coolant and flush the engine cooling system on a VAZ 2114
*check prices with an authorized dealer at the time of purchasing parts.
Before purchasing components, check the compatibility of the part with your technical device. Check the article numbers with the data specified in the operating instructions.
When replacing parts, do not forget to place marks on the crankshaft and camshaft. Many car enthusiasts neglect the rule, as a result of which the engine does not start, operates unstably, and the ignition timing shifts.
Which manufacturer is better: domestic or foreign? Russian analogues are not inferior in quality to imported ones. Whether it’s worth overpaying for “delivery” - decide individually, but you need to listen to the opinion of experts.
Causes of timing belt wear on VAZ 2115
- Duration of vehicle operation without intermediate prevention and diagnostics;
- Installation of non-original parts, poor workmanship;
- Mismatch in length, width, number of teeth;
- Aggressive driving style, speed limits;
- High, low temperature conditions, climatic features of the region where the technical product is used.
Mark on the flywheel
ATTENTION! A completely simple way to reduce fuel consumption has been found! Don't believe me? An auto mechanic with 15 years of experience also didn’t believe it until he tried it. And now he saves 35,000 rubles a year on gasoline! Read more"
The mark for setting the ignition timing or TDC on the flywheel is a thin, as if scratched line. The mark is located not on the crown, naturally, but on the mirror of the element (smooth plane). Unfortunately, this mark often rusts, and it is useful for the motorist to occasionally clean it with a screwdriver or an awl.
Along with this mark, there are holes or recesses on the mirror. These are also special risks intended for proper installation of the flywheel on the end of the crank shaft.
You will be able to see the marks on the crank shaft balancer, if nothing has been disassembled from the car (the box has not been dismantled), through a special hatch. Of course, you need to use the help of an assistant, without this there is no way. One person should quietly rotate the crankshaft, the other should monitor the marks. You need to look under good lighting so as not to miss the required mark. If there is not enough lighting, use a flashlight.
It is more correct to call the flywheel mark a risk. There are several types of tags, and the risk cannot be confused with the others.
For example, on the 8-valve engine of the domestic G8 and later models of the automotive industry there are marks of the following type:
- on the camshaft sprocket (the mark looks more like a protrusion);
- on the back of the drive belt cover (more like a tendril);
- on the flywheel (risk);
- on the rear side of the clutch housing (looks like a triangle);
- on the crank shaft pulley (resembles a dot);
- on the oil pump cover (triangular cutout).
The last two marks are visible only after removing the generator drive pulley. The triangle-cutout of the clutch housing is better visible after removing the gearbox.
But on the 16-valve power plant of the domestic 21126, the marks, in addition to those described above, are also located in the following places:
- on the sprockets of both camshafts in the form of protrusions;
- on the back side of the camshaft belt drive cover (triangle cutout).
Reference. A car flywheel is a special mechanical part made in the form of a disk. It is fixed with bolts to the rear end of the crank shaft and serves mostly to conserve inertial energy.
All the steps to replacing the timing belt “from start to finish”
Before replacing, you need to make sure that: neutral gear is engaged, the car is stopped, the minus terminal is removed from the battery (key “10”). The plastic cover is removed from engine 11183 and the part is carefully pulled up. Then remove the drive casing:
- Unscrew the three fastening screws and remove the plastic part (see photo).
Timing casing on motor 2111 and 11183
Using the “17” key, rotate the crankshaft and see when the marks on the upper pulley and on the engine coincide. Then, opening the plug, we check the alignment of the marks in the clutch housing. Immediately fix the flywheel with a screwdriver.
Marks on the pulley and flywheel
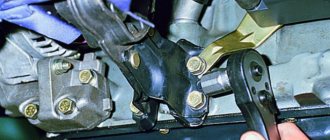
An alternative way to “break” the timing belt
It is impossible to replace the timing belt on a VAZ-2114 without removing the alternator belt. loosen the upper and lower fastening screws, mark the position of the adjusting screw and unscrew it by 80%.
How to move the generator to the engine
Using a 17mm wrench, unscrew the screw securing the generator drive pulley. During installation, you will need to ensure that the marks match (see photo). The screw tightening torque is 99-110 N*m.
Generator pulley on engine
Loosen the nut on the roller, turn it and remove the belt. Now you can replace the roller itself.
The final step for dismantling
When installing a new belt, the upper pulley is once again aligned according to the marks (see above). The locking screwdriver is removed after installation.
New timing belt installed
How to adjust tension?
If everything was done correctly, it means that the belt can be turned half a turn with two fingers, but no more (as in the photo).
Correct tension setting
A fork wrench is used to make adjustments. If you don't have such a wrench, circlip pliers will do. Hold the roller with a wrench and tighten the nut.
The holes for the key should be located under the nut from below. This is the correct position of the roller.
Recommendations
- Before installing a new belt, wipe all pulleys, that is, the teeth on them, with white spirit. And the adjusting screw can be treated with a rust solvent.
- There is no point in protecting a new belt with silicone lubricant. By the way, according to the regulations provided for the VAZ-2114, the timing belt must be replaced every 60,000 km or if necessary. And the need can even be caused by oil products getting on the rubber.
Apparently, an assistant must fix the flywheel: the clutch housing and timing drive are located on two different sides.
2108-1006120 – roller
Attention. parts 2108-1006120 and 2112-1006120 are not interchangeable!
2108-1006129 – pin for the roller;
2108-1006040-10 – belt;
2108-1006149 – seal under the casing;
2108-1006146 – plastic casing.
Analogs of belts
- GATES 5521 or 5521XS (heavy duty), recommended
- FINWHALE BD-111
- BOSCH 1 987 949 559
- LEMFORDER 58-111-19 or 14458 01
- CONTITECH ST-527
- GOOD YEAR G1474 (semicircular tooth) or G1485 (trapezoid tooth)
- DAYCO 111x190/1
- HANSE HZ 011 008
- BRTI 21080-1006040-10
- TOYOTA 13568-19035
- RENAULT 7701462019
- OPEL 636359
- ROVER GTB1124
- AYWIPARTS AW2110560
- PROCODIS FRANCE 05CD27
- FAI 40305
- GK 791170
- MAGNETI MARELLI 340018181434
- MAPCO 43080
- HEPU 29-0165
- OPTIMAL R-1113
- SCT G124
- WILMINK WG1151273
- VEYANCE G1474
- OPTIBELT ZRK 1123 (3 pcs.)
- TRISCAN 8645 5521 (2 pcs.) or 8645 5124 (2 pcs.)
- FLENNOR 4410 (2 pcs.) or F904410 (belt + roller)
- LYNXauto 111CL19 (1 piece) or PK-1236 (belt + roller)
Analogues of the video
- GATES T42042 or T42042A (2 pcs.)
- MAPCO 23081
- FLENNOR FS99018
- LUK 531 0671 20
- OPTIMAL 0N1917
- BREDA LORETT TDI3009
- TORQUE 830900AE2
- ESPRA 2108-1006120/ES0108
- INA 531075010
- CORAM C747
- VPZ-23 830900AE1
TDC marks VAZ 2110 2114 8 valves
The TDC marks are located on the camshaft timing belt pulley (lug) and on the rear camshaft drive belt cover (tendril).
In addition, the marks are located on the flywheel (risk) and on the scale of the rear shield of the clutch housing (triangular cutout). For clarity, the gearbox has been removed.
Additionally, marks are located on the crankshaft timing pulley (dot) and the oil pump cover (triangular cutout). These marks are visible only when the generator drive pulley is removed.
You will need: a socket wrench “17”, a socket wrench “10”. 1. Disconnect the wire from the “–” terminal of the battery.
2. Set the gear shift lever to neutral and place chocks under the car wheels.
3. Remove the right front wheel and the right mudguard of the engine compartment.
4. Open the hood and remove the three screws securing the front camshaft drive belt cover. Please note: the screws on the side fastening of the cover also secure the wire holders. Remove the front cover.
5. Rotate the crankshaft by the bolt securing the generator drive pulley to it until the marks on the camshaft pulley and the rear cover coincide.
6. Remove the plug from the hole in the clutch housing and check the alignment of the marks on the flywheel.
Causes of timing belt failure
There are several reasons for this breakdown on the VAZ-2115:
- natural wear and tear;
- pollution;
- ingress of oil and foreign objects;
- pump failure;
- changing the position of the tension roller;
- camshaft or crankshaft jamming.
The role of the timing belt installed on the injector of a VAZ-2115 car is to ensure that the engine valves open at the right time. It synchronizes the camshaft pulley with the crankshaft. Therefore, it is important to change it in time when it wears out so that problems with the engine do not arise.
How to determine when it's time to change the timing belt
The most prudent thing to do would be to install a new spare part on your VAZ-2115 before the belt breaks. The following signs may indicate that urgent replacement is necessary:
- hum and extraneous noise during operation of the power unit;
- mileage on one belt is over 60 thousand kilometers;
- oil getting into the timing belt.
In a situation with a belt, it is best to spend money on a new spare part and replace it several times than to pay later for a major engine overhaul. Manufacturers often assure that you can drive up to 100 thousand kilometers on one belt on a VAZ-2115; in fact, it is better to change it every 60 or a little earlier.
Check the belt tension regularly; if it sag or distributes the load unevenly, this component may soon need to be replaced. Remember that in this part of the timing belt there is no such thing as self-adjustment during operation. Uneven tension will inevitably lead to breakage. This part of the gas distribution mechanism must be replaced immediately after the first time it is tightened.
Be sure to monitor the battery and ignition system of your VAZ-2115, since starting the engine “from the pusher” has a detrimental effect on the condition of the timing belt. The fact is that with this type of launch, the shafts begin to move with a strong jerk, which stretches the belt and leads to a decrease in its service life.
How to check the ignition coil?
Before diagnosing the ignition coil (SC) on an 8-valve engine, you should check whether there is voltage on the coil. To do this, you need to disconnect the wire block and check it with a tester. The voltage should be 12V.
VAZ short circuit diagram
Typical unit malfunctions
Signs of a faulty short circuit in VAZ engines with 8 valves, UAZs and other cars are similar:
- power is lost, it seems that the engine does not pull;
- the appearance of failures in engine operation;
- unstable operation at idle;
- Cylinders 2-3 and 1-4 do not function in pairs, there is no spark.
If the listed symptoms appear, you first need to check the spark plugs and crankshaft position sensor. Fuel injection into the injectors is regulated based on sensor readings, so if there is excessive fuel consumption, they require checking. The short circuit should be checked last.
You can check the ignition module (IM) on an 8-valve engine in one of three ways:
- The easiest way is to replace the module being tested with a known-good device. True, you need to find a suitable module. Before checking, be sure to make sure that the high-voltage wires are in good condition.
- The second method is to move the module. If, when you move it and the wire block, changes in the operation of the motor are noticeable, then there is a problem with the contacts. In this case, you can do the repair yourself. If repair is not possible, the device should be replaced.
- The third method is to check using a multimeter set to ohmmeter mode. It is necessary to measure resistance at the paired terminals of coils 2-3 and 1-4. It should be the same and be about 5.4 kOhm.
Ignition switch and features of its replacement
ZZ plays an important role in the vehicle's SZ, both for an 8-cl and 16-cl engine. It is activated when the starter is working, thanks to it the lighting, turn signals, and power windows work.
Scheme ZZ VAZ 2115
Replacement or repair of the VAZ 2115 ignition switch may be required if:
- lost or broken keys;
- the lock was damaged during an attempted theft;
- the 3Z cylinder is faulty;
- The contact group does not work.
Ignition switch VAZ 2115
To replace you will need: a set of keys, a hammer, screwdrivers, a thin chisel.
The replacement procedure consists of the following steps:
- The car's power is turned off by disconnecting the negative terminal from the battery.
- We remove the steering wheel.
- Next you need to remove the steering column switches.
- Then you need to loosen the bolts securing the clamp that holds the ZZ on the steering column. If the heads are cut off, the bolts should be carefully knocked out using a hammer and a thin chisel.
- Now you need to disconnect the wiring harness.
- Next, you need to completely unscrew the bolts from the 3Z housing and you can remove it.
- A new device is installed in place of the old one.
- Assembly is carried out in reverse order.
After assembly, you should start the engine and check the operation of the switch (the author of the video is the MY LADA channel).
VAZ 2115: do-it-yourself timing belt replacement
Replacing the timing belt on a VAZ 2115 is a standard procedure that is included in maintenance; replacement should be done every 50,000 kilometers or once every 3 years of operation of the car. If the belt breaks during operation, then you should put on a new one and first determine the degree of damage to the gas distribution mechanisms (check the compression, if not, check the valves, then the condition of the pistons, and so on). To avoid problems, it is better to replace the VAZ 2115 timing belt according to the regulations, regardless of its external condition.