A car engine starter is an electromechanical device, the purpose of which is to transmit torque from the armature of the electric motor to the flywheel of the power unit, which brings the engine to a running state.
Due to the increased load and frequency of operation, this part has a short service life, which quite soon leads to the need to replace the starter with a new one.
The approach of a part to the final stage of operation is characterized by the appearance of minor faults, which, if neglected, will negatively affect the functioning of the engine and can cause a car breakdown on the highway. The most common causes of starter failure are the following:
- The electric motor rotates, but the engine does not start - first you need to check the condition of the terminals and the battery charge level. Also, the cause of the malfunction may be low adhesion of the Bendix gear to the flywheel, which indicates grinding of the gear teeth or the flywheel itself. To correct the situation, the parts will have to be replaced with new ones;
- The efficiency of the starter decreases as the motor resistance increases - the cause may be wear on the armature brushes or problems in the operation of the pull-out relay. Also, as in the first case, it would be a good idea to check the condition of the wiring for melting or oxidation of the main cables or terminals;
- The electric motor rotates the crankshaft too slowly - there may be a low level of electrolyte inside the battery case or a mismatch in the viscosity level of the oil inside the engine. If the problem occurs in winter, you just need to warm up the engine with a hairdryer so that the technical fluid “defrosts”;
- During start-up, the engine experiences a creaking sound - extraneous sounds that occur when the engine is ignited are the cause of incomplete charging of the battery (voltage less than 12.6V) or the result of damage to the armature brushes or head teeth;
- The start and relay do not show signs of life when trying to start the engine - there may be a short circuit in the engine electrical system, a break in the insulating winding of the housing, or failure of the electromagnetic relay;
- The relay makes noise, but the engine does not start - there is a problem in the power unit of the unit or a break in the electrical circuit; wear on the armature brushes is also possible.
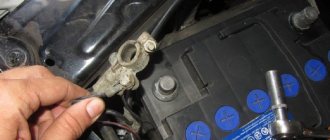
Note! Before disassembling and dismantling the car's electric motor, it is recommended to check the condition of the terminals on the starter and battery - cases of problematic engine starting due to oxidized terminals or a low battery charge level are not so rare.
When is it necessary to replace and remove the exhaust manifold on a VAZ-2114
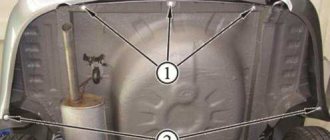
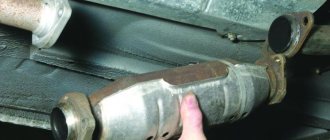
Huge temperature changes are the main problem faced by the exhaust manifold and the gasket, for which it is removed. The collector itself is made of a special grade of cast iron; it can withstand high temperatures (up to 800-900 degrees) , however, these are critical values, after which the collector may warp or crack.
Exhaust manifold VAZ-2114
Its main task is to collect exhaust gases and distribute them into the exhaust pipe of the muffler.
Replacing or dismantling the VAZ-2114 exhaust manifold is necessary in the following cases:
- Mechanical damage to the collector.
- Warping and loss of tightness at the junction with the cylinder head.
- Burnout of the gasket between the head and the manifold.
- The appearance of cracks as a result of engine overheating.
- Replacing the collector with a device of a different configuration, adapted to a more severe operating mode.
In the event that we are not going to participate in high-speed races for the prize of the head of the regional traffic police, replacing or dismantling the collector may be necessary in a number of cases.
Tools and materials for dismantling
There are a number of symptoms that will indicate that you need to prepare to remove the exhaust manifold:
- increased noise level in the engine compartment , the engine produces a characteristic, loud sound in any operating mode;
- breakthrough of exhaust gases into the engine compartment and sometimes into the cabin;
- reduction in engine power due to a mismatch between the exhaust gas outlets in the cylinder head and in the manifold.
Many people decide to replace the standard manifold with a “tuning” one, made of stainless steel and having a different configuration, thereby wanting to increase engine power and reduce the resistance that the standard manifold provides to exhaust gases. As a rule, the most common reason for dismantling a unit is gasket burnout .
Exhaust manifold gasket
The manifold gasket on the VAZ-2114 is made of pressed reinforced asbestos and is designed to ensure a tight connection between the block head and the manifold flanges. Asbestos is used to correct the coefficient of thermal expansion of the aluminum alloy from which the head is cast and the cast iron from which the manifold is cast. At high speeds and under prolonged loads, the gasket may burn out. Then its replacement and dismantling of the collector are inevitable.
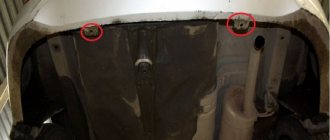
To dismantle the manifold, you will need a standard set of tools, a set of sockets with extensions, and WD-40 penetrating lubricant or its equivalent. In case of broken studs, a stud extractor, drill, drill bits and a set of taps will be useful. A day or two before dismantling the collector, it is worth moistening all the fasteners several times, this will significantly simplify the removal procedure .
Preliminary work
Replacing the VAZ 2109 intake manifold gasket with your own hands is not very difficult and does not require specific knowledge or expensive tools - the required set of keys is usually present in the trunk of every car enthusiast.
But before replacing, you should try to tighten the fastening of the intake unit - if the gasket is not burned out, it is the loose fastening that may cause exhaust gases to get under the hood. If tightening the fastening does not help, it means that the gasket is completely burned out and needs to be replaced. Replacing the VAZ 2109 manifold gasket will require preliminary work to dismantle the air filter, remove the carburetor and the manifold itself. All of the above work is carried out exclusively on a cold engine.
Removing the air filter with housing
On the injection engine of a VAZ 2109 car, to remove the air filter, it is enough to unscrew the four self-tapping screws securing the cover of the filter element housing - for this, use a 10mm wrench or a ratchet. There will be a filter element under the cover. If the cover is difficult to lift, you can disconnect the mass air flow sensor from the plug.
Replacing the Exhaust Manifold VAZ 2109 Injector
The exhaust system consists of several parts, each of which plays an important role. These include the exhaust pipe, catalyst, resonator and the muffler itself. The main functions it performs are noise reduction and reduction in the emission of harmful gases. Also, there is often a corrugation on the receiving pipe, designed to reduce vibration. A malfunction of any part of the exhaust system can affect the condition of the entire car and many other parts in particular, so it is necessary to regularly diagnose this element of the car.
Symptoms of a problem
Without proper care, such as lubricating bearings and checking play, the steering rack can quickly fail. Signs of malfunction that indicate that the mechanism should already be changed:
- A noticeable knock when driving over bumps, which is transmitted to the steering wheel. If a knocking noise is heard when turning the steering wheel, it is unsafe to drive such a car; it is necessary to urgently diagnose the mechanism.
- Strong play in the steering wheel indicates loose fasteners or wear of the rack-and-pinion joint.
- The effort when turning the wheels has increased.
- You can hear noise from the hydraulic booster (if equipped).
- The cause of the knocking noise may be an insufficiently lubricated bearing or wear of the gear-rack pair. If, when rocking the steering shaft, there is noticeable play at the junction with the rack, repair is necessary. If not, just check and tighten the joints between the bushing and the steering shaft gear.
A powerful vice is used to fasten the rail
Video: How to tighten a loose mechanism
How to repair a muffler
If your car's muffler requires repair or complete replacement, it is not recommended to do this work yourself, since there is a high risk that you will only worsen the condition of the exhaust system, and possibly the entire vehicle as a whole. In order to prevent such a situation, contact only specialized car services. In our car service center, qualified specialists with the necessary competence in the field of working with exhaust systems will competently diagnose the exhaust system of your car, and, if necessary, repair or install a new muffler in the shortest possible time.
If you encounter any malfunction in the exhaust system and you need to diagnose it, repair it or replace the muffler, then our salon specialists will be happy to help you with this, since we carry out all types of this work!
Possible reasons for withdrawal
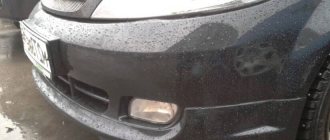
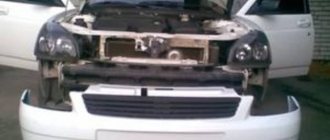
There are not so many reasons for removing the front bumper on Largus, but they all contribute to learning how to dismantle such parts with your own hands. Let's consider what pushes the owner to perform this simple operation:
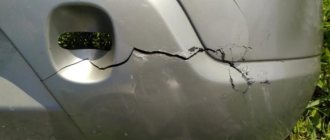
- Part damage . This can happen due to an accident or deformation when driving backwards.
- Another reason may be that the bumper itself was not damaged when damaged, but the rear panel was either deformed and requires restoration .
- Body painting , when carried out comprehensively, also requires removing the buffer.
- Tuning or upgrading the rear bumper will also require dismantling the part.
- Installation of accessories such as parking sensors will force the owner to remove the buffer.
- Partial removal to install bumper cover.
Installing the rear bumper trim
- Other reasons.
There are not many reasons for removing the bumper; this is usually done after road accidents that caused damage to the part.
Design options
At the moment, the selection of towbars for SV Cross is small. They are conventionally divided into two groups:
- removable – can be removed if not needed, which will not affect the appearance of the car;
- non-removable – they are rigidly mounted to the body and remain on it permanently.
Related link:
What is better than Lada Vesta and Hyundai Solaris? Comparison of the main characteristics of competing cars
Since this car model is quite new, there are still few manufacturers of this part, since companies have not yet managed to implement a full-fledged production of components and parts for Vesta.
You can purchase the original device from official AVTOVAZ dealers. There, the cost of a towbar is approximately 7-7.5 thousand rubles . In addition to the original, it offers its own analogue - a removable tow bar, the price of which is about 3-3.5 thousand rubles . Among the major manufacturers, the Russian company AvtoS began producing designs for Vesta SW. The model has already gone into production, but the price needs to be clarified with the distributors. There are also several foreign companies that have already partially launched the production of components for this car.
The following structural models can be installed on Vesta:
- A flange-type device is considered the best option for Vesta, but only if there is a special seat for uniform traction force and load distribution.
- Models with rigid fixation cost less and are easy to install and functional. But they have an unaesthetic appearance, and fastening occurs using bolts or welding.
- Removable hitch ball devices have a removable top and are virtually invisible. The model is stable and reliable, but costs much more than other analogues.
- You can also find American-type towbars on the market, but they are rarely chosen. This is due to installation difficulties, the dimensions of the ball are slightly different, there is a difference in the seat, and the socket does not match.
Many experts recommend installing removable models. Even though they are the most expensive, they can always be removed so as not to spoil the appearance of the car. But most drivers are not particularly concerned about the presence of a constantly peeking towbar.
Which valve cover gasket to choose?
One of the steps when replacing a valve cover is purchasing consumables. What kind of gasket should I buy and what material should it be made of? There are many types of gaskets on sale, depending on the type of material used and manufacturer. It is important to note that the valve mechanism is very delicate. It is necessary to treat it with care and reliably protect it from the external environment. The gasket does just that, but which valve cover gasket should you buy to repair your car's engine?
Clutch disc with friction surface (1.45 minute video)
Therefore, for proper operation of the clutch, it is fundamentally important that the clutch disc contains so-called friction material. The material is applied on both sides of the disc. If the coating is partially or completely erased, the car will not even be able to move. From this, we can conclude that when starting off, it is extremely important to monitor the moment when the clutch pedal is released. If you accidentally erase the friction layer of the working surface, burn out the clutch, you will no longer be able to go anywhere without replacing the clutch discs.
See also: How to learn to drive a manual transmission: All points, from A to Z
The first clutch disc is installed on the engine flywheel (driven, clutch pressure plate). The second disk (drive) is pressed against the first using a push clutch. Through the input shaft, torque is transferred from the engine to the transmission system.
Push coupling
The second important element, without which the clutch cannot work properly, is the push clutch. Its outer part is bolted to the flywheel, continuously transmitting torque to the gearbox and then to the wheels. A so-called diaphragm spring is attached to the coupling ( 2.50 of the video). With its help, the two clutch discs are routed and the engine and gearbox are disconnected.
Recommended Method
Level control technology includes a number of stages:
- We dismantle the housing of the air filter element. To do this, unscrew the fastening nut of the housing cover, unclip the latches, remove the cover, take out the filter and tighten the 4 nuts that secure the housing to the carburetor.
- Raise the body and disconnect the rubber pipes. We move the body to the side.
- Loosen the clamps securing the fuel pipes going to the carburetor and disconnect them.
- Remove the wire suitable for the idle speed solenoid valve;
- Disconnect the drive cable of the air damper (the “choke” handle);
- Unscrew the 5 screws securing the carburetor cover;
- Having removed the cover, we immediately determine the fuel level in the chambers by lowering a ruler or caliper into one of them until it stops (using its depth gauge). If the measurement shows a level of 25-26 mm, it corresponds to the norm and no adjustment is required;
If the amount of fuel in the chamber is lower or higher than normal, we perform a visual inspection and a series of measurements on the floats, and if necessary, we correct their position.
To carry out adjustment work, place the removed carburetor cover on a flat horizontal surface with the floats facing up.
First, we look at the position of the elements from above. The outer side surfaces of the floats are parallel to the special imprints on the gasket. Deviations can cause the floats to touch adjacent elements and surfaces, causing the fuel level to be incorrect. If necessary, adjust the position of the floats by bending their mounting arms. The next step is to measure the gap between the floats and the gasket. A rod with a diameter of 2 mm is useful here - this is how much the specified gap should be.
If it does not correspond, we bend the tongue of the floats, with which they act on the locking needle. After this adjustment, we check the total height of the floats, which is normally 34 mm. If this is not the case, check the gap again, adjust it if necessary and measure the height again.
The last stage of setup is determining the working stroke of the floats. To do this, place a caliper near the float, mark the distance from its lower corner to the surface of the cover, then lift the float with your hand and mark where the lower corner is.