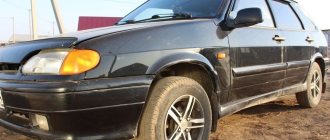
In domestic VAZ cars, almost any repair can be done with your own hands if you have the appropriate skills and experience. But if even a novice car enthusiast can change disks, then to service and replace power plant parts you need to know your car 100%. The VAZ 2114 gearbox is a complex unit with a lot of parts and fasteners that you will have to tinker with. How to remove the VAZ 2114 gearbox: removal, repairs and malfunctions. Before work, you should familiarize yourself with the device: the gearbox diagram is present in the operation and maintenance manual for the Lada Samara.
Removing the gearbox may be necessary in the following cases:
- Repair and diagnostics of the mechanism itself.
- Transmission repair - the clutch discs can only be reached if the gearbox is removed.
The design of the gearbox, as well as other mechanisms, is common to the entire Lada Samara model range. The VAZ 2114 engine is paired with a 5-speed manual transmission. As for the features of the mechanism, these include the adjacent operation of the main gear and differential.
VAZ 2115 clutch does not work (repair)
Today I will tell you about possible malfunctions of the VAZ 2115 clutch, their causes and methods of eliminating them yourself. Note that an article about replacing the clutch on a VAZ 2115 was previously published. Below we will look at the most popular causes of the malfunction.
Incomplete disengagement of the clutch (clutch “drives”)
Malfunction:
Insufficient clutch pedal travel. Remedy method:
Adjust the clutch drive.
Malfunction:
Warping of the driven disk (end runout more than 0.5 mm). Remedy method:
Straighten or replace the drive.
Malfunction:
Seizing of the driven disk hub on the splines of the input shaft. Remedy method:
Clean the splines and rinse with white spirit. If the splines are worn, replace the input shaft or driven disk.
Malfunction:
Distortion or warping of the pressure plate. Remedy method:
Replace the clutch housing assembly with pressure plate and spring.
Malfunction:
Loose rivets or broken friction linings of the driven disc. Remedy method:
Replace the linings, check the end runout of the disc.
Malfunction:
Damage or jamming of the clutch drive. Remedy method:
Eliminate the causes of jamming. Replace damaged parts.
Incomplete engagement of the clutch (clutch “slips”)
Malfunction:
Increased wear or burning of the friction linings of the driven disk. Remedy method:
Replace the friction linings or driven disk assembly.
Malfunction:
Oiling of the friction linings of the driven disc, flywheel surfaces and pressure plate. Remedy method:
Thoroughly wash oily surfaces with white spirit, replace worn or damaged gearbox and engine seals. Check for oil leakage through the flywheel mounting bolts; If there is a leak, install the bolts on the sealant as indicated in the chapter “Engine Assembly”.
Malfunction:
Damage or jamming of the clutch drive. Remedy method:
Eliminate the causes of jamming. Replace damaged parts.
Jerking when the clutch operates
Malfunction:
Oiling of the friction linings of the driven disc, flywheel surfaces and pressure plate. Remedy method:
Thoroughly wash oily surfaces with white spirit, replace worn or damaged gearbox and engine seals. Check for oil leakage through the flywheel mounting bolts; If there is a leak, install the bolts on the sealant as indicated in the chapter “Engine Assembly”.
Malfunction:
Jamming in the clutch drive. Remedy method:
Eliminate the causes of jamming. Replace damaged parts.
Malfunction:
Damage to the surface or warping of the pressure plate. Remedy method:
Replace the clutch housing and pressure plate assembly.
Increased noise when engaging the clutch
Malfunction:
Broken drive disc damper springs. Remedy method:
Replace the driven disk assembly.
Increased noise when disengaging the clutch
Malfunction:
Wear, damage, lubricant leakage from the clutch release bearing Remedy:
Replace bearing
If you have a little time, you can read the manual for removing and installing the hood on a VAZ 2115 with your own hands.
Instructions for removing, disassembling and assembling the VAZ 2114 gearbox
Removing the gearbox is required when troubleshooting parts and the mechanism of the gearbox itself; when replacing the clutch.
Repair work may require one business day, so the instructions below must be started in the morning. Hiring a partner with experience in this type of repair will reduce time costs and improve the quality of repairs.
Preparation
The preparation process consists of the following steps:
- to warm up the oil to be drained, we drive a vehicle for a distance of 5 km;
- we install the vehicle on an inspection ditch (pit) or drive it onto an overpass;
- We put the car on the handbrake;
- raise the hood;
- fix the raised hood;
- we install the hoist, or use improvised means, or a special device, which is a crossbar to support the engine in a suspended position.
Removing and disassembling the gearbox. Procedure for cleaning gearbox parts
We perform the following steps sequentially:
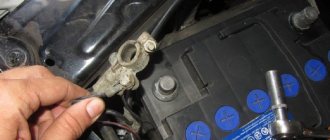
- We remove the terminals.
- We remove the battery.
- We remove the battery to the side.
- We unscrew the three bolts that secure the crankcase protection.
- We remove the protection.
- If the model is before 2003, then remove the oil level dipstick.
- Using a 17 key, unscrew the plug (plug) of the drain hole.
- Place a five-liter container under the drain hole.
- Drain the existing oil from the gearbox into a container.
- We are waiting for the oil to be completely removed from the gearbox.
- We unscrew the two locking nuts of the starter protective jacket, located below in relation to the pit, and one locking nut on top of the starter.
- Remove the protective jacket of the engine starter.
- Disconnect the power wires to the engine starter.
- We remove the engine starter from below, that is, by descending into the pit.
- Remove the clutch cable.
- Compress the spring holding the block.
- From below, disconnect the block with the wires of the speed sensor under the hood.
- Disconnect the reverse sensor wire connector.
- We unscrew the bolts under the hood connecting the ignition module bracket to the gearbox housing.
- Disconnect the torque rod bracket.
- Loosen the gear shift rod clamps.
- We remove it by pulling the torque rod from the hinge intended for changing gears.
- We take out the gear shift rod.
- Unscrew the fastening bolts to the steering knuckle of the left ball joint.
- We carry out dismantling by disconnecting the lower mounting of the gearbox to the engine (sometimes it is enough to loosen the tightening).
- Unscrew the bots.
- Removing the transmission housing
- We unscrew the bot from the lower left part of the gearbox.
- Using a board, we hang the motor.
- We remove the fixation of the left and rear (attachment to the body) engine mount by unscrewing the corresponding nuts.
- We unscrew the pair of bots that secure the rear engine mount to the transmission, holding the nuts against spinning with a second wrench.
- We dismantle the support.
- We insert a screwdriver into the hole between the engine cylinder block and the clutch housing.
- Using an inserted screwdriver, we move the box along the guides so that the rear part of its body passes over the backlight extension, and the input shaft is disconnected from the clutch.
- We remove the gearbox unit from under the car.
- We clean the gearbox parts, removing deposits with a brush.
- We clean the holes and slots from dirt.
- We wash and blow off the parts and bearings with a stream of compressed air.
- We examine the details of the gearbox.
- If necessary, we replace worn or damaged parts.
- We carry out the assembly, focusing on the procedure indicated above.
Are adjustments done differently on different brands of cars?
The above procedures are universal and can be performed on machines from any manufacturer. The essence of the procedure is always the same - to reduce or increase the pedal stroke by tensioning or loosening the cable, or adjusting the hydraulic pusher.
But when adjusting the clutch in cars of different brands, there may be some differences. For example:
- normal pedal amplitude or clutch clearance;
- procedure for accessing the clutch adjusting and control nuts. So, in a VAZ-2114, 2115 you will have to remove the battery before starting work, and in a Lada Kalina you will have to unscrew the air filter.
Before starting work on adjusting the clutch, read the technical information about your vehicle, the operating instructions and the repair manual. This will allow you to complete the procedure correctly.
Lubricant level monitoring
It is best to check the lubricant level in the VAZ 2114 gearbox using a dipstick. To perform this procedure you need:
The practice of operating a VAZ 2114 shows that a sufficient or even increased level of transmission material contributes to a noticeable extension of the life of the gearbox. Therefore, it is better to steadily monitor the oil level in the gearbox and maintain it slightly above the limit mark on the dipstick.
POSSIBLE FAULTS
Despite the imperfect operation, the VAZ 2114 gearbox, when used correctly, is distinguished by good endurance and durability. If you do not hesitate to prevent and promptly eliminate breakdowns, repairing it is not expensive.
Let's consider the main gearbox malfunctions that the owner of the fourteenth may encounter:
- Lack of speed fixation when switching. If the speeds are out of whack, the cause is most likely worn teeth on the gears and clutch. Accelerated wear of these parts is caused by incorrect gear shifting and non-compliance with the speed limit. The problem is resolved by replacing the gears.
- The gear shift lever is tight. The reasons are mechanical damage to the teeth of the lever fixing on the hinge or wear of the reaction rod; it’s also a good idea to check the integrity of the plastic parts of the gearbox drive;
- The VAZ 2114 gearbox is humming. Most often, the gearbox is humming in neutral gear. First of all, you need to check and, if necessary, add oil (in general, the box may hum due to the use of low-quality lubricants). If the oil is normal, the problem is wear of the bearing on the input shaft, which can only be determined through diagnostics or by disassembling the gearbox;
- Crunching sound when changing speed. Here it is necessary to change the worn out synchronizer, and it must be changed immediately after the problem has been discovered, because if you tighten it, the gear unit will completely fly off;
- Knock. The gearbox on a VAZ 2114 can knock both under load and without it, and in any gear. The cause of the knocking noise is a damaged drive gear of the problematic transmission.
Article on the topic: How to change the front brake pads on a VAZ 2114
One of the key factors for the trouble-free operation of gearbox number fourteen is the use of high-quality lubricants. The most suitable option is GL-4 mineral oil. It is not cheap, but it does its job at 5+; when using mineral oil, VAZ gearbox repairs are usually required extremely rarely.
Most VAZ 2114 owners agree that the best gearbox oil is 75W90. It is distinguished by greater fluidity than typical gearbox oils, due to which the lubricant better gets into those places of the gearbox, the lubrication of which is provided exclusively by splashing. Good options for 75W90 are Hypoid-Getriebeoil TDL and Liqui Moly Vollsynthetisches Getriebeoil (GL-5).
When does the lubricant change?
Inaccurate transmission maintenance can sometimes be very costly. After all, creaks and noises that appear become harbingers of unpleasant problems. Serious surprises can be avoided. To achieve this, the transmission material in the gearbox is replaced with clearly defined regularity.
The manufacturer's recommendations indicate that the lubricant in the VAZ 2114 gearbox should be changed after 60,000 km or after 4 years of vehicle operation. The last requirement is also acceptable for those cases when the car was simply parked in the garage.
However, experts and experienced drivers advise looking into the box more often. Wherein:
Taking into account special operating conditions, replacement of the transmission substance may be necessary earlier than established regulatory standards. Then they say that you need to fill in fresh lubricant after 25,000–30,000 km. These indicators are considered optimal for active and constant use of the car.
Now you need to decide what transmission substance to pour into the VAZ 2114 gearbox and how much of it is needed. You can choose from 3 categories of oils. Liquids from the discharges can be poured into the box:
The main recommendations are that the liquid should have an index of GL-4 or TM-4. The most popular option is “mineral water” - 80W90. However, at very low temperatures it thickens, which leads to loss of lubricating elasticity. Among the more expensive options, we can highlight the “synthetic” 75W90 with excellent performance characteristics at low temperatures.
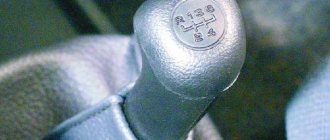
How the box works
It has features that entirely depend on the configuration of the machine. This could be a four- or five-stage vase model. The structure of a four-speed gearbox is as follows:
- 1. Primary shaft;
- 2. Reverse gears, to which the front shaft is attached;
- 3. Synchronizers, 2 pieces;
- 4. Bearings placed on the secondary shaft;
- 5. Driven gear. Attached to the differential flange.
The element is controlled by a drive, rod, rod and ball joint. Only complete interaction of these parts can ensure full operation of the box.
Gearbox device
To determine the type of gear, there is an additional lever, which is attached to the inner end of the rod.
There are also axles in the body; a three-arm lever is attached to one of them. Its main purpose is to lock the bracket and bushing, which is necessary to ensure the strength and immobility of the mechanism.
The second axis is designed to fix the locking brackets from their rotation, passing through the center. In addition, there is a lock that prevents the box from loosening. The other axle also has a fork, which is necessary to engage the VAZ 2114 in reverse.
The five-stage type differs in the size of the shaft and the absence of a bushing in the element. Usually this is what is installed in the VAZ 2114, since the other one is not entirely practical to use. Like any spare part, a gearbox can also break down and fail.
The most common problems are:
Unknown noise: it may be caused by bearing failure or gear wear. In addition, you should play it safe and check the oil level;
The solution to the problem is to completely replace failed spare parts and add oil.
Difficulty shifting the VAZ 2115 gearbox: the drive rod may have become deformed. It would be a good idea to check how firmly all the screws are screwed on and how the box drive is adjusted correctly. There is a possibility of failure of plastic parts in the drive;
Solution: Strengthen the screws, adjust the drive, replace worn and failed parts, replace or correct the deformation of the rod.
Turning off the gearbox without the driver's participation: the cause may be damage to the teeth on the synchronizer, an incorrectly adjusted drive, or poor installation of the traction cover, which provokes incomplete engagement of the traction;
Solution: Adjust the drive and replace the covers, replace the failed spare parts.
Oil leak. The reason is still the same - wear of spare parts, which this time are oil seals, seals and hinge bodies
In addition, you need to pay attention to the strength of the fastening. If it becomes loose, it is necessary to tighten all the bolts and check the seals for damage;. Solution: Purchase new spare parts and replace them
Solution: Purchase new spare parts and replace them.
Where and how is it more profitable to buy a gearbox in case of its complete failure? Since the performance of the vehicle and safety depend on the VAZ 2114 gearbox, its technical condition must be taken very seriously.
That is why it is worth recalling that, like any element of the machine, the gearbox needs regular technical inspection. Saving on oil changes, untimely detection and replacement of breakdowns, complete ignorance of troubles with the machine’s mechanisms - all this leads to failure of the gearbox.
Don’t think that if you have a domestic car, that means you are lucky. The rise in prices for spare parts is indicated by the price of the box, which today ranges from 16 thousand rubles. up to 18 thousand rubles Add in fees for removal, installation and maintenance - the cost will be impressive.
Used manual transmission for Lada 2114
An easier option would be to purchase a used item. No one will give a guarantee that there are no defects in it, but the purchase will cost half as much.
The best option is to carry out timely maintenance and repair of the box. This approach will not only save the budget, but will extend the life of the parts.
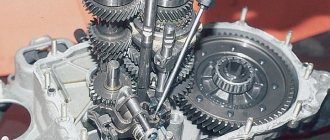
Gearbox device
Gearbox removed and slightly disassembled
Before starting the process, it is necessary to study the structure of the gearbox, as well as its design. This is necessary in order to determine the reasons why the unit needs to be dismantled, as well as to determine the mounting fasteners.
Transmission device diagram
1 – clutch release bearing; 2 – guide sleeve; 3 – input shaft; 4 – roller bearing of the secondary shaft; 5 – secondary shaft; 6 – retaining ring; 7 – satellite axis; 8 – speedometer drive drive gear; 9 – transport plug; 10 – wheel drive oil seal; 11 – tapered roller bearing of the differential; 12 – axle gear; 13 – satellite; 14 – differential box; 15 – clutch housing; 16 – driven gear of the main gear; 17 – drain plug; 18 – adjusting ring; 19 – driven gear of the 1st gear of the secondary shaft; 20 – synchronizer for 1st and 2nd gears; 21 – driven gear of the second gear of the secondary shaft; 22 – retaining ring; 23 – persistent half ring; 24 – driven gear of the third gear of the secondary shaft; 25 – synchronizer for 3rd and 4th gears; 26 – driven gear of the fourth gear of the secondary shaft; 27 – needle bearing of the secondary shaft gears; 28 – ball bearing of the secondary shaft; 29 – thrust plate; 30 – driven gear V of the secondary shaft transmission; 31 – 5th gear synchronizer assembly; 32 – nut; 33 – thrust washer; 34 – drive gear V of the input shaft; 35 – rear cover of the gearbox housing; 36 – ball bearing of the input shaft; 37 – gearbox housing; 38 – roller bearing of the input shaft; 39 – breather; 40 – input shaft oil seal
Removing the gearbox
If all the steps described above have been completed correctly, then withdrawal can begin. The process goes as follows:
- The gearbox is attached to the engine on several sides. First you need to remove the lower fasteners, and then loosen the bracket and remove it. The bracket can also be removed using a wrench of the appropriate size;
- Next, remove the bolts that secure the clutch housing cover. A slotted screwdriver works best here. There is also a bolt at the bottom left that needs to be removed;
Unscrewing the gearbox bolts
The next step is to unscrew the fasteners that hold the engine. It is important to follow the sequence here so as not to damage the parts: the left support is removed first, then the two rear bolts come. After this, the support can be completely removed; Now you need to disconnect the gearbox from the bushings. To do this, the tip of any suitable screwdriver is placed between the crankcase support and the cylinder block. During this step, the power plant must be held; The mechanism is almost removed, now the gearbox needs to be pulled back until the gearbox input shaft comes out of the clutch. If this fails, then you should try to move the motor further to the side. When the shaft comes out, the gearbox can be completely removed from under the car.
We hang up the gearbox and remove it
When the work is completed and the box is completely dismantled, you should disassemble it and check the parts for wear. If possible, repairs and replacement of damaged elements are carried out. In some cases, the problem can be solved by replacing bearings or seals, rather than purchasing a new gearbox.
The gearbox may need to be removed in a variety of cases, for example, in order to replace the clutch or something in its system, as well as to repair the gearbox itself.
Removing the VAZ 2114 box is quite simple, although there are some peculiarities, so it is still advisable to have an experienced partner next to you for the first time.
Tools
- a set of keys;
- Screwdriver Set;
- WD-40 fluid in case you can’t unscrew some part;
Rust converter WD-40
container for draining old transmission oil; new oil (if the replacement was carried out a long time ago); rags; board.
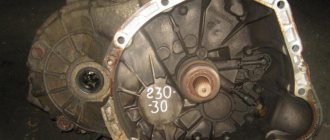
Gearbox VAZ 2114 disassembled
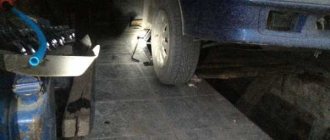
Since you will have to work under the car, it is better to place the VAZ 2114 car on a pit or overpass; a car lift would be a good solution, otherwise you will have to resort to jacks.
First you need to remove the terminals and remove the battery. Drain the oil from the gearbox into a prepared container by unscrewing the drain plug. We remove the starter. Remove the clutch cable. We disconnect the block with wires from the speed sensor, after compressing the spring. We unscrew the bolt attaching the ignition bracket to the gearbox. Then unscrew the remaining bolts. Under the car we find and disconnect the block of wires leading to the reverse sensor. Unscrew the bolts securing the linkage bracket to the gearbox. Having first loosened the gear shift rod clamp, we pull it out, pushing it back. Dismantling the wheel drives
You can leave the right one. In order for the gearbox to be removed without any complications, unscrew the bolts with which the left ball joint is attached to the steering knuckle. We disconnect the lower mount of the gearbox to the engine - sometimes you can get by by simply loosening the tightening of the bracket. After unscrewing the bolts, remove the transmission housing cover. Unscrew the bolt on the left of the gearbox. We carefully and carefully hang the engine using a board or other device. At the bottom of the car, unscrew the nut securing the left motor mount. We unscrew the two nuts with which the rear motor mount is attached to the body. We unscrew the two bolts with which the rear engine support is attached to the transmission (the second key is used to keep the nuts from turning), and remove the support. We move the box along the guides. This completes the process of removing the box; after completing all the necessary tasks, assembly occurs in the reverse order. When you put the box in place, do not forget to adjust the clutch and fill it with new oil.
Preparing for removal
Preparatory work includes the removal of all parts that block access to the gearbox. You can begin removal when you have a board or other hanging equipment, a set of wrenches and sockets, different types of screwdrivers, and WD-40 lubricant at hand. It is also recommended to carry out work in a garage where there is a car pit. Now you can proceed to the analysis:
- It is necessary to remove the terminals from the battery and then remove it. The next step is to completely remove the working fluid from the gearbox and remove the starter. Some bolts may not budge, in which case WD-40 must be used;
- Now the VAZ 2114 needs to be placed on the pit and the crankcase protection, which is attached to the bottom with three fasteners, removed;
- There is a cable coming from the clutch fork - it should be disconnected from the fork and then removed from the gearbox bracket;
- Next, you need to hang the motor to gain access to the lower parts. After this, all wires must be disconnected from the speed sensor. A spring is used as fastening here.
How to remove the gearbox?
The VAZ 2114 and other models of the LADA SAMARA family range are equipped with a five-speed gearbox combined with a differential and final drive. In principle, the box from the VAZ 2114 is no different from the VAZ 2108. The only thing is that the VAZ 2108 does not have a dipstick, and acceleration on it will be faster.
You will need to remove the box to replace the clutch, clutch bearings, and repair the box.
How to remove the gearbox?
To remove the gearbox we will need:
- set of keys;
- screwdrivers;
- assistant;
- wd-40;
- board or other hanging equipment.
First of all, remove the terminals from the battery and take it out. We drain the oil from the gearbox (How to drain the oil from a gearbox?) and remove the starter (How to remove the starter on a VAZ 2114?). As you work, if you can’t unscrew any fastening or bolt, then don’t forget to use wd-40.
1. Place the car on the overpass (pit) and remove the crankcase protection by unscrewing 3 fasteners.
2. Next we need to remove the clutch cable from the clutch release fork. Then we pull it out of the bracket on the box.
For the purpose of complete understanding for the reader, the slides refer to points 3-19 in order except point 14, where you need to hang the engine.
3. Next you need to remove the wire block from the speed sensor (DS). The block is secured by a spring, so to remove it, compress the spring.
4. Unscrew bolt 1 securing the ignition module bracket to our gearbox. And bolt numbers 2 and 3 shown in the picture.
5. We climb under the car and find the wiring block for the reverse sensor. Let's disconnect it.
6. Then unscrew the 2 bolts securing the torque arm to the box.
7. Loosen the clamp of the transmission gear shift rod. We remove the rod from the gear selection rod hinge by moving it back.
8. Remove the wheel drives. Tie the plug inserted in place of one of the drives with a rope or wire so that it does not fall out when removing the box. The right drive does not need to be completely removed. We disconnect it from the box and hang it in the body, first moving it to the side.
9. So that the box can be removed without additional difficulties, unscrew the two bolts of the left ball joint from the steering knuckle.
10. Unscrew the lower right mount of the gearbox to the engine (number 1 in the figure). The support bracket (number 2 in the figure) is needed from the stud.
11. If necessary, just loosen the fastening of the bracket.
12. Unscrew the 3 fastening bolts, remove the cover (number 1) of the clutch housing (number 2).
13. Unscrew the bolt of the lower left gearbox mounting
14. Hanging the engine using a board or other device
15. Unscrew the nut securing the left power unit support (from the bottom of the car)
16. Unscrew the 2 nuts securing the rear support of the power unit to the body.
17. Unscrew the 2 bolts securing the rear support of the power unit to the gearbox, holding the nuts from turning with a second wrench, and remove the support.
18. Inserting a screwdriver between the clutch housing and the cylinder block, slide the gearbox off the guide bushings. Be sure to hold it while doing this.
19. Move the gearbox as far back as possible, passing the rear cover of the box over the front suspension brace (the input shaft should disengage from the clutch). If the input shaft cannot be disengaged from the clutch, push the engine to the side. Lower the front end of the box and remove it from under the car.
How to install the gearbox?
The gearbox must be installed in the reverse order. After installation, you need to adjust the clutch drive (How to adjust the clutch drive?) and the gearbox lever, and fill in the transmission oil.
- Electrical equipment
- Engine
- Brake system
- Other
- Steering
- Transmission
- Suspension
- Tuning
- VAZ 2110 Other
- Engine
- Steering
- Electrical equipment
- Transmission
- Brake system
- Suspension
- Tuning
- Electrical equipment
- Steering
- Video publications
- VAZ tuning photo stream
- Operation and repair manuals
Disassembly
Having removed the gearbox, you can proceed directly to the main thing - disassembly. This will allow you to change damaged elements as you work, identify existing faults and solve problems on your own.
- Clean and thoroughly wash all external surfaces of the gearbox.
- Place the box in a vertical position and remove the back cover.
- Remove the clutch cable bracket, then use a rubber hammer to knock the rear cover off the gearbox.
- Remove the old gasket. She will be replaced.
- Engage any of the two gears - 3 or 4.
- Unscrew the bolt that holds 5th gear, then turn it on.
- Simultaneously turning on the indicated speeds will allow you to fix the shaft and prevent it from turning.
- Unscrew the nut on the secondary shaft, and then on the primary one.
- Remove the 5th speed synchronizer along with the fork.
- Remove the fork from the coupling. Remove the synchronizer as carefully as possible. If you allow the clutch to move away from the hub, the spring-loaded balls that secure the synchronizer will simply fall apart.
- Remove the 5th speed synchronizer locking ring.
- Remove the 5th speed driven gear from the output shaft.
- Remove the thrust ring located on the needle bearing.
- Remove the needle bearing itself from the 5th speed gear.
- Remove the drive gear from the drive shaft and remove the bearing plate.
- Now the needle bearing bushings should be removed from the secondary shaft, and the thrust washer should also be removed.
Malfunctions and reasons for their occurrence
Resetting gears (shifting does not result in a gear change)
Speed slippage is a sign of worn gears and couplings. Most often this is due to a violation of the gear shift order or incorrect position of the traction protective cover.
Sticking (stiff movement) of the shift lever
The malfunction may be caused by wear of the plastic parts of the drive, reaction rod, or damage to the hinge teeth of the lever fixation.
Oil leaks
If you can find the source of the leak visually, it is better to eliminate the cause immediately. The cause of leaks, when the source of the leak could not be detected, may be worn shafts and seals, depressurization, damage to the seal, or play in the box shaft.
Rumble
The hum usually occurs in neutral gear. Most often it is associated with a lack of oil in the unit or its poor quality. If the oil level is normal, the problem is most often a worn front shaft bearing.
Crunch
If a crunching noise occurs, the synchronizers should be replaced as soon as possible. If this is not done in time, the gear unit will completely fail. The condition of the clutch basket, in which the teeth “fly out” over time, can also cause crunching.
Related publications
The clutch in VAZ-2114 cars serves to transmit torque from the engine to the gearbox. That is why this part is constantly exposed to stress and wears out quickly. It is impossible to restore it; to solve the problem with the clutch, you only need to replace it, which can be done at a car service center (expensive, but professionally) or yourself. Do you want to save money? Then we offer detailed instructions with a video that will help you carry out repairs even without the relevant experience.