With the onset of the first cold weather, every decent car owner should pay enough attention to the heating system of his car. Especially if we are talking about domestically produced cars. I don’t want to say anything bad about our automobile industry, but it often happens that it is our cars that begin to act up before winter.
The heating system is the weakest point of all VAZs. A constantly breaking and leaking faucet, problems with the fan drive, problems with the heater - this is not the entire list of problems that arise precisely with the onset of cold weather.
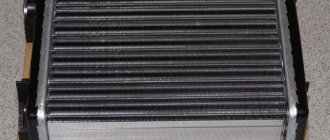
In this article we will talk about what constitutes an independent replacement of the radiator of a VAZ-2115 stove. Photos of the replacement process are presented below.
Design features of the VAZ-2115 heating system
The interior heating system in the fifteenth model, as well as in all representatives of the Samara family, consists of:
- a heater, which includes in its design a plastic housing (casing), a radiator and a fan (electric motor with impeller);
- a valve that blocks access to the coolant (coolant) to the heating radiator, and its mechanical drive (lever on the control panel and cable);
- fan control device (controller on the instrument panel).
How the interior of a VAZ-2115 is heated
In the summer, in order to prevent the interior from overheating, drivers turn off the heater valve by moving its drive lever to the appropriate position, thereby closing the flow of heated coolant into the radiator of the VAZ-2115 heater. In other words, antifreeze or antifreeze circulates in the system, bypassing the heater.
In cold weather, the tap is opened, and the coolant moves through the heating radiator, heating it. To supply heated air into the cabin, a fan is used, which blows on the radiator lamellas and can operate in three different power modes.
Signs of major malfunctions of the stove radiator
It is difficult to notice the leakage of coolant from a heating radiator, since the device itself is hidden from our eyes deep behind the instrument panel. In addition, it is also located in the heater housing. Signs of a radiator leak can be either a decrease in the coolant level in the expansion tank in the absence of visible leaks, or wet spots on the carpet in the passenger compartment on the driver’s side. The leakage of antifreeze or antifreeze into the interior is accompanied by the presence of a specific odor, as well as the formation of a greasy matte film on the windshield of the car.
Obstruction of the heater radiator is most often a consequence of the use of low-quality and cheap coolant or dirt entering the system. Also, a traffic jam may occur due to prolonged use of the device. Its sign is the flow of cold air from the deflectors when the heater tap is open and the fan is running. You can diagnose an obstruction by touching the inlet and outlet pipes of the heating radiator in the engine compartment. If the first one is hot and the second one is cold, there is a problem.
Replacing the heater motor
The following sequential steps must be performed:
- The electrical network is completely de-energized.
- The positive wire should be disconnected from the motor. It is located under the dashboard.
- It is necessary to unscrew two bolts located in the engine compartment. They serve to hold the stove casing.
- Then you need to disconnect the mass.
- Unscrew and remove two bolts that serve to secure the fan to the heater housing.
- The air duct grille is being dismantled. To do this, the element is rotated 90 degrees and removed from the casing.
- The device should be assembled using the reverse sequence. The power supply contacts must be securely fixed. Otherwise, the assembly will have to be disassembled a second time.
Repair or replacement
Having identified such problems, you will probably ask the question: is repair possible or will the radiator of the VAZ-2115 stove still need to be replaced? It can be solved only by establishing what metal it is made of. Radiators can be made of either copper or aluminum. The former, of course, are more expensive, but they last much longer, and in some cases they can be repaired (soldering the depressurization area). Aluminum models are less reliable, but more common due to their low price.
In any case, the first thing you need to do is remove the radiator of the VAZ-2115 stove, and only then plan further actions.
Selecting a replacement radiator
But before you begin the removal and replacement operation, you must first select a new heat exchanger.
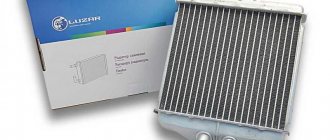
You can purchase a factory heater radiator, catalog number 2108-8101060. But similar products DAAZ, Luzar, Fenox, Weber, Termal are quite suitable.”
As for the material, it is recommended to use copper heat exchangers, but they are much more expensive than aluminum ones. Although it is not for everyone, many people use aluminum products and are quite satisfied.
In general, the main thing is that the radiator is designed specifically for these cars.
On the VAZ-2113, 2114 and 2115 models, the designers used the same front panel design, so the procedure for replacing them is the same.
Next, we will look at how to remove the radiator of the internal heating system using the example of a VAZ-2114 and how this is done in different ways.
Preparatory work
To begin with, it is recommended to warm up the car engine a little. After installing the machine in a pit or lifting it on a lift, you need to remove the engine protection.
Before replacing the radiator of the VAZ-2115 stove, you need to drain the coolant from the system. Having determined the location of the drain plug on the cylinder block (do not confuse it with the oil plug on the crankcase), place the prepared container, and then unscrew it. When the coolant drains, the plug needs to be tightened.
Next, we will look at how to replace the radiator of a VAZ-2115 stove with your own hands. This is not an easy task, but it is quite doable.
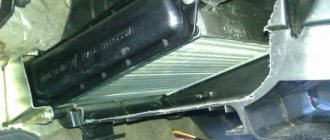
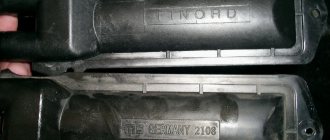
Dismantling the stove radiator
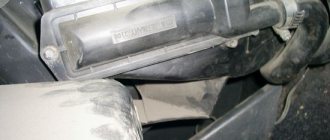
Getting to the heater of the “fifteenth” is quite difficult. To do this, you usually have to dismantle the entire instrument panel. Here, VAZ designers have worked hard to ensure that our car enthusiast, faced with one problem, immediately thinks about the next.
Replacing the radiator of a VAZ-2115 stove without removing the panel is, in principle, possible, but requires the participation of an assistant in the process.
We start by unscrewing the central screw securing the dashboard to the body. It is located in the middle at the top and is closed with a plastic plug. Then we unscrew the screws securing the glove compartment and the left plastic trim covering the additional mounting block (on the passenger seat). Then we unscrew the two screws that secure the central part of the instrument panel to the floor. Next, you need to remove the heater valve control cable, as well as two damper control cables. On the driver's side, find three screws securing the radiator cap and unscrew them.
Replacing the radiator of a VAZ-2115 stove without removing the panel implies its slight displacement deeper into the interior. This is the only way to get to the heater. After first removing the plastic tips of the stove control levers, pull the panel towards you. If all the screws are removed, it should be able to move. Insert an object, for example, an empty plastic bottle, into the gap between the right side of the panel and the body. This way the heater will remain retracted.
Place a container under the radiator pipes and loosen the clamps securing them. At this time, a small amount of coolant may leak out, so we carry out all work with the utmost care.
Only after draining the antifreeze or antifreeze can the radiator be removed from the heater housing. Here you will need an assistant to lift the panel up.
Replacing the VAZ-2115 heater radiator without removing the panel: photo, description
After dismantling the radiator, you shouldn’t relax too much, because putting a new device in place is a more complicated process. Start it by calling an assistant and asking him, as during dismantling, to lift the panel up. Replacing the radiator of a VAZ-2115 stove requires special care - if installed incorrectly, it can be damaged, and then you will have to start all over again. When you put the new heater in place, make sure that it goes all the way to the cover, otherwise it will be impossible to secure it. After this, secure the radiator with three screws.
Next, you need to connect the inlet and outlet hoses to it. To make them easier to put on the pipes, moisten them from the inside with soapy water. If the hoses are damaged (ruptures, cracks), replace them with new ones. The same applies to clamps. Connect the heater control cables to the control panel levers. Check their work. Don't rush to screw on the dashboard just yet.
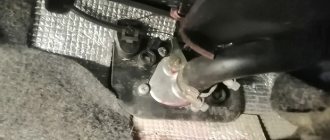
Changing the faucet
A leaking faucet is considered one of the most annoying problems with a heating system. If the problem is not detected in time, it may simply flood the car interior with coolant. To diagnose a leak, it is enough to have a flashlight with you and visually inspect the condition of the faucet. But leaks can also be caused by cracks in the pipes or radiator.
https://www.youtube.com/watch?v=GcNZ7y50KQ4
Faucet replacement procedure
It is better to carry out replacement in a special repair pit:
- Drain the coolant.
- Get to the pipes that connect the engine and the heater valve. Loosen the pipe clamps and clean the threads of the 2 studs that secure the faucet. To do this you will need a metal brush and WD-40.
- Disconnect all the pipes one by one. In this case, coolant may leak.
- After that, in the cabin you will need to remove the side trim of the torpedo and, if necessary, replace the pipes.
- Then you will have to go back under the car and use a 10mm socket to unscrew the nuts securing the faucet.
- Return to the cabin again and pull the faucet towards you, then remove the spring clamp and disconnect the faucet from the control cable.
- Then, when the tap is unscrewed, you can replace it with a new one. Then put everything back together in reverse order.
After repairs and modifications there should be no problems with the stove. The main thing is to notice the beginning problems with the heating system in time in order to have time to prevent them.
What should happen in the end?
After replacing the radiator of the VAZ-2115 stove has been successfully carried out, it is necessary to check the functionality of the entire heating system, as well as the tightness of the connections. To do this, fill the reservoir with coolant to the required level. Start the engine and warm it up. Turn on the heater fan and open the valve. Warm air from the deflectors indicates that the coolant is flowing normally through the heating radiator. But that is not all. Try the heater radiator pipes with your hands. They should both be hot. Make sure that the clamps are tightened enough to prevent fluid from leaking where they connect to the pipes. If everything is in order, you can start screwing the control panel.
Inconvenient design solutions
VAZ-2114 and 2115 cars are quite modern and quite popular cars in the economy segment.
But these cars, like most new models, have a not very pleasant feature.
By increasing the comfort of the interior and the layout of the front panel, designers significantly complicate the maintenance of the heating system.
The heater radiator in these cars is hidden deep under the panel and is not so easy to get to.
But the heating radiator is a rather vulnerable element of the cooling system. And if the interior heating has deteriorated, in more than half of the cases the problems are related to the heat exchanger.
And all this despite the fact that the element itself is practically not repaired and is often simply replaced.
Useful tips
I would also like to give some useful tips on how to extend the life of your heater radiator.
- Don't skimp on coolant. Cheap coolant is the main cause of problems with the heater core.
- Check the coolant level regularly. This will not only help identify its leak, but will also protect the engine from overheating.
- In the summer, open the heater tap at least once a month to allow coolant to flow into the radiator. This solution will prevent the faucet shut-off mechanism from souring, and will also allow the radiator not to “dry out”.
- When replacing coolant, be sure to flush the system with a special fluid. This will slow down the scale deposition process.
- Having identified problems with the system, do not delay repairs.
Resistor fault
Despite the fairly simple design of the heater, some of its elements may fail over time. At the same time, the probability of failure of the heating system as a whole is quite small. The most common stove failures include:
- problems with the radiator;
- faucet leak;
- wear of pipes;
- resistor failure;
- switch malfunctions.
Let's look at each fault block in more detail.
As noted above, the resistor is designed to change the level of resistance of the current supplied from the generator to the heating system fan. In the VAZ-2114, using a switch, you can ensure the fan operates in three modes. In the extreme position, the fan is powered by a voltage equal to the nominal voltage of the vehicle's on-board network, providing maximum power output.
If the windings burn out, regardless of the switch position, the fan operates only at full power. The inability to switch fan operating modes is evidence of a resistor malfunction.
A faulty resistor may be indicated by the fan operating in one mode, when manipulations with the switch do not affect its blowing speed. To replace the resistor, you need to prepare a screwdriver with a Phillips head, fine-grain sandpaper and a multimeter. Algorithm of actions:
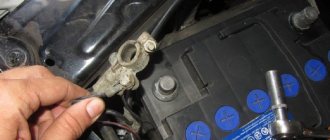
- disconnect the negative terminal of the battery;
- unscrew the screws that secure the right console cover;
- Use a screwdriver to unscrew the screws securing the right cover of the center console;
- you will have access to the resistor, from which you need to disconnect all the wiring and evaluate the contacts for burning. If the contact surface is oxidized, use sandpaper to clean it down to metal;
- It may well be that the resistor has lost its functionality precisely due to burning/oxidation of the contacts, so we assemble everything in the reverse order and check whether the fan will work in all normal modes;
- in case of a negative result, again remove the negative terminal, the panel cover and unscrew the screw that secures the resistor to the body;
- We remove the resistor and use a multimeter to measure the resistance at the resistor inputs and at the inputs of both windings. In the latter case, the indicator indicating the working condition of the additional elements is 0.2 Ohm. For the entire resistor, the standard resistance should be 0.8 ohms. If the multimeter readings do not match the specified values, replace the resistor with a new one, and then reassemble in the reverse order.