Fortunately, users are much less likely to be puzzled by why the cooling fan of the VAZ 2114 is not working than to owners of other cars - fellow models. However, unfortunately, it is no longer possible to say that such a situation is completely unimaginable. It happens, and there is no escape from it.
On the other hand, any machine is a complex unit.
There is always something to break or become capricious. So, noticing that the arrow showing the temperature of your engine is confidently creeping into the red zone and is not going to stop, ease off the gas, turn on the fan in the cabin and look for the nearest hole where you can park your iron horse. You shouldn’t joke about overheating:
seized pistons are a full-fledged overhaul that will hurt your budget and nerves.
Related articles:
Why the VAZ 2114 cooling fan does not work
- there may be several reasons. They should be checked according to the decreasing degree of probability: the more often a given breakdown occurs, the closer to the top of the list is the object being checked.
"Salon" checks
Let's start with what can be examined without leaving the car.
2 fuses are responsible for the normal operation of the fan.
One of them also controls the operation of the beep, so it’s easy to check its viability: honk and listen. There is a sound - we forget about this fuse. No - we climb into the mounting block and look for the one marked F5
(20 amperes). Before putting a fresh one in the place of the burnt one, it would be useful to be curious about why the previous one burned out. Otherwise, the new one will face the same fate as its predecessor in the very short future.
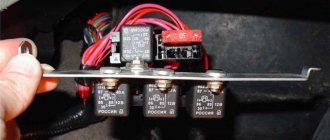
With second fuse
It won't be easy to figure it out. To check it, you will have to dismantle the torpedo casing on the passenger side. 3 relays are hidden under it, accompanied by its own bodyguard-fuse. We need the one in the middle. It is pulled out and checked for integrity. If it burns out, before installing a new one, you will again need to find the cause of the breakdown. By the way, it will be good in this case if you have a spare one (both for checking and for replacing a burnt part).
If this fuse is also working, check the relay adjacent to it. Without an ohmmeter, it is impossible to determine whether it is alive or not; We can only suggest replacing it with a new one (then you need to carry it with you in reserve) and check whether the fan works. In any case, it is worth checking the condition of the contacts on the relay and, if necessary, cleaning them.
If no damage is found inside the car, you will have to get out of it and look for the reasons by opening the hood.
Engine compartment checks
After getting out of the car and lifting the lid, we proceed to more serious actions.
- The block on which the wires leading to the electric motor on the engine cooling fan are attached is disconnected;
- A pair of loose wires connect the motor to the battery. This will give us a clear picture: if the fan starts spinning, then we have a problem with the temperature sensor, if it remains motionless, the motor has burned out.
In the latter case, everything is clear
- you will have to change (or repair, if possible and have the appropriate skills) the fan motor. When a temperature sensor has failed, you need to avoid making the mistake of many and not confusing it with a sensor that records the temperature of the coolant. The one we need is located above the thermostat, directly on the cylinder head.
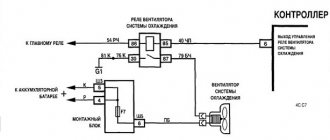
Connection diagram for the fan switching sensor in injection engines
Unlike carburetor cars, where the sensor directly closes and opens the cooling fan circuit, in injection engines the device operates only with an information signal. After processing the received data, the ECU sends a control action to the fan relay installed on the radiator. The main advantage of this scheme is the possibility of emergency operation of the cooling system in the event of a loss of communication with the sensor or its failure. The ECU can also adjust the engine operating mode by influencing the injectors.
To determine where the fan switch sensor is located, you need to pay attention to the thermostat. In injection engines they are located next to each other. In some car models, wires go from the sensor to the dashboard to indicate the status of the device or to display the current coolant temperature.
What to do?
This subsection is so named because professional auto mechanics strongly disagree that fan problems can have anything to do with the part mentioned below. Meanwhile, VAZ owners insist that following these instructions has a significant (and positive) effect on the cooling system in general and on the operation of its fan in particular.
Probably, the subtlety is not in the lid itself, but in the pickling valve, which reduces the pressure that has reached critical levels. But how the operation of the fan depends on it is a mystery shrouded in darkness. But it works! If you have already checked everything possible, but still don’t understand why the cooling fan of the VAZ 2114 does not work, try following the advice of experienced people and replacing the cover - maybe it will help.
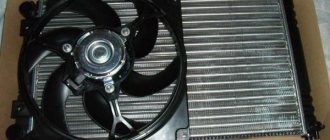
The fan serves to generate air flows that are directed to the engine radiator. This is necessary in order to cool the liquid that circulates through it.
If the car is moving at high speed, the fan is not particularly required, since the engine receives all the necessary cooling from oncoming air flows. But when the car goes into slow driving or idle mode with the engine running, the role of the propeller becomes indispensable.
Switching on occurs after the corresponding signal is sent from the electronic control unit. The ECU, in turn, learns about the need to turn on the fan from the temperature sensor. The switching threshold is 103-105 degrees Celsius.
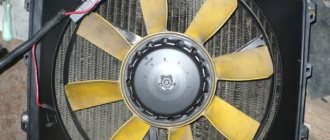
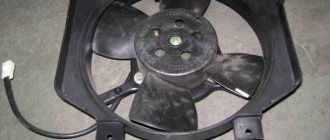
In the case of the VAZ 2114, the fan (propeller) is located in the engine compartment on the back side of the radiator.
Why doesn't it work
There are several reasons why the propeller may not turn on when the temperature situation requires it:
- The electric motor of the fan, that is, the drive, has failed;
- The fuse broke and burned out;
- Relay failed;
- The wiring is broken;
- The sensor connectors have lost contact;
- The sensor has failed.
Finding the fault
| Problem search area | Explanation |
| Propeller check | The connector on the propeller is disconnected and connected directly to the battery. If the fan starts working, everything is fine with the drive. If the propeller still does not spin, the problem is in the electric motor. |
| Wiring and contacts | If the propeller does not work, you must check the condition of the wiring and make sure that the sensor contacts are working properly |
| You can find these two elements in the engine compartment on the left, closer to the driver, inside the mounting block. The fan is supplied with a fuse designated F4 with a rated current of 20A. The test can be performed by pressing the horn button. Why? Yes, because it is also connected to this fuse. Or check with a tester | |
| It is located in the same place as the fuse. For an effective test, it is best to take a relay that you are 100% sure is working, install it in place of the old one and check | |
| To test the sensor, disconnect power from it. If it works, the propeller will start working in emergency mode, that is, it will blow constantly. Disconnect the connector and turn on the ignition. If the propeller spins, then the sensor is broken. Need replacement |
When to change
If the fan itself is the cause of all the problems, it is not necessary to change it, since in some cases it can be repaired. Failures are often associated with bearings or brushes.
If the cause of the breakdown is the failure of the electric motor due to a broken wiring or short circuit, it is not worth the risk of repairing it. It is easier and better to replace the entire drive.
If you drive a car that does not have a cooling propeller, this will lead to overheating of the coolant and destruction of pipes, rubber elements, gaskets of the main cylinder block and valve covers. It is not far from destroying the components of the piston group.
Operating a vehicle with a broken fan is strictly prohibited.
Price issue
Before starting to solve the problem of a radiator propeller not working, it is important for many people to learn about the cost of components and labor.
A new element today will cost approximately 1.5-2.5 thousand rubles, depending on the model and region. The cost of replacement at a service station will be from 400 rubles and more. Although it is not necessary to spend money on this, since replacing it yourself will take you no more than half an hour. Yes, and there is nothing particularly complicated here.
Design Features
A novice car enthusiast is recommended to study the operation of an injection engine. The injector includes a system that injects gasoline. After familiarizing yourself with the device, you won’t have to contact a service center for minor problems, but rather fix them at home yourself. The fuel supply is considered distributional, because gasoline is injected into each cylinder using a specific injector.
The VAZ 2115 is based on the VAZ 21099 model. In the new car, unlike the previous one, the shape of the hood, rear and front bumpers, a new configuration of the front wings, as well as improved aerodynamics of the body have changed. A spoiler was placed on the trunk lid - a wing. The exterior decoration was decorated with plastic elements, since metal ones were corroded by corrosion. For added safety, the model was supplemented with a brake signal and rear lighting.
Thanks to the electronically controlled injection power unit located under the hood, the electrical circuit of the VAZ 2115 differs significantly from the 99 modification.
The supporting structure of the car body is welded, metal, integral. The drive is front transverse. It has a 5-speed gearbox and the front wheels are connected to the drive. The engine has a capacity of 1.5 liters and is a four-cylinder, petrol, four-stroke and in-line. Distributive fuel injection systems are controlled electronically.
Under the rear seats, behind the bottom, there is a fuel tank. Gasoline is supplied from the gasoline pump located in it. The pressure level in it should not fall below 3.2 bar.
Hidden interior sub-cabinet wiring connects the located equipment. The mounting block is placed in the engine compartment. It consists of powerful consumers: wipers, high beam headlights, starter. All of them are connected to the on-board network using an intermediate relay.
Replacement
In order to replace the fan cooling propeller with your own hands, you will need a fairly small set of tools, which includes:
- Crosshead screwdriver;
- 8 mm socket wrench;
- 10mm socket wrench.
If you are ready, then let's get started.
- Place the car on a level surface and apply the handbrake. Just in case, you can put additional supports under the wheels of your VAZ 2114. It never hurts to take precautions.
- Raise the hood and disconnect the negative terminal from the battery.
- Using a 10 mm wrench, the fasteners of the air filter housing are removed.
- Armed with a screwdriver, loosen the clamp from the air duct located on the mass air flow sensor. This way you can remove the corrugation. Do it.
- There are screws on the air filter housing cover that hold it in place. They are unscrewed with a screwdriver, after which the filter component is removed from its seat.
- Now take an 8 mm wrench and use it to remove the air intake fasteners, and then remove the air intake itself.
- Now, using a 10 and 8 mm wrench, remove the fastening nuts on the fan casing around the entire perimeter. In total you will find 6 nuts there.
- Unplug the wire from the connector of your broken fan.
- Remove the fan casing, while also grabbing the drive, that is, the electric motor.
- Armed with a 10 mm wrench, you need to remove the three mounting bolts that hold the electric motor to the casing.
- Install the new fan in place of the old device.
- We return all the fasteners to their places, connect the connectors, and perform the assembly in the reverse order.
After installing new equipment, be sure to turn on the engine and let it run for a while. Until the fan turns on and the propeller starts spinning. This will take no more than 5 minutes. Soon the fan should turn off on its own. If it does not stop, turn off the engine. Repeat the experiment.
The electric fan of the VAZ-2114 engine cooling system is activated only by a signal from the coolant temperature sensor. But the connection does not occur directly, but through a relay. Two fuses protect this electrical circuit. If the temperature gauge needle creeps into the red zone of the scale, then let off the gas, turn on the interior heater fan at full power and look for a place to stop.
.
The serviceability of one of the fuses, located in the mounting block and protecting the electrical circuit of the fan, can be checked by simply pressing the horn button. If the signal works, then everything is in order with the fuse, since it also protects the electrical circuit of the sound signal. If it malfunctions, we open the mounting block and look for a 20-amp fuse F5, but before replacing it, you need to find the reason for its failure, otherwise the newly installed one will burn out in the same way.
To check the second fuse, you will have to remove the console trim on the passenger side. There you will see three relays and next to each of them there is a fuse. You will need to pull out the middle one to check. And again, if it burns out, you need to look for the cause of this phenomenon. If the fuse is working, we check the middle relay, since the fan motor is turned on through it. Having pulled it out of its socket, inspect its contacts for oxidation. You can check it with an ohmmeter; if you don’t have one or don’t know how to use it, you’ll have to try to replace it with a working one.
Next, open the hood, disconnect the block with wires from the fan motor and, if there are a pair of wires, connect it directly to the battery. If the fan starts working, then the cause of the malfunction will have to be looked for in the temperature sensor, or a relay and another fuse located next to this relay. Well, if the fan does not work when connected directly, then you will have to look for the fault in it yourself.
The fan may not work due to a failure of the temperature sensor for turning on the fan. It is located on the cylinder head, above the thermostat. If there is no ohmmeter, we check by replacing it. Only the fan switch sensor should not be confused with the sensor that works with the coolant temperature gauge.
Overheating of the engine threatens with serious consequences: the piston will jam, it will break, which will lead to a major overhaul of the power unit. Therefore, the cooling fan is an important element that protects the power unit from extreme heating.
Changing the fuse
- Fan relay not working
. What is not working is replaced by a new, working one;Changing the fan relay
- Open circuit in power supply
. If a break is detected in the line, you need to restore the wire or replace it;Checking for an open circuit
- Poor contact
. The connections are cleaned, traces of oxidation must be removed; - Temperature sensor failure
. .Changing the coolant temperature sensor
Video about replacing the fan switch sensor
Car electrical equipment
1 — headlight block; 2 — gearmotors for headlight cleaners*; 3 — fog lights*; 4 — ambient temperature sensor; 5 — sound signals; 6 — engine compartment lamp switch; 7 — electric motor of the cooling system fan; 8 — VAZ 2114 generator; 9 — low oil level indicator sensor; 10 — washer fluid level sensor; 11 — front brake pad wear sensor; 12 — wire tips connected to the common windshield washer pump**; 13 — windshield washer pump; 14 — headlight washer pump*; 15 — wire ends for connecting to the rear window washer pump on VAZ 2113 and VAZ 2114 cars; 16 — low oil pressure indicator sensor; 17 — engine compartment lighting lamp; 18 — wire lug for connection to the wiring harness of the engine management system or to the wiring harness of the ignition system on carburetor vehicles; 19 — windshield wiper gearmotor; 20 — VAZ-2114 starter; 22 — coolant temperature indicator sensor; 23 — reversing light switch; 24 — low brake fluid level indicator sensor; 25 - battery; 26 — sensor for insufficient coolant level indicator; 27 — relay for turning on fog lights; 28 — mounting block; 29 — brake light switch; 30 — plug socket for a portable lamp; 31 — lamp for illuminating the headlight hydrocorrector scale; 32 — parking brake warning lamp switch; 33 — backlight lamp connection block; 34 — switch for instrument lighting lamps; 35 — steering column switch; 36 — alarm switch; 37 — front seat heating element relay; 38 — ignition switch VAZ 2114; 39 — rear fog light circuit fuse; 40 — fuse for the front seat heating elements circuit; 41 - door lock circuit fuse; 42 — front ashtray illumination lamp; 43 — ignition relay VAZ-2114; 44 — cigarette lighter; 45 — glove box lighting lamp; 46 — glove compartment lighting switch; 47 — heater fan electric motor; 48 — additional resistor of the heater electric motor; 49 — heater fan switch; 50 — heater switch backlight; 51 — lamp for illuminating the heater levers; 52 — gear motors for electric windows of the front doors; 53 — right front door power window switch (located in the right door); 54 — gearmotors for locking front door locks; 55 — wires for connecting to the right front speaker; 56 — gearmotors for locking rear doors; 57 — wires for connecting to the right rear speaker; 58 — door lock control unit; 59 — wires for connecting to radio equipment; 60 — headlight cleaner switch; 61 — rear window heating element switch; 62 — relay for turning on rear fog lights; 63 — block for connection to the heating element of the right front seat; 64 — switch for rear fog lights: 65 — switch for the heating element of the right front seat; 66 — fog lamp switch; 67 — switch for external lighting lamps; 68 — left front seat heating element switch; 69 — block for connection to the heating element of the left front seat; 70 — wires for connecting to the left front speaker; 71 — left front door power window switch; 72 — right front door power window switch; 73 — wires for connecting to the left rear speaker; 74 — side direction indicators: 75 — lamp switch on the front door pillars; 76 — lamp switch on the rear door pillars; 77 — lampshade; 78 — canopy for individual interior lighting; 79 — block for connecting to the wiring harness of the VAZ 2114 electric fuel pump; 80 — trunk light switch; 81 — instrument cluster: 82 — trunk lighting lamp; 83 — display unit of the on-board control system; 84 — trip computer (not in all models); 85 — block for connecting the wiring harness of the engine control system; 86 — rear external lights of the VAZ-2114; 87 — rear internal lights; 88 — block for connection to the rear window heating element; 89 — license plate lights; 90 - additional brake signal located in the spoiler.
Checking the functionality of the cooling fan motor
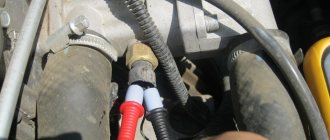
The easiest way to check the operation of the fan is to put two straight wires on it: minus and plus.
The plus is taken from the battery, the minus from the car body. If it doesn’t work when the circuit is closed, then that’s where the problem lies. When starting the blades, we look for the problem elsewhere.
Cooling fan operation diagram
Basically, when a non-working fan is detected, several reasons are identified:
If in the last two cases the problem is solved with little effort, so to speak, the first involves replacing the electric motor.
Important! When installing wires, the main power supply to the electric motor must be disconnected.
Differences from its predecessor
In particular, the designers changed:
- the shape of the front wings;
- the shape of the headlights and side lights;
- back panel shape;
- hood and trunk lid.
As a result, the overall dimensions of the car also changed, but it remained the same front-wheel drive, four-door, five-seater sedan car.
Advice: video materials from thematic forums where VAZ 2115 owners share their impressions of year-round operation of the car can serve as a good help in evaluating a car.
Procedure for checking
The operation of the fan on the VAZ-2114 is connected through 2 fuses. One of them is also responsible for the sound signal.
You can check it by pressing the horn. If there is no sound, replace it with a whole one. It is located in the mounting block, it is 20 ampere, marked F5.
Check and, if necessary, change fuses
The second one is located under the dashboard, on the passenger side.
Under the casing there are 3 relays with a fuse for each. The middle pair is responsible for the operation of the cooling fan. Replace the blown element with a new one (the fuse can be “ringed” with a multimeter or limited to a visual inspection. To check the functionality of the relay, you will need an ohmmeter). When checking their condition, at the same time make sure that the contacts are in normal condition, and if oxide is detected, clean them.
Important! If you find a blown fuse, you should not limit yourself to replacing it with a new one. It is imperative to find the cause of the break, since in the near future the new one will burn out again.
Checking the fan switch sensor
If the cause is not found, the next step should be to check the functionality of the fan switch sensor
. It's not difficult to do this. Disconnect it and turn on the ignition, while paying attention to the fan. The rotation of the blades indicates that the cause of the problem is in the sensor.
Checking the cooling system fan switch sensor
Due to the fact that very often the sensor begins to malfunction, sending erroneous signals, it is recommended to check it in another way
. To do this you will need a container, a thermometer and a multi-mert. Wires from the measuring device are connected to the sensor terminals, the threaded part of the sensor is immersed in the liquid. Heat the contents of the container to the temperature at which the fan operates (on a VAZ 2114 - 92 degrees). When the contacts close, the multimert will sound a sound signal. This means the sensor is working, if this does not happen, you can safely throw it away and buy a new one.
Healthy! Before installation, it is advisable to check the functionality of the purchased sensor in the same way.
Video about checking the cooling fan switch sensor
Final check
Having eliminated the problem, start the car engine. The fan motor should start after about 5 minutes of idling.
. If this does not happen, and the temperature has reached the desired level, diagnose the faults again.
Step-by-step algorithm of work
In each specific case, fan repair will differ depending on the existing breakdown. It is necessary to carry out appropriate diagnostics, which will allow us to determine why the radiator cooling fan on the VAZ 2114 does not turn on in a timely manner, which will simplify subsequent repairs. First of all, it is recommended to disconnect the fan connector, and then, observing the polarity, reconnect the connector directly to the battery terminal. If, with such a direct connection, the fan begins to rotate, this indicates a working drive, and the reason in this case may be electrical wiring, a faulty temperature sensor, or problems with the fuse. You can check the fuse responsible for the operation of the cooling fan without opening the plastic box. The fact is that such a relay is dual and is simultaneously responsible for the operation of the horn. Therefore, if the car's sound signal disappears and the fan does not work at the same time, this indicates a blown fuse. The block with such relays is located under the hood in a small plastic box. To open it, you need to remove two latches, then use tweezers to remove and change the fuse you need. Relay failures are difficult to diagnose. We can recommend that you get a 100% working relay, temporarily install it in the socket and check that the fan is turned on correctly. If during such a test the fan starts working, then you should simply replace the relay used with a working one. To check the temperature sensor, from which the signal goes directly to the radiator, disconnect the connector from the sensor and then turn on the ignition. In this case, the automation starts the fan for constant blowing in emergency mode. If, when the connector from the sensor is disconnected in this way, the fan turns on late, then we can therefore conclude that the temperature sensor has failed and will require replacement. The temperature sensor itself is fixed with two bolts, which can be unscrewed with a simple Phillips screwdriver. This sensor replacement usually takes no more than 5 minutes. If the cause of the breakdown is still the fan, you can try to repair it first or immediately replace it with a new one. The problem may be with the bearing or brushes. In this case, you can replace such damaged parts, which will completely restore the functionality of the cooling system fan. If the cause of the fan breakdown is the electric motor, then the repair presents certain difficulties, and such a failed drive is best replaced with a new one.
Video about the reasons why the cooling fan on the VAZ-2114 does not turn on
The fan serves to generate air flows that are directed to the engine radiator. This is necessary in order to cool the liquid that circulates through it.
If the car is moving at high speed, the fan is not particularly required, since the engine receives all the necessary cooling from oncoming air flows. But when the car goes into slow driving or idle mode with the engine running, the role of the propeller becomes indispensable.
Searched device
Switching on occurs after the corresponding signal is sent from the electronic control unit. The ECU, in turn, learns about the need to turn on the fan from the temperature sensor. The switching threshold is 103-105 degrees Celsius.
In the case of the VAZ 2114, the fan (propeller) is located in the engine compartment on the back side of the radiator.
Why doesn't it work
There are several reasons why the propeller may not turn on when the temperature situation requires it:
- The electric motor of the fan, that is, the drive, has failed;
- The fuse broke and burned out;
- Relay failed;
- The wiring is broken;
- The sensor connectors have lost contact;
- The sensor has failed.
Finding the fault
| Problem search area | Explanation |
| Propeller check | The connector on the propeller is disconnected and connected directly to the battery. If the fan starts working, everything is fine with the drive. If the propeller still does not spin, the problem is in the electric motor. |
| Wiring and contacts | If the propeller does not work, you must check the condition of the wiring and make sure that the sensor contacts are working properly |
| Fuse | You can find these two elements in the engine compartment on the left, closer to the driver, inside the mounting block. The fan is supplied with a fuse designated F4 with a rated current of 20A. The test can be performed by pressing the horn button. Why? Yes, because it is also connected to this fuse. Or check with a tester |
| It is located in the same place as the fuse. For an effective test, it is best to take a relay that you are 100% sure is working, install it in place of the old one and check | |
| To test the sensor, disconnect power from it. If it works, the propeller will start working in emergency mode, that is, it will blow constantly. Disconnect the connector and turn on the ignition. If the propeller spins, then the sensor is broken. Need replacement |
When to change
If the fan itself is the cause of all the problems, it is not necessary to change it, since in some cases it can be repaired. Failures are often associated with bearings or brushes.
If the cause of the breakdown is the failure of the electric motor due to a broken wiring or short circuit, it is not worth the risk of repairing it. It is easier and better to replace the entire drive.
Checking for open circuit
If you drive a car that does not have a cooling propeller, this will lead to overheating of the coolant and destruction of pipes, rubber elements, gaskets of the main cylinder block and valve covers. It is not far from destroying the components of the piston group.
Fuse
Operating a vehicle with a broken fan is strictly prohibited.
Price issue
Before starting to solve the problem of a radiator propeller not working, it is important for many people to learn about the cost of components and labor.
A new element today will cost approximately 1.5-2.5 thousand rubles, depending on the model and region. The cost of replacement at a service station will be from 400 rubles and more. Although it is not necessary to spend money on this, since replacing it yourself will take you no more than half an hour. Yes, and there is nothing particularly complicated here.
temperature sensor
Replacement
In order to replace the fan cooling propeller with your own hands, you will need a fairly small set of tools, which includes:
- Crosshead screwdriver;
- 8 mm socket wrench;
- 10mm socket wrench.
If you are ready, then let's get started.
- Place the car on a level surface and apply the handbrake. Just in case, you can put additional supports under the wheels of your VAZ 2114. It never hurts to take precautions.
- Raise the hood and disconnect the negative terminal from the battery.
- Using a 10 mm wrench, the fasteners of the air filter housing are removed.
- Armed with a screwdriver, loosen the clamp from the air duct located on the mass air flow sensor. This way you can remove the corrugation. Do it.
- There are screws on the air filter housing cover that hold it in place. They are unscrewed with a screwdriver, after which the filter component is removed from its seat.
- Now take an 8 mm wrench and use it to remove the air intake fasteners, and then remove the air intake itself.
- Now, using a 10 and 8 mm wrench, remove the fastening nuts on the fan casing around the entire perimeter. In total you will find 6 nuts there.
- Unplug the wire from the connector of your broken fan.
- Remove the fan casing, while also grabbing the drive, that is, the electric motor.
- Armed with a 10 mm wrench, you need to remove the three mounting bolts that hold the electric motor to the casing.
- Install the new fan in place of the old device.
- We return all the fasteners to their places, connect the connectors, and perform the assembly in the reverse order.
After installing new equipment, be sure to turn on the engine and let it run for a while. Until the fan turns on and the propeller starts spinning. This will take no more than 5 minutes. Soon the fan should turn off on its own. If it does not stop, turn off the engine. Repeat the experiment.
It rarely turns out that after replacement the fan still does not work. Even if this happened, this is due to two possible events - other elements of the cooling system were damaged, or you purchased a non-working fan. Alas, given the number of fakes on the market, the second option cannot be ruled out.