Toyota
cabin filter 87139-0D070 is installed from the factory . Its cost at the time of writing is from 1800 rubles. However, it is not necessary to buy exactly the original filter; you can purchase a high-quality analogue filter. At the moment there are quite a large number of them offered.
Filter analogues
- AIKO AC108C from 260 RUR coal
- AMC Filter TC1018 from 300 RUR
- AMD AMDJFC96C from 240 rubles carbon
- Bosch 1 987 432 190 from 550 RUR
- Denso DCF35-6P from 630 RUR
- Filtron K 1210 from 270 RUR
- Fortech FS022 from 270 RUR
- Goodwill AG582CF from 400 rub.
- Mann CU1919 from 350 RUR
- Sakura CA1114 from 350 RUR
The filters mentioned above are only some of the analogues offered by manufacturers. When choosing a filter, you should not buy the cheapest ones, as their quality will not be the best.
Before changing the filter, you need to purchase it, and here it would be useful to follow some recommendations. In this case, saving money by purchasing a cheap cleaner is not worth it. If possible, it is better to buy an original filter element or from a well-established manufacturer.
Do not forget that not only you, but also your passengers will have to breathe this air. This is doubly important if you frequently transport children. And of course you shouldn’t try to make it yourself, since the filter is made from a special material using a special technology.
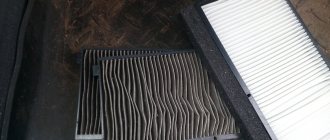
If a visual inspection shows that the filter element is in good condition and can still serve, then it will be enough to shake it out and blow it with compressed air.
Tools
- salon barrier;
- rags;
- gloves;
- vacuum cleaner.
Car vacuum cleaner
First of all, in order to choose the right filter, you need to accurately determine the year of manufacture and body number of the car. In our case it is 150.
Stages
- Open the glove compartment and take out all the things from it.
- Remove the glove compartment mount.
- We fold it down.
- Remove the cabin air barrier cover.
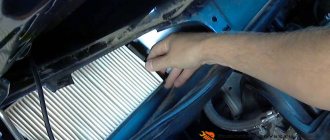
- We remove the old air cleaner.
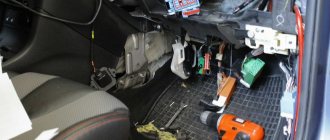
- Wipe the installation area with a rag or vacuum cleaner.
- We install a new cleaner.
As you can see, everything is simple and it took no more than 20 minutes. And the result: good heater performance and clean air in the cabin. If you have any questions, watch the video.
What are car filters?
All salon cleaners can be divided into two types: anti-dust and carbon. Anti-dust devices are a rectangle of cellulose or synthetic fiber corrugated paper laid in rows. The fiber, in addition to dust particles, is capable of retaining soot, pollen, and heavy compounds. The paper on some models is pre-treated with chlorine and can prevent the spread of bacteria.
Anti-dust cabin filter
The coal version is a more “advanced” continuation of the anti-dust ones. The filter fiber in it contains particles of molded carbon, which, as is known, is an excellent absorbent. The cleaning element of the carbon filter is characterized by a higher density and is capable of trapping the smallest particles, such as nitrogen and sulfur oxides, benzenes and phenols. These carcinogens are very dangerous to human health and can cause the development of diseases of the respiratory system. When carcinogens interact with coal, coal particles absorb them and partially neutralize them.
Why do most car owners prefer carbon filters?
Structurally, the cabin filter can consist of several layers, but in the case of the carbon version, it includes activated carbon, which is capable of absorbing chemical compounds at the molecular level. Thus, you protect yourself from any harmful substances present in exhaust gases, which is important in many cases (when driving in traffic jams, in tunnels, near polluted industrial zones, livestock farms and other similar places). Advantages of using carbon filter elements:
- when driving in congested conditions, you can use a fan or car air conditioner without any problems (there is no need to turn on the recirculation mode);
- an uncontaminated carbon filter helps reduce glass fogging;
- the level of air purification increases to 95-98%;
- the interior is completely protected from the penetration of external odors and volatile chemicals harmful to health.
How often should I replace it?
In accordance with the manufacturer's regulations, the cleaning element is updated every scheduled maintenance - after 20,000 km .
For CIS countries, it is rational to reduce the replacement interval to 10,000 km. We take into account the level of dust and gas pollution in regions and megacities. In summer, the resource is reduced by fallen leaves and poplar fluff, which is absorbed by the air flow. In winter there is excess moisture, which contributes to the emergence and development of pathogenic bacteria.
Most motorists follow the recommendations in the operating instructions, which is also true.
Why is a filter element needed?
The more often you change the filter, the cleaner air you breathe.
Considering that there is a lot of dust and other dangerous impurities in the road air, it is dangerous to ignore the importance of the task performed by the Corolla 150/120 cabin filter.
For the Corolla's climate system to operate correctly, a constant flow of air is required, in the absence of which the system resorts to using recirculation flows. All this leads to the accumulation of dust on the filter, increased humidity in the cabin, constant fogging of windows and the development of a favorable environment for pathogenic microorganisms.
Article number and cost of the original cabin filter for Corolla 150 and its analogues
Filters with different catalog numbers are installed on the Toyota Corolla 150 car. The article number depends both on the country to which the machine is produced for export, and on the year of its manufacture. At the same time, replaceable filter cartridges are completely interchangeable. The cost of branded standard filter elements ranges from 450 to 800 rubles. The article numbers for cabin filters are presented below:
- 8713952020;
- 87139YZZ20;
In addition to the original filter for the Toyota Corolla 150, a number of analogs are produced from third-party manufacturers. The best of them are summarized in the table below.
Table - Analogues of the cabin filter for Corolla 150
| Manufacturer | vendor code | Cost, ruble |
| Sakura | CAC1112 | 280-320 |
| Knecht-Mahle | LA395 | 300-350 |
| Starline | SFKF9470 | 200-220 |
| Blue Print | ADT32514 | 240-260 |
| Denso | DCC1007 | 360-400 |
| Parts-Mall | PMF081 | 180-200 |
| Masuma | MC2038 | 300-340 |
The Toyota Corolla 150 also uses a carbon filter. Its cost is from 700 to 1200 rubles. The article numbers of original carbon filters installed on cars are given below:
- 8713902020;
- 87139YZZ16;
- 17801YZZ06;
- 0897400820;
- 8713906080;
- 8713950100;
- 87139YZZ08;
- 87139YZZ10.
Third-party manufacturers produce analogues of branded coal products, which are not inferior to the original in terms of performance characteristics and quality. A list of the best brands is given in the table below.
Table - Analogues of the carbon filter on the Corolla 150
| Firm | Article number | Approximate cost, ruble |
| Nipparts | J1342027 | 320-370 |
| Blue Print | ADT32522 | 240-280 |
| Profit | 15203112 | 220-260 |
| Parts-Mall | PMF077 | 200-280 |
| Japan Parts | FAATY13 | 140-200 |
| Brother Star | XDK113 | 160-1900 |
| Interparts | IPCA107 | 190-240 |
Changing the cabin filter on a Toyota Corolla (E120 and E150): process and product selection
Replacing the cabin filter on Toyota Corolla E150 and E120 is the same process, since the filter element is located in the same place.
The cabin filter serves to clean the air that enters the cabin from outside. According to new international standards, every car must be equipped with such a product. Video
The videos will tell you how to change the cabin filter on different generations of the car, and will also tell you about some of the subtleties and nuances of the process.
Consumable replacement time
While doing its job, the cabin filter part becomes clogged with dust, dirt, pollen over time; insects can get into it in the summer and fallen leaves in the fall. Therefore, it is important to change the “stuffing” of the ventilation system on time.
According to the data specified in the manufacturer's operating manual, the filtration part in a Toyota car must be replaced with a new one after 20,000 km, that is, during every second maintenance. But there are nuances:
- if the car is rarely used, it is recommended to change this part at least once a year, even if the cherished 20,000 km on the meter have not yet reached;
- if the car is used more often for driving around the city, it is worth reducing the figure to 10,000 km and changing the cabin filter earlier than the manufacturer advises. Constantly being in the flow of other cars contributes to increased load during the filtration process due to the large number of microparticles of soot from exhaust gases and dust raised by tires from the road;
- when the machine is operated most of the time at low air temperatures (northern region), the filter element can be changed less frequently - there are no major pollutants;
- areas with a warm climate, on the contrary, require more frequent replacement: this is affected by insects, a large amount of dust, fluff and pollen during the flowering period;
- those who drive on roads near black soil will have to buy new consumables less often, but the more common sandy loam soils contribute to the rapid deterioration of the filter element;
- People with hypersensitivity to air quality and allergies to dust or fluff are recommended to change this part as often as possible.
Doctors and specialists who study the negative impact of vehicles on the human body are actively advocating for more frequent replacement of the filter part. They recommend changing it twice a year: in the spring - after the flowering period, and in early to mid-autumn, so as not to breathe summer dust and particles of rotten leaves in the car.
The reason for replacing or at least cleaning the filter element ahead of time may be too weak airflow during ventilation operation and fogging of the windshield. Typically, these symptoms mean that the paper or charcoal part is clogged and is too difficult for it to let air through.
Replacing the filter yourself
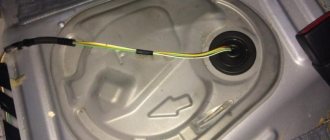
The lower loop of the stop is attached here.
If you have “correctly growing” hands, replacing the cabin filtration element of a Toyota Corolla is not difficult at all. Before you change the cabin filter on your Corolla 150 yourself, empty the glove box.
Algorithm for replacing the cabin absorber:
- Empty the glove compartment;
- If replacing in the cold season, it is better to pre-warm the car, since cold plastic is fragile and therefore often cracks when pressed;
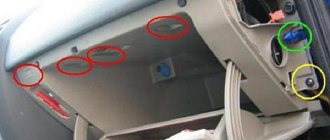
- To dismantle the glove compartment, carefully move the side walls and open the fixing elements of the drawer pull-out;
- Remove the glove compartment from the hook-shaped fasteners at the bottom of the glove compartment;
- Behind it is a cover covering the cabin filter. To remove the part, simply press down on the side clips attached to the body
- Take out the anti-dust element. Avoid getting debris into the air duct and heating fan, perform the manipulation very carefully, without pulling the filter with force;
- Insert a new filter.
Attach the support leg to the glove box
After completing the installation of the new absorber, fasten the filter cover, and then assemble the glove box back.
Replacing the cabin filter on a Toyota Corolla with a 110 body with your own hands
In general, the scheme of work does not differ from the first one, but there are certain features. Procedure:
- Find the filtration element in the car interior behind the glove compartment, open the glove box, unclip the fastenings on the left and right at the top.
- Find the cabin body, closed with a plug.
- Unscrew the cover and remove the filter.
- Compare old and new parts, if there are no serious discrepancies, install the item.
If necessary, clean the mounting mounts of the filtration elements - napkins and rags will be useful. Assembly is carried out in the reverse order of disassembly.
Beginners sometimes have difficulty attaching the element. You need to make sure that it fits in size; if not, you will have to make adjustments. It is also important to get into the grooves and make sure that there is a click. If the matter is not brought to fruition, the element will not fit securely enough, which will affect the quality and service life of it.
Where is the SF Toyota Corolla located?
The element that purifies oxygen in a car is located in the air duct of the ventilation system.
The E120 modification in terms of location coincides with the E150 model, so there is no point in describing the location twice.
Due to its purpose, the consumable is installed on the border between the outside of the car and the interior. To access, you do not need to lift the entire panel, as in some cars, disassemble the body or crawl under the hood. In the 2008 Toyota Corolla - one of our most popular models - the seat for the filter element is located immediately behind the glove compartment, and access to it is very easy, with literally three movements of the hand.
The process of replacing the cabin filter
So, let's look at the process of changing the Toyota Corolla cabin filter:
- The filter element is located in the cabin, behind the glove compartment.
The cabin filter element is located under the glove compartment.
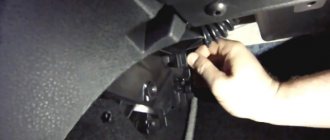
In order to get to the element, you need to unclip the side fastenings.
Under the glove compartment we find the cabin filter housing.
Comparing the old and new filter.
Clean the filter seat.
We install a new filter.
Filter selection
Such a part as a cabin filter often has, in addition to the original, many more analogues. This did not bypass the Toyota Corolla, therefore, in addition to the original part, you can choose quite a lot of analogues that can be installed on the vehicle.
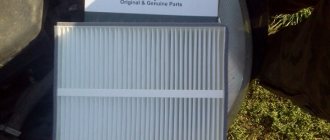
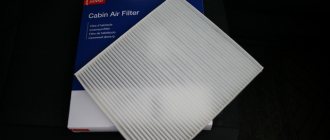
Original
88568-52010 — packaging of the original cabin filter.
88568-52010 – the original catalog article for the cabin filter for Toyota Corolla in body types 120 and 150. The average cost is 1000 rubles from an official representative, but on the automobile market you can find it cheaper, for 800 rubles.
Analogs
Not original cabin filter
In addition to the original, the automotive market presents a wide range of analog products that can be used and installed on a vehicle. Let's consider the main ones:
| Manufacturer's name | Catalog number | Cost in rubles |
| Ag autoparts | AG5099 | 210 |
| Alco | MS-6188 | 400 |
| AMC Filters | TC-1006 | 300 |
| Amd | AMD.JFC111 | 300 |
| Asam | 70345 | 200 |
| Ashika | 21-TY-TY2 | 210 |
| Avantech | CFC0108 | 1000 |
| BIG Filter | GB-9859 | 210 |
| Blue Print | ADT32505 | 300 |
| Bosch | 1 987 432 084 | 500 |
| Champion | CCF0123 | 300 |
| Corteco | 80000419 | 1000 |
| Delphi | TSP0325173 | 400 |
| Denckermann | M110060 | 210 |
| Denso | DCF357P | 400 |
| Febi | 24433 | 700 |
| Filtron | AP142/1 | 400 |
| Fortech | FS-070 | 400 |
| Fram | CF9466 | 400 |
| Goodwill | AG 162 CFC | 400 |
| Interparts filter | IPCA-107 | 400 |
| Jakoparts | J1342001 | 300 |
| Japan Parts | FAA-TY2 | 300 |
| Jc Premium | B42002CPR | 300 |
| JS Asakashi | AC101J | 300 |
| Kamoka | F406101 | 320 |
| Kolbenschmidt | 50013944 | 400 |
| Kortex | KC0014S | 400 |
| LYNXauto | LAC-105 | 500 |
| Mahle/Knecht | LA 109 | 500 |
| MANN-FILTER | CU 1828 | 550 |
| Mapco | 65550 | 500 |
| Meyle | 30-12 319 0001 | 300 |
| Micro | RCF1801B | 700 |
| Nac | 77190-CH | 550 |
| Nipparts | J1342001 | 300 |
| Patron | PF2095 | 400 |
| Profit | 1521-2144 | 400 |
| Quattro freni | QF20Q00002 | 300 |
| SCT | SA 1209 | 300 |
| Starline | SF KF9198 | 300 |
As you can see, the range of analogues is quite wide, and any motorist will have plenty to choose from in terms of price and quality.
Substitution rules
On the Internet you can find many different videos about how to install and choose the type and number of filter for cars in the back of E 100 and others. Usually there are no strict restrictions; the main thing is to choose a high-quality element that is suitable in size. In a Toyota Corolla, the process of replacing the cabin filter does not require special tools and can be quickly completed without going to a service station. Typically, the cabin air filter is located behind the glove compartment.
Before changing the cabin filter, you should prepare your work area by freeing up space in the front passenger seat. Empty the glove compartment and open the front passenger door.
While working, you may need to lie down, and in order to avoid getting dirty, it is recommended to spread something both on the floor of the car and on the ground in front of the open door.
The replacement step by step looks like this:
- It is necessary to open the glove compartment and press the latches on the right and left on which it is held, thus removing the lid and gaining access to the filter container.
- The container located behind the glove compartment must be opened; to do this, press the buttons on its lid and remove it.
- After that, the used old consumable is removed from the compartment, and its location is wiped with a damp cloth.
- After the location of the filter element has dried, you should begin installing a new one. It is very important to consider the correct installation method. Most often, arrows on the consumable itself indicate the direction of installation.
- Then you should install the covers in reverse order, first on the compartment with the filter, and then on the glove compartment.
Typically, all elements are simply and tightly inserted into their grooves, and the process does not take much time.