Good day, dear readers of the group!
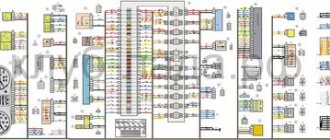
The other day I came across different pinouts for the VAZ 2110-2115 devices, namely, according to the PP diagrams, one numbering of the block is indicated, and for the Niv one, another.
After which I started studying the diagrams and pinned out the numbering of the Nivopriborka. And it turned out that the difference is only in the numbers - the functional locations of the wires suitable for the white and red blocks have not changed, that is, replacing one device with another will not be a problem, but during repairs and finding the right wire you will have to rack your brains for an hour or two, checking car diagrams. That’s why I’ll post the pinout for everyone else, so as not to rack their brains in the future)
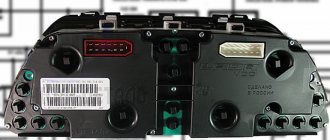
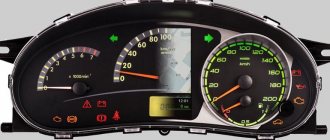
WHITE BLOCK 1 — oil pressure lamp 2 — empty 3 — battery warning lamp 4 — size warning lamp on the dash 5 — handbrake lamp 6 — coolant sensor, to the arrow 7 — + from the second fuse (NIVA) 8 — to the hazard warning light button (8 contact) 9 - + from the second fuse (NIVA) 10 - empty 11 - CHECK lamp 12 - tachometer signal wire 13 - minus
RED BLOCK 1 — brake fluid level 2 — left turn 3 — right turn 4 — power supply from the backlight control 5 — minus 6 — + from the second fuse (NIVA) 7 — DTV, to the tidy 8 — 50 ignition switch terminal 9 — empty 10 — high beam warning lamp 11 - fuel level 12 - speedometer signal wire
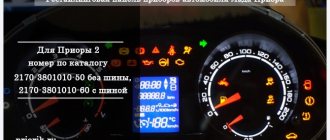
New instrument cluster for the Niva dashboard
I bought a used instrument cluster from 2115 VDO with two LCD displays. When I bought it, the seller foamed at the mouth to prove that I couldn’t install it on a carb car and that it was purely for the injector. I was given only two days to test its performance. I was able to check it on the table without even connecting it to the car. All that was needed was a power supply and some wires and a 2110 speed sensor.
I also bought the instrument cluster cover from 21214M. I thought I wouldn't find it. It turned out that they had been lying on the car market for a long time.
Well, the panel begins to take on a finished look. Tomorrow I plan to fully install the gearbox on the car. Accordingly, I will describe in detail what I did and how.
Installation of devices from VAZ 2115 in Niva
An excellent step-by-step guide to jumping wires is provided below. I did everything according to the description. I printed out the table and crossed out each step so as not to get confused.
On my own behalf, I’ll just add the pinout of the contacts of the instrument cluster 2115/2110 VDO and which wire needs to be transferred from the Niva block. B - white, K - red.
White block (X1)
1 - ground - K6 and lay a new ground wire of the speed sensor, contact No. 1 2 - Low-voltage tachometer input (not connected to the carburetor) - empty 3 - High-voltage tachometer input (connected to the carburetor) - K3 4 - “+” battery - A new wire is thrown to pin 30 of the ignition switch. 5 - To the coolant temperature sensor - B13 6 - Dimensions - B3 7 - Choke - weight control. 8 - CHECK ENGINE (+ or - CHECK ENGINE lamps, did not understand!) 9 - CHECK ENGINE (+ or - CHECK ENGINE lamps, did not understand!) 10 - + 12V - B4 11- To the parking brake switch - K8 12 - wire to excitation winding of the generator B12 or B6, depending on what kind of tidy was installed on the Niva. 13 - To the oil pressure warning lamp sensor - K12
Removing (replacing) the dashboard (“torpedo”)
The structure of the instrument panel and its components: 1 — mounting bracket;
2 - amplifier; 3 — dashboard; 4 — glove box body; 5 — lid lock latch; 6 — glove box cover; 7 — lock spring; 8 — lid lock; 9 — shelf; 10 — lid hinge link; 11 — box for small items; 12 — fastening brackets; 13 — radio mounting panel; 14 — instrument panel panel From the instrument panel, disconnect the main cylinder of the headlight hydraulic adjustment (see here) and the instrument lighting switch (see here).
We remove the instrument cluster (see here).
On a car with a carburetor engine, remove the air damper drive (see here)
On a car with an injection engine, disconnect the two connectors of the APS status indicator (see here).
Remove the central panel for attaching the radio (see here).
Using a Phillips screwdriver, unscrew the three self-tapping screws securing the trim of the right windshield pillar... |
|
|
|
|
|
|
|
Remove the instrument panel from the pins by pulling it towards you...
Install the instrument panel in reverse order.
Video
Source
Removing the instrument panel (combination), replacing the instrument panel illumination lamps and warning lamps
We remove the instrument cluster to replace it, as well as to replace indicator lamps and instrument backlight lamps, the speedometer cable, and to access the instrument panel mounting points.
Note. The instrument panel mounts may vary slightly depending on the year of manufacture and modification of the vehicle.
Using a Phillips screwdriver, unscrew the two self-tapping screws securing the instrument panel panel to the instrument panel itself.
Pull the upper part of the shield towards you, overcoming the resistance of the two latches.
Two latches (latches) are located in the upper corners of the shield.
|
|
Move the instrument cluster away from the panel
and on cars before 2009, we also unscrew the union nut of the flexible shaft (cable) of the speedometer drive.
We disconnect the two wire blocks: the left one is white, the right one is red.
We remove the instrument cluster.
Location of instrument cluster lamps (after 2009): 1 — backlight lamps; 2 control lamps.
Lamps on all modifications of devices are replaced in the same way, only their location differs. (lamps used)
On the removed instrument cluster we replace:
indicator lamp by turning the socket counterclockwise and removing it (the photo shows the battery charge indicator lamp),...
|
We install the lamps and instrument cluster in the reverse order.
Video
Source
Replacement.
To remove the DS, you need to place the car on a level surface. After this, it is best to disconnect the battery terminals to avoid errors in the BC.
Disconnect the wire terminals; to do this, press the plastic lock on the block. After this, use a wrench to unscrew the sensor from its seat. If you cannot unscrew it immediately, it is not recommended to use excessive force. You need to treat the threaded connection with WD-40, wait a few minutes and continue dismantling.
Installation of a new DS is carried out in the reverse order. When purchasing a new part, you need to pay attention to the external condition: the contacts must be treated with a sufficient amount of varnish, as this protects them from moisture. After completing the work, it is necessary to reset the on-board computer errors in order to remove the CHECK ENGINE error.
As for its location, look for the DS in the engine compartment in close proximity to the exhaust manifold. To be honest, the place where it is installed cannot be called ideal. While the car is running, the manifold heats up. The sensor wires rub against it, which over time leads to malfunctions and short circuits.
It doesn’t matter whether you have an injection car or a carburetor with a Europanel - the connection of the speed sensor to the instrument cluster is identical.
Replacing the VAZ speed sensor: step-by-step instructions:
- Drive into the pit - it will be more convenient to work from below - and wait until the engine cools down.
- Turn off the vehicle's power by removing the cable from the negative terminal of the battery. Do not close the hood after this, this will provide you with lighting.
- Locate the speed sensor on the transmission. Clean it and everything near it with a rag to remove any dirt.
- By pressing the spring clip, disconnect the wire block from the sensor.
- Dismantle the sensor itself by unscrewing it counterclockwise - with your fingers or an open-end wrench to “22”.
- Carefully, so as not to break anything, install a new part in place of the removed part. Connect the wire block to it and the procedure for replacing the speed sensor can be considered complete.
How to properly connect a new DS? It is important here that the device rod fits correctly into the fixing sleeve, otherwise rotation will not be transmitted to the sensor. If the sensor fits into the socket the first time, then everything is in its place, and if something prevents it from moving, then the rod did not fit into the bushing.
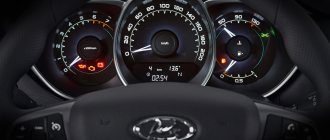
Dashboard Niva 21214
The instrument panel is present in any car. It combines a lot of different devices for monitoring the car. This part of the car is also sometimes called the dashboard. One important rule must be observed on any dashboard: it should not block the driver’s view and must provide full visibility of its instruments. On the VAZ 21214 car, all these rules are followed with precision.
Since this is an off-road vehicle, visibility here should be maximum, and information about the condition of the vehicle should be maximum.
Tuning NIVA Urban
The material will be useful and interesting to those who decided to do it themselves or order from professional tuners and would like to read reviews and discussions on the topic Video on auto tuning and key queries: tuning, video, VAZ 2121, Niva, do it yourself.
Niva - DIY tuning video
Basic concepts and topic of the article: what can be changed and remade, or all types of improvements and modifications
The video shows a selection of incredible modifications of the Niva Urban (updated VAZ-2121), mainly these improvements relate to styling, that is, improving the appearance of the car. Most of these alterations were done by hand. This video also contains answers to the question “how to easily improve the appearance of NIVA.”
Watch the video: “Niva Urban after tuning.”
Alteration work
- Replacing wheels;
- Installation of alternative optics;
- Aerodynamic body kits;
- Power body kits;
- Installation of accessories for off-road tuning;
You can read about all these areas in the following materials.
- How to tuning the dashboard of a VAZ-2101
| Conversion of VAZ-2121 for the city |
You can find other useful materials using the links below.
We hope that in the corresponding categories of the photo album, where photographs, installation examples and connection diagrams are collected, there will be more interesting materials.
All categories of the section:
| Moskvich tuning videoVideos of tuning Moskvich cars (AZLK and IZH), made with your own hands or in professional workshops. A selection of videos on tuning Muscovites of various models. Examples of work on alteration and fine-tuning of the body and interior, engine (including its replacement with an engine from a foreign car). |
| Tuning Volga GAZ 3110 on video A selection of videos of tuning GaZ cars, made by professional tuners or with your own hands. Finishing and complete refurbishment (convertibles, limousines) of Pobeda, Volga, families of 469 different models and years of production. Videos on replacing the engine with a motor from a foreign car, tuning the interior and exterior. |
| Tuning Tavria - videoTuning the Zaz car (Tavria 1102) in videos. Finished and remade to the fullest extent of Tavria. Tuning projects of varying degrees of complexity, including the construction of limousines and convertibles. Tuning and fine-tuning of the engine (chip tuning, installation of turbocharging, etc.), suspension and brakes. A selection of videos of homemade and professional tuning of ZAZ cars starting from the first models. |
| Niva - DIY tuning video Videos on tuning VAZ 2121, 21213, 21214 and 2131 (4x4, Taiga, 5-door). Do-it-yourself finishing and alteration. Engine tuning (chip tuning, installing turbocharging, increasing engine volume, etc.), changing and adjusting suspension and brakes. A selection of videos of homemade and professional work with off-road vehicles produced by the Volzhsky Automobile Plant. |
| Chevrolet Niva - a selection of do-it-yourself tuning videos Videos on tuning a VAZ-2123 (Chevrolet Niva) car. Do-it-yourself finishing and alteration. Tuning of the body and interior, engine development (chip tuning, increasing engine capacity, installing turbocharging, etc.), changing and tuning the suspension and brakes. A selection of videos of homemade and professional work with off-road vehicles produced by the Volzhsky Automobile Plant. |
| Videos on tuning UAZ 469, 3151 and HunterVideo materials on tuning the UAZ 469 model and its modifications (Hunter, 3151). Video reviews on improvements and alterations done by hand with exterior work on the body (installation of aerodynamic and power body kits, additional optics, non-standard painting), on the interior (upholstery of the interior, replacement of the dashboard and seats), changes in suspension characteristics (lifting - increasing ground clearance and operating suspension travel), improving engine performance (increasing volume, installing turbocharging), and sometimes independent replacement with an engine from a foreign car. Examples of successful tuning for off-road use and hunting or fishing. Video reports on the installation of various additional tuning equipment and homemade preparation for the trophy. |
You might be interested to see:
Tuning Honda Ak...Body tuning...Nothing extraLowrider from Behind...
Sorry, there were problems with the database.
Please try again soon. Thank you.
Tuning.expert-club.com 2018
Panel Contents
On the VAZ 21214, on which the injector is installed, there are a lot of different instruments on the panel, among them you can find:
- Speedometer and tachometer (which report the vehicle speed and crankshaft speed).
- Engine temperature indicator.
- Fuel level indicator in the gas tank.
- Turning light indicator.
- There are a lot of indicator lamps that indicate breakdowns: battery charge, parking brake, oil pressure in the engine lubrication system, “check engine” lamp, emergency lamp of the entire brake system.
- Odometer (counts the kilometers that the car has traveled since it left the assembly line).
Significance of the torpedo
The instrument panel includes all of the above elements and is located in such a way that they are always visible to the driver from any position. Experienced drivers note that it is necessary to carefully monitor the condition of all devices, since the condition of the entire VAZ 21214 car and the injector engine depends on their performance.
Dashboard Niva 21214
For example, the battery charge sensor can notify you in advance of a bad charge, and the car owner will understand that the belt driving the generator has become unusable. When the belt finally comes to an end, it will first begin to whistle bizarrely, and then completely burst.
If this happens on a long journey, the car will be immobilized. Also, the instrument panel has a seemingly simple VAZ 21214 engine temperature sensor, since it is imperative to monitor how the injector heats up. However, it is precisely this that can prevent engine overheating.
Using it, the driver can determine when the temperature began to rise sharply. If this happened while the car was running and driving for a long time, then this may be evidence that the coolant pump drive belt has broken.
By looking at the instrument panel in time, you can prevent sudden overheating of the engine.
Checking the sensors.
In order to check the DC, you need to have a multimeter, then follow a certain procedure:
- Turn off the sensor.
- We connect the red (positive) probe to the DC contact.
- We connect the black (negative) probe to ground.
- We fix a tube of suitable diameter onto the shaft in order to be able to rotate it.
- We switch the multimeter switch to low voltage measurement mode.
- It is necessary to rotate the shaft and observe the readings: as the speed increases, the readings on the multimeter display will increase. If the readings do not change, the sensor is faulty.
Another method does not require removing the sensor. To do this, you need to jack up one wheel so that it is at a distance from the ground and can rotate freely. After this, you need to connect a multimeter to the DC connectors. You need to rotate the wheel and observe the readings of the device. A change in voltage will also indicate performance.
Removing the panel
Sometimes it happens that it is necessary to remove the panel, often when it is necessary to replace some faulty device on the VAZ 21214, for example, a sensor for the condition of the injector. Doing it yourself is not that difficult. First we will have to unscrew and remove all the trim around the panel to get to the mounting bolts. The next step will be to unscrew the screws securing the heater arms. Next, you need to unscrew two nuts under the panel with a wrench; they are located in the steering wheel area. Now unscrew all the bolts around the instrument cluster. Now we simply find all the screws around the perimeter of the panel and forcefully remove it from the studs.
Source
How to remove the complete instrument panel (dashboard) Lada Niva Legend
In 2022, Lada 4×4 (now Niva Legend) received interior updates. The SUV has a new instrument panel assembly (dashboard). How to remove it yourself is described in the factory’s technological instructions.
Open the hood and disconnect the earth wire terminal from the battery (spanner 10).
Open glove compartment lid 1, Figure 3-1.
Unscrew screws 3 securing the glove box to instrument panel 2 (Phillips screwdriver).
Figure 3-1 – Fastening the glove box: 1 – glove box; 2 – instrument panel; 3 – glove box fastening screw
Unscrew the screws 2, Figure 3-2, securing the lower right part of the instrument panel 1 (Phillips screwdriver).
Figure 3-2 – Fastening the lower right part of the instrument panel: 1 – instrument panel; 2 – instrument panel fastening screw
Unscrew nuts 1, Figure 3-3, fastening the upper right part of the instrument panel 2 (replaceable head 10, extension, knob)
Figure 3-3 – Fastening the upper right part of the instrument panel: 1 – instrument panel; 2 – instrument panel fastening screw
Remove the central trim (instructions).
Remove the instrument cluster (instructions).
Unscrew screws 1, Figure 3-7, securing the trim of the lower part of the instrument panel (Phillips screwdriver).
Overcoming the resistance of the clamps at the bottom of the cladding, remove the cladding.
Figure 3-7 – Fastening the instrument panel trim: 1 – screw securing the trim; 2 – instrument panel trim
Unscrew screws 4, Figure 3-8, securing the instrument panel (Phillips screwdriver).
Unscrew screw 2 securing lighting control module 1, remove the module by disconnecting the instrument panel wiring harness block from it (a Phillips screwdriver).
Remove handle 3 for controlling the headlight hydraulic adjustment.
Unscrew the nut securing the hydraulic corrector control mechanism to the instrument panel (replaceable head 21, knob).
Figure 3-8 – Fastening the lower left part of the instrument panel: 1 – lighting control module; 2 – screw for fastening the lighting control module; 3 – control handle for headlight hydraulic adjustment; 4 – instrument panel fastening screw
Unscrew nuts 1, Figure 3-9, fastening the upper left part of the instrument panel 2 (replaceable head 10, extension, knob)
Figure 3-9 – Fastening the upper left part of the instrument panel: 1 – instrument panel fastening nut; 2 – instrument panel
Install the instrument panel in the reverse order of removal.
The process of removing the Niva dashboard is also shown in the video:
You will find other reference information on the modification, maintenance and repair of the Lada Niva Legend in this section.
Key words: 4x4 dashboard
Source
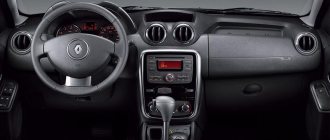
Installation of a dashboard (panel) from a foreign car on a VAZ 2110
| Over time, the interior of the car becomes boring and you want to update it somehow. More often, a feeling of satisfaction comes after minor changes to the interior, for example, painting plastic, replacing the steering wheel or radio. If you are not satisfied with this tuning, try replacing the VAZ dashboard with a panel from a foreign car. |
There are many topics on the Internet about installing dashboards from foreign cars on VAZ 2101-07, 2109-99 and even Moskvich 2141. As a rule, the panels are borrowed from old BMW models (E36) or Opel Vectra, and they fit Russian cars with virtually no modifications. Installing a dashboard on a VAZ 2110 from a foreign car will not be easy; you will have to redo it, adjust it, trim it, so many say that it is easier to buy a new car. “The eyes are afraid, but the hands are doing”, here is one good example of such an installation, when a panel from a Volkswagen Passat (B5), which was produced from 1996 to 2005, was installed on the “ten”. The panel was received without covers, a glove compartment, plastic sides, a light control module and other things that had to be purchased later. It’s worth noting right away that the process of replacing the dashboard itself will take a lot of time. If you can remove the original panel of the “tens” in a working day (instructions), then installing a panel from a foreign car will take several times more time and effort, and this is primarily due to adjustment, local modifications, etc. So, the Volkswagen torpedo underwent a little trimming and adjustment, after which it was in the right place. The next stage is finishing the stove. Here it was decided to use the Finnish dignity. a unit that served as air ducts to the left and right parts of the dashboard. xn--2111-43da1a8c.xn--p1ai