With the panel in the Lada Kalina model, situations sometimes occur related to the failure of the lamps responsible for providing the backlight. This creates certain inconveniences in driving, which is especially important during the dark period of the day. Here the driver loses immediate control over the state of various vehicle systems, the indicators of which are present on the instrument panel. Since the resulting situation can provoke a dangerous situation on the road due to the driver’s distraction from the situation, it must be eliminated as quickly as possible. Many car enthusiasts are interested in the question of how to change light bulbs, as well as how to remove the instrument panel, and questions about what kind of backlighting the instrument panel should have.
Replacing light bulbs in the dashboard of Lada Kalina, Priora
During vehicle operation, the backlight of the vehicle's instrument panel may burn out, causing some of the readings to lose their illumination.
There is no need to disassemble the “tidy” for this. This instruction tells you how to change the light bulbs on the instrument panel of a Priora or Kalina. The process looks similar on both cars. You will need : remove the instrument cluster, buy new backlight lamps for the instrument cluster (A12-1.2 W1.2W with a power of 1.2 W).
Procedure:
- Turn the panel with the back side facing you.
- Remove the backlight bulb by turning the socket counterclockwise.
We install the lamp and socket in the reverse order.
The panel can use various sockets, some of which require the use of a soldering iron to install the lamp. In this case, to save time, it is recommended to buy the lamp together with the socket assembly. By the way, you can use LEDs instead of conventional lamps. When installing them, observe the polarity, otherwise it will not burn.
The entire process of replacing lamps in the instrument cluster is also shown in the video:
Let us remind you that the backlight can be modified so that it turns on with the ignition.
Source
Replacing light bulbs
When the console is freed, you can disassemble the backlight of the Lada Kalina stove without unnecessary interference. Essentially, disassembly comes down to removing burnt out light bulbs. This is done with a slight twisting movement counterclockwise.
The light bulbs are sold assembled, but purchasing them can be problematic. Therefore, it is often necessary to resolder burned-out elements, for which it is recommended to stock up on LEDs. The lamp replacement process looks like this:
- by pressing with a thin screwdriver on the base of the housing lock, the sides of the light bulb are squeezed out one by one;
- at the base of the old lamp, the legs leading to the terminals are cut off;
- diodes purchased in advance are soldered to the terminals;
- the resulting structure is embedded into the lamp body.
When installing the center console, force will be required to secure the metal latches. Please note here that light pressure is enough to secure it, otherwise the console will burst. If problems occur, check what exactly is preventing the plastic cover from returning into place. Excessive force will lead to cracks and chips.
Compliance with the rules and recommendations described in the article will help solve problems in a situation where the backlight of the Kalina stove does not light up. The procedure is simple, but the integrity of the most noticeable element of the interior - the central lining of the instrument panel - depends on the dexterity and calmness of the master.
Expert opinion
It-Technology, Electrical power and electronics specialist
Ask questions to the “Specialist for modernization of energy generation systems”
Replacing backlight bulbs in the Lada-Kalina dashboard with your own hands: photos, videos | Uremont | Yandex Zen The list of required tools is modest; you will need a Phillips and flathead screwdriver, LEDs with resistors, or assembled lamps. Ask, I'm in touch!
Do-it-yourself replacement of light bulbs in the dashboard of a Lada Kalina
Although not often, it does happen that one of the bulbs in the car’s dashboard burns out and therefore needs to be replaced. Of course, this is not so difficult to do, but you will have to tinker. You can do this kind of work on your own in 30-40 minutes. To work, you will need a long and short Phillips screwdriver.
The video below describes the detailed process of replacing light bulbs in the dashboard on a Lada Kalina car.
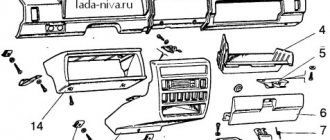
Removing the instrument panel
- Using the steering wheel adjuster, it must be lowered to its lowest position. The lever itself is located under the steering column.
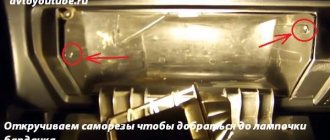
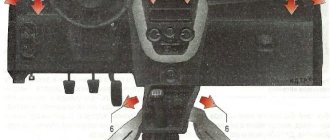
- Unscrew the two bolts and remove the decorative casing.
Two decorative casing screws
The picture shows two instrument panel mounting bolts
Visible wire chips to the instrument panel
At this point, the work of removing the instrument panel can be considered complete.
Replacing light bulbs on a Lada Kalina panel
Standard instrument panel lamp
- After completely removing the instrument panel from the panel, you can begin replacing the light bulbs. They are located behind the shield. You can remove them by hand, without using special tools. You can also use pliers if difficulties arise.
- New light bulbs are installed in the reverse order of removal.
The photo shows all 5 instrument panel lamps, they are removed counterclockwise
Installation of LED lamps
Most modern lighting devices have an LED design. LEDs are economical, consume little energy, and have high brightness. In addition, you can choose a different color shade of the backlight, which will diversify and decorate the dashboard of the Lada Kalina. However, you should remember some features of LED backlighting:
- LEDs are longer than regular light bulbs, so the brightness may be excessive;
- When installing, you must carefully monitor the polarity, otherwise the lamps will not light;
- The brightness control has practically no effect on LED devices.
Diagnostics
- Check the panel backlight brightness adjustment slider. It often happens that the brightness adjustment is at a minimum and the backlight is very dim or does not light at all;
- Check the panel hanger fuse. On Kalina, the fuses are located under the cover of the light switch block. In the block you need to check fuse F7, it is responsible for the panel illumination. The fuse location diagram is on the light switch block cover;
- One of the most common problems is a wiring problem that causes the panel backlight to not work. This usually happens when some wire breaks. In this case, only an electrician can help you.
Instrument panel backlight does not light up
I support only one thing - check the dimmer.
The relays are in the same block as the fuses.
K1 - headlight washer . If the washers stop working and this relay is working properly, check their nozzles. Sometimes they become clogged or damaged.
K2 - electric windows . Check this relay together with fuse F2. See F2 for troubleshooting.
What kind of lighting do you prefer?
Built-in Chandelier
Short circuit - starter relay . If you turn the ignition key and the starter does not turn, it may be the relay. Check its contacts and clean them if necessary. Next, you need to check the battery terminals so that there is reliable contact between them, and if necessary, clean them. Also check the contact group of the ignition switch, there may be no contact there.
K4 - additional relay, rear window defroster, heater switch, wiper and washer switch .
K5 - relay-breaker for turn signals and hazard warning lights . If the direction indicators or hazard lights do not work, check this relay together with fuses F1 and F3.
K6 - windshield wiper relay . Check together with fuse F4.
K7 - high beam relay . Check together with fuses F14 and F15.
K8 - sound signal . Check together with fuse F6.
K9 - fog lights . Check together with fuses F16 and F17.
K10 - heated rear window . Also check relay K4 and fuses F4 and F8.
K11 - heated seats . Also check fuse F18.
Expert opinion
It-Technology, Electrical power and electronics specialist
Ask questions to the “Specialist for modernization of energy generation systems”
Fuse and relay diagram of Lada Kalina 1st generation A tester is required for one reason: the light bulb is very small and it is almost impossible to determine the serviceability of the filament purely by eye. Ask, I'm in touch!
Lamp selection
When choosing lamps, you can go in two ways:
- Install regular incandescent lamps, such as those installed by the manufacturer.
- Install LED lamps.
We recommend installing LED lamps, since their lifespan is longer than standard ones and you can also slightly reduce the load on the generator. Also keep in mind that LED lamps have pros and cons. If you install an LED lamp and it does not light, turn the socket with the lamp 180 degrees.
The instrument panel on Kalina uses a type of lamp with a W1.2W socket. In any auto store you can buy a socket with a lamp or a light bulb separately.
How to choose good lamps
It is not enough to replace a faulty element in a car; you also need to select the right spare part. Light bulbs are no exception. The auto parts market offers a large selection of lighting devices from a variety of manufacturers with appropriate quality.
Conventionally, lamps can be divided into three categories:
When it comes to choosing a lamp, we always think of light sources for low beam headlights or PTF. For other luminaires, lamps are selected with much lesser requirements.
Selecting an original light bulb based on the article number is expensive. It’s much easier to go into a store and tell the salesperson about the type of base so that he can give you the right light source.
Step-by-step instruction
- Before starting work, use a ten-point open-end wrench to loosen the nut securing the negative terminal of the battery and remove it. It is worth noting that when the instrument panel is removed, all readings except mileage are reset.
- For ease of operation, position the steering wheel as if driving straight.
Using a small Phillips screwdriver, unscrew the two screws securing the plastic cover of the shield.
Remove the plastic trim of the instrument panel by disengaging the two spring clips at the bottom.
Using a small Phillips screwdriver, remove the two screws securing the instrument panel.
Remove the instrument panel and go to a well-lit area to change light bulbs. It is worth noting that the lower part of the parting shield is inserted into the recess and supported by rollers on the sides.
To replace the lamp, grasp the socket with pliers and turn it counterclockwise. After turning, remove the socket along with the lamp.
Take a new lamp socket, install it in the seat and turn it clockwise until it stops. It is worth noting that if your lampshade is in good condition, the lamp can be replaced separately. You remove the lamp by simply pulling it towards you.
What is needed to eliminate the VDO instrument disease
- Turn off the power to the car. To prevent a short circuit during work, you must first disconnect the negative terminal from the battery. If this is not done, there is a possibility of electrical equipment failure.
- Lower the steering column to its lowest position. This will allow you to gain easier access to the instrument panel.
- Unscrew the two screws securing the cover; this will require a short screwdriver. Then it is carefully pulled out, while it is necessary to overcome the resistance of the spring clamps. It is necessary to shake the lining and gradually pull it towards you. To remove the lining, unscrew two screws
- Unscrew the console mount. It is also secured with two screws located at the edges of the case. You must hold the screws, otherwise they may fall inside the panel. The console is attached in two places along the edges of the case
- Disconnect the plug with wires. To do this, tilt the instrument panel forward slightly and pull out the plug. To do this, you need to use a screwdriver to move the lock on the plug to the right side.
- Remove the dashboard. Now that the instrument panel is not holding anything, it can be carefully pulled out. Turn the shield a little and pull it to the side; it’s easier to do this to the left. After disconnecting the plug, the instrument panel can be easily removed
Useful tips Connection diagrams Principles of operation of devices Main concepts Meters from Energomer Precautions Incandescent lamps Video instructions for the master Testing with a multimeter
Changing the light bulbs on the dashboard of Lada Kalina
The mileage of our editorial Kalina is only 45,400 km . Which is quite a bit for a car produced in 2011 .
Our "low oil pressure" light in the instrument panel burned out.
Replacing lighting elements with your own hands is not difficult. With the right approach, the entire procedure will take no more than 40 minutes.
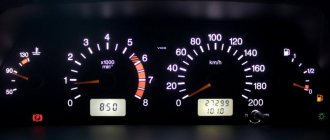
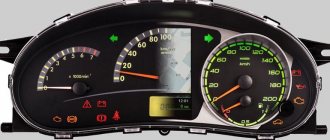
Description and location of indicators and instruments on the panel
Thanks to the tidy, the driver receives information about the condition of the car and the speed of movement.
Tidy Lada Kalina 2
A novice car enthusiast should know about the purpose of warning lights from the very first days.
Below is a description of the device:
1 - tachometer - a device showing at what frequency the crankshaft rotates; 2, 4 — direction indicators, left and right, respectively; 3 — speedometer, displays the actual speed of the vehicle; 5 — coolant temperature indicator; 6 - indicator showing the fuel level in the tank; 7 — fuel reserve warning light; 8 - button with which the daily mileage readings are reset; 9 - a lamp indicating that the emergency lights are on, during which the side lights and turn signals flash, indicating a car malfunction; 10 — electric power steering lamp. Goes off when the ignition is turned on. If it continues to light, then the EUR is faulty; 11 — high beam indicator. The light is on if the high beam is on; 12 — indicator of the applied hand brake; 13 — external lighting indicator; 14 — airbag malfunction indicator; 15 — emergency oil pressure indicator in the car system; 16 — immobilizer warning light; 17 - liquid crystal screen displaying information from the on-board computer; 18 — seat belt malfunction indicator; 19 — battery charging lamp; 20 — emergency brake fluid level indicator; 21 - electronic brake force distribution light, red light indicates a malfunction; 22 — brake pad warning light; 23 — anti-lock braking system (ABS) indicator; 24 - a constantly burning orange light indicates problems with the engine.
After the engine starts, the indicators light up orange. If everything in the system works normally, then they go out after 1-2 seconds.
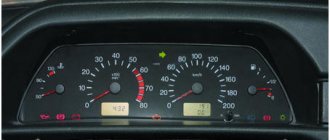
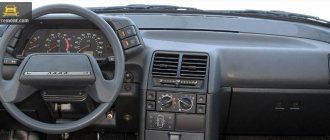
Tidy Lada Kalina
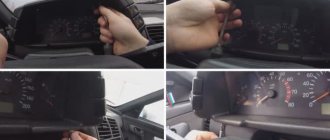
Removing the dashboard
To do this you will need a short and a long Phillips screwdriver. The removal process is carried out in several stages.
- Lower the steering wheel to its lowest position. There is a regulator at the bottom, it is located under the steering column.
The bolts are marked with arrows.
The decorative plug was removed.
Replacing lamps
The backlight is located on the back of the shield. You can remove the light element (light bulb) without using tools. If difficulties arise, pliers will help you .
Layout of the backlight lamps on the rear wall of the instrument panel.
Next, you should install new light bulbs in the vacated sockets. After that, connect the power connector and install the shield in place.
Removing the center trim
Before you begin the repair procedure for the Kalina stove backlight, you need to stock up on everything you need. The list of required tools is modest: you will need Phillips and flathead screwdrivers, LEDs with resistors or assembled lamps. The algorithm for removing the center console itself is as follows:
- Turn off the radio. The device is removed completely after first disconnecting the wires going to it.
- Removing the plugs. The plugs located next to the alarm button are removed by pressing them from the inside through the space vacated by the tape recorder.
- Freeing the emergency lights from the wires. The plug is held in place by a latch on the button, but there is enough space here for comfortable manipulation.
- Unscrewing the bolts. Two screws for a Phillips screwdriver are hidden under the plugs; if you unscrew them, the console will only be held in place by the latches around the perimeter.
- Removing the heater adjustment levers. To remove them, you need to pull them towards you with a slight force. It was possible to remove them earlier, the main thing is not to forget (note that the speed controller does not need to be removed).
- Removing the center console. Starting from the bottom, you need to pull the console towards you, removing it from the metal clips. Try not to make too sudden or rough movements to avoid damaging the panel.
- Disconnecting the last wires. After removing the console, you have access to the wires leading to the speed controller, as well as the lighting bulbs. This is the last thing holding the plastic module.
In situations where it is difficult to remove the radio, a flat-head screwdriver will come in handy - you can use it to remove the plugs. Then standard actions are carried out according to the algorithm, only the wires from the radio are disconnected in the last step.
Lamp type
Standard lamps are installed from the factory - 12V , lamp type - W1.2W , glass base W2x4.6d .
If you change to diode lamps, be sure to check their functionality before assembly. The diode only works in a certain position. If it does not light, then change its contacts the other way around!
I wish I had read this article earlier, but I had to contact the service. It turns out it wasn't difficult to replace.
Overall, nothing complicated, you just need to tinker a little and try not to rush too much.
Source
Do-it-yourself replacement of backlight bulbs in the Lada-Kalina dashboard: photo, video
It is important to keep the instrument panel in good condition in order to receive timely information about the components and systems of the vehicle.
The shelf life of lamps is reduced due to vibrations, power surges and temperature changes. As a result, the question of replacement arises regularly. To carry out such work you will need pliers, Phillips screwdrivers and a set of new lamps. It is better to immediately buy a set of 5 pieces of 12 V baseless incandescent. You will also need new cartridges, since the manufacturer solders the backlight to the cartridges with antennae (if you purchase each unit separately, you will need a soldering iron). To preserve the mounting screws, magnetize the screwdriver. This way the small details will remain under your control.
Find out the cost of replacing the backlight bulbs in the Lada-Kalina dashboard online in 3 minutes
Don't waste your time - use the Uremont search and get offers from nearby services with specific prices!
Sequence of replacing the backlight lamps of the Kalina dashboard
The technology is very simple. To remove cartridges, turn them half a turn counterclockwise. Remove the burnt element with your hands or pliers, picking up the shank. Install a new spare part. Install the cartridge (turn clockwise).
Tip #1 for replacing Kalina dashboard lamps from experienced car owners - change all the lamps at once.
This will eliminate the need to repeat the procedure in the near future. Although it is simple, it is still labor-intensive. Another important advantage of this advice is the uniform illumination of the entire “tidy” (the elements produce a glow of different intensities over time). The work is quite simple, but you should not lose your vigilance - there is always a risk of damaging the threads or thin elements.
Replacing lamps in the Kalina instrument panel - installing LEDs
LEDs are most often used (tuning enthusiasts cannot do without them at all). They are bright and economical, but there are nuances:
- length (may “overexpose”);
- When installing, it is important to observe polarity (otherwise they will not work);
- The glow intensity regulator is useless in this case.
The advantage of LEDs is their durability (they can last for several years). At the same time, it is important to provide them with timely cooling (at temperatures above 80 degrees Celsius, the shelf life is shortened and the brightness decreases).
Installation of such parts is carried out according to the canonical diagram. Just cut off the tip of the LED first (take care of the luminous component during the procedure). If you forget about this, there will be no diffuse glow. When using tapes of this type, they are glued around the perimeter of the “tidy”.
Replacing instrument panel backlight lamps “Kalina” - tuning
When it comes to car lighting, I would like to mention spectacular modifications. Fans of an original approach sometimes decide to decorate the dashboard. To do this, use super-bright diodes and a light strip. Installation is carried out according to the standard scheme. The search for the necessary elements here depends on the preferences of the car owner and technical limitations. In the standard scenario, they buy lighting devices W1, W2, A12-1 with a power of 1.2 W. If you want to take a non-standard approach, consult with technical center specialists.
The Uremont.com aggregator makes it possible to find out technical nuances online. To get a qualified answer, write a question in the chat. Professionals from partner service stations will promptly give you the necessary information. Also here for the convenience of car owners are provided:
- interactive map indicating the addresses of auto repair shops;
- feature articles;
- consultation with a car expert;
- online application form for making a request;
- user reviews and ratings.
Source