The rear beam is an all-metal structure that attaches the linkage part of the rear suspension to the holders on the body, ensures the installation of spring elements on the front part of the beam and the fastening of shock absorber struts for the rear suspension of the car. It is not surprising that the safety and reliability of driving and the behavior of the car on the road depend on the technical condition of the beam. It is necessary to treat its condition with full responsibility and promptly pay attention to its malfunction.
Rear beam device
The metal rear beam, a photo of which is presented on our resource, is structurally represented by 2 longitudinal levers and connection elements, which are connected by welding through reinforcement components. At the rear of the product there are special holders with holes for mounting shock-absorbing elements. There are also flanges with holes for fastening the axles of the rear wheel pair together with the casings of the stern brake systems.
In the front part of the rear axle beam of the VAZ 2110 there are levers with welded bushings, in which rubber-metal type hinges are installed by pressing. The rear beam mounts pass through them, which connect the lever part of the stern suspension to stamped-welded type holders. Those, in turn, are mounted with welded bolts to the body side members.
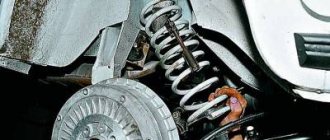
The spring elements of the suspension rest with one plane on the support of the shock absorber strut, and with the other, through a rubber insulating gasket, into the welded support of the hidden arch of the body tail. The shock absorber strut of the rear suspension beam of the VAZ 2110 is a hydraulic telescopic system of a two-way operating principle.
Through fasteners in the form of a bolted connection, it is articulated with the holder of the longitudinal-type stern suspension arm. The upper fastener of the rack is made in the form of a pin connection, while the fastening of the rod to the upper support is made through rubber pads and a support washer.
The factory “tens” rear beam, the dimensions of which differ from the parameters of similar products, has the item number 2110-2914008, while the “eight” beam has the catalog number 2108-2914008-10.
Important points
Unscrewing nuts with a 24 mm spanner can be a very difficult task. To move such a nut out of place, as a rule, enormous force is required. And not only that, each next revolution will also require considerable effort. Therefore, it is best to use a long tube mounted on a spanner as a lever.
To make the nuts even easier to unscrew, you can pour plenty of oil on them and wait 10 minutes.
The silent blocks should be pressed in with a hammer blow (or a sledgehammer blow) only after placing the lever on a flat metal surface. In this case, the blow must be very accurate; at the slightest misalignment of the hammer, there is a risk of damage to the silent block.
In order to avoid the above damage, it makes sense to press the silent block into the extension using a vice. A vice will be needed in any case, since new blocks rarely fit completely into the eye after one blow. They almost always need to be “added.”
Removing and installing the rear beam and its elements
If during the operation of the vehicle the rear suspension beam of the VAZ 2110 bursts, then in the future it will need to be replaced. Of course, as a temporary aid, it can be restored by welding. But this is done solely in order to get to the maintenance site where it needs to be replaced.
Operating a vehicle with a welded beam rear suspension of the VAZ 2110 not only creates an emergency situation on the road, but also leads to disruption of vehicle stability and accelerated wear of the vehicle tires. The market value of the rear beam is quite high, but its replacement in this case is simply necessary.
We replace a product such as a rear beam, which can be purchased at any specialized automotive store, according to the following scenario:
- We place the vehicle on an electric lift or a special repair pit.
- We remove the brake pads from the rear wheels and release the hand brake cables from the rear beam and holders.
- We remove the brake pipes from the rear cylinders, and the hoses from the stern beam.
- We remove the drive-type pressure regulator fasteners from the stern beam.
- Remove the 4 bolts securing the hub axle to the aft beam using a wrench set to “17”.
- We dismantle the hub axle together with the brake mechanism casing.
- Having removed the fastening bracket, we dismantle the brake system pipe.
- If the need arises, we disconnect the hub axle and the brake mechanism housing, while freeing 2 screws with a curly screwdriver.
- We detach the lower fasteners of the shock absorbers from the rear beam.
- Remove the fasteners of the rear suspension beam to the holders.
- Place the rear beam on the ground.
- Having removed the fasteners, we dismantle the product.
- We remove the fasteners of the holder to the bodywork and dismantle the bracket.
- Installing the rear suspension component is carried out in the reverse order.
- We complete the fastening of the rear beam and the lower part of the shock absorber struts with the vehicle installed on the site.
- We finish the job by bleeding the brake system.
On the “ten”, specialized car stores always sell a rear beam stabilizer, which is used by specialists as a tuning component for this model. This element is presented in the form of a steel rod with fasteners to the aft beam and is similar in appearance to the cross-section stabilizer bar installed on the front suspension.
The fundamental difference is that when installing the system on the front wheels and overcoming obstacles with the rear wheelset, the stabilizer creates a torsional moment, and the rear beam stabilizer gives the aft suspension more rigidity, while it will create less torsional moment.
Tools for work
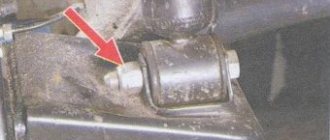
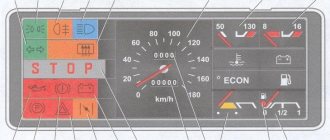
Replacement parts are highlighted in red: hinge, bolt, nut and spring washer.
In order for the replacement of the rear beam silent blocks to be successful, you will need the following tools:
- Liquid soap or special lubricant. Previously, they used ordinary soap solution.
- A set of keys. It is better to prepare end and cap ones. There must be keys for 17, 19 and 24.
- Ratchet for heads.
- Hammer and chisel for knocking out old parts.
- To make the disassembly process easier, it is better to use WD-40 liquid, which must be applied to all rusty nuts.
It is best to apply the penetrating agent to rusty nuts the night before.
As for new parts, branded spare parts from AvtoVAZ have the article number 21100291405400 . You can buy reinforced VTR silent blocks made of polyurethane. Their article number is LADA0401RP , although they cost several times more.
Replacement process without removing the beam
This replacement process occurs as follows:
- The machine is installed on the pit and raised on a jack. If you have to work on the ground, then you must install not only wheel chocks, but also a support to secure the jack.
We drive the “ten” into the inspection hole and jack up the first wheel.
Unscrew and remove the old bolt.
This is what the beam with the old silent block looks like when it goes down a little.
For pressing out, it is more convenient to use a puller.
All that remains is to screw the rear beam back and insert the brake sorcerer into its place.
Standard replacement, with rear beam removed
If you remove the rear beam, it will be much easier to get the silent block. The procedure itself goes as follows:
- It is highly recommended to drive the car into the inspection hole. You can work on the ground, but it is very dangerous.
- The beam is disconnected from the bracket. To do this, use a 19mm wrench. It often happens that the disconnection process is very difficult, and even a ratchet and WD-40 do not help. In such cases, it is better to use a special lever pipe, which will create enormous force. The length of the pipe directly affects the force. The main thing is not to break the thread, otherwise you will have to cut everything off with a grinder.
It is more convenient to twist the beam fastening nuts with a slightly shortened spanner.
Beam structure
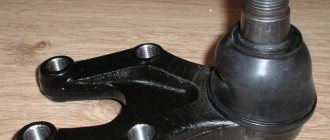
On the inside, brackets with special holes necessary for installing shock absorbers are attached to the suspension arms. There are also flanges located there, bolted to the axle of the rear wheels and shields located on the brake mechanism. Bushings are attached to the suspension arms on the front side. They are inserted into hinges made of a special rubber-metal material.
Bolts pass through them, connecting the suspension arms together with the stamped-welded brackets. They, in turn, are attached with bolts welded into the side member of the car. The springs of the rear beam of the VAZ 2110 are located in such a way that the first end rests against the recess of the shock absorber, and the second passes through a special gasket directly into the support area attached to the underside of the arch on the car body.
The gasket acts as an insulator and is made of rubber. The shock absorber mounted on the rear suspension is double-acting. It is attached with short bolts directly to a bracket located on the trailing arm in the rear suspension area. In the upper part, fastening is done using the rod method. The rod is fixed in the upper support directly on the suspension spring. The shock absorber is fixed through a protective rubber pad and a support washer.
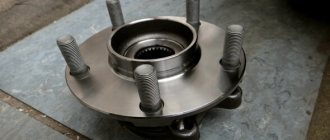
A double row thrust bearing is located in the middle of the hub. Its structure is very similar to the bearing located in the hub of the front wheels, but it is much smaller in size.
Removing the rear block
Replacement of the rear beam is carried out after transporting the car to an inspection ditch or lift. To begin, remove the brake pads located at the rear of the VAZ 2110. Disconnect the steel ropes that secure the parking brake to the underside of the beam attached to the rear of the bracket.
Now disconnect the thin brake hoses leading to the brake cylinders located at the rear of the car. Disconnect the brake pipes attached to the beam. In addition, you will need to disconnect the elastic lever from the beam, which is located on the drive responsible for regulating the pressure.
Using a size 17 wrench, unscrew the 4 mounting bolts holding the hub axle together with the rear suspension beam. Remove the axle itself along with the brake mechanism shield and, if necessary, separate them by unscrewing the two fastening screws using a Phillips screwdriver. Bend the bracket and remove the brake pipe.
It is necessary to disconnect the lower ends of the shock absorbers and the nuts attaching the beams to the brackets from the beam. After this, you need to remove the bolts from the beam and carefully remove it. Using a size 17 socket, remove the 3 nuts securing the bracket to the body.
Rear suspension structure: 1 — rubber-metal hinge; 2 — suspension arm mounting bracket; 3 — shock absorber casing; 4 — compression stroke buffer; 5 — casing cover; 6 — support washer; 7 — shock absorber cushion; 8 — spacer sleeve; 9 — shock absorber; 10 - insulating gasket; 11 — rear suspension spring; 12 — lever connector; 13 — rear suspension beam arm; 14 — shock absorber mounting bracket; 15 - flange; 16 — lever bushing
PayAnyWay payment:
1. Payment/transfer to Sberbank VISA card № ( 4276 1633 1094 5170 )
Payment transfer methods:
A. The simplest and most proven method, transfer from any bank card to a VISA illva.ru store through the online service of Alfa Bank, Commission is only 1.95%.
b. Through payment terminals: QIWI Instructions or Cyberplat Instructions
d. Many other methods are described on the VISA portal.
2. After payment is received in the bank account, the order is delivered to the client. When sending goods through a transport company, they are delivered to the transport company and sent for further transportation to the client’s city. The Client is provided with a bill of lading number via SMS notification or to the specified e-mail, to track the cargo on the transport company’s website;
Payment in cash upon receipt.
Payment in cash upon receipt.
QIWI (transfer to wallet +79221511117)
Replacing silent blocks
If squeaks and extraneous noises occur in the car, it is necessary to replace worn parts. This will help avoid more significant breakdowns that will lead to complex and expensive repairs. The first thing you need to pay attention to when checking the performance of beams is the silent blocks. They are replaced using a special puller made using several sections of pipes to which washers are welded.
If you do not want to spend extra time on manufacturing, purchase the device at any specialized store. The rear wheels must be secured using shoes specially adapted for this procedure or ordinary bricks. This must be done because the car, raised with a jack, can jump off it and crush you.
Remove the raised wheel and check how loose the silent blocks are in the beam arm. If they are loose, repairs will need to be made. Unscrew the upper support nut and, applying short blows to the bipod, turn out the wheel. The blows must be applied until the support pops out. Then unscrew the long bolt, which is located at the top of the lever, and proceed to directly inspect the silent blocks of the front beam.
They must be knocked out with strong blows of the hammer on the chisel. They pop out of the grooves with ease after the first successful hit. In order to obtain greater sliding ability, first clean the old socket. After this, all parts are moistened with a soap solution, and the new silent block is pressed into place of the old one using the pressing method. Please note: after you press in, there should be no play at all, otherwise the repair of the front beam will be in vain.
Replacing the silent blocks on the lower beam will require much more effort. First of all, turn off the stabilizer so that the lever can move freely. Unscrew all the nuts that hold it in place and knock them out in the same way as when replacing the front beam. After you press in the new silent block, the replacement can be considered complete.
Please note that the removal of the rear beam of the VAZ 2110 is not carried out alone. You will need the help of several people. They are necessary to support and lower the rear suspension in a timely manner. In addition, work on tightening or loosening the bolts on the wheels of the car should only be done when it is standing on the ground.
The production of cars of the tenth family has long been discontinued, replaced by the Lada Priora. This is probably why many parts from Priora are installed at ten. In this photo report we will look at how to replace the rear beam of a VAZ 2110 with a Priorovskaya one .
What is the difference between the rear beam of the Priora and the beam of the VAZ 2110 ? A torsion bar is welded into the beam from Priora for reinforcement. Installation of torsion bar.
To replace a beam with your own hands you will need:
- Set of wrenches with all heads and sockets
- Special wrench for unscrewing brake pipes
- VD-40
- A piece of pipe for keys
To conveniently unscrew the nuts securing the beam to the body, you need to cut the spanner to “19”. Before starting work, first remove all the nuts and brake pipes in the pit. It is also advisable to remove the “Sorcerer” rod; it is mounted on a rod, at the end there is a clamp in the form of a cut washer. Now we jack up the car, remove the wheels and drums. brakes so that only one hub remains.
We unscrew the 4 step bolts with an open-end wrench set to “17”.
We unscrew the brake pipes from the hoses at any connection. This should be done somewhere easier, because... With the beam removed, it’s easier to unscrew the remaining tubes, or it’s even possible to replace these short ends. Otherwise, you can change the entire circuit.
We unscrew the beam from the racks and from the body.
We knock down the hubs and unscrew the hoses, tubes, and handbrake mounting brackets.
If you bought a Priora beam without silent blocks, then we press in the polyurethane using a press-in puller (long bolt, stops, VD-40). Don't forget to stretch the hubs.
We put everything back together in reverse order. We check the connections of the tubes and hoses, tighten the nuts, bleed the brakes and rejoice.
Garage or service station
All car owners can be divided into two categories:
- Those who carry out most of the repairs themselves in their garage, and only in emergency cases turn to a car service;
- Those who prefer not to touch anything with their own hands, but completely entrust repairs and maintenance to the masters of service stations.
Each of them is right in their own way. Therefore, we have no right to reproach those who do not want to carry out repairs themselves. After all, garage and professional repair of silent blocks, like other components, has its advantages.
STO has the following advantages:
- A high-quality, responsible car service provides a guarantee for repairs performed;
- In the event of a repeated breakdown covered by the warranty, repairs will be carried out free of charge;
- Professionals are professionals; they have extensive experience and knowledge, which allows them to competently perform their work.
But first you need to find such a car service, which, alas, is not an easy matter. Many provide a guarantee, but when you re-apply, they do everything possible to prove that the breakdown does not comply with the terms of the guarantee. A banal trick.
Repairing your garage will provide the following advantages:
- Significant financial savings, since you only have to spend money on consumables;
- The quality of the work performed by a master is always in doubt if you do not know this person personally. So self-repair may be much better than at a service station;
- You purchase the silent block, and the master only installs it. Why pay money for work that you can do yourself?!;
- Guarantee that a new one will be installed instead of the old silent block. Questionable service stations can easily install an old, more or less usable silent block instead of the one you gave them. You know what the result is.