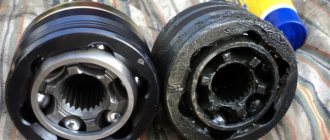
Inner CV joint of VAZ 2110 or constant velocity joint, or popularly “grenade”, is an integral part of the transmission of a front-wheel drive car.
Its main role is the continuous transmission of rotation from the gearbox to the wheels at different angles. Despite the same principle of operation of all CV joints, they differ in design features for different car models. In addition, different operating conditions cause differences in the design of the external and internal CV joints.
When to replace
In order for this part to work long enough, sand, dirt and dust should not get into it. Contamination significantly accelerates wear and reduces the service life of the unit. But to protect against this, a boot is provided, which can become unusable relatively quickly. Therefore, timely replacement of the boot will keep the CV joint in working condition for a long time.
The wear of the CV joint is indicated by a noticeable crunch and extraneous sounds when turning the steering wheel. In this case, it is recommended to replace the unit.
On a VAZ, a grenade flies out of the box, reasons, repairs, photos
Repair manual for VAZ 2108, 2109, 2114, 2115 Wires and fuses It is necessary to change the constant velocity joint (CV joint, or popularly a grenade) on a VAZ-2112 when a peculiar knocking (crackling) noise appears in this part. If such repairs are not carried out on time, the grenade may fly out of its place while moving. Then you will have to call a tow truck to transport the car to the service station, since it will no longer be able to drive on its own.
Why are grenades flying?
The grenade flew out and the boot broke
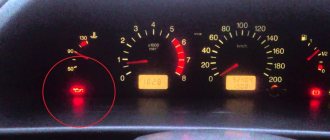
The fact that the grenade is out of order is indicated by a knocking sound in the area of the front wheel when turning, as well as when the clutch pedal is released while the car is standing still. A crash will be heard in the area of the front wheel where the grenade was fired.
In this case, you should check with the speed turned on (the car must be placed on a lift); if the drive spins, but the wheel does not, then the external grenade has failed. If the drive is stationary at switched on speed, then the internal grenade has broken.
The internal grenade just “flies” out of the gearbox. Or rather, it crumbles, one part remains in the gearbox, the other on the wheel drive. Sometimes a situation arises when the retaining ring falls apart, in this case the grenade will also fly out. The breakdown is not associated with incorrectly selected oil in the gearbox.
Grenade replacement
Trialli external grenade - seems to be praised.
When you hear a cracking sound in the grenade, you can fix this breakdown yourself, without resorting to the services of a specialist. To do this, follow simple steps that will be described below.
Process
Don’t forget to check whether the CV joint kit includes a separate boot and clamps. If not, then you will have to buy it all.
Separate boot and clamps
- The car should be raised from the side where the grenade failed. In this case, wheel chocks should be placed under the rear wheels.
- Remove the protective cap from the wheel and unscrew it.
- Remove the hub nut. This may require a strong tool, since the nut may become welded to the axle during operation. You can also use a special wrench for this (weld the head at “30” to the chisel and use a long wrench).
- Unscrew the ball joint (lower) bolts from the steering knuckle.
- Turn the wheel to its extreme position.
- Pull the steering knuckle together with the strut and pull out the CV joint spline from the hub. We took the CV joint out of the hub
- Using a pry bar, you need to pull out the drive splines from the gearbox. If you need to change two grenades at once, then after removing the drive from one side, you need to fix the box with a technological lock. You can use an old CV joint for this. If this procedure is not done initially, the gears on the differential will shift, and then during assembly it will be impossible to insert the CV joints themselves.
- After removing the drive shaft, it must be clamped in a vice.
- Remove protection from grenades. If the anthers are torn, you can simply cut them off and then install new ones. If they are whole, then you should simply wrap them, being careful not to damage them.
- Using a hammer, knock the CV joints off the drive shaft.
- Next, a new spare part is installed. The CV joint must first be lubricated. You also need to put fresh lubricant in the boot. It is recommended to use MoS2. It will last for the entire service life of the hinge. We check the condition of the separator on the grenade and fill it with lubricant
- The boot is attached to the grenade using clamps. We put on the “fashionable” transparent ACVA boot. Reviews are mostly positive
- If the inner CV joint is being assembled, then do not forget about the plastic plug that is placed on the end of the shaft. The old grenade is on the right, and the new one is on the left, they differ in height
- A retaining ring is also installed on the inner CV joint.
- Then the assembled part is placed in the box drive. It should be seated on the slots to the base. To do this, you can lightly hit it with a hammer, placing a block of wood on it. The inner CV joint is already in the gearbox
- Further assembly is carried out in the reverse order of disassembly.
It is also worth replacing the nut that holds the hub with a new one. It must also be tightened in accordance with the requirements of the car manufacturer.
Stabilizer link failure and grenade flying out
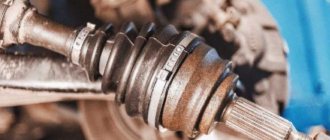
As a result of the stabilizer bar breaking, the wheel went to the side, and grenades flew out with it. The anthers also came to an “end.”
Knowing these points and adhering to the given rules, you can replace CV joints on your own and without resorting to the help of a specialist.
Removing the drive, boot and CV joint
To replace the outer CV joint, follow the following procedure:
- We place the car on the inspection hole and support it with wheel chocks.
- Using a 30mm socket, loosen the hub nut. If the nut does not break off, then you can extend the key with a pipe.
- Raise the car with a jack in the right place and remove the wheel.
- We unscrew the bolts securing the ball joint of the lower arm to the hub.
- We squeeze out the tie rod end with a puller.
- Unscrew the drive shaft nut completely.
- We pull out the hub by grasping the brake disc and pulling the shock absorber strut towards us.
To change the boot and hinge, you will have to climb into the inspection hole. To remove the CV joint, remove the clamps that hold the boot. Next, we get rid of the old boot, which is easier to do with a knife. Use a rag to remove grease from the hinge. Then you need to knock down the inner race, for which we lightly hit the attachment with a hammer, which must be rested against the end of the hinge. Next, we thoroughly clean the CV joint from dirt, sand, dust and grease.
Drive shaft installation
So:
- The shaft is finally fixed in the side gear.
- The drive shaft is installed in the wheel hub.
- Further assembly is carried out reversely to removal.
How to correctly replace the internal grenade on a VAZ 2112 can be clearly seen in the video. Timely replacement of CV joint elements increases the service life of the vehicle in good condition.
Rear-wheel drive cars are being replaced by cars with front-wheel drive. In this regard, the crosspieces are replaced by hinges of equal angular velocities, which are called grenades. This article is instructions for replacing the internal grenade on a VAZ 2112 car and other cars from this family. Here you will find a video describing the process, as well as photos of some of the process steps. So, let's begin:
- Causes of constant velocity joint failure
- Determining the need to replace the internal grenade
- Replacing a grenade Tool for work
- Removing the axle shaft (wheel drive)
- Removing and installing a new CV joint
- Installing the drive on the car
Build process
When assembling the outer CV joint, you must perform the following steps:
- We put a rubber part on the shaft.
- We stuff the CV joint (new or cleaned) onto the shaft until the part is secured with a retaining ring.
- We place fresh lubricant in the hinge and boot.
- We put the boot on the outer race.
- We remove excess air from the boot by pressing it with your hand.
- We secure the boot with clamps.
Then the drive is put in place, the hub is clamped with a nut. It is also necessary to put back the tie rod end, support and wheel. Next, you can lower the jack and tighten the nut securing the drive. To prevent it from unscrewing on its own, the nut should be capped.
Causes of constant velocity joint failure
What can cause the failure of this element of the car:
- Poor quality boot is the first reason and the most important. If the boot on a grenade is made of low-quality material, it will quickly wear out, and all sorts of debris will begin to get inside the grenade.
- Loosening the boot clamp also allows sand and dust to get inside the CV joint.
- Other defects of the boot (see), such as a cut of the clamp, rupture of the boot or its stretching also lead to bad consequences.
- An insufficient amount of lubricant, or, even worse, its absence in the constant velocity joint housing, leads to rapid wear of the bearing and, as a result, wear of the entire part.
Advice! When repairing your car, especially if you have to crawl under the car, do not be lazy and pay attention to the condition of the axle shaft boots. If you notice at least one of the defects listed above, replacing the CV joint on a VAZ 2112 is simply necessary!
Determining the need to replace the internal grenade
Before any repair, it is important to make sure that there is a fault. And now we’ll do this with the CV joint:
- Often, a malfunction can be determined by the sound emanating from the suspected component of the car.
- A joint malfunction is detected while driving or starting the car.
- Of course, sounds can come from a faulty shock absorber strut, or from the engine. Let's learn how to determine what kind of sound should come from the CV joint and when it appears.
- The sound of a faulty grenade is the grinding of metal on metal, similar to a crunch, breaking of metal, or a stone hitting a bearing or other drive mechanism.
- When can this sound be heard? If such a sound appears when turning, it means that you need to change the outer grenade, not the inner one.
Advice! Although external grenades fail much more often than internal ones, when repairing external ones, be sure to check the others for functionality. Lubricants should also be added if necessary.
- On a VAZ 2112, the internal CV joints make a sound when driving straight, and especially when the car starts to move.
To more accurately determine the malfunction of the unit, diagnostics should be carried out in the inspection pit. The following explains how to do it yourself:
- The car is driven into a viewing hole. Wheel chocks must be placed under the rear wheels, and the car must be set to the parking brake.
- Next, you should raise the car with a jack so much that one of the front wheels is lifted off the ground.
- Then you should turn the wheel by hand. When the wheel rotates, a sound appears - there is a malfunction in the internal grenade. If you turn the wheel at the same time, then rotate it, and only then does the sound appear - there is a malfunction in.
- After carrying out such an operation, it should be done on the second side (with the opposite wheel).
Now that the breakdown has been identified, you can begin repairs. Replacement of the internal grenade on the VAZ 2112 begins!
Features of repairing the internal CV joint
To replace the inner CV joint, it is necessary to completely remove the drive, for which the outer joint is first disconnected without subsequent dismantling. Next, using a pry bar, remove the hinge end from the gearbox. To do this, we insert the flat part of the tool between the outer frame and the box, and then move it like a lever.
Further, the procedure for replacing the unit will be similar to the actions when repairing the external hinge. The inner CV joint must be correctly inserted into the transmission. It is recommended to insert the part into the hub, with the help of which the unit is brought into place by pushing movements. But it is also possible to drive the already assembled shaft with a mallet or a wooden pointer and a hammer. The hinge must be secured with a locking ring.
At the final stage, all removed parts are installed back. At this point, the replacement of CV joints is considered completed.
Didn't find the information you are looking for? on our forum.
How to check functionality
First you need to check how the external and internal grenade works. When replacing, the process will be different, as will the symptoms.
If the outer link fails, the main signs of failure will be the appearance of a specific sound, similar to a crunching sound. The reason is the wear of the grooves, and the movement of the balls remains the same, as if the element is in good condition. It becomes more obvious as soon as the car begins to turn, or when the gas pedal is pressed sharply.
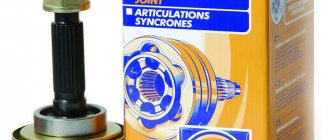
Required spare parts
Each car is equipped with two grenades: internal and external. The first joint transmits rotation to the shaft from the gearbox, the second – to the hub from the shaft. Depending on the scope of the repair, you may need:
- internal hinge (article 302315, 2108-2215056);
- external CV joint (article 3107K, 2110-2215012);
- front wheel drive shaft (article 2110-2215070, 21100221507000);
- cover (article 2110-2215068, 21100221506800, 2108-2215068);
- buffer (article 2108-2215073-01);
- hinge clamp (article 2108-2215086);
- internal hinge retaining ring (article 2108-2215104, 21080221510400, 2121-2215084);
- thrust ring (article 2121-2215082);
- clamp (article 2108-2215034Ч, T-00040, 2108-2215036, 2108-2215034-31, 2108-2215034);
- protective ring (article 2108-3103060, 21080310306000).
Attention! It is better to purchase a new hinge using an old grenade, so the risks of purchasing the wrong part will be reduced to zero. It is better to go to a trusted store for a CV joint.
Order of Operations
If there is no inspection hole or overpass, you need to prepare a place for repairs. Raise the car with a jack, put on the handbrake, provide the work area with good lighting, and support the wheels with clamps.
On a note! To replace a broken joint with a new grenade, you will need to perform many operations: removing the VAZ 2110 internal CV joint and wheel, disconnecting the ball joint, and many others.
Replacing the inner CV joint of the VAZ 2110 and other models is carried out in the same way as the outer joint. They are both located on the shaft drive, which you need to get to first:
- On the crankcase protection, two nuts are unscrewed at the front and rear.
- You need to drain the oil from the box - 40 percent of the total volume.
- When replacing the right CV joint on a VAZ 2110, the wheel bolts come off on the right; if the left one is changed, the wheel bolts come off on the left.
- The outer hinge fasteners are completely unscrewed.
- Now you still need to jack up the car and remove the wheel.
- At this stage, two hub bolts securing the grenade become accessible; they need to be removed.
- The hub needs to be separated from the rods, this is done with a pry bar.
- The stand is pulled forward and the CV joint pin is removed from the hub.
- The shaft drive is removed and set aside.
- Now you need to remove the inner grenade from the box. With the hood open, you need to insert a pry bar between these elements. Then the tool jerks the hinge towards the box. The grenade should move. If this does not happen, the operation is repeated again. If the CV joint moves, then both hinges and the shaft can be removed from the wheel arch area.
- You need to remove the covers from the grenades; to do this, use pliers or special pliers to open the small and large clamps.
- The boot must be inspected for integrity. If the cover is damaged, it must be replaced. If the boot is in good condition, you can simply move it away.
- Use a hammer to remove the inner hinge. They need to hit the clip hard. The grenade should fly off. The same action must be performed on the other side.
- The rings are removed from the shaft drive, new ones are installed in their place and the boot is put on.
- The new grenade is also installed using a hammer. It and the boot need to be lubricated.
- The covers are secured to the hinge and shaft with clamps.
- A nut is screwed onto the grenade, then the hinge is driven into the box.
- Further operations are similar to the first, but are performed in reverse order.
See this video for the sequence of replacing the outer and inner CV joints of VAZ 2110 2111 2112:
– , , .
| Lada, Lynxauto CO-4600, | + 11:06, 18 1336 |
| () | 09:08, 18 5956 – |
| FJ-218 2108-2110 Finwhale FJ218 | 01:01, STODETALEY |
| | / | Ruville 77201S | 12:23, 22 “-… |
| 22x50x22 : 2108-09, 2110,2111,2112 1.1-2.0i 88> Patron PCV1081 | 14:44, 22 “-… |
| | / | Lada 110,111,112/Samara Ruville 77201S | 22:48, 24 |
| LADA 2110/ 2109 SKF VKJA5708 | 21:16, 24 |
| : 2108-09, 2110,2111,2112 1.1-2.0i 88> Patron PCV1081 | 03:41, 24 |
| LADA 110>112/08>099 1.1>1.5 86> . 828001 GSP | 10:46, 13 Zakaz28rus |
| | / | Ruville 77201S | 08:05, 20 |
| | / | Ruville 77201S | 09:25, 15 Gabarit |
| | / | Ruville 77201S 77201S | 15:44, |
| INKO 415016 415016 | 15:43, |
| INKO 415001 415001 | 15:43, |
| INKO 315007 315007 | 15:42, |
| LADA 110>112/08>099 1.1>1.5 86> . 828001 GSP | 10:53, 22 |
| | / | Ruville 77201S | 07:07, 20 |
| LADA 110>112/08>099 1.1>1.5 86> . 828001 828001 | 07:12, 1 Gabarit |
| LADA: 110 1.5/1.5 16V/2.0 i 95-, 111 1.5/1.5 16V 95-, 112 1.5/1.5 16V 95-, Samara 1100/1300/1500 86-, Samara Forma 1100/1300/1500 87- Ruville 77201 S | 08:03, |
| 22x50x22 : 2108-09, 2110,2111,2112 1.1-2.0i 88> Patron PCV1081 | 08:00, |
| | / | Ruville 77201S | 03:59, |
| LADA: 110 1.5/1.5 16V/2.0 i 95-, 111 1.5/1.5 16V 95-, 112 1.5/1.5 16V 95-, Samara 1100/1300/1500 86-, Samara Forma 1100/1300/1500 87-: Ruville 772 01S | 04:13, 16 |
| 22x50x22 : 2108-09, 2110,2111,2112 1.1-2.0i 88> : Patron PCV1081 | 04:09, 16 |
| , / , | 07:05, 22 |
| | / | Ruville 77201S | 11:35, 7 AutoSup |
| Ruville, (+) 77201S | 15:27, 21 Boost24 |
| 22x50x22 : 2108-09, 2110,2111,2112 1.1-2.0i 88>PCV1081 | 11:34, 21 |
| LADA: 110 1.5/1.5 16V/2.0 i 95-, 111 1.5/1.5 16V 95-, 112 1.5/1.5 16V 95-, Samara 1100/1300/1500 86-, Samara Forma 1100/1300/1500 87- 77201S | 11:05, 21 |
| LADA: 110 1.5/1.5 16V/2.0 i 95-, 111 1.5/1.5 16V 95-, 112 1.5/1.5 16V 95-, Samara 1100/1300/1500 86-, Samara Forma 1100/1300/1500 87- Ruville 77201 S | 09:01, 18 … |
| : 2108-09, 2110,2111,2112 1.1-2.0i 88> | 19:23, 17 Autoclub02 |
| . / 2108-2215010;2108-2215011;2108-2215012;L-302040; | 12:28, 15 24 |
| | / | Ruville 77201S | 10:56, 15 24 |
| INKO 415016 | 09:14, 15 24 |
| INKO 415001 | 09:14, 15 24 |
| INKO 315007 | 09:13, 15 24 |
| lada 2108 2109 2110 LD-001 | 07:16, 15 24 |
| lada 110 95-, samara 86-, samara forma 89-, Skf. VKJA8972 | 00:21, –… |
| . 22*22*50 lada 110 95- 2108 2109 86- 21099 89- Zekkert .gs-3263 | 00:02, – |
| . 22*22*50 lada 110 95- 2108 2109 86- 21099 89- Zekkert. GS3263 | 06:56, –… |
| LADA 2108-09/99/2110-12 86- Ruville 77201S | 23:59, – … |
| 22x50x22: 2108-09, 2110,2111,2112 1.1-2.0i 88 Patron. PCV1081 | 23:24, –… |
| : 2108-09, 2110,2111,2112 1.1-2.0i 88 Patron. PCV1081 | 23:13, –… |
| | / | Ruville 77201S | 10:11, CARakoom |
| LADA: 110 1.5/1.5 16V/2.0 I 95-, 111 1.5/1.5 16V 95-, 112 1.5/1.5 16V 95-, Samara 1100/1300/1500 86-, Samara Forma 1100/1300/1500 87- Ruville. 77201S | 08:08, –… |
| lada: 110 1.5/1.5 16v/2.0 i 95-, 111 1.5/1.5 Ruville .77201S | 06:41, –… |
| : 2108-09, 2110,2111,2112 1.1-2.0i Patron. PCV1081 | 05:25, –… |
| LADA 110>112/08>099 1.1>1.5 86> . 828001 GSP 828001 | 03:34, – … |
| . 22*22*50 Lada 110 95- 2108 2109 86- 21099 89- Zekkert GS3263 | 13:12, 21 Jc-Market |
| . 22*22*50 Lada 110 95- 2108 2109 86- 21099 89- Zekkert GS3263 2110, 2108, 21099 … , 1 | 13:12, 21 Jc-Market |
| 22x50x22 : 2108-09, 2110,2111,2112 1.1-2.0i 88> | 15:58, 13 AutoPart02 |
Fault diagnosis
The VAZ 2114 has 2 external and 2 internal CV joints. First you need to determine which one is knocking. The optimal test would be on a suspension diagnostic stand. If this is not possible, diagnosis by ear is possible.
Two signs indicate a grenade malfunction in a VAZ 2114:
- the sound resembles a crunch;
- It usually appears when turning.
The simplest and most accurate way to do a garage check is as follows:
- Place the car on a flat surface;
- Turn the wheels to one side (to the middle position or a little further);
- Drive off with medium speed. It is worth remembering that starting too smoothly may not reveal a crunch due to insufficient load on the CV joint, and starting too abruptly may lead to the drive flying out of the wheel.
- Repeat the operation by turning the steering wheel in the other direction. The appearance of a crunch indicates a malfunction of the outer CV joint on the side in which the steering wheel is turned.
Visual detection of ruptured anthers will also be a sign of a CV joint failure. If you discover a damaged protection for any grenade, it must be immediately removed, disassembled and cleaned. If there is enough grease and there is no significant wear on the hinges yet, it is enough to replace the boot and fill it with new grease. If the wear of the balls is obvious, it is better to change the grenade.
It is more difficult to diagnose a malfunction of the internal grenade on a VAZ 2114. If it malfunctions, it crunches when starting off in a straight direction, and not when turning. But the same symptoms, for example, include play in the steering rack or wear on the engine mounts.
Sometimes the problem can be diagnosed from the pit by tugging on the drive from the gearbox side: strong play or the appearance of extraneous sounds indicate that the internal CV joint should be replaced.