The Lada Vesta dashboard was developed from scratch and turned out to be easy to use, as well as attractive in design. But at the end of 2016, an announcement appeared that AvtoVAZ had developed a new dashboard for the Lada Vesta, which implemented a number of qualitative changes. It is assumed that drivers will be able to tune the car themselves by purchasing an updated version of the instrument panel.
New dashboard
Description of the instrument panel
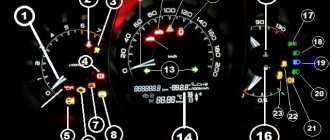
The instrument cluster includes the following control and measuring devices:
- speedometer
- tachometer;
- engine temperature indicator;
- fuel level indicator in the tank.
All this is located in three “wells” above the steering wheel.
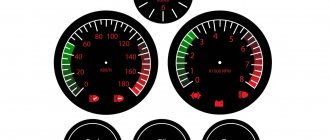
The central instrument is the speedometer. Its scale is marked up to 200 km/h, although the Lada Vesta does not accelerate to this mark with any of the engines. There are also several indicators on the speedometer:
- unlocked trunk;
- open hood;
- alarm;
- unlocked doors;
- Cruise control;
- speed limiter
- direction indicators.
Below the speed scale there is a small on-board computer screen that displays the following information:
- mileage (including mileage per trip);
- current time and travel time;
- average speed;
- voltage in the on-board network;
- fuel consumption;
- checkpoint operation;
- ambient temperature;
- cruise control operation.
In the left “well” there is a tachometer with a scale from 1 to 7. “Red zone” means that the engine produces more than 5500 rpm. The indicators located here may indicate the following:
- pedal adjustment;
- safety belt;
- airbags;
- brake failure;
- accumulator battery;
- engine malfunction;
- emergency oil pressure;
- ABS;
- transmission malfunction;
- electric power steering.
On the right side there are two scales at once: engine temperature (top) and fuel level (bottom). Here you can see indicators such as:
- immobilizer;
- ESC;
- fuel level;
- lighting work.
Functions and features of the Vesta panel device
The instrument cluster on the Lada Vesta is completely different from those used on the Priora, Grant and Kalina. It is now a completely redesigned multifunctional device.
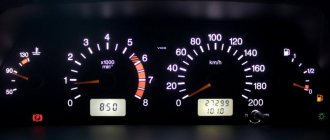
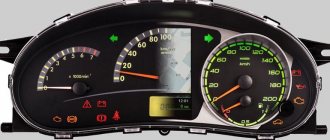
The speedometer is located in the central well - this is the main element of any “tidy” in a production car. The scale implies acceleration to 200 km/h, although in fact the stated maximum speed of Vesta with the current engine is no more than 185 km/h. Next to the speedometer there is a small on-board computer display, on which the driver can see all the necessary information about the operation of the engine and other vehicle systems.
Inside the speedometer scale there are various indicators that inform the driver about different parameters: the hazard warning lights are on and the direction indicators are on, the brake pads are critically worn, the engine is malfunctioning and the engine oil level is low. On the left is the tachometer well, the scale of which is marked from 1 to 7 (1000-7000 rpm). The engine allows you to “spin” up to 5500 rpm - this way there is no harm to the motor. After this mark there is a red zone; prolonged operation of the power unit at such high speeds is not recommended. The tachometer also contains information indicators.
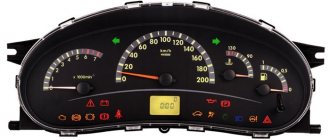
On the right side there is a well in which there are two indicators. One of them informs about the engine temperature, and the second – about the fuel level in the tank. In Grant, the temperature indicator was removed to reduce the cost of the car, but in the climatic conditions of Russia and the CIS countries, it is extremely important for the driver to know the current temperature of the engine oil in order to prevent possible overheating due to various malfunctions.
The fuel tank indicator shows a scale of “full tank”, “half tank” and “empty”. You can see an arrow near the gas pump icon; it is needed to indicate to the driver which side the fuel filler neck is located (the indicator points to the right). There are also warning lights in the right well.
In general, the instrument panel has an attractive design; the scales are backlit in green and orange with white numbers. The only drawback is the poor design of the arrow indicators. The intermediate divisions of the scales are not informative, and you need to get used to them. With a quick glance while moving, it will not be easy to read the readings.
What has changed in the new dashboard of Lada Vesta
It is known that cars going for export will be the first to receive the update, however, the Russian market should also be replenished with such versions of Vesta in 2022.
In the front part, the changes affected the following:
- font increased;
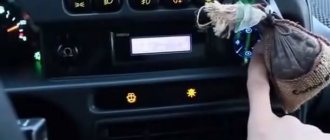
- daytime instrument lighting appeared;
- The scale backlight color turned orange.
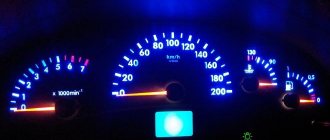
In theory, changing the instrument lighting will correct problems with reading readings. In the photo of the Lada Vesta instrument panel you can see that it has become much more presentable.
The new instrument panel is illuminated at the proper level at night and during the day.
There are also several useful functionality improvements:
- added voice accompaniment;
- the volume of sound signals has increased;
- the time is now automatically synchronized with the satellite (the driver only needs to set the time zone);
- “Unfastened passenger seat belts” and “Low tire pressure” indicators appeared.
It is still unknown whether backlight brightness adjustment will be implemented.
Features of the updated panel
In favor of AvtoVAZ, we can say that the manufacturer constantly modernizes all its cars, even new ones. Increasingly, engineers are listening to ordinary car enthusiasts (surveys on social networks, meetings with representatives, communication on forums). At the request of customers, the dashboard of the Lada Vesta has been modified. The changes include:
- the numbers have become noticeably larger, reading readings while moving has become much easier;
- the backlight is used regardless of whether the lighting is on or not, the backlight is on on all scales at any time;
- instead of white backlight, red is used;
- a voice alert now warns of an unfastened seat belt; the audio also includes a GPS connection and much more;
- the volume of sound notification and voice guidance has increased (information and warning signals);
- the time on the display is now synchronized automatically by satellites of the ERA-GLONASS navigation system;
- The warning indicators have been changed (low tire pressure and unfastened seat belts front and rear).
Export models supplied to Germany and Hungary were the first to be equipped with the updated dashboard. Since 2022, the “tidy” has become available for the domestic market. A function such as adjusting the backlight level has not yet been implemented.
How to remove the dashboard of Lada Vesta
It is assumed that the new version of the panel can be purchased and installed on a torpedo. Its price will be approximately 8,000 rubles.
The procedure for removing the dashboard involves the following steps:
- Disconnect the negative terminal of the battery.
- There are two bolts at the top of the panel that hold it in place. They need to be unscrewed using the T20 socket.
- Now you can remove the instrument panel by pulling it towards you so that the latches release.
- Using the T20 socket, unscrew the exposed screws that secure the devices.
- Now you can pull the panel towards you and disconnect it from the wires.
Installation is in the reverse order. The connection diagram should not change.
About SMD LEDs
Here are the most commonly used:
- very bright SMD 5050 (luminous flux - 15 Lumens);
- bright SMD 3825 (brightness 7-9 Lumens)
- medium brightness SMD 3528 (about 5 Lumens);
- medium brightness SMD 3028 (about 5 Lumens);
- not bright SMD 3020 (about 4 Lumens);
- not bright SMD 3014 (about 3 Lumens).
You can buy everything you need on AliExpress (see catalog).
The numbers after SMD mean the ratio of width and length, for example, an SMD 3528 LED has dimensions of 3.5 mm by 2.8 mm.
Solution
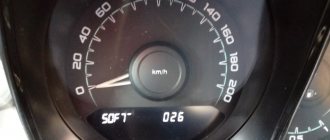
Due to numerous requests to resolve the issue with the lack of instrument lighting in the Lada Vesta, which were sent to AvtoVAZ, the Russian plant produced new firmware. After this, already in the last days of June, all the necessary materials were sent from the factory to the dealership centers to update the firmware of the Lada Vesta dashboard.
And from the first days of July, dealership centers received new firmware. This software is marked with the index 35, while the previous version, which is installed on many sedans, is indicated with the index 26. Software 35 is focused on turning on the backlight of Vesta’s instruments when the daytime running lights are turned on.
The video demonstrates the backlight at PO 35
The firmware changes quite quickly - usually no more than a quarter of an hour. In addition, as reported by Ladnaya Mechanics, this service is paid and costs about 600 rubles.
It's much more comfortable to drive with the lights on.
Dashboard firmware
After the not entirely successful first “tidy” of Vesta, an updated one was released, with the defects corrected. The question arises - what should the owners of the first generation Lada Vesta do? In order for the backlight to work in the daytime without turning on the headlights, you can reflash the “tidy”. If the car is equipped with cruise control not at the factory, but by the owner, the corresponding indication on the old panel without firmware will not light up.
Without the skills and knowledge, installing software yourself can do more harm than good. The tailoring must be used strictly for the specific dashboard. It is not allowed to install updated software from a new device to an old one and vice versa.
Find out the firmware number
If you are faced with the problem of the lack of backlight on the Lada Vesta dashboard during the day, first you need to find out the current firmware number. This can be done in one of 2 ways:
- Display the current software directly on the on-board computer display. To do this, during testing, you need to press the up button on the right steering column paddle.
- Dismantle the entire shield and look at the label that is glued to the back. The software version is also indicated on it.
Do-it-yourself firmware
You need to be aware that all actions are performed at your own peril and risk. No one can guarantee that after installing the firmware yourself, the device will work correctly. To prevent this outcome, it is recommended to update the panel either at an authorized dealer or at specialized service stations.
There is no need to confuse the panel firmware with the multimedia firmware - these are different devices.
The cost of such a service varies from 1,500 to 2,500 thousand rubles. This is much cheaper than buying a new shield to replace a damaged one yourself. For dismantling and reflashing, the warranty may be revoked if the procedure is not carried out by an authorized dealer. If you decide to update the software yourself, you will need to make a backup copy of the standard firmware, then prepare the necessary tools:
- A device for flashing Usbdm OSBDM V4.95 - can be ordered on AliExpress, the cost is approximately 600-700 rubles.
- Install drivers and software for Windows from the disk included with the programmer.
- Dismantle the instrument panel, peel off the factory seal, and remove the cover from the back.
- Open the programmer and move the checkbox to the 3.3V position - at this voltage you will not need an external power source.
- Connect to the dashboard and PC.
- On a computer or laptop, open the HCS12 Programmer program, select and click on the “Detected” item.
- Go to the “Target” item and select the folder with the location of the firmware, check the box next to the “Auto Reload” item, then click on “Detect Chip”. The programmer will determine the chip type automatically.
- Go to the “Security” tab and check the “Unsecure” box.
- In the “Advanced” tab, check the “Enable” box.
- In the “Device Operations” section on the “Target” tab, select the “Erase Selective” item - only the firmware will be replaced, the immobilizer data and mileage will be saved.
Dismantling
First you need to remove the glove box. To do this, you need to open the box and then press out the plastic hooks that secure the top of the lid.
Then you need to pull the cover towards you. It is held in place by 3 clamps from below. You just need to pull and the cover will come off.
The next step is to remove the glove compartment light, which is located in the upper left corner. First, you need to press out the lampshade using a knife or a thin screwdriver, and then disconnect the wires.
When you are done with the lampshade, you will need to unscrew 5 screws using a Torx T20 sprocket and remove the glove compartment.