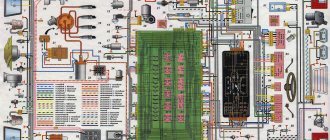
Installing a Europanel on a VAZ 2109 injector wiring
The topic of today's article is quite interesting. This is the installation of a VAZ 2114 panel on a VAZ 2109 (carburetor) and other experiments with the Nine dashboard.
Let's not talk about such things as the justification of these actions. In the end, each car owner decides for himself what his car will look like. But still, we can say with confidence that it looks much better than the original panel and torpedo from the VAZ 2109.
Let's say right away - installing a Europanel on a VAZ 2109 (carburetor) is a very troublesome process, and first you need to.
First, there is a difference in wiring. And you will have to delve into the instructions and pinouts. Otherwise it may “not fly”.
In terms of price, installing a VAZ 2114 torpedo in a VAZ 2109 (carburetor) can cost five to ten thousand rubles, depending on where you buy it and who will do the installation. A new one in cellophane can cost more.
How difficult this process is if you do it yourself depends on how well you understand auto electrics. And in electrics, as such. You may have to actually redo some wiring. It rarely happens that everything starts up and starts from scratch, especially when it comes to any other basin. Also, during this kind of repair, you need to look into it so as not to accidentally make a mistake again.
Most likely, you will have to redo the wiring and change the mounting block. Some experts recommend installing wiring from.
Installing a VAZ 2114 instrument panel on a VAZ 2109 (carburetor) makes the interior of your car more modern, “newer”. You can also replace the steering column to maintain a sense of integrity of the picture.
Beautiful and more modern requires its costs. So you will have to spend a lot of time and effort to put it in order, replace the wiring and connect everything correctly.
Tuning a VAZ 2108 (tuning eight) with your own hands is easier than ever
Carburetor Colex 21083 and its design
New cars up to 500,000 rubles in good configuration
And so, I’ll say right away that I didn’t take a lot of photos, because.. =( (Thanks to Serega (Sega535) for telling me about this site!)
I'll tell you everything in order.
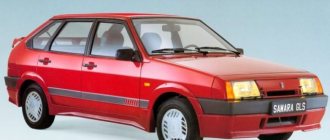
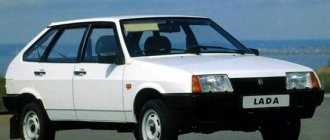
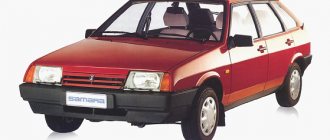
When I took my license, I was studying on a VAZ 2106, I thought that the first car would be a six...) But after driving with a friend in his 99, I liked it more! Well, actually, the dream of 99 appeared. I dreamed of a VAZ 21099 with a Europanel! It turned out that I bought it with a high panel, but this can be fixed;) That’s how it was)
One lucky day I met a man who was selling a VAZ 2114 for parts. We talked to him about selling a Europanel - and he agreed, the next day I had it. =)
What was: — Europanel — Instrument panel (VDO with 2 screens) — Wiring harness for Europanel — Steering column cover. — Center console — Air ducts — Two plastic covers (on the sides of the stove). — Iron fastenings — Buttons — Door trims
For all this I paid 2000 rubles. =)
The work has begun.
In the summer, in my free time at work, I glued the europanel.
— 3 sheets of STP — 450 rubles — 1 sq. meter of bitoplast - 150 rubles
I glued all the plastic and air ducts in the panel with STP, and glued all the joints of the plastic with bitoplast.
Noise insulation.
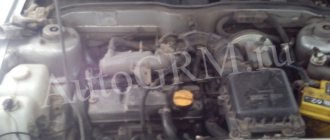
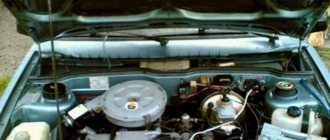
In the fall, I removed the high panel, removed the stove, replaced the heater valve (because it ran), and removed the wiring. I cleaned the entire engine compartment of dust, washed, wiped and dulled the sound insulation of the engine compartment.
What I needed for this: - 7 sheets of STP - 1000 rubles - 2 sq. meter of Splen - 400 rubles - Gasoline "Galoshes" (For degreasing) - 50 rubles - Paper tape - 50 rubles
I taped the entire engine compartment and the bottom to the STP seats.
I glued the second layer with Splen, also to the seats. Unfortunately there is no photo =( I partially glued the stove with STP and the joints with bitoplast, restored the dampers. This work with sizing took 2 days...
Installation of europanel.
— I laid out the wiring harness, having previously distributed which chips go where. — I brought the panel into the car through the right front door.
In the area of the steering column on the panel there are iron fastenings to it, so we screw these fastenings so that they are under the steering column.
I tightened two screws on the right and two on the left. (1 where the eyelet is, 2 below) The panel stood up straight, the stove and air ducts coincided.
Started connecting the wires.
All the wiring was enough, nothing had to be extended. Every chip was in its place.
I checked the turn signals, headlights, dimensions, wipers, heater, etc. Everything works correctly. Next to the wires on the ignition lock there will be a chip for a relay; the relay must be installed, otherwise the stove will not work. (I had this happen)
Description and location of indicators and instruments on the panel
To begin with, we suggest that you familiarize yourself with the description and designations of the icons on the dashboard of the VAZ 21099 and 21093 carburetor or injector:
- A speedometer that allows you to find out at what speed the vehicle is traveling.
- Coolant temperature controller. If the indicator needle enters the red zone, this indicates engine overheating, sometimes this may be due to failure of the sensor itself. Overheating of the power unit can cause serious malfunctions, so it is necessary to diagnose the engine radiator fan.
- One of the features of VAZ cars is that the dashboard diagram involves the use of a voltage sensor in the car’s electrical network. According to the indicators of this controller, it is possible to determine the battery discharge when the indicator arrow is located in the left red zone. If it falls into the right red zone, then this means that an overcharge has been detected in the network. In case of such a problem, the generator device should be diagnosed.
- Gasoline volume sensor in the fuel tank.
- The symbol is in the form of a gas station; its appearance indicates that there are no more than 6.5 liters of fuel left in the tank.
- Another feature of VAZs is a fuel economy sensor. With its help, the driver can determine the optimal ratio of the number of crankshaft revolutions to fuel consumption. If the indicator needle is in the yellow zone, this means that there is excessive consumption of gasoline in the system; if it is in the white zone, then fuel consumption is economical.
- Daily mileage odometer.
- General odometer.
- If the word “STOP” appears on the instrument cluster while driving, the driver is warned to stop driving. Usually its appearance is associated with a decrease in the level of engine fluid pressure in the power unit. It can also appear due to a lack of brake fluid or when the parking brake lever is raised.
- The symbol in the form of a battery always blinks when the power unit starts. If it lights up after the engine has been started, then most likely the drive belt of the generator set has broken or the unit has failed. It also makes sense to check the charging circuit for damage and breaks.
- The choke icon indicates that the air damper is closed.
- An indicator in the form of a triangle indicates that the light alarm is on.
- An exclamation mark icon appears when there is insufficient brake fluid and the volume needs to be replenished.
- This symbol indicates that the vehicle's handbrake has been applied.
- The engine fluid icon informs the driver that the pressure in the engine lubrication system has decreased; first of all, you should check the fluid level and, if necessary, add oil.
- An icon in the form of arrows pointing in different directions indicates that the turning lights are turned on.
- Side light activation symbol.
- Indicator that the rear fog lights are on, if equipped.
- Symbol for activating high beam lights.
- This icon indicates that the rear window heating system is turned on.
Torpedo device
What is a torpedo? In short, this is the dashboard. The word “torpedo” came to us from the West and has now become firmly established in the everyday life of domestic car enthusiasts.
Dashboard of a VAZ 2115 car
The instrument panels on the VAZ 2113, 2114 and 2115 are almost the same. These are complex collapsible structures made of metal with plastic inserts. In addition, in the panels of this line of VAZ models, engineers actively used polymer film, which covered most of the controls.
Diagram of the main elements of the VAZ 2115 dashboard
Instructions for installing a new panel
If you want to replace a low tidy with a more advanced, high one, then in any case you will have to change the entire center console.
Removal and installation instructions look like this:
- First, you need to turn off the power to the on-board network; to do this, disconnect the battery, remove the steering wheel, as well as the steering column switches and the ignition switch. You will also need to disconnect the ignition relay.
- Next, unscrew the two bolts that secure the control panel visor and remove it.
- Now you need to compress the spring and remove the shield itself from the center console. Disconnect all wires and connectors connected to the dash, including the speedometer cable, the econometer hose, and the odometer cable. After this, the tidy can be moved to the side.
- Then remove the regulator from the hydrocorrector of the optics light, the tidy light switch knob, as well as the interior heater and fan regulators. To do this, pull the controls towards you.
- After this, unscrew the two bolts securing the center panel trim on the sides; the trim itself can be moved towards you. Then you need to disconnect the connectors.
- Now the key in the lock should be turned to position “0”, this will disable the anti-theft system. A connector with wires is connected to the lock itself; it must be disconnected. Next, unscrew the two nuts and two bolts, after which you can remove the steering column pipe with the switch.
- Remove the choke handle located under the instrument panel. Pull it towards you so that you can feel the pull. You need to unscrew the two bolts that secure the damper guide rod, after which the choke can be removed.
- Now you can unscrew four more screws that secure the heater control panel in the car. Unscrew the bolts located on the side of the shield on both sides. Also unscrew the lower console mounting bolts with nuts that secure the control panel lighting switch and the optics hydraulic corrector. To do this you will need a 22mm socket wrench, it must be high.
- After completing these steps, you need to unscrew the bolt that secures the center console in the glove compartment. Then all you have to do is unscrew one bolt at a time on each side securing the center console. The console itself can then be dismantled.
- As for installing a new high panel with tidy, this process does not present any particular difficulties. All dimensions at the mounting points on the body are the same, but this procedure also has its own characteristics. To install your new console, you will need the appropriate wiring harness. If you use an existing harness, then you will need to rearrange the terminals in it, taking into account the connection diagram. In addition, it will be necessary to change the cables leading to the heater to longer ones, the same applies to the speedometer cable. If you are installing a new console, you will also need other roof pillar side trims, these must be installed before you install the console. Since the new dashboard will not use a flow meter, the tube from it will need to be plugged. In addition, the signal to the tachometer will need to be supplied from wire K on the coil, which is connected to the speed sensor cable bracket.
- Immediately before installation, you should reassemble the new console, and wrap the connection points of the blowers with electrical tape and, preferably, glue them with foam rubber or anti-creaking agent. It is also necessary to change the foam rubber of the heater, since the old one will no longer be able to perform its functions. Also make sure that the choke can close completely and remember that the cable from the new speedometer should be installed before you install the console. The assembly procedure begins with laying a new wiring harness and connecting all connectors. Before you finally assemble everything, turn on the dashboard and check how all the indicators and gauges work. After this, the console can be put back in place.
What's inside the cabin
Replacing the power unit will also require replacing the interior wiring.
Many owners combine this process with replacing the instrument panel with a modern one:
- the “high” panel from the VAZ 21099 fits without modification;
- The “LUX” panel from the VAZ 2114 model is suitable with minor modifications.
Tip: there are a lot of videos on the Internet that describe in detail the process of finalizing the panel. Read them all carefully before starting work on your car.
Rework
To replace a carburetor with an injector yourself, be sure to arm yourself with the following components:
- Cylinder head from VAZ 2112 with receiver and manifolds;
- Knock sensor;
- Throttle pipe with throttle position sensor;
- Mass air flow sensor and a number of other elements.
Replacement kit
When everything is ready, you can get to work.
- Remove the old cylinder head. Plus, remove all attachments in the fuel assembly, gas tank and ignition system.
- Remove the alternator, thermostat, pulleys and belts.
- Install a new gas tank with a pump, borrowed from a donor - an injection VAZ.
- Remove the carburetor and ignition system components that need to be replaced.
- Disconnect the cooling system pipes and hoses. Here, install a completely new kit from the injector.
- Remove the pan.
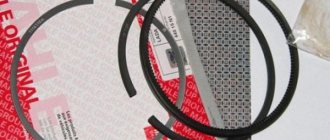
- Install new pistons from an injection donor and connecting rods at 10. Standard carburetor components are not designed for an injection compression ratio. Plus there are special recesses for other valves.
- Install a new unit with an underflow on the cover for the DPKV, replacing the standard oil pump. If you can remove the cover, then only that will be replaced.
- After removing the old cooling system pipes, install new ones. The best solution is to replace the entire set. Buying it won't really impact your overall budget.
- Prepare everything necessary to mount the 16 valve head. The fasteners match, only the bolts from the old head are long and need to be shortened. Plus, don’t forget to make a size 12 hole in the new head.
- Install new fuel lines from the donor.
- Connect your new gas tank to the lines.
- Route the wiring from the control unit to the fuel pump. You can use old fuel level regulators from a carburetor car.
- Cut a hole in the wall of the engine compartment through which the wiring will be routed. This way you won't have to make the standard wires longer.
- Install the knock sensor by drilling a hole in the block and tapping a size 8 thread.
- Be sure to replace the water pump using a unit from donor 2112.
- Get a new crankcase breather and oil dipstick. Install them instead of the previous ones.
- Install a new cylinder head. Just don't forget to change the gasket, which corresponds to a different head.
- Install a thermostat borrowed from a VAZ 2112.
- Connect the coolant pipes.
- Remove the rear timing cover and rollers. The pulleys from 2112 are dismantled. The belt must be installed in accordance with the marks.
- Install the new generator along with the drive. For the new generator, the upper fasteners will remain intact, since they are not provided for by the design of the carburetor VAZ 2109. Therefore, fasten the pair of lower mounting bolts as securely as possible.
- Place all the sensors in their new places.
- Seal the valve covers with a good quality sealant.
- Assemble the ignition module, wires, spark plugs and other components.
- Install the air filter.
- Get your exhaust system back to normal. The muffler is often left stock, but the resonator and other components are taken from the donor.
- The wiring is connected to the dashboard and the lock.
- Fill in new oil, refuel the car with high-quality fuel.
- Start the engine and take it for a test drive.
Possible malfunctions and ways to eliminate them
What problems can a car owner encounter:
- The shield works fine, all sensors function, but there is no backlight. As you know, the backlight on the tidy appears only when the side lights are turned on. Therefore, if there is no light on the dashboard, you need to check whether the side light, license plate light and lamps in the engine compartment are working, since one fuse is responsible for all these elements. We are talking about a 7.5 ampere fuse device F10. If it is burnt out, the device needs to be replaced. Sometimes the reason lies in the inoperability of the backlight control located under the tidy.
- The speedometer does not work, in some cases the needle rises and falls, and it moves jerkily. If the speedometer stops functioning, then first of all you need to check the cable connecting it to the gearbox. Older versions used a mechanical cable, the ends of which wore out over time, causing the speedometers to not work. You need to replace the cable itself or try to restore its functionality by winding a piece of food foil around the end connected to the speedometer. If we are talking about an electronic sensor, then you need to remove it, clean the contacts and reconnect it; if this does not help, then the controller must be replaced.
- The economy sensor does not function. There can be many reasons for its inoperability, ranging from failure of the device itself to damage to the electrical circuit. In practice, this sensor breaks down in many cars; this is considered a “disease” of the Nines.
- The engine temperature controller does not work. If the needle does not rise at all, then you need to diagnose the sensor itself, located in the exhaust line of the cylinder head, next to the thermostat. You should also check the quality of the controller connection, make sure that the power circuit is intact, and diagnose the connector. It may happen that the needle rises sharply and goes beyond the red zone, while the engine has not even warmed up. Most likely, there is a short circuit problem; you will have to use a tester to diagnose car wiring or seek the help of a specialist.
- The indicators on the dashboard or part of the backlight do not work. In case of such a malfunction, the cause should be sought in burnt-out lighting sources. You need to remove the tidy and check the light bulbs; if they are really burnt out, then they will have to be changed (the video was shot by Semyon Pedan).
How to remove the high type panel
If your VAZ-2109 has a high panel model installed, then you need to act differently:
- First remove the steering wheel to gain access to the instrument panel.
- If you have a carburetor engine, pull out the choke and remove the handle from it.
- Now you need to remove the decorative trim; it is held on by two screws.
- Remove the ashtray and cigarette lighter.
- Pull the fan control handle towards you.
- Use a screwdriver to pry off the decorative control knobs for the interior heater drive.
- Be careful when removing the power wire connectors that go to the heater switch and to the heating control light.
- Remove the handles for the headlight hydraulic adjustment and the instrument panel lighting control.
- Use a socket to turn these adjusters and gently push them inward.
- Remove the air deflectors for the left and right side windows, and also remove the fasteners that were located under them.
- Pry the headlight switch with a screwdriver and pull it out to the length of the wires, disconnect it from the power supply. Place the block back behind the plastic part.
- Remove the stereo or standard radio, and then unscrew the center mount of the decor.
- Along the edges of the decorative trim there are latches that will need to be pressed in order to remove the decorative part of the torpedo by moving upwards.
- Disconnect power from the cigarette lighter, backlights, and hazard warning lights.
- Remove the decorative trims and speakers, disconnecting them from the wiring. After this, turn off the power to the heated rear window and fog lamp switches.
- Unscrew the fasteners and remove the instrument panel, remove the central screw on the speedometer and disconnect it from the cables. De-energize the shield.
- Turn off the power and remove the ignition switch, disconnect the choke control rod from the power supply.
- Disconnect the illumination lamp of the compartment for personal belongings from the power supply. Unscrew the remaining fasteners on the left and right and remove the panel.
Car dashboard cover
Another way to get rid of low-quality plastic in the car interior is to cover the dashboard. As a rule, leather or a high-quality substitute is used for this. It is quite difficult to do the covering yourself; the plastic, which was previously part of the interior design, will serve as the basis.
Sidebar: Important: It is recommended to carry out the covering only after creating all the necessary niches for installing additional equipment. Otherwise, costs increase significantly
When choosing a material, you need to abandon fabric, since the front panel is constantly exposed to direct sunlight and is often exposed to greater impact than other upholstery elements. When choosing a color, you need to give preference to not bright shades that will not be very noticeable. Quite often you can find examples of tuning that use bright fabric: red, blue and other colors. Note that this option looks quite attractive, but during a long trip the driver and passengers will be very tired.
Peculiarities
Most of all, “chisels” liked the “low” panel due to one significant difference from the “high” one - the well-designed arrangement of air ducts. In 21083, the air forced by the fan from the heater core is lost somewhere inside it. As a result, the interior does not warm up well.
The second feature is the low quality of plastic and poor fit to body parts. At the slightest vibration or pressure, it begins to creak unpleasantly. And when driving on uneven roads, the noise from it is similar to a baby rattle.
Instrument panels with indexes 2108 and 21083 were installed on the first generation of front-wheel drive models; in addition to the cuts, they differ from each other only in the location of the equipment control buttons and differently combined control devices.
( 2 ratings, average 4 out of 5 )