A car is a complex complex of various systems that are inextricably linked. The failure of one unit can provoke unpleasant consequences for both the car and the driver. Almost all mechanisms included in the control system operate in difficult conditions: large amounts of dirt, dust, water, snow, chemical reagents, negative temperatures. For this reason, they are very vulnerable, and their technical condition must be treated with increased attention, especially when operating a vehicle on unpaved roads.
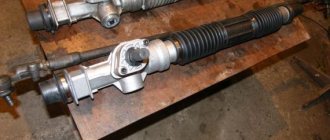
Removing the Kalina steering rack
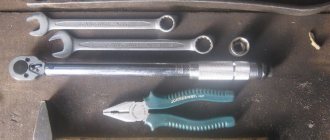
You will need: heads “10”, “13”, “15”, “17”, “27”, a spanner “19”, pliers, a mounting blade, a hammer, a flat-head screwdriver.
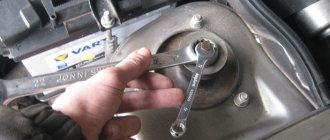
Inside, unscrew the nut and remove the bolt securing the lower cardan joint to the steering gear shaft (steering rack), using a 13mm socket. If the bolt turns, hold it with a 13mm wrench.
In the engine compartment:
- Unscrew the upper fastening nut of the steering rack casing using a 10mm socket.
- Unscrew the 2 nuts securing the steering rack casing from the bottom of the car with a “10” socket.
- Remove the casing.
We hang the front part of the car and remove the wheels. To remove the steering rack without tie rods, they should be disconnected:
- Remove the locking plate of the steering linkage bolts by prying it up with a screwdriver. Then unscrew the 2 bolts securing the steering rods to the rack.
- Unscrew the nuts securing the steering rack brackets to the front panel using a 13mm socket.
- Move the steering rack forward, removing the pinion shaft from the hole in the front panel.
- Remove the Kalina steering rack along with the rods.
To remove the steering rack along with the tie rods, then you need to disconnect the tie rod ends from the swing arms of the shock absorber struts, to do this:
- Remove the cotter pin using pliers.
- Unscrew the ball pin fastening nut partly using a 19mm spanner.
- Loosen the tie rod end pinch bolt using a 17mm socket.
- We press the ball pin out of the lever by inserting a mounting blade between the swing arm and the tip, pressing the tip away from the lever, and striking the end of the swing arm with a hammer.
- Unscrew the ball stud mounting nut completely.
- Remove the ball pin from the hole in the swing arm.
- Unclip the tie rod end groove using a screwdriver.
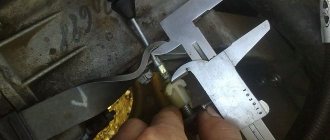
- Unscrew the tip, holding the adjusting threaded bushing with a 27 wrench. We count the number of turns in order to screw the tip the same number of turns when installing. At the same time, we maintain the position of the threaded bushing on the steering rod. This will help approximately maintain the same wheel toe angle.
We remove the Kalina steering rack along with the rods:
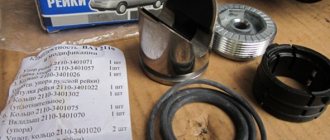
Parts selection
If you need to replace the tie rod end on Kalina, you should choose spare parts recommended by the manufacturer. First you need to write down the part number in the catalog or its alphanumeric designation. The article number for the right steering wheel end of domestic production is 1118-3414056, the left one is 1118-3414057. These spare parts are produced by VIS LLC in St. Petersburg.
Of the foreign analogues recommended for use on Lada Kalina 2nd and 1st generations, the following brands can be noted:
- "Fenox", CIS;
- "Lemforder", Germany;
- "Pilenga", Italy;
- Brembo, Italy.
The quality of the products from these brands is approximately the same, but there is a slight difference in price. Products from domestic manufacturers are not inferior in quality and reliability at a lower cost.
Basic steering rack faults
Seal leakage
French and Japanese cars usually suffer from leaks in the input shaft seals. It occurs due to corrosion of the oil seal area.
2. Leaking power seals and corrosion of the steering column shaft
This problem occurs when water gets in through the rod boots.
Worn steering rack center tooth
Due to the fact that the steering wheel remains in the central position most of the time, the vast majority of all loads fall on the central part of the rack.
5. Knocks of the support bushing
The support bushings are designed to centralize the shaft in the steering rack housing; when it wears out, the shaft begins to knock on the rack housing.
Knocks of the pressure block
Over time, a sample forms on the surface of the cracker and the gasket wears off. At the same time, the cracker begins to knock on the steering rack, dangling in its body.
Steering wheel turns tight to one side
This effect is observed when the hydraulic fluid is contaminated and grooves are formed inside the distributor.
Tight steering in both directions
There could be many reasons:
- grooves described above.
- The Teflon ring on the piston could rupture.
- wear of the working pair could have occurred on the pump.
- The distributor torsion bar could have broken.
Diagnostics of the Kalina steering rack
So, dear readers, by replacing the bushing, repair the Kalina steering rack
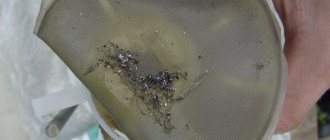
It is only worth it if the right end of the rail is in perfect condition. If there is rust on it (as it was for me), then it will act as an abrasive and will “eat” the nylon bushing quite quickly. The right edge of the “rasp” should shine like a mirror, only then it will not break the sleeve.
Check the condition of the right edge of the rack
quite simple
To do this, you need to carefully cut off the plastic clamp that secures the long right boot, then remove this boot and, turning the steering wheel to the left, visually inspect the right end of the rack that has emerged from the body
I advise you to carry out such a diagnosis
before removing the rack from the vehicle. And in general, if you are going to solve the problem with the rack yourself, then I sincerely wish you to remove and install it only once, because the process of installing the rack is quite complicated and can cause discomfort, especially if it needs to be repeated.
In the article about I already mentioned how to determine that a knock
comes precisely from the Kalina steering rack
.
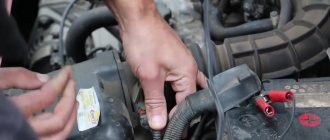
To do this, open the hood and give the steering rod a good tug with your hand
.
A serviceable steering rack bushing
will not allow the rods to move even a millimeter, but with a “broken” bushing, the rods will shake.
At the beginning of this video you can clearly see the play of the steering rack after a run of 164 t.km, and at the end - a new steering rack after a run of 3 t.km.
As you can see, there is no play on the new rack. If
on your Kalina the steering rods do not hang out
, which means
it is NOT the rack that is knocking
.
Repair kit for repairing or replacing the Lada Kalina steering rack
A properly functioning steering mechanism is one of the main conditions for ensuring the safety of any vehicle. If the owner of a Lada Kalina detects suspicious signs of failure of any component components of this unit, then he urgently needs to take effective measures to find and eliminate the malfunction. The main characteristic symptom of problems is knocking.
It is clearly audible when driving over bumps or when turning the steering wheel while driving. When the owner determines that the steering rack requires steering rack repair, then he has two options: go to the station to the experts or dare to repair the steering rack on his own. You can make the replacement with your own hands; of course, it is not easy and troublesome, but nevertheless it is possible.
Design features
The structure of the Lada Kalina steering unit includes:
- electric amplifier;
- steering column, adjustable for reach and tilt;
- electric power steering rack with gear ratio change mechanism;
- rods with tips, as well as rotary levers.
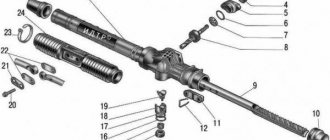
In the mechanism housing there is a unit with mechanical gearing, where the main operating element is a helical gear, the pitch of the teeth of which varies depending on the length of the rack.
The figure shows the design of the Lada Kalina rack and pinion unit.
The pressure in the rack-and-pinion pair is carried out by means of a spring, and the plastic liner present is designed to reduce the friction force. The compression level of the spring element is adjusted using a nut. The factory gap between the steering shaft and the rack is 0.1 mm in the LADA Kalina model.
If a knock appears inside the unit, it can be eliminated by adjusting the gap with your own hands. The steering shaft is centered using two bearings, one of which is located in the column bracket, and the second is located inside the electric power steering housing. The bracket is connected both to the pedal mounting unit, or rather to its front part, and to the body. Structurally, the bracket together with the pipe forms a hinged connection from a pair of plates. This unit provides a change in the position of the steering wheel, where the width of the range of movement is limited by slots in the designated plates.
The specific position of the pipe is fixed by a lever, which is connected to a special bushing that performs an adjustment mission. It is screwed onto a coupling bolt located just in the slots of the plates. When the lever is turned, the sleeve rotates synchronously. At this moment, the fixation of the plate weakens, and the steering wheel begins to change its position. Springs located in the middle of the bracket and plates, when the fastening is loosened, pull the pipe in the upward direction.
Let us repeat, the steering unit of the Lada Kalina has two rods and rotary levers. The rod design includes two tips, one of which is external, and the second is internal. The process of adjusting the length of the rod is carried out by rotating the threaded bushing present here. Having completed the adjustment manipulation, the position of the tips should be fixed with specially designed bolts. The outer rod end is connected to the swing arm bracket via a ball joint.
The power steering mechanism, operating on an electric drive, changes its degree of gain depending on the driving speed. When the car is stopped, the amplifier produces maximum torque, and the steering wheel turns very easily. As the speed increases, the force on the steering wheel of the Lada Kalina increases, which is facilitated by a decrease in the torque generated by this unit. The mechanism is based on an electric motor, which transmits rotation through a gearbox “hidden” under the column casing. The amplifier is controlled using an electronic unit, which is supplied with impulses from speed sensors, recognizes the amount of force when rotating the steering column shaft, and also reads the number of revolutions of the engine shaft. The instrument panel has a special indicator that allows you to monitor the operation of the amplifier.
Vulnerabilities in the Lada Kalina steering system
The weak links in the steering system are the ball joints. According to the service manual, replacement of steering tips on Kalina should be done when the odometer reaches 80 thousand km. However, practice proves that on average they travel up to 40 thousand km, although exceptions do occur.
The service life of the part that serves as an intermediary between the rod and the strut directly depends on driving style and the condition of the road surface as a whole. Indirect factors are:
- operating conditions (dust, sand, salt quickly damage rubbing surfaces);
- unit assembly culture;
- quality and accuracy of manufactured components;
- durability of passive protection (reliability of boot).
A high level of organization of the sequence of repair operations consists of:
- cleaning mating surfaces;
- use of high-quality lubricant for friction joints;
- monitoring the tightening force of bolted joints.
Features of the design of the steering tip
The rod is attached to the steering rack rod using an internal tip, and to the middle link of the trapezoid - using a swivel joint. The rods are connected to the steering knuckle lever through the outer steering tip. Internal tips and ball joints ensure the mobility of the rods in the vertical plane - otherwise the rods would break off when the car drives on uneven surfaces. The external tip ensures the mobility of the rod and the wheel in any plane - so the drive can operate normally on turns and potholes without damage.
Steering rods and ends
The design of the tip resembles the structure of a human joint: the sphere of the finger rotates inside a hemispherical body with a Teflon, caprolon sleeve or lubricant, which eliminates the friction of metal elements and allows the finger to deviate at a certain angle. The entire hinge is protected by a rubber boot. This design allows you to accurately connect the fixed and moving elements of the steering drive.
In general, the steering tip is a reliable, wear-resistant element: the fingers are made by casting or stamping from special steels, the ball parts are carefully ground, wear-resistant anti-friction materials are used as liners, the body is injection molded and anodized to further protect against corrosion. There is nothing to say about traction.
So why do these reliable elements force drivers to go to the service station from time to time?
Scheme of operation of the tie rod end
How and why steering rods break
The tie rods themselves never wear out, unless the car sits on the street for an eternity and simply rots. Usually the driver “helps” the rods: he suddenly flew onto the curb at speed, hit a stone - the rod was bent. Actually, corrosion and deformation are all possible malfunctions of steering rods.
However, bent rods cause other troubles - wheel alignment, wheel steering angle are disrupted, tip boots are torn, or the entire tip is torn out. Therefore, if you come across something impressive, just in case, go to a service station and check the geometry of the rods. If one rod is bent, both will have to be replaced.
Why do tie rod ends break?
The condition of the steering tips depends on one factor - the driver: how he drives, at what speed, and how carefully he monitors the steering system. Well, and also from the condition of the roads, because no one is safe from “suddenly flying into a hole in the dark.”
Therefore, the first enemy of steering tips is “beautiful” roads and the driver who drives on them. Due to strong impacts, not only do the rods bend, but the fixing nut simply loosens—the consequences of this are clear. In addition, a strong blow breaks the anthers, displaces the sphere, and it, in turn, breaks the bushing.
A torn boot is enemy number two. Yes, yes, the boot again (sometimes you get the impression that this is generally the most important element in the system). Through a torn boot, water and dirt will enter the ball, the metal elements rust, the dirt acts as an abrasive, and the water gradually washes away the lubricant.
How do handpiece malfunctions manifest?
We have already mentioned more than once that malfunctions of different elements and components of the steering can manifest themselves in the same way: backlash, knocking, vibrations, tight or loose steering wheel, beating in the steering wheel.
When should you think about replacing the steering tips in the control system on Kalina and why?
Ideally, it is necessary to inspect the important components of the technical part of the car before each trip. But very often there is not enough time for the mini-diagnosis process. The control system must be reliable, since it directly affects the safety of movement.
By shaking the hinge with your hand, you can first determine the serviceability of the hinge, as evidenced by the absence of play. Wear of the pin that secures the part to the strut affects the behavior of the car. It reacts sluggishly to sudden rotations of the steering wheel, which is unacceptable in critical situations.
In addition, a knocking noise appears when driving over small irregularities. The reason lies in the formation of an unacceptable gap in the mating parts.
How to put the steering wheel straight on Kalina?
After repairing or replacing the steering rack, it is not always possible to position the steering wheel so that it faces straight, so many car enthusiasts have a question: how can Kalina place the steering wheel straight? Indeed, when the steering wheel is straight when driving in a straight line, it is not only pleasant, but also convenient. It's just easier to hold on to.
To then set the steering wheel straight , first, while driving in a straight line, make a mark at the top point of the steering wheel, and when you arrive at the repair site, place the steering wheel so that this point is at the very top. Next, pull the central part of the steering wheel towards you, it will detach and end up in your hands.
The horn terminals must be disconnected, the central part of the steering wheel can be put aside.
Using a 24mm wrench, unscrew the nut securing the steering wheel to the steering shaft.
Don't forget to mark the position of the steering wheel relative to the shaft with a marker.
Now we take the steering wheel with both hands (at 9 and 3 o’clock) and, alternately shaking each hand towards and away from us, carefully remove the steering wheel from the splines of the steering shaft. As soon as the steering wheel is removed from the splines, turn it to the position you need (that is, put it straight) and put it back on the splines. Now, when driving straight, your steering wheel will also point straight.
My steering wheel was slightly skewed to the right, so I moved it one slot to the left, like this:
Classification of steering mechanism faults into groups:
- large play (free play) of the steering wheel;
- the presence of extraneous noises, knocks and creaks while driving a car in different modes (creaking, knocking, for example, can only happen when turning right or only when going uphill);
- tight turn of the steering wheel.
Causes of malfunctions:
- The tie rod nuts have become loose.
- The steering tips and silent blocks are worn out.
- The nuts securing the entire steering mechanism (RM) have become loose.
- There is a large gap between the nut and the adjusting rod.
Troubleshoot problems by tightening bolted connections, replacing tips and silent blocks.
If the steering wheel on your Kalina car has become very difficult to turn, then the reasons for this may be:
- The bearings of the upper support of the steering column upper universal joint (RC) are worn out.
- The steering rack support bushing is worn or damaged.
- The telescopic strut of the front suspension broke.
- The electric power steering (EPS) does not work.
- Low pressure in the front wheels.
The fifth reason can be easily eliminated with your own hands. To eliminate other causes of problems, you will have to contact a car mechanic or study the device and replacement procedure yourself.
There are also worm and screw types of steering. Some people are interested in whether it is possible to install a mechanism of a different operating principle instead of the standard rack and pinion mechanism for driving a car. Answer: It is possible, it is possible, but is it necessary? It is better not to change the factory design at as many critical components as the machine control unit.
Visual inspection of hinges
You can assess the condition of the play by driving on a flat road at a speed of 60 km/h. To do this, carefully rotate the steering wheel in different directions, a few degrees. If the play is very large, then the tips will need to be replaced.
The next stage is visual diagnostics. To do this, carefully inspect the condition of the Kalina steering wheel boots. If they have cracks, cuts, or there is no lubricant inside, then you should not operate the car - change the hinges immediately. Their cost is not very high, so you shouldn’t bother with restoration.
Replacement instructions
We put the car on a jack and unscrew the wheel. If you wish, you can put the car on 2 jacks at once and remove both wheels. But I prefer to change the tips one by one.
To make it easier to unscrew the tip fastening nut, pre-treat it with any penetrating lubricant. for example WD40 and let it sit for a few minutes.
We turn the wheel out to make it easier to unscrew the tip.
Now, using a 17mm wrench, unscrew the nut securing the tip to the rod.
Next, straighten and pull out the cotter pin, then use a 19mm wrench to unscrew the nut securing the steering tip to the rack.
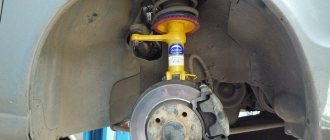
Now, using a puller, we pull the tip out of the groove of the stand; if there is no puller, we simply knock it out.
So, unscrew the old tip, clockwise! If the adjusting sleeve starts to unscrew, hold it with a wrench.
We install the new tip, counting the turns, and reassemble in the reverse order, not forgetting to insert the cotter pin.
Determining joint wear
To make sure that the steering tips of the Lada Kalina have become unusable, you need to check them. To do this, it is enough to estimate the amount of play. This is done as follows:
- Turn the wheel to the side.
- Press the palm of your hand onto the top of the element. Press the hinge joint from below with your finger.
- You will feel the play with your palm - you may even feel a slight knock or jamming.
Typically, the tips begin to show symptoms of failure when traveling on uneven roads. If you hit a small hole, a knock will be transmitted to the steering wheel.
Features of replacing tie rod ends on Lada Kalina
To begin with, here is a list of tools that will be needed to perform this type of repair. I’ll say right away that this information is slightly different from the manual that was written by the “Third Rome”; they were probably mistaken. Here's what you need:
- Balloon wrench
- Jack
- Open-end wrenches for 17 and 19
- Pliers
- Torque wrench (when tightening)
- Crowbar and hammer (instead of a puller, if you don’t have one)
For those who like to watch everything live, I decided to make a video where I clearly showed everything:
And below will be a step-by-step photo report on the work done, if suddenly the video is not displayed.
First, we tear off the wheel bolts and jack up the car, the side where we are going to repair. Then we remove the wheel and be sure to apply penetrating lubricant to all threaded connections of the tip: to the pin and the tie bolt. One more thing: when performing the procedure on the left side, we turn the steering wheel all the way to the right, respectively, when replacing it on the right, we turn it all the way to the left. It will be more convenient to work this way.
Then we unscrew the coupling bolt, not necessarily all the way, the main thing is that the thread becomes looser. This bolt is located in the place shown in the photo:
Then we straighten the lower cotter pin of the tip nut and remove it with pliers:
Then you can unscrew the nut with a spanner or open-end wrench:
Next, we take a pry bar, if there is no special puller, and insert it between the swing arm of the stand and the tip. We press harder, as if trying to lift the tip up, and at this time we hit the rotary lever with a hammer exactly in the place where the finger sits. This is shown more clearly in the photograph:
After several strong blows of the hammer and under the influence of the lever from the mount, the steering tip should jump out of the hole in the swing arm, as shown above.
Then we take it by the tip and lift it up, thereby finally releasing it:
Now you can unscrew it from the steering rod
Please note that you must turn clockwise
Attention! Be sure to count the number of turns until the tip is completely turned out. If this is not done, then there may be serious problems with the alignment of the front wheels.
And if you count and remember the number of revolutions you made, then you can approximately put everything the same as it was before the replacement.
I got 23.5 turns on the left side and 21.5 turns on the right side. Your data may differ.
The result of the work done was as follows:
Now we take the new tip needed in this case (the right and left are different!) and twist it counterclockwise with the same number of turns as when unscrewing.
We tighten the coupling bolt into place, but the nut securing the tip to the swing arm should be tightened with a certain torque. Once again, my Ombra torque wrench, which had been lying around for quite some time, came in handy. The tightening torque of this connection should be between 27 and 33 Nm. I turned it up to 70 Nm according to the manual from the Third Rome, for which “many thanks” to them, there are jambs on every page in their book! After which I had to weaken it when I checked it in other sources.
Don’t forget to insert the locking pin into the pin hole and bend its edges. That's all the replacement, the end result of which is shown in the picture below:
Replacement on the second side is carried out in the same sequence. The price of new steering tips for the Lada Kalina is about 600 rubles per pair.
As a result, after testing it on the road, the steering wheel immediately became noticeably more collected, knocks and vibrations on the steering wheel stopped being heard, and the reaction to turns is now immediate, which is something I’ve been missing lately. In short, there is now no looseness or wobbling, all that remains is to check the balls and, if necessary, replace them, but more on that a little later!
Removing old tips
To dismantle the old Kalina steering tips, you need to prepare the car for repair:
- Be sure to place two stops under the rear wheels to prevent the car from rolling away during repairs.
- Loosen the bolts on the wheel that is being repaired.
- Raise the side to be repaired and place the machine on secure supports.
- Remove the cotter pin that secures the nut on the steering joint pin.
- Unscrew the nut using a “17” wrench. It is best to use socket or socket heads.
- After this, you need to loosen the nuts that secure the tip to the steering rack.
- Unscrew the bolt that secures the end of the rod (tension clamp).
Problems can arise with this - the nuts often stick. Therefore, you need to treat them with a penetrating lubricant in advance.
If this still does not help, you will need to completely remove the rods. For this:
- Remove the protective cover by unscrewing the nuts with a 10mm wrench.
- Unbend the locking plate, which is located under the bolts securing the rods to the rack.
- Using a 22mm wrench (it is advisable to use a socket with a ratchet), unscrew the bolts that secure the rod to the steering rack.
- Install a special puller on the tip, rotate its bolt until the pin comes out of the strut knuckle.
- Completely remove the linkage from the car.
To unscrew the nuts securing the tip, you need to thoroughly heat the threads. Without this, it is not always possible to replace Kalina steering tips. You can warm it up on the stove or with a simple gas canister. After you warm up the metal, you need to tap the nuts. After this they will definitely get out. Count how many revolutions the Kalina's steering ends are screwed in.
Analogs of tips
There are also many analogues that are available in any store:
- Manufactured by "TRACK" with indexes TR70-107 and TR70-108 (left and right tips, respectively) - cost from 400 rubles and more.
- HOFER HF-812002 are sold as a set for the left and right sides. The cost of the set is at least 700 rubles.
- "BELMAG" BM-1118-3414056/57, also sold in sets of two tips, cost 800 rubles and more.
These are indicative prices, you need to build on them. If you come across a set of TRACK tips for 900 rubles (and these may be on sale), then these are most likely high-quality products. But if they cost 500 rubles or less, then this is an obvious fake - you should not trust such mechanisms.
Factory tips for Kalina
On sale you can find elements that are installed from the factory, or similar products. It should be noted that an analogue is not always a low quality part; sometimes they are much better than factory ones. The original ones have the following catalog numbers:
- “VAZINTERSERVICE” (OAT) – 11180-3414057-00. This is the end of the left tie rod, the cost is over 450 rubles.
- "VAZINTERSERVICE" (OAT) – 11180-3414056-00. This is the end of the right tie rod, the cost is over 450 rubles.
Factory items are almost always of good quality, so you can purchase them with confidence.
How to adjust the spring and tune the amplifier?
Rail
The spring requires adjustment due to its natural tendency to stretch over time. The tightening should be done after disconnecting the steering unit shaft. The action does not imply the need to remove the entire mechanism from the car.
Repairing the steering rack involves correctly setting the amount of gap observed between the shaft gear and the rack itself.
- To do this, the rack assembly will need to be set to the central position and secured against spontaneous displacement.
- Remove the rubber plug.
- Place the indicator probe inside the opened hole and make sure it comes into contact with the stop (close).
- We rotate the gear shaft, with the help of which the stop is pushed out. We measure the length of its movement with an indicator, which should be within 0.05 mm.
If we observe an excess of the measured value beyond the designated limit, we resort to eliminating it by rotating the adjusting nut. After completing the procedure, we check whether the electric power steering rack rotates easily in the crankcase by rotating the steering wheel all the way in both directions.
Note that the adjusting nut should be rotated with a special wrench. Do not try to tighten this nut with great force, as this may cause difficulty in turning the steering wheel, especially in extreme positions. It is advisable to make adjustments in stages. First, turn the key 20-25 degrees and check the assembly for absence of knocking during the rack movement. If the knocking does not disappear, then we add the angle of rotation by about 10-15 degrees and again resort to control. It happens that a lift does not lead to the expected result. This hints at repairs, and perhaps only the steering rack will need to be replaced.
Installation of the Kalina steering mechanism
Before installation, check that the rail is installed in the middle position. To do this, using sliding pliers, use the flat on the gear shaft to rotate the shaft in any direction until it stops, then turn the shaft in the opposite direction two full turns and turn the shaft so that the flat on the shaft is located vertically on the right side along the direction of the car. Otherwise, the installation of the rack is carried out in the reverse order.
Thus, it will take at least 1 hour to replace the steering rack on Kalina. If it is not possible to repair it, then you will have to buy a new one. The steering rack of the Lada Kalina is the same as the rack of the Priora or VAZ 2110-2112 of the new model and has a catalog number: 11183-3400010 (rasp inside 21100-3401068). Price approximately 3500 rub. For Kalina Sport:
- 11183-3400010-10 inside rasp 11183-3401068-00 (3.1 turns)
- 11183-3400010-12 inside rasp 11183-3401068-01
- 11183-3400010-01 without EUR inside rasp 21100-3401068-00 (4.1 turns)
- 11183-3400010-10 with EUR inside rasp 11183-3401223-00
Steering rack Kalina 2: 11183-3401068
By the way, do you know how to adjust the steering rack?