Unfortunately, the quality of individual elements of domestic VAZ cars of the ninth family leaves much to be desired, which is why breakdowns and failures often occur. This can be tolerated if preventive maintenance is carried out, however, there is a special category of components and assemblies that require the closest attention from the driver.
There are many pitfalls hidden behind the appearance
Location of the main components of the car
The power unit is located in the engine compartment under the hood; it occupies most of the engine compartment.
The power unit is the engine along with the clutch, gearbox (clutch and gearbox are elements of the transmission) and the starter and generator installed on the engine. The engine includes systems that enable it to operate. These include lubrication, cooling, power and exhaust systems. The operation of the injection engine is controlled by the ECM (electronic engine management system). In addition, the car has an engine starting system (starter, electrical circuits and switching devices) and a power supply system (generator and battery). The last two systems belong to the group of electrical equipment elements.
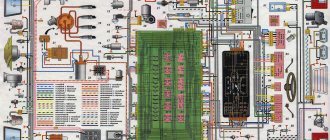
Engine compartment of a VAZ-2109 car with a carburetor engine
1 – windshield washer reservoir and tailgate glass; 2 – upper support of the rack; 3 – air filter housing; 4 – brake system hydraulic reservoir; 5 – expansion tank of the cooling system; 6 – battery; 7 – gearbox (not visible); 8 – engine.
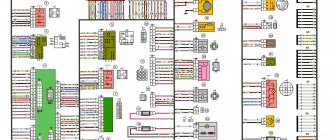
Engine compartment of a VAZ-21099 car with an injection engine
1 – windshield washer reservoir; 2 – upper support of the rack; 3 – receiver; 4 – brake system hydraulic reservoir; 5 – expansion tank of the cooling system; 6 – battery; 7 – air filter housing; 8 – gearbox; 9 – engine.
Nuances of underhood wiring
There are quite a few hazards associated with wiring under the hood of a car that can affect its proper operation.
This place combines the most important systems and devices that have high physical and chemical properties:
- An internal combustion engine is a source of excess heat that “well” heats closely located components.
- Fuel system - explosive vapors of a mixture of air and gasoline.
- Power parts in the form of relays, electric motors, headlight ignition units and self-installed fog lights.
Accordingly, if the condition of the wiring is in poor condition or is deteriorating gradually, it is best to replace it. Otherwise there may be problems.
Bottom view
The front of the car.
The levers, braces and anti-roll bar of the front suspension are clearly visible (like the front wheels, they belong to the group of chassis elements).
1 – front wheel suspension arm (chassis); 2 – lever extension (chassis); 3 – engine (sump pan with oil drain plug); 4 – gearbox; 5 – front wheel drive shaft (front wheel drives belong to the transmission); 6 – anti-roll bar (chassis); 7 – exhaust system (exhaust system).
The back of the car's underbody.
The beam is clearly visible, the shock absorbers and springs of the rear suspension are partially visible.
The main muffler of the exhaust system is located next to the wheel. At the rear of the car, behind the rear suspension beam, you can see a niche in the bottom of the trunk, which houses the spare wheel. 1 – shock absorber; 2 – rear suspension beam (chassis); 3 – fuel filter of the power supply system (only a car with an injection engine); 4 – main muffler of the exhaust gas system; 5 – niche in the bottom of the trunk for a spare wheel.
The bottom of the car under the driver and front passenger seats.
Under the bottom, parallel to the additional muffler pipe, there is a transmission control drive rod.
1 – additional exhaust system muffler; 2 – pipelines for hydraulic drive of the brake system and engine power supply system; 3 – drive rod for controlling the gearbox (transmission).
The bottom of the car under the seats of the rear passengers.
The fuel tank is located under the bottom, in front of the rear suspension beam.
Near the fuel tank, there is a pressure regulator that adjusts the brake fluid pressure in the brake mechanisms of the rear wheels. The pressure regulator belongs to the brake system. 1 – additional exhaust system muffler; 2 – fluid pressure regulator in the brake mechanisms of the rear wheels; 3 – fuel tank.
The G8 made a huge impression on Soviet car enthusiasts. Many were amazed by the excellent handling and dynamics of this car, but it also had its drawbacks. The main one is low practicality due to the three-door body. The concern decided to correct this and gradually expanded the body range of the model.
Let's get started:
- First you need to drain the coolant into a special separate container. Any liquid remaining in the radiator should be removed using a hose and funnel. Carefully remove the air ducts and, be sure to pay attention to possible misalignment of the holes that are located in the panel with the stove nozzles. If the misalignment exceeds 50%, you need to cut the interior heater.
- Next, having previously marked the connectors of the switches and light bulbs, remove the instrument panel. We disconnect the steering wheel, steering column trim and steering column switches. Next, we dismantle the heater: unscrew the 4 M10 nuts, disconnect the wire connector and all connectors on the heater body.
- Disconnect the radiator hoses and remove the heater valve cable latch. Next, carefully remove the heater, after unscrewing the two fan screws. Remove the radiator by unscrewing the three bolts. Be careful - there may still be coolant left here.
- Then make turbulators. These are special plastic spirals that increase the heat transfer of the radiator. “According to the rules,” they should be installed at the factory, but most often they are not. To make them yourself, you need to cut aluminum or copper plates, the width of which is 6 mm and the thickness is 1.5 mm. One side of such a plate should be clamped in a drill, and, at the same time, the other, using a vice, should be twisted into a spiral.
- Carefully inspect the bottom of the heater. Make sure there are no deformations, displacements, breaks or other defects. Then disassemble the stove by separating the body into two halves. To do this, use a screwdriver to open the latches and then unscrew the screw under the central nozzle. Remove the damper control levers.
- Carefully inspect the inside surface of the stove. If the foam has come loose, carefully glue it back, you can add strips of bitoplast. The housing should be made as airtight as possible. Adjust the center shutter.
- Before you begin assembling the heater, be sure to lubricate the places where the dampers are attached with a special grease. At the same time, when connecting the halves of the case, apply silicone or acrylic sealant to the connector. The heater should be assembled in the reverse order of disassembly. If there is deformation on the bottom wall, fill the gap with sealant.
- There should be no gaps between the stove body and the radiator. In the places where the housing is connected to the radiator, bitoplast should be glued. Next, you need to balance the fan impeller by winding wire around the blades. The wires must be routed through a special rubber plug located in the heater housing.
- Be sure to adjust the travel of the dampers. You need to be guided by the fact that the levers should always be clearly fixed in their extreme positions. Adjustment must be carried out by selecting the positions of the braid. Next, adjust the stove tap. You should choose a position in which the tap will not close completely.
- It is necessary to lubricate the hoses and radiator tubes with sealant before installing them. New clamps should be used. When the assembly is completed, you have filled in the coolant and warmed up the engine, you should tighten the clamps again. Before installing the instrument panel, you need to glue foam and bitoplast to the inlet holes of the nozzles.
VAZ 2109
“Nine” became a logical continuation of 2108. Its history of existence begins in 1986. The car appeared before buyers in the form of a hatchback with five doors, which significantly increased its utilitarian capabilities.
Engineers slightly changed the dimensions and proportions of the 2109 body relative to the Eighth model. In particular, it is worth noting the new sidewalls and less massive front doors, which deprived the car of its swift appearance, but made it possible to make the rear doorways of normal sizes.
VAZ 21099
The idea of creating a sedan based on the 2108/2109 models haunted the creators from the very moment they were launched into series. The fact is that in the USSR, even in the 80s, a car was still a luxury and the buyer preferred modern Samaras to the time-tested “classics”, which had a more spacious trunk and a comfortable interior.
In this regard, VAZ management constantly received letters from Soviet car enthusiasts demanding the release of a new sedan. In Togliatti they listened to these requirements and in 1990 launched the Lada 21099 into mass production.
Search algorithm
You need to start with something simple - determine whether an electrical impulse is supplied to the spark plugs:
- Remove the tip from the first candle;
- We expose his contact;
- We bring it to the metal part (possibly to the cylinder block) at a distance of 4-5 mm;
- We run the starter for a couple of seconds;
- Let's see if there is a spark.
Advice: in this way we divide the troubleshooting. If a spark is supplied to the spark plugs, then it is unlikely that all 4 have failed. This means that the problem of failure should be sought in the power system.
If there is no spark, then we continue to search for a malfunction in the ignition system.
To do this, we carry out a spark test:
- We remove the central wire coming from the coil from the distributor cover (ignition distributor);
- We bring it again to the metal part of the engine;
- We turn on the starter and watch to see if an electric discharge passes through.
Advice: If there is no spark, then further troubleshooting should be carried out using diagnostic tools. Moreover, every owner who independently maintains the car should have such devices. Moreover, their price is low.
The simplest but effective devices have long been produced for motorists. With their help, you can diagnose a fairly large contingent of cars from the domestic automobile industry:
- A family of VAZ cars (models 2108, 2109, 2110) that have the same connectors for electronic switches;
- Cars of Ukrainian origin (Tavria and ZAZ);
- OKA cars, etc.
Of course, with their help it is impossible to determine whether the VAZ 2109 engine compartment wiring needs to be replaced, but they are able to detect a failed electronic unit or electrical circuit. Their functions include:
- Checking the functionality of the ignition coil;
- Checking the Hall sensor;
- Checking the operation of the ignition switch and contact group;
- Checking the ignition relay.
It is enough to connect the MD-1 device instead of the standard switch and turn on the ignition (without starting the engine). With the help of LED lamps built into the housing we will see:
- The ignition relay and lock are operational if the “P” LED lights up;
- The primary winding is in working condition if the “K” LED lights up;
- We turn on the starter for 1-2 seconds and monitor the LED “D” - if it starts blinking, then the Hall sensor is operational.
Design differences
What is the difference between 2109 and 21099?
Even though these two cars are very similar, there are still some differences between them.
So, 21099 had the following features:
- A different radiator grille configuration.
- Instrument panel with a tachometer (early versions).
- The rear overhang of the body has been increased by 20 centimeters.
Variations
VAZ 2109 and 21099 had modifications with identical technical characteristics.
Therefore, it is more logical to present only the power units with which these models were equipped:
- The engine is 1.3 liters with an output of 64 horsepower.
- The engine is 1.5 liters, producing 70 horsepower.
- Installation of 1.5 liters with fuel injection system. Develops 78 “horses”.
All engines were equipped with a five-speed manual transmission.
It is worth noting that later versions of Lada 21099 received a 1.6 liter engine that produced 81 horsepower. In addition, its power range lacked a 1.1-liter unit, which was equipped with both the Nine and Eight.
About the preferences of motorists
Owner reviews of these cars differ little from each other. The models are structurally similar and have the same disadvantages. The main ones are severe corrosion of the body, as well as an interior that rattles on uneven surfaces.
Many people do the tuning themselves. The improvements, for the most part, concern minor changes in the appearance and interior. An example of tuning can be easily found on the Internet - read the relevant articles or watch a video.
Trial
Nothing extra
These two cars look quite attractive. Their design is devoid of provocative solutions, but it is harmonious and thoughtful. “Nine” has a more rapid body profile, while 21099 is more sedate and respectable.
In terms of geometric cross-country ability, the 2109 has a slight advantage due to shorter body overhangs. But driving over potholes on the 21099 is more problematic due to the long stern.
Comfortable and cozy
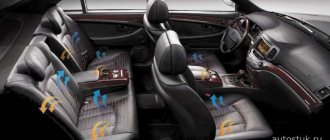
The interior of both Samaras is identical. It is worth mentioning in advance that the quality of finishing materials is far from ideal - hard, echoing plastic everywhere. Of course, plastic made it possible to reduce the weight of cars, but it deprived VAZ models of that touch of luxury for which the Zhiguli of the classic family is famous. At the same time, the ergonomics are good and you don’t have to be distracted from the road thanks to the compact layout of the controls.
Elastic front seats provide good body support. However, a tall driver will complain about the lack of adjustment of his seat in the longitudinal plane. Only two passengers are comfortable on the back seat, provided their height is less than 175 centimeters.
As for the luggage compartment, there are differences between 2109 and 21099. The “Nine” has a trunk volume of 270 liters, while its more practical companion platform has this figure already equal to 400 liters.
Familiar habits.
The most popular engine for both cars is a 1.5-liter unit that produces 70 horsepower. This unit has good pickup in the mid-speed zone, and the sensitive accelerator pedal enhances the sensation of acceleration.
A manual transmission with a closely spaced gear row makes it possible to realize the engine's potential well in the first three gears, but the clarity of the shifts and selectivity of the gears are mediocre.
VAZ 21099 relative to 2109 is a little more stable at high speed. However, in corners the Nine feels more solid and has better cornering stability. The steering is informative, but the long steering rack deprives the steering wheel of sensitivity in the zero zone.
The long-travel suspension confidently handles unevenness without breaking through when the cabin is fully loaded. Although, it is a bit harsh, so it cannot provide a very smooth ride even on small bumps.
Russia Cars
Rice.
1–2. Engine compartment of VAZ-2109 (top view): 1 – engine 2 – washer reservoir 3 – air filter 4 – fuel pump 5 – vacuum booster
6 – brake master cylinder 7 – relay and fuse block 8 – expansion tank 9 – battery 10 – ignition distributor
Rice. 1–3. Engine compartment of VAZ-2109 (bottom view):
1 – engine 2 – starter 3 – gearbox 4 – muffler exhaust pipe 5 – stabilizer 6 – front suspension arm 7 – front wheel drive 8 – engine oil sump 9 – brace
Cylinder head and valve mechanism (device features) The main dimensions of valves, guide bushings and valve seats are given in Fig. 2-44. Rice. 2-44. Main dimensions of valves, guides and valve seats. The cylinder head is cast from aluminum.
Checking the rear axle beam Carefully check the technical condition of the beam, especially when repairing a car that has suffered an accident. A deformed beam can cause rear axle noise and accelerated tire wear. De.
Weak spots
What weak points does the body of the domestic nine have? Let's try to find out.
If rotten or deformed elements of the car body are detected, they must be removed and appropriate measures taken to restore the integrity of these areas.
The most vulnerable areas of the VAZ 2109 body include:
- Front floor, reinforced sills, doors, fenders and rear underbody;
- The hood has relative endurance, but over time it begins to lose its former properties. The area above the battery is especially affected. This is where Nine owners most often notice the formation of rust;
- A noticeable problem that many drivers face is the fuel tank floor;
- Optics reflectors and a muffler also cannot boast of a long life without the appearance of signs of rust.
Corrosion is obvious
Corrosion is the main enemy of almost all domestic cars. Although anti-corrosion coatings are done quite well, time, weather conditions and the characteristics of our roads kill everything, rust actively begins to eat the metal and this problem must be dealt with.
Dealing with problems in general terms
To get rid of the problem of rust formation on the body, you need to do some work. On your own or with the help of specialists, decide for yourself.
- Disassemble the engine compartment, drain the coolant and remove the radiator.
- Remove all doors.
- If there is an amplifier (TV) in front, then it will also have to be disassembled.
- Using a grinder, all damaged areas are cut off;
- If the wings or panels are rusty, they will have to be cut off.
- If holes or holes have formed due to corrosion, they can be welded or patches can be used.
- It is recommended to additionally cover areas that are not highly resistant to corrosion with metal inserts.
- Experts advise strengthening mudguards with additional inserts and then securing them with spot welding.
- New body parts that are installed in place of rusted ones must be adjusted in accordance with the standards.
- After processing, the wings and sills are secured with screws, bolts and welding.
- Restoring the geometry of the body is a mandatory activity, on which most of the time is spent. To do this, you will need a bench machine on which the machine is fixed and adjusted in accordance with the norms of the control points.
- The next stage is welding a new floor, if required as a result of assessing the condition of the body. When restoring the floor, patches, connectors and amplifiers are used. At the final stage, the floor is covered with anti-corrosion compounds.
- It is easier to purchase new arches than to try to restore old ones. They can be coated with resin and waste oil mixed together. This mixture is excellent at resisting rust. Just do not use this composition to treat the bottom under any circumstances.
During body repairs, it is often necessary to jack up the car. If the jacking areas are rusty, use a support beam to lift the car.
Holes, rust
Often, the body is repaired independently if small areas are damaged, dents or holes are formed due to the effects of rust. In addition to correcting the geometry, painting and polishing are performed.
More serious deformations and damage caused by collisions and road accidents necessarily require contacting specialized workshops. Here, focusing on control points and using professional equipment, you can restore the body as correctly as possible without disturbing its geometry, maintaining rigidity and other factory parameters. Sometimes they can even be improved.
VAZ 2109 body diagram: data on geometry and control points
The VAZ 2109 body diagram will be of interest to the owners of this legendary car. A good knowledge of the circuit will allow you to carry out independent repairs and even completely restore the metal frame of the “nine”. The geometric dimensions of the body on the VAZ 2109 are very important, since they become the main criterion for assessing the condition and degree of damage to the frame.
What causes damage to the body of the “nine”
ATTENTION! A completely simple way to reduce fuel consumption has been found! Don't believe me? An auto mechanic with 15 years of experience also didn’t believe it until he tried it. And now he saves 35,000 rubles a year on gasoline! Read more"
There is an opinion that Soviet cars are equipped with an “indestructible” body. It is impossible to say this one hundred percent, but it is also wrong to refute such a statement. Indeed, the body of the VAZ 2109, the diagram of which is presented in the article, is made to perfection, but over time, any quality will come to an end.
VAZ 2109 body geometry
Almost all car bodies older than 5-7 years need repair. And there is nothing surprising about this. The living conditions of recent years, the huge amount of harmful substances, the general deterioration of the environment - all this cannot have a positive effect. Difficult, almost extreme, modern operating conditions also cause a lot of harm.
Vehicle handling
So, with the first two categories everything is very clear:
- Every owner understands what a loss of car control can result in.
- All identified breakdowns are immediately eliminated by repair or complete replacement of parts.
However, the wiring is not so simple. For some reason, everyone is accustomed to thinking that underhood wiring does not pose any danger. But this is a very big misconception.
The short circuit and ignition of live wires threatens that the car may simply burn out, explode, etc. And all this can happen both while parked and while driving.
Underhood wiring includes the following categories:
- Ignition system wires.
- Lighting systems, side lights.
- Connection system for sensors and control unit.
- Wires that are responsible for the operation of the electric motor of the radiator, washer, windows, and wiper.
If the wiring is in good condition, all current-carrying parts are insulated and qualitatively fixed in the engine compartment, taking into account all the necessary physical and temperature indicators of the internal combustion engine.
However, during vehicle operation, fastenings may deteriorate, which will entail:
- Loose contact.
- Destruction of insulation upon contact with hot surfaces of the engine and commutator.
- Formation of abrasions and exposure of wire cores.
- Oxidation of contact connections due to which the “mass” may disappear.
Most owners of the VAZ-2109, as well as other modifications of the domestic automobile industry, independently repair damage in which electrical tape is a direct participant. However, this is only a temporary solution and is not suitable for permanent operation of the machine. If there are problems with the wiring, the best way out of the situation is to completely replace it. According to the instructions, the harnesses must be laid in a corrugation, which is not the case on most machines.