VAZ cars, which are classic models, are distinguished by pleasant reliability. This also applies to the steering mechanism.
It is quite complex, but its design allows you to maneuver and ensure reliable vehicle control even in the most difficult road conditions.
The modernization process led to the installation of a composite shaft and a safety column. Due to the size of the steering wheel, the driver makes the necessary maneuvers without any problems. From lock to lock, it takes 3.5 turns to turn the steering wheel completely. The force from the steering column is transmitted to the drive via a composite shaft.
The current steering mechanism on the VAZ 2107, a product of the Volga Automobile Company, is quite informative and does not allow the driver to get tired during long trips. There are certain difficulties when turning in a parking lot, but as soon as the car begins to move, the resistance weakens and turning the steering wheel becomes easier.
There is one more nuance - when the steering mechanism is working properly, there is a slight play. But its limit value complies with the traffic rules. This is due to the fact that there are steering rods on the VAZ 2107 and an impressive number of elements in the gearbox.
In general, the steering of the 7 can be considered reliable.
Mechanism design
To repair the steering column on a VAZ 2107, you first need to understand its structure, as well as the principle of operation.
The seven is in many ways similar to the “penny”. Therefore, the device and design received minor changes. The structure includes:
- A mechanism that transmits the driver’s force to the executive components;
- A steering drive that turns at an angle specified by the driver.
In turn, the steering mechanism consists of:
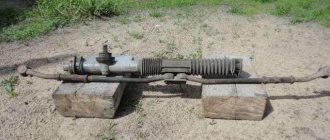
- Composite shaft with cardan transmission;
- Steering wheel (steering column together with a steering wheel with a diameter of 520 mm);
- Worm gearbox of the VAZ 2107 steering mechanism.
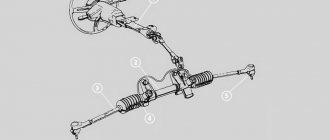
The control system has the following components:
- Bipod;
- Pendulum arm;
- Swivel arms;
- Steering rods for VAZ 2107 (one middle, two side).
The outer rods include two parts, which allows you to change their size by adjusting the toe angle.
Tie rod/end set for VAZ 2107
The operating principle of the steering mechanism looks like this:
- The driver begins to rotate the steering wheel, the wheel size of which ensures that this task can be performed quite simply;
- By means of a composite shaft, a worm gear is activated, which reduces the speed;
- The steering mechanism is lubricated with special oil (TAD 17) poured into the gearbox;
- The worm gears rotate, which causes the double ridge roller to move;
- This, in turn, causes the secondary shaft to rotate;
- The tray mounted on the secondary shaft makes a turn and pulls the rod system behind it;
- These components influence the levers that synchronously rotate the wheels to the required angle specified by the driver.
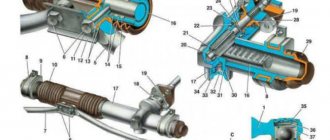
Steering gear housing parts
1 - crankcase; 2 - bipod; 3 — lower crankcase cover; 4 — adjusting shims; 5 — outer ring of the worm shaft bearing; 6 — separator with balls; 7 — bipod shaft; 8 - adjusting screw; 9 — adjusting plate; 10 — lock washer; 11 - worm shaft; 12 — upper crankcase cover; 13 - sealing gasket; 14 — bipod shaft sleeve; 15 — worm shaft seal; 16 — bipod shaft seal.
Details
1 — steering gear housing; 2 - shaft seal; 3 - intermediate shaft; 4 - upper shaft; 5 — fixing plate of the front part of the bracket; 6 — bracket for fastening the steering shaft; 7 - upper part of the facing casing; 8 — bearing sleeve; 9 — bearing; 10 — steering wheel; 11 — lower part of the facing casing; 12 — bracket fastening parts
Repair and maintenance
Over the years of operation it has been proven that the steering on VAZ 2107 vehicles has impressive reliability. However, this does not take away the fact that the machine requires periodic inspection and repair.
- When performing maintenance, it is important to check for increased play as well as increased wear on the ball joints. To do this, you need to turn the steering wheel from one side to the other. If the wheels do not respond when the steering wheel is turned 5 degrees from its original position, this indicates severe wear. Here you will need to repair the steering column on a VAZ 2107.
- To avoid the need for urgent and rather expensive repairs of the steering gear on a VAZ 2107, it is necessary to change the oil in the worm gear housing. This is done at intervals of 60 thousand kilometers. Leaks may occur through the seals, so they are carefully checked 2-3 times a year. This is one of the weak points of the system.
- The swing arm should be inspected by slowly rotating the steering wheel from side to side. If the parts move in a vertical plane, then surgical intervention is required.
Price issue
The cost of new slats depends on the manufacturer, region, and even the specific store where you are going to purchase them.
Replacement kit
If you don’t want to change it yourself, then get ready to pay about 1.5-2 thousand rubles for the services of specialists from service stations. Today this is the average price of such repairs. Again, it all depends on the level of the car service, and sometimes on its arrogance.
Typical breakdowns
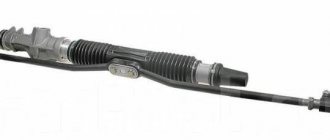
Torn steering rack boot
There are several most common reasons why a unit may need to be replaced:
- The rail has exhausted its service life;
- The vehicle is regularly driven on uneven roads;
- Having turned the steering wheel to its extreme position, sharp accelerations are often made;
- The presence of mechanical damage due to collisions with potholes, accidents, etc.
Drivers should pay attention to the behavior of their car, which itself may indicate that the steering is out of order. This may manifest itself as follows:
- The rack knocks when turning the steering wheel;
- The steering wheel jams and turns to the sides with some difficulty;
- There is knocking and vibration during travel;
- The play at the steering wheel has increased;
- The wheel alignment is disrupted. This can be determined by uneven wear of the rubber.
Principle of operation
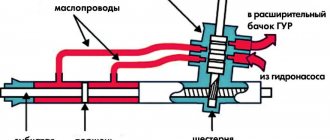
The basic diagram of a power steering rack is shown in the figure:
During operation of the internal combustion engine, the drive of the power steering oil pump, kinematically connected to the crankshaft, rotates. When the steering wheel is in the center position, oil is recirculated through the hydraulic system effortlessly through the check valve. The torsion bar, which acts as a follower mechanism, responds to steering wheel rotation. It actuates the distributor spool. It communicates with the main discharge channel with the right or left cavities of the power cylinders. The latter help turn the car's wheels.
In the extreme positions of the steering wheel, safety valves prevent excessive pressure in the system by allowing oil to flow into the recirculation channel.
Electric power steering is equipped with an electric valve controlled by an electronic control unit (ECU). The power steering ECU, guided by the readings of the steering wheel angle, vehicle speed, and crankshaft sensors, regulates valve closure. Thus, depending on the speed of the car and other indicators, the degree of power steering gain is adjusted, the information content of the steering wheel is controlled
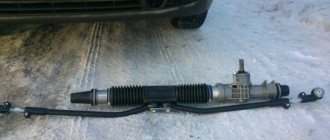
Replacement procedure
Replacing steering wheels will require not only your hands, but also a couple more to help. So, agree in advance with a friend that he will help you solve the problem of faulty steering.
In addition to a helper and new slats, you will also need a set of tools and materials. Be sure to include in this list:
- Set of wrenches;
- Jack;
- 17mm hex wrench;
- Balloon wrench;
- Bricks or similar materials (to support the front of the car without wheels);
- Puller for steering rods (not necessarily needed, you can do without it);
- Dry rags;
- Litol type lubricant;
- The almighty WD40.
Now you can proceed directly to replacing the steering racks. We strongly recommend that you follow the established procedure for conducting operations.
- Place the car on a level surface. No, a simple floor in your garage is enough, it is not necessary to level it with cement.
- Apply the parking brake to keep the car from moving.
- Raise the car on a jack, place logs or bricks under the front, and then remove the wheels.
- Remove the negative cable from your battery for safety reasons. Nobody needs electric shocks today.
- On the driver's side inside the passenger compartment, near the pedal block, unscrew the locking fastening bolt of the cardan of your steering shaft.
- Remove the adsorber directly from the engine compartment. You can put it aside for now.
- Remove the cotter pins, which will allow you to then remove the mounting nuts from the tie rod ends.
- Using a rod puller, the ends are removed from the racks. If for some reason the puller is missing, it can be replaced by gentle, successive blows to the tips. Don't damage their threads just by doing this. They usually lend themselves, so many people do without pullers.
- Treat the rack clamp fixing nuts with an anti-rust agent. Now we are talking about the almighty WD40. Wait a while for the composition to be absorbed.
- Using a wrench, unscrew the fastening nuts. Processing with a Vedash should greatly simplify this task for you. There are four nuts in total.
- Remove the rack by pushing it through the passenger side, that is, the right side of your VAZ 2114.
- We recommend replacing the boot at the same time as replacing the racks. Over time and during the period of operation, the steering boots seriously wear out, so it is hardly worth trusting old boots to work with new racks.
- The tips are removed from the slats. At the same time, try to count the number of turns with which the nuts were tightened. This will allow you to fasten them back as close to precision as possible at the reassembly stage and, with peace of mind, go to the service station, where they will adjust the wheel alignment.
- Take your new rail, remove the plugs from it.
- Next, take Litol or a similar lubricating liquid into your hands and fill the body with this composition as much as possible.
- The ends are mounted back onto the rods. Try not to mix up the places of the nodes, although they are different from each other. However, as practice shows, this does not prevent many do-it-yourself repairmen from confusing them.
- The new rail is placed in its rightful place. To do this, the nuts are attached to the studs of the clamps.
- Now you will need your friend, comrade, assistant. Ask him to help guide the shaft drive gear to the seat located directly on the rack housing. The splines must line up exactly. Be sure to check this moment.
- A locking bolt is fixed on the cardan.
- You can safely perform all other work in the reverse order of the dismantling described above. In this case, each thread must be treated with Litol. This event will allow you to more easily deal with disassembling the elements during subsequent repairs. Or it will be a pleasant surprise for the new owner of your VAZ 2114.
We repair it ourselves (VAZ classic)
We replace the DS and KS on a rear-wheel drive VAZ as follows:
- place the car on a car lift or pit;
- turn off the engine, put the car in neutral gear;
- remove the gearbox lever mounting cover (unscrew the screws);
- we dismantle only the upper part of the gearbox lever; there is no need to remove it completely (we disconnect it at the place marked by the arrow in the figure);
- unscrew the propeller shaft bolts, dismantle the shaft itself (make marks on the cardan and rear axle gearbox - this is necessary in order to secure the shaft according to the same marks during installation to avoid unnecessary vibrations);
- disconnect the speedometer cable from the gearbox, as well as the control center;
- unscrew all the gearbox fasteners (including the traverse), remove the gearbox;
- unscrew the six bolts securing the basket, remove the parts;
- We put new parts in place and put everything back together.
When installing new spare parts, the disk must be centered, otherwise the manual transmission will not fit into place. A factory mandrel or an old “primary” from a “classic” gearbox is used as a center.
Introduction
The VAZ-2107, to which thousands of compatriots are accustomed, is inferior in several respects to its foreign counterparts, which is why motorists who want to improve the characteristics of their own car do their own tuning of the VAZ-2107 steering. A thoughtful and correct tuning solution can be considered the installation of a hydraulic booster or electric power steering. Thanks to competent modernization, a unit will appear in the car, through which additional force is created on the wheels when entering a turn. The improvements made will bring domestic cars closer to the class of more expensive foreign cars.
Steering tuning
Tuning the VAZ-2107 steering can begin with a well-founded decision to replace the factory steering wheel with a sportier device with a diameter of 320 mm. Such a unit will give the car owner many advantages: firstly, he will be able to park with greater maneuverability. When upgrading the steering wheel, do not forget about installing a safety glass.
Those motorists who prefer sports tuning (low-number rack) should be prepared to pay twice as much money for the unit than for a simple standard device. However, after installation, the car will be able to turn the wheels in just two steering turns.
The third step to improve the car could be adjusting the camber and toe. Experts who have been working with different VAZ models for many years increase toe-in and negative camber on the front axle. At the same time, it is imperative to pay attention to the toe-in of the rear wheelbase, which should, on the contrary, decrease.
Installing power steering
If a motorist wants to install power steering on a VAZ-2107 with his own hands, which the manufacturer did not consider necessary to install in one of the most budget cars in the whole world, he can take one of two possible paths. Firstly, you can select the optimal steering rack that has power steering and then decide on its further location in the car. True, such an action will require enormous labor and money. Secondly, which is more expedient, you can buy a ready-made kit at an auto parts store that allows you to perform all possible most useful manipulations on the stationary steering rack.
The purchased power steering for a VAZ-2107 will consist of many parts: a pump, a pulley, a steering gear, a hydraulic cylinder, an expansion tank and a hose system.
To install power steering on a VAZ-2107, you need to start with a pump, through which pumping is carried out and a certain pressure is created in the unit. This pump must be placed on the cylinder block, since it will operate due to a belt drive. The next step is to determine where to install the crankshaft pulley. Then the steering gear is replaced. The car owner should check the size of the purchased device in advance, since it will most likely differ from the factory analogue, which may require modification of the installation location of the device.
When installing power steering in your car, you should pay close attention to the hydraulic cylinder, which should be located in the car according to the instructions. Further modernization consists of the location of the expansion tank and the sequential connection of a set of parts with high-pressure hoses. The installed reservoir must be equipped with a special fluid intended directly for the power steering. As a result of the manipulation, it is worth pumping the system.
VAZ 2106 fuse diagram
The VAZ 2106 fuse diagram is one of the simplest. It presents two lines with automotive fuses. This structure is attached with two nuts to the machine body. If you need to remove the fuse line, you will have to disconnect the battery. The disadvantages of such a fuse circuit (block) are its inconvenient covers.
The main disadvantage is that due to the unbending legs, contact sometimes disappears. And in some cases, as a result of poor contact, the fuse heats up and, as a result, the plastic ruler melts. This drawback can easily be corrected by replacing the block with fork-shaped fuses. It will take 10 minutes, but in the future, thanks to this “do-it-yourself VAZ 2106 tuning”, you will get rid of various hassles associated with electricity.
Additionally: the car on the move requires investment, replacing the steering rack, the grenade crunches on the right! replaced the salenblocks on the levers, the left drive is completely assembled with grenades, there is a broken drive from it, you can remove the left outer grenade casting R14 with rubber, the problem is one bolt cannot be repaired, there is also a set of stampings, the tires are small there, the radio has an amplifier, the subwoofer needs to be glued! bargain
City: Rubtsovsk, Altai region
Sources
- https://wertes.pp.ua/2017/09/07/zamena-rulevoj-rejki-na-vaz-2110-2/
- https://novayarossiy.ru/remont-rulevoy-reyki-lada-kalina-video/
- https://rubtsovsk.drom.ru/honda/civic/22933663.html
Installing electric power steering
If a car owner wants to install an electric booster on a VAZ-2107, he should give preference to factory units. Before setting up and upgrading the system, the transmission speed sensor should be adjusted. This will avoid turning the steering wheel too “tight”.
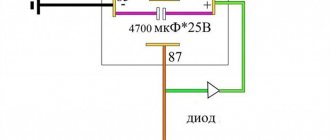
Among other additions, when installing an ESD in your car, the vehicle owner will have to install a new choke cable (you can purchase it as part of the ESD kit for the VAZ-2108), replace the gearbox and install a MUR1100E diode.
Electric power steering on a VAZ-2107, when purchasing a ready-made kit, requires the presence of a speed sensor, various fasteners, a choke cable, an ignition switch, several switches and a casing for the steering column.
When assembling an electric power steering for a VAZ-2107 with your own hands, you need to start with the adapter plate and cardan. After removing the crosspiece, you need to select a cardan of the appropriate length. The welded and assembled crosspiece, or rather its bearings, are equipped with new lubricant. After this, the steering device is installed and the electrical component of the power steering is connected. The red wire should go to the battery, and the brown wire should go to its mounting stud. The blue cable for the ignition switch should go to the orange one. The tachometer wires should go to the dashboard chip, and the connecting elements between the speed sensors should go to the ninth pin of the ECU.
History of the VAZ 2106 car
The VAZ 2106 diagram gives motorists a detailed idea of the location of the main components of the vehicle. This model is a small-class car (the version that was exported is Lada 2106) with a four-door body.
It is equipped with an engine with a displacement of 1.57 liters and a power of 75.5 hp. The motor is located in the front part, along the longitudinal axis. The history of the VAZ 2106 brand began in 1976. It was a modernized model 2103.
In the summer of 1998, production of cars and their modifications was stopped at AvtoVAZ OJSC, but, at the same time, began at RosLada in the city of Syzran. Since July 2001, this model began to be produced from vehicle kits at DOJSC Izhmash-Avto.