The on-board network and related electronic components and assemblies in VAZ cars have never been famous for their great reliability and workmanship. Quite often, electrical problems in cars arise due to a faulty alternator.
There are often situations when constant mechanical loads directly affect the mounting of the generator, which subsequently affects the operation of the unit and the condition of the on-board network of the machine. Other malfunctions associated with the generator usually arise due to premature wear of its elements (brushes, diode bridge, etc.), contamination, or due to improper installation and adjustment. In this article we will look in detail at the nuances that arise when installing electric generators on AvtoVAZ family cars and when setting them up.
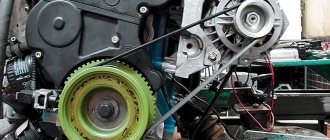
Replacement and repair of generator on VAZ 2114 (2115)
Location: engine compartment, to the left of the power unit, at the end.
Preparatory stage:
- a set of keys, heads, cranks;
- a torque wrench to check the tension of the drive belt;
- mounting spatula to remove the belt;
- flat head screwdriver
Step-by-step replacement instructions:
- We fix the vehicle on a level platform.
- Squeeze the parking brake.
- Turn off the ignition.
- Open the hood.
- Disconnect the terminals from the battery.
- Unscrew the fastening of the “+” and “-” terminals from the generator set.
- We turn out the coupling bolt of the support bracket.
- We lower the unit down and remove the drive belt from the groove.
- We unscrew the studs and turn out the coupling bolt.
- To change the GU, we remove it from its regular place.
Do-it-yourself dismantling of the control unit on the VAZ 2114 (VAZ 2115) is completed. We carry out comprehensive preventative maintenance of the equipment, clean the housing and elements from dirt and dust, blow through the windings with a stream of compressed air, and dry the contacts.
We replace worn parts and components with new ones as necessary, if defects are detected. The generator must be completely replaced if cracks are detected in its housing.
We measure the resistance of the excitation winding with a multimeter and check the diode bridge for operability. We also inspect the fuse for integrity and replace it with a new one if damage is detected.
DIY generator installation:
- We fix the GU on the support brackets, put on a pin and a spring washer.
- Place the belt in the groove.
- We screw in the fastening bolts.
- We move the GU body up, tighten the mounting bolts of the bar.
- We tighten the generator fasteners with a torque wrench with a force of 28.0 Nm.
- We check the belt deflection; the range should not exceed 12 mm. tighten as needed.
- We clamp the power cables on the installation.
- We put on the battery terminals.
To reduce the frequency of replacing power units, some car owners install generators from Priora (injector, 8 valves). The equipment is more powerful in terms of technical characteristics, which means it ensures stability in the generation and supply of current to the motor.
A new generator set is 500 - 750 rubles more expensive than a standard one. The holes for fasteners completely coincide with the factory ones on the VAZ 2114 (VAZ 2115).
Recommendations for care and maintenance of PG on VAZ 2114
- strictly adhere to the technical inspection deadlines;
- when purchasing consumables and spare parts, check the correspondence of catalog articles;
- give preference to original parts where the manufacturer guarantees quality;
- in the absence of experience, carry out prevention in certified workshops;
- when purchasing components, require the manager to provide documents for the products he sells;
- Always use the vehicle’s operating manual and consult with car service specialists.
Procedure for replacing the generator
If the electrical unit fails and repair is impractical, you must first find a replacement. It is recommended to buy a factory version that will fit the fasteners and terminals. Otherwise, the repair will be accompanied by changing the wires.
Replacement process for VAZ 2109-2115:
- Drive the car onto the overpass.
- Remove engine protection.
- Remove the (−) terminal from the battery.
- Move the protective cover away from the positive one, unscrew the fixing bolt and remove the terminal.
- Remove the wires (secured with a block).
- Remove the upper fastening element.
- Dismantle the device.
- Install a new unit so that the fasteners match.
- Secure with the lower and upper bolts.
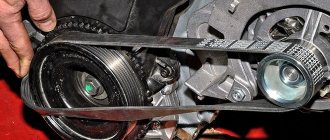
- Install the belt (preferably a new one).
- Place the terminal, secure it, and return the protective cover.
Attention! If you overtighten when adjusting the belt, the bearings will quickly fail. If the tension is weak, there will be no proper grip and the battery will not be able to charge.
To tighten, you need to turn the adjusting screw, which, when moving clockwise, is tightened, and when moved counterclockwise, it is loosened. It's easy to check - you need to gently press the belt so that it bends no more than 15 mm.
Reasons for changing brushes
In a car generator, most parts are constantly in motion, which causes friction and wear. The reasons for changing brushes may seem very varied, but this should be done during routine vehicle maintenance. On VAZ 2114 it is advisable to change them after 50 thousand kilometers traveled. But as a rule, few people remember about this event, and this breakdown comes as a big surprise to them. There are also markers that signal an imminent breakdown; we will arrange them in order of the most frequent possibility of occurrence:
- Inexplicable chaotic shutdown of various electrical equipment in the car.
- A noticeable decrease in the brightness of headlights and other lamps both inside the car and on the body.
- Battery that discharges too quickly and problems with voltage levels.
To check the functionality of the brushes, it is not even necessary to remove the entire generator from the car. To carry out diagnostics, it is enough to remove the negative terminal from the battery, remove the voltage regulator from it and visually evaluate how much the brushes protrude from their seat. If their size is less than five millimeters, then they must be urgently replaced with new ones, otherwise unforeseen consequences can be expected at any time.
Main problems
Signs by which you can understand that the VAZ 2115, 2113 or 2114 generator brushes need to be replaced are:
- the battery does not charge or runs out of power quickly;
- warning lights on the dashboard are flashing;
- voltage failures;
- on-board electronics turn off or there is not enough power for its operation;
- the headlights begin to flicker or their light has become dim.
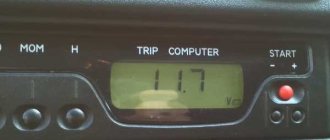
All these signs indicate brush wear. The following message appears on the instrument panel.
Where are the generator brushes located?
Changing generator brushes is not difficult. They are located in the rear half of the device and are held in place by a single bolt. The brush assembly itself is located next to the slip rings and is connected to the voltage regulator. The brushes are held in place by springs next to the rings. Knowing the circuit diagram of the generator, it is not difficult to find the brushes. To replace, you will need a standard set of tools:
- Several wrenches;
- A pair of screwdrivers;
- New brushes;
- Liquid WD-40 (in order not to strip the threads of the bolts).
The brushes can be replaced in two ways, by removing the generator or without removing it. The design of the car, or rather the location in the engine compartment, will tell you which method is best to use. If there is free space, it is not difficult to repair the generator brushes without removing the unit, and if the engine occupies the entire engine compartment, it is impossible to do without removing the generator.
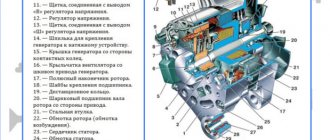
Electric generator device
The internal structure of a self-generator is very similar to a typical electric motor, but with certain differences. Moreover, differences in detail are present both external and internal. So, in the circuit of a self-oscillator there are such elements as:
- special voltage regulator;
- rectifier assembly (diode bridge).
In conventional electric motors, the above elements are rarely present, and their presence depends on the industry and the specific application of electric motors. But in autogenerators, the presence of such electronic components is simply necessary, since without them voltage surges can occur, as well as exceeding the maximum permissible voltage. Severely over or undervoltage in the on-board network negatively affects the condition of the on-board network, up to the fire of electrical appliances in the cabin (radio, subwoofer, alarm, etc.).
The self-generator is based on a rotor on which the primary winding with parts forming the poles is located. During operation, a magnetic field appears on the winding as a result of the supply of electrical voltage from the battery. The rotor is installed in the housing on special bearings, and a pulley for the belt and an impeller with blades for cooling are also attached to the rotor.
The second main element of the autogenerator is the stator; it is a round metal part (core) with special grooves through which the secondary winding (copper thread) is passed. The design also contains graphite brushes, which are responsible for transmitting voltage to the winding.
To regulate and output the resulting voltage, a diode bridge (converts alternating current to direct current) and a voltage regulator (does not allow overvoltage or undervoltage) are used. The external component of the autogenerator is a ventilated metal case, reinforced with stiffening ribs and having special fasteners for installation in the engine compartment.
Tips for replacing bearings on a VAZ 2110 generator
After identifying the malfunction, you can proceed directly to work. All that is required is to figure out how to change the bearing on a VAZ 2110 generator, where to start and in what sequence to carry out all the manipulations.
Let's consider the algorithm of actions in more detail:
1. Slightly loosen the fastening nut installed on the generator and the special adjusting bolt.
2. Reset the alternator belt and start the engine. This is done to make sure that the problem is really with the generator. If the noise has disappeared, then you can safely continue disassembly.
3. Go to the battery and remove the “minus” from it
This precaution is very important in terms of protection against accidental short circuits during work. Then you can unscrew all the wires that go to the generator.
4. Unscrew the crankcase protection bolts, if any, and remove it, unscrew the lower fasteners of the generator and the device itself. At the same time, remove the generator from the bottom of the engine compartment.
5. Block the generator rotor with a screwdriver or other device and unscrew the pulley.
6. Find the special latches, pull them to the sides and remove the housing.
7. Unscrew the generator brushes and the four bolts of the generator assembly halves.
8. Don’t forget that you still have to put the device back together, so to avoid confusion, immediately make marks on the two halves. After this, pry up the cover using a screwdriver and remove it.
9. As a rule, it is much more convenient to remove the rotor from the front cover bearing by screwing the nut into place on the threaded part of the rotor and hitting it with a bronze or copper hammer, or a regular one, but only through some kind of wooden block.
11. Select the necessary part that will fit the diameter of the bearing. In our case, you can take the head at “27”
Now gently tap the device and knock the bearing out of its place.
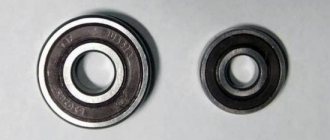
12. Remove new bearings and prepare them for installation. In particular, the first thing to do is fill them with the required amount of lubricant.
13. Install the new bearing using the old part; to do this, simply place the dismantled bearing on top. And lightly press the bearing into place.
14. You can remove the rear bearing using a puller, if available; if not, you will have to knock it down with a chisel (you can use a thin metal rod or a powerful screwdriver) and hit the device with a hammer, constantly moving it along the surface (you need to move in the opposite direction) . By the way, you can also dismantle the bearing using a powerful open-end wrench.
15. The next step is to drive the new device using the head mentioned above and the old bearing. In addition, to solve this problem you can use a special tubular wrench or a pipe with the required diameter.
16. Once all the bearings have been changed, you can proceed directly to assembling the unit.
17. Return everything to its place in the reverse order of dismantling. In this case, start working directly from the front cover of the device. After this, you can complete the assembly.
Replacing the bearings of a VAZ 2110 generator yourself is the best way to fix the problem and save on visiting expensive service stations.
In this case, the work will not cause any difficulties. The main thing is to be well prepared for work, namely, briefly familiarize yourself with the design of the generator, study the replacement instructions, buy original bearings and good lubricant, prepare the necessary tools and allocate only 40-60 minutes of your precious time.
If everything is done correctly, the extraneous noise will disappear, and the generator itself will continue to successfully perform the task assigned to it. Good luck on the roads and of course no breakdowns.
Replacement result
After replacement, errors may appear about a low battery charge or a malfunction of the generator; there is no need to immediately try to find the cause of the failure. This phenomenon is not uncommon, since new brushes have just begun to break in. After some time, everything will return to normal, and you can safely continue using the car.
Since front-wheel drive cars of domestic production, such as VAZ 2110, 2115 and 2114, are almost identical in the set of electrical equipment, many repair and maintenance operations will be identical. For example, this can be attributed to repairing a generator, namely replacing brushes.
I think there is no need to explain that the wear of the generator brushes primarily determines the normal charging of the car battery. And if you do not replace them in time, then over time the battery will discharge and you will constantly need to charge it.
Below is the necessary list of tools that you will need to replace the generator brushes yourself:
- Open-end or socket wrench 13
- 8 socket socket with ratchet
- Flat blade screwdriver
Now below we will analyze this procedure in more detail, we will provide the necessary photographs to show the whole process more clearly.
So, the first step is to disconnect the battery terminal and remove the generator from the car, although some perform the replacement without removing the device.
Open the lid, which is a protective casing:
After this, immediately disconnect the brush power wires, as shown in the photo below:
Now all that remains is to unscrew the two bolts that secure the part we need:
And unscrew one nut with a 13mm wrench, which is located on the right:
That's practically all, now we just raise the voltage regulator and we can start replacing it. It is worth noting that before installing new brushes, carefully check the removed ones: if their length is less than 5 mm, then this indicates excessive wear and they should be replaced without hesitation.
The price of a new part for VAZ 2110, 2114, 2115 cars is no more than 150 rubles, so this repair will cost you mere pennies. Agree that this is better than a new generator!
The generator for a front-wheel drive VAZ is quite expensive, costs around 3,000 - 3,500 rubles, of course, compared to foreign cars, VAZ spare parts are much cheaper.
Replacing the battery charging relay
1. Disconnect the negative cable from the battery.
2. Turn off the minus generator
3. Unscrew the nut securing the “plus” of the generator and remove the plastic cover by bending the latches
4. Unscrew the two screws securing the voltage regulator (the generator has been removed for clarity) and remove it
The brushes must protrude from the voltage regulator by at least 5mm. My brushes protruded 1-1.2 cm.
Almost new, one might say. The brushes did not jam and were generally in good condition. Next, I cleaned the terminals of the battery itself and the “+” contacts or, as it is also called, the “B” output of the generator. I measured the voltage again - the picture was the same. The charge is bad. After weighing all the pros and cons, I decided not to disassemble the generator (if you decide to disassemble the generator here), but to replace the voltage regulator (despite the good condition of the brushes). This element in the generator is perhaps the cheapest. I bought it for 230 rubles. Having replaced the regulator and started the engine, I hastened to check the voltage. The long-awaited reading of 14.1V appeared on the multimeter. Having turned on the low beam, stove, speakers and heated glass, the device showed 13.6V. The battery began to charge again. Next, I removed the battery and charged it at home. Now, two weeks later, all battery readings are normal. I hope this article will be useful to someone.
Sources
- https://vaz-russia.ru/remont-vaz-2113/zamena-regulyatora-napryazheniya-generatora-na-vaz-2113-vaz-2114-vaz-2115.html
- https://nadomkrat.ru/elektrooborudovaniye/zamena-shhetok-generatora-na-vaz-2114
- https://xn—-8sbapc1bfiir0a.xn--p1ai/remont/elektrika/zamena-rele-zaryadki-akkumulyatora-vaz-2114-2110.html
Installation of the generator with subsequent adjustment
When installing a generator on a VAZ 2109 (no matter the injector or carburetor) and other models, be sure to check whether the purchased clamps, bolts and nuts fit the installation locations. Also, we must not forget that the mounting holes on old-style electric generators are different from new ones. Therefore, when installing a modern autogenerator on front-wheel drive models of the first generations (08, 09, 99), you should purchase the appropriate fasteners.
The generator mounting mount cannot be taken from Grants or Prioras. You can take a new potassium generator and no additional modifications will be required, but the mounting plates must be type 21082. In addition, you will need to purchase a pulley 2110 and a tensioner type 21082.
The installation process is identical to the removal process. If the standard strips are worn out, they are replaced with new ones; this will require unscrewing several bolts and installing new strips.
When installing the electric generator, start from the bottom fastening plate, tighten (but not completely) the fixing bolt (do not forget to put the bushing), put the belt on the pulley and move to the top. To fix the generator, install the top fastening, but do not screw it all the way. Then the tension bar is inserted. Then tighten the tension bolt, checking the belt tension.
The belt should not bend more than 1-1.5 cm when pressed with a force of 10 kgf. It is quite difficult to maintain these indicators in garage conditions, so you should focus on the gap between the frame and the tension bolt of 15–20 mm. There should be a small gap (15–20 mm) between the tension frame and the screw (from the thread side). Then turn the engine crankshaft two turns with a wrench and monitor the position of the belt and its tension.
If, after checking the engine by turning the key, the gap changes, then the bolts securing the electric generator should be tightened. As soon as, after a control rotation of the crankshaft with a key, the gap remains the same, and the belt bends slightly when you press it, the bolts of the upper and lower fastenings are finally tightened, a control rotation of the crankshaft is performed two turns, the wires are connected to the electric generator and the engine is started.
If, when starting the engine, the belt does not make unwanted noise or whistle, and the charge level is normal, then the installation procedure was completed correctly. If a whistle appears, then most likely the belt is too tight and should be loosened.
Video about tightening and adjusting the belt:
Installation of generator from 2110 to 2109/08/99 – video:
Did you manage to solve your problem using the recommendations from the article?
Yes!
46.39%
No. More answers required. I'll ask in the comments now.
38.56%
Partially. There are still questions. I'll write in the comments now.
15.05%
Voted: 804
Replacement
Now let’s talk directly about how we can remove our ill-fated generator. We recommend that you study the relevant videos in order to better understand the nuances of dismantling.
If you follow the instructions, there should be no problems with removal and replacement.
- Find a place where there is a lift or pit. That is, an ordinary garage may be quite suitable.
- Remove the protection from the power unit.
- Loosen the drive belt tension roller slightly.
- The upper bolt responsible for fastening the generator should be unscrewed.
- By analogy, we work with the lower fastening element.
- Next, be sure to disconnect the air conditioning compressor fasteners.
- Then remove the drive belt.
- Now you can remove the generator from its seat and move it slightly to the right in relation to the battery.
- Remove the bolt on top of the air conditioning compressor. Remove the compressor and hang it up. Don’t worry, the tubes used are quite reliable, so they can easily handle the weight.
- Remove all bolts from your generator holder.
- When you disconnect the terminal, calmly pull down the generator along with the holders.
- Reinstallation of the new device is carried out in strictly reverse order. In this case, adjusting the drive belt is a must.
It is not difficult to remove and replace such a unit yourself. But you will definitely need certain skills and preliminary study of the instructions. Use only high quality and efficient replacement parts to ensure that your generator does not cause problems in the future.
No car can do without electrical energy and a device that will generate it. It is called a direct current generator and is present in any modern technology, not only in a car.
The functions of the generator include powering the following vital machine systems:
- Ignition system;
- Providing food;
- Self-diagnosis module;
- Recharging the battery;
- Ensuring the operation of the on-board computer.
Based on this, it is necessary to understand that this device is subject to strict reliability requirements, and in general, it is advisable to be able to carry out repairs in the field, or at least just know where the generator is located in the car and have a minimal understanding of its technical structure
This article proposes to pay attention to the most common problem - how to quickly and correctly replace the brushes on the generator of a VAZ 2114 car with your own hands.
Required spare parts
To work, you will need to purchase new brushes. In the store you can select goods according to article number 2101-3708340, 9402/9412 or EG51A. The markings can also be found in the vehicle's operating instructions. It is better to purchase a kit so that you always have spare parts with you. This will guarantee that if a breakdown occurs you will not have to call a tow truck.
What problems may arise in the operation of the generator and options for solving them.
- If the brushes or voltage regulator malfunction, you will have to replace the entire assembly due to the fact that it is not collapsible.
- Rotor bearings and their replacement. We have already discussed in detail how to change a bearing on a generator, so let us just remind you that there are two bearings in the generator. One is pressed into the front cover and if it malfunctions, it is most often replaced along with the cover assembly. The second bearing is attached, rolled onto the rotor shaft, it is removed using a special puller and a new one is pressed in its place.
- Additional diodes. If the diode malfunctions, its leads can be unsoldered and then, carefully trying not to break the rectifier unit with blows, pulled out of the holder. Clean the area from epoxy resin, then install the diode and solder it. After the entire procedure, the lead of the diode, which has a color mark, is soldered to the bus, and the diode body is attached to the holder with epoxy resin.
- The generator tension belt needs adjustment. But this must be done competently and carefully, since excessive tension can increase the load on the bearing and lead to its unsuitability in a short period of time.
Many of these problems may seem trivial, but they could mean you need a new generator. You can repair the generator yourself, but to do this you need to have certain skills, so we still recommend leaving this work to knowledgeable craftsmen.
The alternator bearing is an integral part of the alternator and its failure may result in malfunction. In this case, only replacing the generator bearing can help.
On devices from different manufacturers, this process is carried out in different ways, and the bearings of the Bosch generator are most easily replaced. Car enthusiasts often ask the question of how to change a bearing in a generator. So, this is done in the following way:
Remember that even if the bearing on your car looks great, the alternator bearing will still need to be replaced.
Install the generator bearing only using a press, and never use hammers or blows.
It is important that the bearing itself sits completely in place, then install the impeller and pulley on the shaft. The next step is to replace the rear bearing of the generator with the cover, again do not use any blows, only using a press
Next, you just need to perform the opposite actions to those taken during removal, and that’s it, you replaced the generator bearing yourself!
Sources
- https://remontavtovaz.ru/vaz-2110/samostoyatelnaya-zamena-podshipnikov-generatora-vaz-2110.html
- https://nadomkrat.ru/elektrooborudovaniye/kak-pomenyat-podshipnik-generatora-na-vaz-2114
- https://vaz-2114-lada.ru/2012/06/kak-zamenit-podshipnik-generatora/
When should you replace the generator?
The service life of the generator is quite long, as is its cost. Therefore, if suddenly this part fails on your car, you should not run to the store and buy a new one. It is enough to simply remove the old generator and try to determine the breakdown. Signs that it is time to pay attention to the operation of the generator are unstable operation of the headlights. So, for example, if you notice that at one point the headlights begin to glow brighter or, conversely, dimmer, it’s time to look for the place where the generator is hidden. A similar action must be taken if your car’s battery begins to discharge too often, and without any apparent reason.
Signs that it's time to change the alternator brushes:
The generator is the main component in the vehicle's electrical power supply system. Sometimes it breaks down, but you shouldn’t throw it away and rush to buy a new one. Often the problem is that the generator brushes are worn out and it is enough to replace them for further uninterrupted operation of this unit. Replacing generator brushes is a fairly simple procedure, but first you should find out what signs may indicate brush wear.
Often, when carrying out a preventive inspection of a car, attention is not paid to various details. Generator brushes are one of these little things; if they wear out, the generator will stop charging the battery
Experts recommend inspecting the brush assembly once every 45-55 thousand kilometers. Diagnostics of the brushes can be carried out without removing the generator, and in some cases it may even be possible to replace them without removing the main unit.
- The car's electrical appliances suddenly turn off (even while driving);
- Headlights, dimensions and even interior lighting dim and flicker;
- A sharp decrease in the voltage of the vehicle's on-board network;
- A sharp discharge of the battery, which will be very difficult to recharge in the future.
Each of these points may indicate wear on the generator brushes, which are located inside this unit. Many people wonder how to check brushes. In order to check the remaining length of the generator brushes, it is enough to disconnect the generator from the battery and remove the voltage regulator. After this procedure, you can determine by eye how worn out any of the generator brushes are. If the length is less than 0.5 centimeters, the brushes definitely need to be changed. Checking the brushes should be carried out during routine inspection of the generator.
Main problems
Signs by which you can understand that the VAZ 2115, 2113 or 2114 generator brushes need to be replaced are:
- the battery does not charge or runs out of power quickly;
- warning lights on the dashboard are flashing;
- voltage failures;
- on-board electronics turn off or there is not enough power for its operation;
- the headlights begin to flicker or their light has become dim.
All these signs indicate brush wear. The following message appears on the instrument panel.
Why change brushes?
If signs of brush breakage are detected, they should be replaced. If repairs are not carried out in a timely manner, there is a possibility that you will soon need to purchase a new generator, and this is a completely different expense. The battery can only hold the ignition without brushes for a few minutes, which means it will have to be constantly charged. And soon it will be replaced.
You can check the condition of the brushes by the size of their protrusion from the seat. If the protrusion size does not reach five millimeters, then they should be replaced immediately to avoid possible problems.
It is recommended to replace it every 50,000 km or every season, which is the key to safe operation of the vehicle. It is better to have a spare set of spare parts so as not to get into an unpleasant situation on the road and then call a tow truck.
For a set of brushes you will need to pay from 150 to 200 rubles, depending on the store. The cost of repairs at a car service center will cost 200-300 rubles, inexpensive, of course, but why pay for something that you can do yourself?
The process of replacing old brushes with new ones does not take much time and does not require special knowledge. The only thing you need to prepare are the tools:
- socket wrench 13;
- flat screwdriver (ordinary);
- 8mm socket with ratchet.
Without removing the generator
If you are sure that the problem with the car breakdown is a malfunction of the generator brushes, then you can do without removing it.
- Turn off the negative terminal.
- Disconnect the wires.
- On the brush holder body, unscrew the two bolts holding it in place.
- We extract the structure.
- We check for damage and the size of the protruding part of the brushes (it must be at least 5mm).
- We install new elements and carry out installation in the reverse order.
https://youtube.com/watch?v=i14x_oeYLwA
With the generator removed
Poor charging of the car can be caused not only by the brushes, but also by the alternator belt. To eliminate this point, when replacing brushes, you should remove it to check the condition of the belt.
First, we dismantle the unit.
- We unscrew the bolt securing the generator belt.
- Move the unit towards the engine and remove the belt.
- Unscrew the tensioner bar and remove it.
- Disconnect the plug and terminals.
- We take out the part.
Let's move on to the brushes
- Open the protective casing (cover).
- Disconnect the brush power wires.
- We unscrew the two bolts securing the element we need.
- On the right side, using a 13mm wrench, unscrew one nut.
- The voltage regulator should be raised.
- We check the old brushes.
- We clear their location.
- We install new elements and assemble everything in reverse order.
Fastening design
The design of fastening elements for electric generators on AvtoVAZ vehicles varies. Differences in fasteners are caused by the peculiarities of the structure and location of the power unit. For cars of the VAZ classic and Niva family, with a longitudinal engine, the autogenerator is typically located longitudinally, along the block, near the first cylinder. The generator is driven through a belt from the crankshaft pulley. On front-wheel drive models with a transverse engine, the electric generator is located opposite the front right side member in the direction of travel.
The compatibility of the installation grooves on classic and front-wheel drive models differs, but depending on the specific model. The installation locations of the electric generator on classics and the first front-wheel drive cars (08, 09 and 99 families) are the same. However, to install an electric generator from a tens or Chevrolet Niva to a classic, you will need to purchase pulleys, a special strip and a mounting bolt for installing the generator. In other cases, the installation and fastening of generators from 21214 and other Nivas to rear-wheel drive VAZ models does not require additional work.
To install powerful devices from Kalina or Priora, the generator mount for other VAZ models will need to be changed. It is very important to select the appropriate components. For installation on the 08, 09 and 99 family, we select all generator mounts from VAZ (2110, etc.) for an 8-valve head, and not for a 16-valve one.
This nuance is very important, because it directly affects the compatibility and possibility of installing powerful electric generators on older front-wheel drive and rear-wheel drive car models.
The fastener itself is a metal L-shaped structure made of durable steel. The design provides special holes for its combination with the autogenerator itself. In addition, the mounting strip is equipped with a technological cutout into which a screw is inserted to align the device relative to the cylinder block.
The lower mount of the generator is presented in the form of a special metal bracket with technological holes (in the bracket itself and in the counter part of the generator). A bolt passes through these fasteners, which rigidly connects the elements together. This is necessary in order to avoid vibrations and belt slippage during engine operation.
VAZ replacement of generator brushes.
| generator brushes, + how to remove generator brushes VAZ 2106, generator 2106, |
| Subscribe to my Instagram: There will be something on Instagram that will not be on YouTube.. Hello everyone... |
| Tags: |
| Replacing the brushes of a VAZ 2112 generator without removing the generator |
| Well, there you are... LIKE AND DON'T FORGET TO SUBSCRIBE I)) Brotherly My Instagram... |
| Tags: |
| The generator does not charge. Replacing brushes, classic. |
| Subscribe to the group on VK Instagram |
| Tags: |
| How to remove the brushes from the generator and check the VAZ 2107 VAZ 2106 |
| Removing the brushes. |
| Tags: |
| Replacing the generator on VAZ 2110-2112 and 2114-2115 |
| Video instructions for removing and installing a generator on a VAZ 2110-2115 car with your own hands. Description… |
| Tags: |
| repair of generator VAZ-2114 (08-15)… |
| DIY car repair... 18+... mat... |
| Tags: |
| REPLACEMENT OF GENERATOR BRUSHES. GENERATOR VOLTAGE REGULATOR RELAY. VAZ, LADA. |
| REPLACING THE GENERATOR VOLTAGE REGULATOR RELAY. GENERATOR BRUSHES. Replacing generator brushes... |
| Tags: |
| Replacing generator brushes on a VAZ 2108 |
| very fast and simple. |
| Tags: |
| How to remove a VAZ classic generator. (for beginners.) |
| how to remove a generator from a classic VAZ car. |
| Tags: |
| remove the generator on a classic in 5 minutes |
| how to remove a generator on a classic in 5 minutes. |
| Tags: |
| Replacing generator brushes for VAZ 2108, VAZ 2109, VAZ 21099, VAZ 21010… |
| Continuation of the fight on electrical issues. Let me remind you that the previous time I repaired the oval generator from a local specialist... |
| Tags: |
| Replacing brushes |
| Detailed article on how to check the generator on a car WITHOUT REMOVING! We will use a multimeter, as well as a wire... |
| Tags: |
| How to check the generator on a car. Basic malfunctions. Just something complicated |
| reasons for the lack of battery charging and low voltage in the vehicle's on-board network. VKontatka groups... |
| Tags: |
| Current leakage through the generator. What it looks like and how to treat it. Advice from an auto electrician. |
| OVER 300 USEFUL VIDEOS HERE: ... |
| Tags: |
| Reasons for the battery not charging. |
| Click to view | Installation of the German LV HUCO - 14.5V in generators VAZ Priora, Kalina, Grant, VAZ 2110, VAZ2109, VAZ 2114,... |
| Tags: |
| Current leakage and poor charging at the same time. We search, find and eliminate the cause. |
| This test does not provide a 100% guarantee of adequate operation of the generator in the car. |
| Tags: |
| How to increase the voltage of a VAZ generator: setting the HUCO pH - 14.5V |
| In this video, Nail Poroshin shows that sometimes “The casket opens much easier than you think” ;-)… |
| Tags: |
| Quick check of the generator outside the car |
| Click to view | VAZ 2107, there is no charge at idle...it goes cold when changing gears. |
| Tags: |
| But it was the wire! Be careful!!! |
| The procedure for replacing generator brushes on VAZs. |
| Tags: |
| Poor charging of Lada Granta, replacement of alternator brushes |
| We change alternator brushes on a VAZ 2115! Voltage problems! Enjoy watching everyone! I'm on: ... |
| Tags: |
| VAZ 2107 Replacing brushes (NO CHARGING) |
| Replacing brushes and bearings in a VAZ 2107 generator. |
| Tags: |
| Replacing generator brushes VAZ 2101 2107 |
| replacing Niva generator brushes. remove the Niva generator. remove and install Niva generator. |
| Tags: |
| Voltage problems. Replacing brushes on a VAZ 2115. Relay voltage regulator. |
| Repair of generator 1118 Kalina, budget option, replacement of the factory voltage regulator with an external one… |
| Tags: |
| Repair of generator VAZ 2107″ rel=»spf-prefetch |
| Description missing |
| Tags: |
| Replacing generator brushes on a Priora.” rel=»spf-prefetch |
| Description missing |
| Tags: |
| replacing generator brushes VAZ 2121″ rel=”spf-prefetch |
| Description missing |
| Tags: |
| Generator Kalina, Priora, Granta, original repair of voltage regulator.” rel=»spf-prefetch |
How to remove the generator
If you have at least a rough idea of how exactly the generator works, you can try to fix it yourself.
- In order to remove the generator, you will need to drive the car into a pit or lift it on a lift. For ease of operation, it is necessary to remove the crankcase protection. The next step is to remove the terminal from the car battery.
- Moving the rubber boot to the side, you can see the nut that attaches the positive terminal to the generator. It should be unscrewed and the wire block disconnected. This may require some force.
- Using a socket wrench or wrench, unscrew the adjusting bolt.
- Find the nut of the bolt located on top. It is thanks to him that the generator is held on the bar. Both the nut and bolt should be removed while simultaneously removing the tension bar that holds the bolt.
- Finally, you need to unscrew the nut of the bolt located below. Directly behind this nut there is a spacer sleeve that will also need to be removed.
- Next, using milk, you should knock out the bolt from the generator, but at the same time the latter must be held suspended.
Note. Once the bottom nut of the alternator bolt is loosened a little, you will need to remove the alternator belt. To do this, move the generator closer to the engine itself, and with the other hand remove the belt from the generator roller.
It should remain hanging until the generator is put in place or a new one is installed.
Installation of a new generator occurs in exactly the same way, only in reverse order. After installing the generator in place and installing the belt roller, the voltage should be adjusted to the required level.
Important! It is best to replace the generator with a similar one. It often happens that, having purchased a slightly different generator, it is simply not possible to install it on a VAZ-2115. This is directly influenced by several reasons. For example, the mounting may be arranged differently, or the dimensions of the generator may not correspond to those prescribed by the factory. In any case, before purchasing a new generator, it is best to consult a specialist.
Source
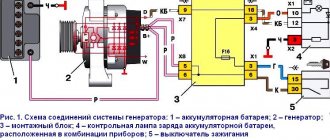
Functions and connection diagram of the generator
The generator, like all other car parts related to movement, plays a certain functional role. And performs the following functions:
- charging the battery;
- replenishment of the starter at the moment the engine starts.
Proper and early care of the generator will preserve the functionality of not only the generator itself, but also the battery. This is due to the fact that with a constantly reduced charging voltage, the power source is discharged, as a result of which this will lead to degradation of the storage plates and their further premature destruction. And this, in turn, will lead to an urgent replacement of the battery, the cost of which is sometimes more expensive than the generator.
To deal with possible generator malfunctions, you need to have a good understanding of its structure and connection diagram.
Connection diagram for the VAZ 2114 generator
Modern automobile generators have 3 windings, wound in such a way that an alternating voltage source is obtained. The stator windings act as magnets, and they are powered by a constant voltage from the battery. A magnetic field is formed in which a rotor rotates with a leaf-type magnetic core and a winding from which voltage is removed through slip rings and graphite brushes, with a rating of more than 18 V and a current of 60 to 120 A, depending on its power and number of revolutions. But since the battery voltage should not exceed 14.7 V, a rectifier unit and a stabilizer are used. They are installed on the generator itself, because based on the diagram, it is clear that the wires go directly to the battery and to the starter relay.
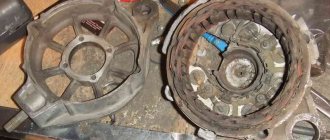
Generator in analysis
The VAZ 2114 generator includes a rectifier unit, which is located inside it. And to replace it in the event of a malfunction, you will have to disassemble the generator itself. There is also a brush mechanism along with a voltage regulator, more precisely, it should be called a stabilizer. Because the rectified voltage from the generator is pulsating, which is of course smoothed out by capacitance. But to keep it at the required level, an additional electronic device is required. And since it is impossible to regulate the voltage on it manually, this means it is a stabilizer. Generators with an output current of 80.9 A are installed on domestic cars.
Found the answer to the question “how to change brushes on a VAZ 2114 generator?” is not always limited to just replacing them, because as the brushes wear out, all other parts that require any action wear out. Therefore, due to the complex design of the generator and the large number of functional parts in it, many malfunctions arise, and usually when one of them is eliminated, the overall problem does not disappear. But it is only dulled and will arise again in the near future. So, let's consider the possible main faults that occur with generators, determined by the control devices of the machine itself or a multimeter:
- reduced battery charge voltage (less than 14.3 V);
- increased charge voltage (more than 14.7 V);
- fast, almost instantaneous battery discharge when the ignition is turned on;
- lack of battery charge.
Depending on the type of fault, appropriate approaches must be used. But also with all the above malfunctions, the brushes may be faulty. They can also have a number of reasons for failure:
- wear of the brushes themselves;
- breakage or discoloration due to poor quality material or workmanship;
- rectifier failure.
On VAZ 2114 cars, replacing alternator brushes does not seem difficult, but time-consuming. Because there are a lot of actions that need to be taken.
Required spare parts
To work, you will need to purchase new brushes. In the store you can select goods according to article number 2101-3708340, 9402/9412 or EG51A. The markings can also be found in the vehicle's operating instructions. It is better to purchase a kit so that you always have spare parts with you. This will guarantee that if a breakdown occurs you will not have to call a tow truck.
Originals, analogues, prices, articles
| Catalog item | Serial number | Price | |
| KATEK ELD-A-2114-90A (original) | BOSCH (9402.3701) (original) | From 3500 – 4000 | |
| 9402.3701 | FINWHALE 6РК-698-05 | 6202 2RS / 180202 | From 3500 – 4000 |
| KZATE 9427.3749 | Electromash 977.3701 | SKL 2114-6202 2RS | From 3500 – 4000 |
| 2114-3701010 (HORT) | KATEK 2114-3701010 | Contitech 6PK-1115 | From 3500 – 4000 |
| PRAMO-Electro 2114-3701984 | PRAMO- 3701953 | PRAMO-Electro 2114-3701747 | From 3500 – 4000 |
| *prices are as of July 2022 |
Operating principle of the electrical energy source
There are 8 coils installed in the GU housing. The material is copper, the connection method is “star”. The rotor is a steel shaft, on the back surface of which magnetic circuits are pressed, between which a winding is installed.
Excitation winding wires and copper-graphite brushes are soldered to the shaft rings. After the ignition is activated, the current from the battery passes through the brushes and winding, forming a magnetic field.
Thus, the rotor is driven, and the alternating current is converted into direct current through the coils.
On the back side of the GU there are two terminals marked “+” and “–”. Accordingly, the terminals with the indicated polarity are connected to the battery.
To rotate the PG you need a battery. When the actual voltage during operation of the unit is higher than the battery voltage, the generator will begin to supply power to the battery consumers. Thanks to this, the on-board network current is maintained within a specified range.
Characteristic reasons for the failure of the main control unit on the VAZ 2114 (2115)
- insufficient tension of the drive belt;
- contamination of contacts on rings;
- mechanical damage to the rectifier unit;
- excessive wear of brushes;
- jamming (freezing) of brushes;
- short circuit in the winding;
- power supply interruption;
- the voltage regulator is faulty;
- roller bearing wear;
- pulley fixation is loose;
- Fan blades are damaged.
Methods for troubleshooting generator VAZ 2114 (2115)
- carrying out preventive measures;
- replacement of the PG assembly (in a comprehensive manner);
- drive belt tension;
- centering the fan blades;
- installation of new brushes;
- replacement of the rectifier bridge;
- voltage regulator prevention;
- inserting a new roller bearing;
- replacing the fuse in the mounting block.