According to the existing regulatory requirements of the manufacturer, replacing the alternator belt, that is, on the generator set drive in the Lada Granta model, should be performed after every 30 thousand kilometers. It is recommended to check the condition of this element at 14-16 thousand periodic mileage.
Replacing the alternator belt is carried out following the basic principles of operation. The Lada Granta car is installed on a flat area without a slope. The generator drive does not have a tensioner, so the process is slightly more complicated; in some cases, replacement occurs without a tensioner. The instructions prohibit the reuse of the belt drive, since this component is endowed with the property of one-time stretching, which appears when the attachment is completed and placed under load at the factory (tension).
Re-use is resorted to only in emergency conditions, when, in the event of a breakdown, the belt is put back in order to get to the service center. In other situations, it is better to stock up on a new set in advance.
What is needed to replace the Lada Granta
Tool
For work we will need:
- sharp knife (remove old belt);
- a longer flat-head screwdriver;
- wrench to “13”;
- new belt. Catalog number 1118–1041020–07, size – 823 mm.
When going shopping, take the old belt with you.
Options offered on the market (photo)
Finwhale belt Gates belt Rosteco belt Lada belt
Replacement instructions
The belt is replaced as follows:
- We remove the defective belt.
- Using a “13” wrench, loosen the bolt securing the generator from below. You need to loosen it slightly without unscrewing it all the way.
- Unscrew the top mount and remove the nut and bolt.
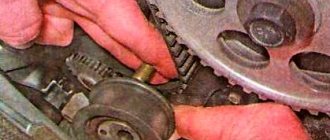
- Use extreme caution. Rotating the generator until the upper eye is exactly behind the surface of the protrusion on the bracket, we will fix them in this position with ordinary wire.
- We put the belt on the generator pulley (pictured 2), and on the top of the drive pulley (pictured 1).
- Having engaged fifth gear, we push the car back. We need to rotate the drive pulley so that the belt lies in its place.
- We remove the wire and carefully use a screwdriver to move the generator to its original position.
- We return the upper bolt and nut to their place, tighten them, then tighten the lower one.
We put a new belt on the pulleys.
This is how the belt on an 8-valve engine is replaced in a car without air conditioning. Then you can start the engine and load the generator to check - turn on the heating, high beams, and other devices.
The 8-valve valve is installed only on the cheapest configurations - the norm and the standard. The Lux received a 16-valve power plant. Replacing the belt on it is not much different from other models with the same motor.
Video on replacing the alternator belt on an 8-valve Granta
Car with air conditioning: the differences are not only in the presence of a tensioner
Owners of cars with air conditioning will have to stock up on WD-40 or similar lubricant, a “10” key, and also a cylinder one, since the right front wheel will need to be removed.
We do not change the procedure, otherwise the lubricant will not have time to act.
- We wet the bolts securing the cushion and bracket.
- We support the front part of the car on the right with a jack.
- We remove the wheel.
- While lowering the car, unscrew the tension roller.
We work carefully because we only need a little engine lift.
- Then unscrew the bolts that were wetted earlier.
- We move the pillow towards the power unit. A little effort, and the generator belt is in front of us. After replacing the parts, we assemble everything in the reverse order. Be sure to monitor the position of the pillow, as well as the alternator belt.
Note that to work you will have to lower the car without the wheel.
An attempt to reduce the cost of cheap Grant configurations led to the absence of a tensioner on the alternator belt, which is why the latter can be over-tensioned and, as a result, fail.
Basic faults
Failures associated with the failure of the Granta generator lead to discharge or, conversely, overcharging of the battery and its boiling. In both cases, this will make further operation of the car impossible. If the belt is overtightened, problems with high bearing wear will soon arise. If the belt tension is insufficient, slipping will occur and the battery will receive too little charge.
Normally, a working generator produces 14.5 V; exceeding this value is most often due to a breakdown of the voltage regulator. Without urgent replacement of the element, constant recharging of the battery will lead to shedding of lead plates and battery malfunction. If the unit does not produce the required voltage, and it is below 13 V, then the problem may not only be with the regulator, but also with the fact that the brushes are worn out, the diode bridge or windings are damaged.
It happens that suspicious sounds occur during operation, in which case the nature of the noise is important. It’s not difficult to deal with this: just remove the wires from the generator. If the rotation of the pulley is accompanied by a howling or squealing noise, then the problem is in the bearings. If, after removing the wires, the noise disappears, then it is in the diode bridge, or a short circuit has occurred in the winding. In any case, repairs are inevitable, and sometimes only replacing the unit will help.
Typical faults and methods for their elimination:
Cause of malfunction
Remedy
The table shows the main faults. Mechanical and other damage is also possible.
How to replace the Grant alternator belt
The replacement process is not simple and depends on the equipment of the car: whether there is a tensioner, air conditioning. In the latter case, you cannot do without a lift and dismantling the engine mount due to the air conditioning compressor clutch pulley.
For a Granta with air conditioning, for installation you will need to hang the wheel and remove one engine mount.
How to change a belt on a Grant 8 and 16 valve without air conditioning and tensioner
What you will need for work :
- a knife, if you just need to cut off an old part;
- crank or ratchet with head 13;
- long strong wire;
- flat screwdriver;
- partner – you can replace it yourself, but it’s easier with an assistant.
Step 1. Dismantling
The car is on a flat surface, neutral is engaged without the handbrake. The battery is disconnected .
If the old belt is not needed, we cut it in an accessible place and take it out.
If you need to save the old one, do everything up to step 3.
A replacement is needed with a length of 8223mm, six-wedge. Called 6RK 823. PHOTO: www.zr.ru
Step 2. Remove the generator mount
We approach the generator mount with head 13:
- we remove the lower bolt by 2-3 turns;
- Use it to completely unscrew the top bolt.
In this situation, we proceed to installation. PHOTO: www.zr.ru
Step 3. Raise the part
Scroll the generator up. The top mount becomes higher than the bracket to which it is screwed.
We press the part to the engine. We fix it with strong wire. For example, we hang it from the cylinder head bolt.
In this situation, we proceed to installation. PHOTO: www.zr.ru
Step 4. Install a new one
We pull the new one onto the pulleys.
The installation takes place in the position of the generator when it is pressed against the engine. PHOTO: www.zr.ru
Engage fifth gear , push the car back, pressing the belt against pulley 1 in the picture. This is where a helper will come in handy.
As soon as we put it on, we work in reverse order:
- unplug the generator;
- press it into working position;
- return the upper mounting bolt and tighten the lower one.
Replacing the alternator belt on a Grant with air conditioning
It's more difficult here. Step by step :
- we drive the car onto a lift or overpass;
- remove the tensioner;
- take off the front right wheel;
- we support the internal combustion engine and dismantle the pillow;
- change the required part.
Let's summarize
To work with the generator and to replace the belt you need:
- set of spanners, Torx t20 and 27, ratchet with heads or wrench, knife;
- if there is no tensioner, you can assemble and install it;
- if there is no air conditioner, replacement is easiest;
- is there air conditioning? To work, you need a pit or a lift with dismantling the engine support;
- They change consumables every 30 thousand mileage according to regulations.
Write comments and share your experience.
Power for the vehicle's electrical equipment while driving is provided by a generator, which operates thanks to a belt drive. Therefore, the effective operation of the unit depends on the condition of the belt. This is a consumable item that requires regular replacement. The article provides instructions on how to check and replace the belt on a Grant alternator with air conditioning.
Technical regulations for Lada Granta cars
Self-check the condition of the alternator belt
DIY replacement instructions
Tools and materials
Video “Replacing the generator set belt”
Comments and Reviews
General questions about working with the Grant generator
Let's consider general questions: everything except replacement.
Tension check
There are two approaches: visual assessment and physical.
Visual assessment of condition:
- the car is on a flat surface, the gear is in neutral, the handbrake is off, the hood is open;
- We don’t start the car - we put it in 5th gear;
- We opened the hood and found a generator: we push the car back, resting against the bumper;
- We inspect the required part along its entire length: are there any breaks or cracks? It needs to be changed.
Poor quality will lead to unexpected problems on the way.
Physical assessment:
- if you have a tool that measures pressure force: press the belt with a force of 10 kg*s - the deflection should be no more than 10 mm;
- there is no special tool: we try to turn it across - it should turn no more than 90 degrees.
Signs that replacement is needed
When conducting an inspection, we must pay attention to the presence of the following signs:
Some stripes on the belt are already worn out
- abrasions;
- cracks;
- rubber lags behind the base;
- ruptures.
If there is any of them, the belt needs to be changed.
Technical regulations for Lada Granta cars
In order to be sure that the car will not fail on the road, you should monitor its technical condition and comply with technical regulations. Maintenance consists of diagnosing vehicle systems and components, identifying and troubleshooting problems. But even if everything is in order with the car, it is necessary to carry out the routine operations provided for in the vehicle’s operating manual.
Experts recommend doing a technical inspection when purchasing a used car and every 15 kilometers. During a visual inspection, you should check the systems and components for leaks, check the reliability of fasteners, the generator voltage regulator, belt tension, and their condition. If necessary, change filters, oils, working fluids, and consumables. In order to bring the car into good working order, you need to buy all the necessary consumables in advance so that they can be replaced during inspection.
The accessory strap is a consumable item that needs to be replaced periodically. In the Lada Granta manual, the manufacturer recommends replacing the belt every 30 thousand km. Experienced drivers advise checking the condition of the belt drive at intervals of 15 thousand km.
The frequency of replacement of consumables is influenced by the following factors:
- terms of Use;
- driver's driving style;
- quality of consumables;
- serviceability of components and mechanisms;
- climatic conditions.
If the machine is operated in difficult conditions, then diagnostics should be done more often. It is recommended to do a technical inspection before a long trip so that the car does not fail along the way.
This is interesting: Ground clearance of the Lada Granta sedan - photos and videos
Checking and prevention
It is possible to prevent the Lada Granta generator belt from breaking. You should make it a rule to check the belt tension before starting your journey. It should not sag or be overtightened. When you press the belt with your finger, it should press down a little, and when you try to turn it over, it should turn onto its edge without effort.
It should not be bent, its teeth should be intact. You need to inspect the seals. Leaking oil negatively affects the wear resistance of rubber. Granta users will have to listen carefully so as not to miss the moment when the alternator belt needs to be replaced. You can determine that the alternator belt will soon break: in wet weather or on a cold engine, it begins to whistle.
If the problem begins to appear in the middle of the journey and there is no opportunity to go to a service station, you need to check the condition of the belt tension. Most likely, the belt can be tightened a little and movement can be resumed. After this, it is necessary to replace it. Additional signals regarding an impending problem will include:
- dim light from headlights and dashboard;
- The interior heating is unstable;
- the sound of car horns has become lower;
- The turn signal and windshield wiper operating intervals have increased.
Alternator belt replacement process
- key "8"
- key "10"
- key "13"
- key “18”,
- wheel wrench for wheel removal,
- also a special device, the catalog number of which looks like 67.7834-9703. In principle, if you do not have this device, then you can do without it. But the possibility of belt .
If you are getting ready to replace the alternator on the A/C version, then make sure you have all of the above tools on hand.
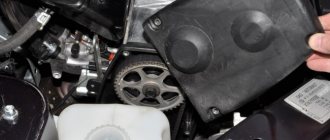
Generator belt
Gates MICRO-V 6PK995 was installed on the Granta with air conditioning from the factory.
- Use a 13mm wrench to loosen the nut.
- Now a “10” wrench comes to the rescue, with which the adjusting bolt is unscrewed.
- Next, you need to shift the generator and replace its belt. To do this, carefully move the generator to the side towards the engine.
- Thus, we open up the possibility of further work, which consists of unscrewing the front right wheel. It must be completely removed from the vehicle.
- Similar actions must be done with the corresponding fender liner. Now you can freely remove the old alternator belt
, replacing it with a new one.
Technical regulations Lada Granta
The alternator belt is located under the alternator itself
If you rely on the manufacturer’s technical regulations, then the belt should be checked at least once every 15,000 km. And every thirty thousand kilometers, this belt needs to be replaced.
That is, it turns out to be a cycle with an interval of fifteen thousand kilometers, in which the alternator belt is alternately checked and replaced.
And, given that the tensioner, as such, is not used, the belt is focused solely on one-time stretching during installation.
There are options for reusing the belt, but this practice is highly discouraged.
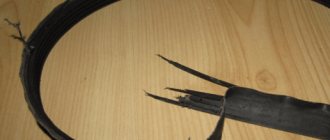
Inspecting the old belt
The manufacturer recommends checking the condition of the alternator belt every fifteen thousand kilometers. And every thirty thousand you need to change the belt, even if you are completely satisfied with its appearance.
As for the unusual cases of replacing an alternator belt, they arise when you have examined it and noticed damage to the surface.
The main types of damage include scratches, cracks, detachment of rubber from the fabric base, etc. If the belt has any defects, then it needs to be replaced.
We check the condition of the alternator belt ourselves
To make sure that the belt is in good condition, you need to perform simple steps. Initially, fifth gear is engaged. On it, leaning on the front bumper, we try to push the car back. At the same time, we are trying to conduct a visual inspection of the belt along its entire length.
All the grooves have been cut off, the belt is on the verge of breaking
There, according to the general rule, there should be no cracks, even the smallest ones, as well as ruptures and peelings that occur due to long-term use of rubber products.
This belt is no longer any good.
If such problems are found, the belt must be replaced. The timing belt is checked in the same way.
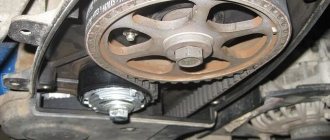
It is also a good idea to check the external condition of the generator itself, since its quality raises questions. Don't forget to inspect the generator roller.
The belt is already bad, but the generator pulley is still good
Alternator belt replacement process
To carry out the replacement work, we will need the alternator belt itself, which can be purchased from official dealer representatives at a price of approximately 800 rubles.
Standard article number for alternator belt: 1118-1041020-07
- The length of this belt is 823 millimeters.
- You can find it in the catalog by name or by your own unique number 1118-1041020-07.
- The marking on the box will indicate the index 6РК 823.
In addition, prepare in advance a sufficiently long screwdriver, as well as a “13” key. You may also need a knife to remove the old belt.
- To begin with, we remove the old belt, or what is left of it.
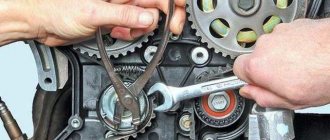
As we have already said, this needs to be done every thirty thousand kilometers, even if the condition of the belt appears to be completely satisfactory. We remove the belt by simply cutting it off, most conveniently with a stationery knife - Now we find the bolt for the lower mounting of the generator. Try to unscrew it literally a few turns, which will help with the “13” key.
- Use the same key to unscrew the nut, after which the bolt for the upper mounting of the generator is completely pulled out.
- Now you need to be very careful. You must try to rotate the generator so that the upper eye exactly goes beyond the surface of the protrusion located on the bracket. We confidently press the generator to this bracket and fix it there with ordinary wire. It is best to tie it to the cylinder head cover mounting nut.
- Now carefully put the belt on the generator pulley, as well as on the surface part of the generator drive pulley.
- We engage fifth gear again, while simultaneously pressing the belt against the pulley. In this position, we try to push the car back until the belt is completely in place.
- Now you can untie the wire and start squeezing the generator with a screwdriver in the place where it came into contact with the bracket. Don't forget to insert the top bolt that mounts the generator.
After this, all that remains is to take care of tightening the lower bolt and the nut of the upper generator mounting bolt. This will be enough to set everything in place.
Alternative options
Of course, many car enthusiasts are well aware of the consequences of not having a belt tensioner. The fact is that the belt, quite often, is overtightened, which leads to too rapid wear of the generator bearing. You can recognize this problem by a characteristic sound reminiscent of a howl. This design flaw can be eliminated by installing a generator belt tensioner. The most common option is to install a tensioner from the Lada Kalina.
Installing the alternator belt tensioner
The reason for abandoning the tensioner is simple. The manufacturer tried to save additional money by making the car one of the most affordable in the world. And this is typical only for the cheapest trim levels (standard and norm), which are supplied with eight-valve power units.
To make it easier to control the belt tension, you can simply replace the generator bracket by pre-modifying it.
On the left is a bracket with a tensioner from Kalina, on the right is the standard version from Granta
In the standard bracket you will not find holes for the tensioner pulley. Instead, you can assemble a new bracket, which will be based on the base of the first generation Lada Kalina. As we already said, we will need:
- the bracket itself is from the specified car,
- tension roller,
- tensioner pulley bracket,
- as well as the alternator belt itself, all from the same Lada Kalina of the first generation.
- In addition, do not forget about purchasing a screw tensioner, the corresponding bushing and bolt.
The price of this entire set reaches two thousand rubles, for which you can significantly improve the design of the car and extend the service life of individual parts.
The replacement process itself is similar to replacing standard Lada Granta parts. However, if you do not have the appropriate technical knowledge, then you should contact a service center to assemble the structure.
Solution
You can avoid regular contact with the described problem. There are several ways out for this.
- Generator replacement. Suitable for those who purchased a car with a ZiT generator. Since 2013, new Grants began to be equipped with a generator from Bosch.
- Replacing the bearing on the generator. This option, like the next two, threatens to void the warranty.
- Reduce belt tension by thinner fastening.
- Install the tensioner from Kalina.
Regarding the third point, some masters are not puzzled by finding a suitable option. They fix the standard fastening themselves, using a grinder and a sharpener to make it thinner. To implement the fourth option, contact a service station (also with loss of warranty) or perform all the manipulations yourself.
The alternator belt tensioner from Kalina installed in the Lada Granta will not relieve the car owner from worries. In the new design, the bracket requires close attention. Its service life is limited. It is subject to deformation during operation and cannot be restored, only completely replaced.
Self-check the condition of the alternator belt
Before replacing an implement belt, drivers should perform a visual inspection to determine if replacement is necessary. To perform diagnostics, the vehicle must be stationary. To prevent the car from rolling during inspection, clamps should be installed under the wheels. The generator belt is located in the engine compartment, and is tensioned on the pulleys of the attachment.
The entire product must be checked. Having examined one area, inspect all the others sequentially, turning the belt. You can make a mark at the place where the inspection began.
The following signs indicate the need for replacement:
- cracks and abrasions on the surface, both internal and external;
- frayed, sides;
- peeling of rubber from rubber;
- mechanical damage;
- traces of oil and working fluids are on the surface.
During inspection, you also need to check the belt tension. If it is loosely tensioned, the generator will not work at full capacity. Too much tension causes premature wear of the bearings and strap. To check the tension, press the belt in a place free from equipment. With a force of approximately 10 kg, the deflection should not be more than 7-8 cm.
If the tension is insufficient, then you need to know how to tighten the belt. The tensioner screw acts as a regulator; it is used to perform tension (video author – Remgar).
When replacing a belt, it is advisable to change the tensioner pulley, which should also be inspected. It should be free of scratches, chips, play, and deformation. The roller should rotate freely without delay. You should not neglect regularly checking the condition of the belt drive.
If the belt breaks on the way, further movement is only possible using the battery. But even if it is fully charged, you can move it for no more than one hour. Therefore, it is recommended to have a spare alternator belt in the trunk in case it breaks.
Signs of generator malfunction, ways to eliminate them
| Sign | Cause/remedy |
| The warning light on the dashboard does not light up | Open circuit in the power supply from the converter to the battery. Check the integrity of the electrical circuit |
| The warning light does not go out after the engine starts | Insufficient belt tension, insufficient tension in the chain. Measure the voltage in the circuit. |
| —/— | Worn brushes, faulty diode bridge. Measure the voltage with a multimeter and replace worn elements with new ones. |
| Short to ground | The insulation of the power cable is damaged. Check the condition of the insulating coating. |
| The converter does not produce the proper voltage of 14 V | Oxidation of terminals, cleaning with a metal brush, replacement |
| —/— | The battery is worn out, replace the battery |
| —/— | Loose belt tension. Adjust the tension. |
| —/— | Diode (rectifier) bridge is unusable, replace with a new one |
| The battery is not receiving a charge | Replacing the diode bridge with a new one |
| —/— | Rectifier failure. Replacement of components |
| Voltage drop in the network (circuit) | Checking the quality of connections of terminals and clamps. Tightening, replacing with new ones |
New Lada: Reviews of the operation of the Lada Granta air conditioner
DIY replacement instructions
A Lada Granta 8-valve car requires replacement of the alternator belt in the same way as a 16-valve car after identifying defects or according to the regulations. The procedure can be performed by a driver who does not have much experience in repair work. It is enough to have the necessary tools and basic knowledge of where the components that require replacement are located.
Tools and materials
Before replacing, you need to purchase a new alternator belt. In order not to make a mistake with your choice, you should look at the catalog number in the operating instructions. It should be 1118-1041020-07. The size should be 823 mm.
You should buy originals so as not to buy a fake or low-quality product. The packaging should be marked 6РК 823. You should not save money by buying a cheaper product. A low-quality belt will not last long, and the consumables will have to be changed earlier than required by regulations. High-quality belts are produced by Bosch and Gates.
You should also buy a tensioner pulley if you decide to change it too.
In addition to consumables, you need to prepare the following tools:
- a set of keys;
- TORX E-14 head;
- long screwdriver;
- jack;
- emphasis
Stages
The procedure for replacing the generator set belt on a Lada Granta with air conditioning is complicated by the fact that the belt passes through the support of the power unit. Therefore, before putting on a new strap, it will have to be dismantled.
Replacement consists of the following steps:
- First, using a “19” wrench, you need to loosen the lock nut of the strap tensioner lead screw. While unscrewing the locknut, hold the screw with the head at “8”.
- To loosen the belt tension, rotate the lead screw in the direction of movement clockwise. By following these steps, you can adjust the tension of the accessory drive belt.
- To replace the strap, you need to remove the right engine mount.
- Having moved under the car, you need to dismantle the right and middle protective shields of the engine compartment.
- Then unscrew the fastenings in the middle and front part of the right front wheel arch liner. Next, bend the fender liner behind the wheel brake disc.
- Using a jack, we hang the right front wheel and dismantle it. The fender liner fastenings can now be released.
- At the next stage, we place a stop under the oil pan of the power unit so that it holds the weight of the engine.
- Using a TORX E-14 head, unscrew the screws that secure the support to the cylinder block bracket of the power unit. Using the “17” socket, unscrew the two nuts and the support bolt that secures it to the body side member.
- We dismantle the engine mount with the cushion.
- Now, through the resulting opening, you can remove the strap from the pulleys of the auxiliary units and pull it out of the engine compartment.
- We install a new consumable in place of the worn-out product. In this case, its tension should be adjusted using the tensioner screw. The deflection of the belt in the gap between the air conditioner compressor and the power unit pulley with a force of 10 kilograms should be within 7-8 mm.
- We perform assembly in the reverse order of removal.
This completes the replacement. Now you know how to replace and tighten the generator set belt on a Lada Granta.
If the belt breaks on the way
When a break in the alternator belt still catches the driver in the middle of the journey, it is possible to temporarily correct the situation. If you are aware of such a problem with your car, it would be wise to carry a spare belt with you. When replacing a belt at a service station, special devices are used. But, of course, an ordinary driver cannot have these on the road. Therefore, the procedure must be carried out carefully and carefully.
We need to wait for the car to cool down. Next, remove the right side of the mudguard. Then the belt scraps are removed. After this, put on a new belt in stages, first on the crankshaft pulley, then put the other part of the belt behind the pulley, pressing it against it, and begin rotating the crankshaft clockwise. But if you don’t have a spare timing belt at hand, you can replace it with improvised materials.
Nylon women's tights are perfect. As a rule, they are sold in almost any store, even grocery stores. The advantage of this wardrobe detail is that the tights have a tension limit; you won’t be able to overtighten them. They are tied in a tight, reliable knot. After the structure is fitted, the excess is cut off as close to the knot as possible so that nothing catches anywhere.
In cases where tights don’t work out, elements from a men’s wardrobe are perfect. Leather belt of trousers or bags or a tie. In this case, the length of the future product is measured in proportion to the worn-out belt. This approach is due to the fact that leather and fabric products can be overtightened, which can cause damage to the mechanism. In this case, repairs will be much more serious than just replacing the alternator belt.
If you study the reviews on the model, it is clear that stories with the Lada tensioner are quite common. Grant's warranty period is not at all comparable to its Korean counterparts. It is only 24 months. The frequency of operation of the machine decides a lot. Taking these factors into account, everyone will be able to individually decide how to deal with this annoying problem - wait two years or sacrifice the node guarantee by resorting to radical actions.
Most modern cars have a tensioner on the alternator belt, which requires some special features during repair work or when replacing the belt itself. But in Lada Granta models that use an eight-valve engine, the manufacturer does not provide a belt tensioner. So replacing the alternator belt needs to be done a little differently.