Generator type 94.3701 alternating current, three-phase, with built-in rectifier unit and electronic voltage regulator, right-hand rotation (drive side)
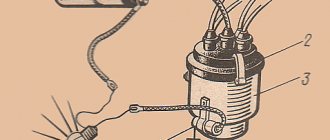
The generator connection diagram is shown in Figure 1
The voltage to excite the generator when the ignition is turned on is supplied to terminal “D+” of the regulator (terminal “D” of the generator) through indicator lamp 4 located in the instrument cluster.
After starting the engine, the excitation winding is powered by three additional diodes installed on the generator rectifier block. The “W” terminal of the generator is not used on vehicles of the VAZ-2115 family.
The operation of the generator is controlled by a warning lamp in the instrument cluster.
When the ignition is turned on, the lamp should be on, and after starting the engine, it should go out if the generator is working.
A brightly burning lamp or glowing at full intensity indicates a malfunction.
The “minus” of the battery should always be connected to ground, and the “plus” should always be connected to the “B+” terminal of the generator.
Failure to turn the battery back on will immediately cause increased current through the generator valves and damage them.
It is not allowed to operate the generator with the battery disconnected. This will cause short-term overvoltages to occur at the “B+” terminal of the generator, which can damage the generator voltage regulator and electronic devices in the vehicle’s on-board network.
It is prohibited to check the functionality of the generator “for spark” even by briefly connecting the “B+” terminal of the generator to ground. In this case, significant current flows through the valves and they are damaged.
The generator can only be checked using an ammeter and voltmeter.
The generator valves are not allowed to be checked with a voltage of more than 12 V or with a megger, since it has a voltage too high for the valves, and they will be broken during testing (a short circuit will occur).
It is prohibited to check the vehicle's electrical wiring with a megger or a lamp powered by a voltage of more than 12 V. If such a check is necessary, you must first disconnect the wires from the generator.
The insulation resistance of the generator stator winding with increased voltage should be checked only on a stand and always with the terminals of the phase windings disconnected from the valves.
When electrically welding components and parts of the car body, you should disconnect the wires from all terminals of the generator and battery.
Reasons for generator failure
Without specialized equipment, it is not always possible to determine the exact cause of a unit failure. But most often the problem is caused by:
- Bearing jamming . Due to drying out of the lubricant and gradual wear, the bearings jam. First, the belt usually breaks, which necessitates rebuilding the assembly.
- Winding burnout . Most often, the winding burns out due to the penetration of chemicals and salts used to sprinkle the road in winter.
- Brush wear . Graphite brushes wear out gradually, so they need to be replaced periodically. If they are not replaced in time, the unit may fail completely.
- Relay malfunction . The device is designed to prevent battery overcharging. If it malfunctions, the generator does not start.
To prevent breakdowns, scheduled vehicle maintenance should be carried out in a timely manner.
Reasons for replacement
Replacing generator brushes VAZ 2109
Generator brushes need to be changed in the following cases:
- They have worn out so much that they have ceased to perform their main function - to maintain battery charge.
- The battery drains quickly.
Note: there are many reasons why the battery discharges quickly. Therefore, this does not always signal bad brushes. But just in case, it is better to check them, since perhaps the reason is hidden precisely in them.
Check Features
When checking the generator of a VAZ 2110, 2107 and others for serviceability, the following conditions must be met:
- An accurate multimeter should be used for diagnosis.
- The normal voltage is 12 V.
- If it is necessary to replace the wiring, you must use wires with the same cross-section as the original.
- Before checking, you should check that all fasteners are connected correctly and the belt tension is correct. If necessary, the connections should be adjusted to normal, the belt should be loosened or tightened.
During the verification process it is prohibited:
- short circuit the wires;
- connect terminals that differ in purpose and parameters, connect terminal 30 or B+ to ground;
- diagnose a generator without connected consumers.
How to remove the generator on a VAZ 2108 yourself step by step instructions
In order to remove the VAZ 2108 generator with your own hands, you must perform the following procedure:
- In order to easily remove the VAZ 2108 generator, it is necessary to remove the engine protection.
- During the dismantling process, the VAZ generator must be removed together with the bracket, since its fastening bolt will be impossible to pull out due to the position of the body side member.
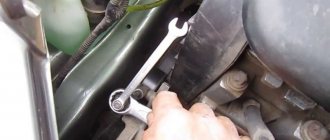
- Now disconnect all electrical terminals from the generator
- Then you need to loosen the adjusting nut and the generator mounting nut from below.
- Move the generator forward and remove the loose belt
- Unscrew the bolt and remove the adjusting bar
- We find it at the bottom of the engine compartment (shown in the photo) and unscrew the two bolts securing the bracket.
- Then, carefully pushing down, remove the VAZ 2108 generator
- After repairing or purchasing a new generator, we install it in the reverse order, taking into account the fact that the long bolt securing the bracket should be closer to the generator drive.
- After completing the installation of the VAZ 2108 generator, tension the drive belt
Diagnostics of the VAZ generator without removal and special tools
This is not the most reliable and reliable method, but it allows you to determine whether the generator is functioning or there are malfunctions. The use of any specialized tools, including a multimeter, is not required. There is no need to remove the generator.
To diagnose, start the engine and turn on the low beams. In operating condition, the negative terminal must be disconnected from the engine. The uniform light of the headlights and the stability of the engine stroke indicate normal operation of the generator. If malfunctions are observed or the brightness of the light changes, the VAZ generator is probably faulty; in-depth diagnostics need to be carried out.
Installing a generator on a VAZ 2108
Finally bought some goodies for my eight to install a generator)))
not a complete set
What I needed:
1. Generator 115A 2. Lower mounting of the VAZ 21082 generator with mounting bolts! 3. Upper fastener for 8-valve valves 4. Alternator belt (this is a separate topic) 5. Plug for genes or small mother
I didn’t install it myself, so I’ll describe everything from the words of the master.
Everything fit without problems, except the belt. To find the one we needed, we traveled all over the city. As a result, it came from 8-mic valves of the first generation. I can’t write more precisely.
After installation, with a sharp acceleration of the gene, the spar caught (perhaps my muzzle was behaving) I had to distort it, but in the end it worked.
I also read that a 330 Ohm 5 W resistor should be installed on the “L” contact, where the gene excitation wire is connected... But I haven’t found it yet.
Voltage Regulator Diagnostics
To check the voltage regulator on a VAZ 2114, 2106 car, you should perform the following steps:
- Start and warm up the engine by turning on the headlights. Warm up the engine for about 15 minutes. For diagnostics, a multimeter or voltmeter capable of taking measurements in the voltage range 0-15 V is used.
- Measure the voltage between ground and terminal 30. For most cars in normal condition, the reading will be within 13.5-14.6 V. A value less than 13 V means the unit needs to be replaced.
How to check the generator?
To check the functionality of the unit in your car, you need to follow these steps:
- Using a voltmeter, diagnose the voltage at the battery terminals. When the engine is running and the generator unit is operating normally, this parameter should be around 13.8-14.5 volts.
- Try placing your palm on the unit body with the engine running, you need to feel the vibration. If there is vibration, you will notice it immediately. Moreover, it may be due to wear of bearing parts.
- It is also necessary to diagnose the tension of the device strap, while the motor must be turned off. Press the strap with your finger - the deflection should be no more than 1.5 cm (video author - Vyacheslav Lyakhov).
Checking the return current
Diagnostics is carried out with the engine running at high speeds. It is necessary to measure the current consumed by the vehicle components. The probe is pressed against the wire from terminal 30 or B+.
It is necessary to turn on the electrical appliances of the car one by one and record the indicators. The resulting values should be summed. Then you need to turn on all the devices and measure the current indicator. The resulting indicator should be compared with the summed value of previous measurements. The final value should be approximately 5 A below the summed value. A higher value confirms that the node is faulty.
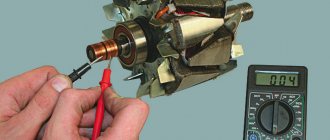
Checking the windings
First you need to visually inspect the windings. If there are no visible defects, you should use a multimeter. First you need to do the following:
- Remove the brush holder.
- Disconnect the voltage regulator.
- Clean the slip rings.
- Diagnose the winding for defects.
The resistance measurement function on the multimeter should be activated. The measurement is taken between the slip rings and the stator. In normal mode, the value will be from 5 to 10 ohms.
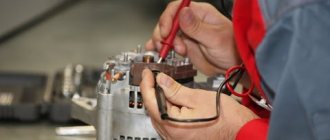
Diagnostics of a removed generator
To check the generator removed from the VAZ 21, you should use a multimeter in ohmmeter mode. The probes are pressed against terminal 30 and the body of the unit. If there are contaminants and strong oxides on the case, they should be removed first, as they can affect the readings of the device.
You need to measure the resistance of each generator unit in turn. Parts that do not have the required resistance have become unusable. Most of them can be replaced at home using a minimal set of tools. To replace, you need to buy the same parts as those originally installed in the generator.
Didn't find the information you are looking for? on our forum.
Generator 2109: device and features
Let's start with the fact that alternating current generators are installed on the VAZ 2109: series -37.3701 (design using a V-belt drive) and series - 94.3701 (design using a poly-V-belt drive).
Let's take a closer look at the connection diagrams, methods of diagnosing and repairing the generator device on the VAZ 2109 (design features of automobile generators: series 37.3701 and 94.3701).
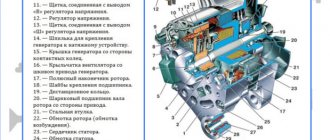
So, the generator is located in the front part and is mounted almost on the internal combustion engine of the car. Generators come in two types: traditional and compact. The main components of the generator on the VAZ 2109:
- frame;
- rotor;
- stator;
- brush assembly (VAZ generator brushes);
- rectifier block;
- voltage regulator.
The design of the generator series 37.3701 consists of more than 20 elements:
- bushing, clamping and buffer fittings;
- back cover of the unit, bolt fixing the rectifier device, rectifier unit with valve;
- capacitor component;
- pulley and rear bearing of the rotor shaft;
- impeller, shaft, brush connected to the output on the control mechanism, thrust ring;
- contacts for connecting electricity consumers;
- stator mechanism, rotor winding, etc.
Currently reading: DIY interior dry cleaning: what you need to know
Jul 4, 2021
Choice of car acoustics 2022: 16 cm speakers
Jul 4, 2021
A more complex design of the 94.3701 series generator, consisting of more than 30 elements, including:
- capacitor device, protective casing of the device;
- contact B+ and the common contact of additional diode elements with connection on the control device to output D+;
- fixing device for positive diodes of the rectifying mechanism and fixing for negative diode elements;
- shaft, coupling bolt, washers (regular, conical);
- bushing, brush assembly holder, etc.
In fact, the resource of the generator type 37.3701 is about 120 thousand kilometers; the generator 94.3701 has a slightly longer resource due to the slip rings (they are smaller in diameter).
The generator connection diagram will depend on its type. In general, the technical characteristics of generators for the VAZ 2109 are as follows:
- at a rated voltage of 14V, the highest output current for generators 37.3701 is 55A, for generators 94.3701 it is 80A;
- voltage is adjustable: 13.6-14.3V (37.3701) and 13.2-14.7V (94.3701);
- gear ratio – 1:2.04 (37.3701) and 1;2.4 (94.3701).
If we consider a generator, the general circuit includes the following elements:
- alternating current generator for VAZ 2109;
- negative and positive diode;
- car dashboard and warning light for generator and battery discharge;
- voltmeter device;
- fuse box installed in the engine compartment, under the windshield on the driver's side;
- additional resistor elements built into the fuse mounting block;
- vehicle ignition switch and relay;
- capacitor device, winding and car battery;
- generator voltage regulator relay installed in the engine compartment.
As for how to connect the VAZ 2109 generator, it will depend on the device model:
- generator model 37.370 - when you turn the ignition key, voltage is connected through the control light on the instrument panel and resistors. When the internal combustion engine is running, the voltage is supplied to the excitation winding of the valves on the rectifier block (the main voltage is supplied to the output of the regulator, the current does not pass through the control lamp and it does not light up)
- generator model 94.3701 - the connection circuit is similar to the previous one (after turning on the ignition, voltage is supplied to the regulator output through the control light).
Please note that the device works properly if the lamp lights up when you turn the key in the ignition switch, and then goes out after starting the engine. If the lamp does not go out immediately, but with some delay, this means that the generator is faulty