Replacing a bearing in a generator
Replacing the VAZ 2109 generator bearing is simply necessary, since otherwise the generator will fail. And this will lead to the fact that it will be impossible to use the machine, since it does not work without a generator, and that, in turn, does not function without a bearing. If any defects are noticeable in the operation of the generator bearing, it must be replaced. Replacing the bearing on a VAZ 2109 generator can be done on your own.
How to fix a generator failure on a VAZ 2109?
There are various reasons for generator failure. But they all boil down to the fact that the product needs to be repaired or replaced. After all, driving a car is impossible without a generator.
Replacing and even repairing it is quite expensive.
You can, of course, contact a service station. But you have to pay a lot for this.
I suggest you fix the problem yourself.
To do this, please read this article carefully.
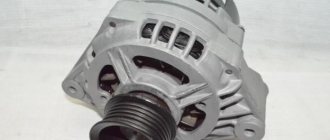
ABOUT REPLACING THE GENERATOR SET ON A CAR
It so happened that replacing the VAZ generator is necessary. The necessary spare part has been purchased. By the way, some car enthusiasts replace serviceable components with more powerful units. The reasons for this can be very different. Basically, this is the installation of new, additional electricity consumers. Powerful audio systems, good headlights, illumination of body kits and other similar “things” require an increase in the power of the generator set.
In such cases, a generator from Priora or Kalina is usually purchased and installed. Its generated current is approximately 115 A, while the standard device produces 80 A. Its mounting is similar to the standard one, only the drive belt pulley needs to be replaced. The matter is not very difficult; even inexperienced drivers can cope with it.
Required tools for replacing generators:
- Wrenches for “10”, “13”;
- Open-end wrench 17x19;
- Screwdriver Set;
- Mount.
Replacement work begins only after the battery is disconnected.
If the work is carried out in a garage with an inspection hole, then the following procedure can be recommended:
- Disconnect the engine protection. You can release it only in the area of the generator set and leave it hanging;
- Using a “10” wrench, tighten the nut on the protruding contact bolt of the generator and remove the wires from it. Also disconnect the connector from the brush assembly;
- Unscrew the tensioner bolt, the bolt securing it to the cylinder block and remove it from the engine;
- Now the nut of the bracket axle is unscrewed to mount the generator. This action is performed with a key set to “19”, remove the nut with the spacer washer and knock the axle out of the bracket.
The generator can be removed from the engine compartment and a new one installed in its place. Installation is carried out in reverse order. Connect the previously disconnected wires and connectors, and replace the drive belt. After this, you can try it out at work. Before starting the engine for testing, a few words about how to properly tension the alternator belt. This process is slightly different for different engine displacements. With a volume of 1.5 liters, the belt is tensioned by moving the generator housing away from the engine block with a pry bar. With a volume of 1.6 liters, tighten the belt using the tensioner screw.
Modern cars are equipped with a large amount of electrical equipment, both basic and additional. The source of current for its normal functioning is the battery. The battery is recharged when the engine is running by a generator set (also known as a generator).
Replacement
To replace it, you will need to remove the generator from the car and some plumbing tools. It would also be a good idea to have a generator bearing puller. Having all the necessary tools, you can handle the job with basic mechanical knowledge.
Puller
The puller greatly facilitates bearing replacement work, saving time, effort and nerves. This device is a faithful assistant not only when working with a generator, but also with other car parts.
It consists of claws and a thrust bolt. There are a large number of different pullers, they are: two-jaw and three-jaw. In our case, when working with a VAZ 2110 generator, it is best to use a two-jaw one; it is the most compact and convenient to dismantle the bearing.
Its cost varies from 200 to 1000 rubles, depending on the quality of the part.
Necessary tool
The tools you will need to complete the work are presented below:
- Ratchet;
- 13mm, 10mm key;
- 21mm head;
- 8 mm hexagon;
- Gas key;
- Powerful screwdriver “+”;
- Hammer;
- Puller;
- Punch;
- WD-40 (lubricant)
- Rags;
- Marker;
Stages of work
1. Disconnect the negative terminal from the battery. We unscrew the wires on the generator with a 10mm wrench and remove the generator excitation chip.
2. We remove the generator from the car. To do this, unscrew the generator belt tension bolt and remove the belt, unscrew the generator from the mounts and remove it from the car. Be careful not to lose the rubber bushing and washers when removing the lower mounting bolt.
3. Let's start disassembling. Remove the plastic cover of the diode bridge by bending the three latches. Unscrew the two screws securing the brushes to the body and disconnect the connector from the brushes. We mark the alignment of the covers with a marker so that in the future we can assemble everything correctly.
We are sorting out the VAZ 2107 37.3701 generator
So in this article I will describe the generator overhaul. We will talk about the 37.3701 generator, although everything on the G-222 generator is almost identical and this article will be suitable for it with some adjustments. I bought for replacement: 1. Diode bridge - 190 rubles 2. Generator capacitor - 15 rubles 3. Bearings - I took Andycar - 65 rubles 4. four nuts for 8. The relay regulator on the generator is new, so I decided not to change it. We will also need a universal puller (I personally used a rod puller instead, it wasn’t very convenient, but after fiddling around I removed the bearing with it). It is very desirable to have a brush for metal; I bought a set of three brushes and some sandpaper.
Reasons leading to generator failure
First, you need to find out what the cause of the breakdown is.
They may be the following:
— short circuit of the stator winding turns;
— if used incorrectly, the voltage regulator is damaged;
— the current collection brushes are worn out;
- the pulley has become unusable;
— the generator bearing has collapsed;
— rectifier failure;
- break in the charging circuit.
Before you begin repairing or replacing the generator, it is necessary to diagnose it.
I recommend doing this yourself.
You can troubleshoot this way:
— pay attention to the operation of the engine when starting. If the generator is not working properly, the battery does not receive energy to charge. As a result, it is discharged. The starter is unable to turn.
— dim or flickering headlights in the dark. Try accelerating the engine. If the light from the headlights becomes brighter and then goes out when the speed is reduced, this indicates a malfunction;
— look at the instrument panel lighting. Light up rhythmically when the engine is loaded;
— the battery charging sensor on the instrument panel turned on. It signals that the system is not working correctly. The generator does not supply current to the battery. At the same time, know that you have up to 40 kilometers left to drive. Then there will be no spark at the spark plugs, and your car will stop.
My recommendation for this is to turn off all energy-consuming systems. Including a stove, a fan and even music.
Next during diagnosis:
— a whistle is heard under the hood. This indicates that the generator belt tension has weakened. You need to stop and tighten the belt. It is also possible, of course, that water gets in when driving into a puddle. Wipe the belt.
— if the generator jams, you will smell the drive belt;
- you will hear a rustling sound in the area of the generator - this bearing has shattered and requires replacement. The fact is that the operating conditions of the generator bearing are very difficult, and it often breaks;
- if the generator stator casing is short-circuited, then you will hear a sound that you hear when you are traveling in an electric train or tram.
Be aware that it is usually possible to fix a malfunction in a generator only if you replace the uncorrected parts.
In order to start repairing a generator yourself, you need to prepare.
Generator repair
Repairs occur in the following sequence:
- Remove the generator from the car.
- Press three latches.
- Remove the plastic casing.
Note: this should be done with gentle movements so as not to damage the parts.
- Unscrew the two screws securing the voltage regulator.
- After this, remove it together with the brush holder.
- Disconnect the battery.
- Unscrew the four bolts securing the unit and condenser.
- Bend the stator wires so that it is possible to remove the block.
- If you want to replace the capacitor, you should unscrew the nut, remove the washer, as well as the bushing (see Changing the capacitor (vase generator)).
Note: To make work easier, you can unhook the capacitor wire lug.
- Remove the tightening screws (4 of them).
- Remove the generator cover using a screwdriver.
- Clamp the rotor until it becomes stationary.
- Unscrew the nut securing the pulley.
- Remove the spring, pulley and thrust washer.
- Remove the rotor.
Note: It is easier to remove it from the drive side.
- Remove the spacer ring from it.
Note: If there are any defects on it, it should be sanded.
- You should check the rotor with an ohmmeter. It will show whether there is a break in its windings.
- Inspect the stator. There should be no gaps from the anchor on the inside. If they are, the bearings need to be changed.
- Carefully diagnose the generator cover. If the cover sticks while the bearings are rotating, then it needs to be replaced.
- Reassemble the generator in reverse order.
- But before putting the generator in place, you should check whether its belt has worn out. To check this, you need to bend the belt in half on the opposite side. If small cracks or tears appear on it, then it urgently needs to be replaced.
Note: They are quite noticeable, so they can be easily seen. However, this does not apply to microcracks (that is, the belt can still be used with them).
- It is also necessary to pay attention to the condition of the brushes. If they have become shorter than they were before, then they need to be changed. Otherwise, the battery will drain too quickly.
You can replace the generator bearing with your own hands, as it is not difficult to do even at home. The cost of repairs may vary. After all, it is often necessary to change not only the bearing, but also other parts of the generator, since its damage leads to failure of other components. Of course, before starting repairs, it is worth reviewing photos and videos on this topic. Instructions wouldn't hurt either.
Direct work (instruction)
So, you have chosen the third option, where you have to remove the generator, disassemble it and replace the worn bearing with a new one. Let's get started:
- Disconnect the alternator wires from the battery.
- Remove the belt.
- Unscrew all fastening nuts.
- Remove the film and pull out the spacer sleeve.
- Carefully remove the generator.
- Unscrew all the nuts in a row, remove the plastic cover and pull out the voltage regulator along with the brushes.
- Of course, you need to separate the stator from the cover, but this must be done carefully so as not to break the copper winding. By the way, it often happens that the housing is simply rusty and literally stuck to the stator. Here you will need a hammer and precise, gentle blows to separate the knots into pieces.
- Separating the generator from the stator, you will see both bearings (front and rear), which are the reason for all this, and which you need to change.
- Of course, you remove the old ones that are deformed and worn out, and install new ones in their place.
- Assembling the generator and installing it in the engine compartment must be done in exactly the reverse order.
Tips and tricks
Before reinstalling an already assembled generator, it is necessary to check its belt for wear, tear and damage to the cord. Naturally, once you have climbed into the generator, you should pay attention and check its brushes so as not to crawl a hundred times. Before all replacement and repair actions, you can check the operation of the bearings in a simple way:
- remove the belt;
- start the engine;
- If, when the belt is removed, noise, whistling and grinding noises come from the generator, then this is a bearing problem.
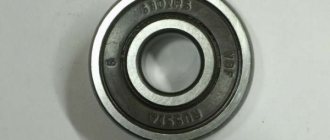
Size and catalog numbers
These parameters of the ball bearing are necessary for purchase, since without these numbers it is very difficult to buy the right part suitable for your car.
The dimensions of the bearings varied depending on the year of manufacture of the car, so the selection of a bearing can be carried out based on the year of manufacture. auto.
Cars manufactured before 2001 with carburetor engines they have bearings of type 6302 front and 6202 rear.
Cars produced after 2001 with injection engines, have bearings type 6303 front and 6203 rear.
Catalog numbers (articles) and external dimensions
| Bearing, no. | vendor code | Dimensions, mm |
| 6303 | 180302 | 17*47*14 |
| 6203 | 80203 | 17*40*12 |
| 6302 | 180303 | 15*42*13 |
| 6202 | 80202 | 15*35*11 |
Bearings VAZ 2109 "Samara"
VAZ-2109 Lada Samara is a five-door front-wheel drive hatchback manufactured by the Volga Automobile Plant. Produced since 1987. This is essentially a five-door version of the VAZ-2108. In 2004, production of the VAZ-2109 was transferred to the AvtoZAZ plant in Ukraine. Previously, the car was equipped with in-line four-cylinder eight-valve petrol carburetor engines with a volume of 1100, 1300, 1500 and 1600 cm3. Since 1994, four-cylinder gasoline engines with split fuel injection began to be installed on these cars.
| Installation location | Number | Bearing type | Size | Qty |
| Generator | 180201 (24940220) | Ball radial single row | 12x32x10 | 1 |
| Generator | 180302 (24940230) | Ball radial single row | 15x42x13 | 1 |
| Engine (belt tensioner) | 256705 (2105-1006124) | Double row angular contact ball | 25x62x28 | 1 |
| Differential | 7207 (2108-2303036) | Roller conical single row | 35x72x18.3 | 2 |
| Gearbox (primary shaft) | 42205 (2108-1701031) | Roller radial single row | 25x52x15 | 1 |
| Gearbox (primary shaft) | 50305 (2108-1701033) | Ball radial single row with locking groove | 25x62x17 | 2 |
| Gearbox (secondary shaft) | 42305 (2108-1701180) | Roller radial single row | 25x62x17 | 1 |
| Gearbox (secondary shaft) | 464706 (2108-1701108) | Needle single row without rings | 30x36x25 | 5 |
| Water pump | 330802 (2108-1307027) | Double-row radial ball with a roller instead of an inner ring | 15x30x92 | 1 |
| Front suspension (strut) | 348702 (2108-2902840) | Ball thrust-radial single row | 14.5x52x14 | 2 |
| Distributor | 7690906 | Ball radial single row | 30x47x7/8 | 1 |
| Steering (shaft support) | 2108-3401120 | Needle radial single row without inner ring with separator | 21.6x37x11.5 | 1 |
| Steering (gear support) | 80-903 (2108-3401123) | Ball radial single row | 17.7x35x7.8 | 1 |
| Steering (gear support) | 604901 (2108-3401104) | Single-row needle with separator | 11.1x17.5x13 | 1 |
| Rear wheel hubs | 256706 (2108-3104020) | Double row angular contact ball | 30x60x37 | 2 |
| Front wheel hubs | 256907 (2108-3103020) | Double row angular contact ball | 34x64x37 | 2 |
| Clutch | 360106 (1111-1601182) or | Ball radial single row | 30x55.6x17.5 | 1 |
| Clutch | 520806 (2108-1601182) | Ball radial single row | 30x62x16/20 | 1 |
How to replace brushes yourself
When it is necessary to replace the brushes of a VAZ 2109 generator, the broken device must be dismantled to begin repairs. Before completely removing the module, you need to make sure that the damage lies in the brushes. To do this, it is necessary to dismantle only the faulty (poorly functioning) device. To gain access to the brushes, simply unscrew a couple of bolts that secure the charging relay to the housing. You need to unscrew the bolts carefully, making sure that they do not end up behind the body, because getting the fallen fastening elements is a big problem.
To check the integrity of the brushes, you need to attach a test light to them and apply positive voltage to the relay terminals, and negative voltage to the brush holder body. At a voltage of 12 V the lamp should light up, and at 15 V it should go out. If it does not light up or does not go out, the cause of the poorly functioning device is faulty brushes.
Next, you need to check how freely the brushes move in the grooves and the depth of their protrusion. If the brushes protrude less than half a centimeter, they should be replaced. It is advisable to completely change the relay along with the brush holder.
Purpose and principle of operation
An electric generator is designed to provide the vehicle with electricity and recharge the battery. What is the battery for then? Everything is very simple, but it provides the car with energy when the engine is off, and the generator when it is running.
Principle of operation. When you turn the ignition key, the battery supplies voltage to the electric starter motor, which starts the car engine, which in turn starts the generator through a belt drive. From the moment the engine starts the generator, it is the generator that provides the car with energy.
What types of bearings are in the top ten: part numbers and sizes
Bearings in generators of VAZ 2110 cars are closed type, ball, single row, have a double-sided seal.
- The front marking is 6202 2RS (in domestic catalogs under number 180202).
- Rear bearing - 6103 2RS (aka - 24940220).
An important point: when choosing bearings, you should pay special attention to the manufacturers of their hubs. Typically, VAZ 2110 bearing hubs are produced in Samara, their marking is SP3-4.
You can also find hubs on the market from 23 GPP (this is Vologda) and 3 GPP (this is Saratov). It is strictly not recommended to buy bearings on which the hubs are not marked. You also cannot buy Chinese generator bearings, which are now found everywhere, since the quality of these bearings does not stand up to criticism.
When replacement is required
If you hear creaking and howling while the generator is running, then you have discovered the main sign of bearing failure. The only correct solution is replacement.
Creaking and howling occur due to the fact that the bearing separators lose lubrication, they wear out, and are destroyed as a result of prolonged use under heavy loads.
Sometimes a thin creaking sound can be heard from the generator, which is often confused with bearing failure. In fact, it could be the timing belt pulley or the water pump. Because to make sure, just remove the belt. If the sound remains, then the culprit is the bearing.
What to use
Before you start replacing the bearings on the generator, you need to determine what elements are on your car, as well as what they can be replaced with.
When choosing bearings, pay attention to the hub manufacturers. For VAZ 2110, bearing hubs are produced in the city of Samara and are marked SPZ-4. But there are also Vologda and Saratov hubs marked 23 GPZ and 3 GPZ, respectively. It is not recommended to purchase bearings with unmarked hubs, much less use Chinese generator elements.
Front and rear
Dimensions
It will not be superfluous to know what dimensions the standard front and rear generator bearings for your “ten” should have in order to make sure that the spare parts are selected correctly.
The rear bearings of the new type, marked 6203, have the following dimensions:
The front bearings marked 6303 have the following dimensions:
- Inner diameter - 17 millimeters
- External diameter - 47 millimeters
- Width - 14 millimeters.
Disassembled device
Preparing for work to replace parts
Complete the devices and tools according to the following list:
- screwdriver, pliers, small hammer;
— a rheostat, voltmeter, and ammeter are required;
— lubricating, penetrating liquid VD40 (vedeshka)
- standard set of keys and sockets;
— puller.
Be sure to review the drawing or sketch of the generator assembly.
When you have done all this, you can safely begin the repair.
Generator bearing and belt diagnostics
To check, the generator does not need to be removed. The test is carried out using a tester. You can use a cheap Chinese tester. The two probes of the measuring device need to be connected to the battery terminals and the voltage checked.
Analysis of voltage values makes it possible to judge the health of the generator set. What voltage the generator device produces can be found in the manual.
Signs of device malfunction:
- The charging indicator light is constantly on or flashes when the engine is running;
- the battery either does not discharge completely or receives an increased charge;
- The headlights do not shine well enough when the engine is running, poor performance of other electricity consumers;
- the headlights are too bright, the electrolyte in the battery boils;
- heats up at high voltage;
- increased noise during engine operation from the generator side.
There may be problems in the brush assembly, which may be due to a malfunction of the brushes, their size, or problems with the three-level regulator. It is impossible to check the size and serviceability of the brushes without removing the generator. But you can change the brushes.
If the brushes are less than 0.5 cm long, that is, they do not correspond to the required size, they need to be replaced. The condition of the brushes is checked to see how the brushes move in the grooves. After replacing the brushes, the generator restores its operation after a few minutes when the slip rings and brushes grind in.
The three-level regulator should be checked along with the brush holders. If the regulator is working properly, the voltage should be 14.7 V. If the voltage is less than 13 V, the regulator must be replaced with a new one, since it maintains the required voltage for devices in the on-board network.
Problems are possible not only with the cheeks, but also with the diode bridge.
Signs of a diode bridge malfunction:
- There is no charging at all;
- charging significantly exceeds the permissible values.
Repairing a diode bridge by replacing its spare parts is problematic. Therefore, the problem can be solved by replacing the diode bridge with a new one. When replacing the diode bridge, install the contact bolt, install the leads of the stator windings, and install the brush assembly.
While the generator is running, with or without noise, it is rarely noticed. But as soon as it stops producing current, its absence is immediately noticed. The battery charging light comes on and the search for a fault begins. But it was enough to just listen to the sounds that the generator makes, and the trouble could have been avoided.
Replacing the VAZ 2114 generator bearing may be required as early as 60-80 thousand km. It all depends on how much the owner pays attention to such little things as the tension of the generator drive belt. First of all, this is what affects the resource of the generator. For prevention, let's check the degree of belt tension.
An ordinary eight-cylinder engine, which costs 2114, does not require special maintenance skills. On the tenth family, the belt is tensioned through a tension roller, but in 2114 there is none of this, and the belt itself no longer drives any mechanisms or assemblies.
There is no power steering or air conditioning compressor. It's simple, the main thing is to buy the right belt. Its index is 21082-3701720, and it is better to take Gates or Bosch. Such a belt costs the same as two domestic ones, but its service life is longer. A German belt will cost 530 rubles.
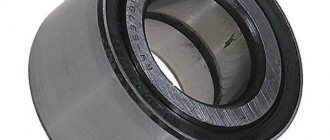
Select bearing
Structurally, a conventional generator has two bearings - front and rear. The front one, as usual, is more powerful, since it remains under a relatively large load, which arises due to the influence of the tension of the generator belt. The integrity of the bearings should be checked by external inspection. Cracks in the races, the presence of rust or chipping of metal, etc. are unacceptable. The next step is to check the ease of rotation, the presence of play or extraneous noise. It is recommended to replace the front bearing together with the cover, since it is rolled into the generator cover, but it is cheaper, if the cost of repairs matters, to press it out and replace it separately from the cover. If you decide to carry out the repairs yourself, without resorting to the services of a specialist, this will allow you to save some money. You will only need to spend money on purchasing bearings.
During the repair process, you will need a set of tools, for example, a hydraulic press and various pullers, without which it will be quite difficult and you will need to use resourcefulness. Another very difficult step is the correct choice of bearing for the generator.
KATEK generators are routinely installed on dozens of them. With the digital designation 5102.3771 or 94.3701, the power of both is 80 amperes, voltage is 14 volts. Answer the question “What bearings are on the VAZ-2110 generator?” you can do this: if it is a standard KATEK generator, then this generator most often has two bearings. These are the front 6302 in older versions, or 6303, and the rear 6202, or, accordingly, in a more modern version 6203.
The dimensions of the front bearing (6303) are 17×47×14, the dimensions of the bearing (6302) are 15×42×13. Their domestic “twins” are designated as 180302 and, accordingly, 180303 and are called 303 closed, or 302 closed.
The dimensions of the rear bearing (6202) are 15×35×11, those of the bearing (6203) are 17×40×12. Domestic analogues are designated as 180202 and 180203.
The practical part is removing the generator, disassembling it, repairing it and reinstalling it.
Due to the fact that the generator is located under the hood of the car, it is necessary to turn off the engine, turn the steering wheel to the right all the way and open the hood. The electric generator on VAZ 2108 - 15 cars is installed in front of the engine, in the lower left corner of the engine compartment, between the engine and the cooling radiator.
Before dismantling the generator, it is necessary to disconnect the ground from the battery, i.e. negative contact.
Before removing the generator itself, in order not to do unnecessary work, we remove the charging relay from the generator housing and check the production of the generator brushes. The charging relay is installed in the rear of the generator housing, and is attached to it with two bolts. To unscrew them you will need a Phillips screwdriver. When unscrewing the bolts, be careful not to drop them on the crankcase guard, otherwise getting them out of there will be one big problem.
To remove the relay, you need to disconnect the wire, the “female” contact. After removing the charging relay and visually inspecting the brushes, we decide to purchase a new generator voltage regulator relay or reinstall the dismantled one, depending on the wear of the brushes. For their normal operation, a brush length of at least 4 cm is required. Now we proceed directly to removing the electric generator from the engine.
- We disconnect the wires from the generator - as a rule, they are red and consist of two groups of wires, red. One group consists of two wires and is attached with a nut to a bolt on the rear wall of the generator. The other group consists of one wire and is connected to the generator terminal via a male-female contact, also on the rear wall of the generator.
- To remove the generator from the engine, you need to unscrew two nuts and one bolt in the following sequence: unscrew the nut attached to the generator belt tensioner bar (at the top of the generator), unscrew the bolt securing the tensioner bar to the engine block and remove it. The last step is to unscrew the nut from the bolt securing the generator bracket to the engine block.
- The generator mounting bracket is located at the bottom of the engine block, directly below the generator. After unscrewing this nut, you need to remove the generator belt from the generator pulley itself.
- The generator mounting bolt should be pushed to the left, out of the bracket, until it stops against the body shell or the generator’s mud protection.
- On the right wheel side, you need to unscrew the two screws that secure the dust protection of the generator to the car body.
- If the generator mounting bolt still rests against any body parts, you should press on the engine with one hand, and at the same time pull out the bolt with the other hand.
Now your generator is completely disconnected from the engine, and you can begin to disassemble and repair it.
When disassembling an electric generator, you need to have two important things on hand: a bearing puller and a vice. This will greatly simplify and speed up your work. Using a wrench set to “19”, unscrew the nut from the rotor shaft, which secures the impeller to the shaft.
To do this, you need to hold the impeller directly with one hand and unscrew the nut with the other hand, counterclockwise. It will take some effort, of course, but this nut needs to be unscrewed. The generator impeller is secured to the shaft with a key, and after removing the impeller from the shaft, it is necessary to remove this very key.
Now we turn the generator over with the back cover up, and unscrew the four nuts with an “8” wrench. We take out the released four studs and release the front part of the generator housing.
In the front part of the generator cover there is a “front” bearing secured by plates. We remove it by unscrewing the nuts and plates and knock the bearing out of its seat. The easiest way to do this is with a wooden plank, the size of which matches the diameter of the bearing.
Now we need a vice: screw a nut onto the rotor shaft and secure the generator, or something that we have not yet disassembled, in the vice. We tear off the back cover with a sharp upward movement from the bearing seat.
We still have the rotor shaft clamped in a vice, with the “rear” bearing in the very top part. To dismantle it, you need a puller; we put it on the bearing and remove it from the shaft.
Now you have two bearings on your hands - “front” (small) and “rear” (larger) - look at their markings and purchase exactly the same ones.
Important: Practice shows that when purchasing bearings for a generator, you need to remove them and, by analogy, buy them in a store. Advice from sellers such as: “they are all the same type” or “if you have an old-style generator, then take these” are often wrong. Yes, they are almost always wrong. To save time, the easiest way is to remove the bearings and select similar ones based on their markings.
The same advice applies to the diode bridge installed in the rear cover of the generator. If damage or metal oxide is visually observed on it, it is better to remove it without hesitation (it is secured with four nuts to the inside of the back cover) and purchase a new one.
Cost of spare parts (on average): Bearings (pair) – 150 rubles. Charging relay: 140 rubles. Diode bridge – 200 rubles. Bearing puller - 100 rubles. Total: 590 rubles.
- We start by installing the rear bearing on the shaft. This is done using a hammer and a small board. With two or three blows we seat the bearing on the shaft.
- If the diode bridge is removed, we fix it in its “original” places, on the same four studs, in the back cover of the generator housing.
- We install the back cover on the generator rotor so that the bearing completely “sits” into its seat in the back cover of the generator; to simplify the procedure, you can use a hammer and, with not very strong blows on the back cover, “seat” it onto the shaft.
- In the front cover we replace the small (or front) bearing and secure it with plates in the seat.
- We take the generator out of the vice and before putting on the front cover, we put the spacer ring on the shaft, between the front bearing and the thrust recess on the shaft.
- We install the front cover and tighten the nuts “crosswise” on long studs so that the tightening is even.
- We install a key in the recess on the rotor shaft, then put on the generator impeller and tighten it with a nut.
The generator is assembled and now, for convenience, you need to install the generator relay with brushes in its standard place. And don’t forget to connect the wire from the generator to it (the relay).
The installation procedure is the reverse of its removal:
- We insert the generator into the mounting bracket.
- With one hand we press on top of the engine, and with the other hand, from under the front right wheel arch, we insert the bracket bolt into place. We screw the nut of this bolt on, but do not tighten it.
- We secure the dust protection of the generator with self-tapping screws.
- We put the generator drive belt on the generator pulley and install the generator belt tensioner bar. We tighten the belt to the required deflection values (1 - 1.5 cm) and at the same time tighten the nut on the tensioner plate.
- Now tighten the nut on the generator mounting bracket.
That's it, the generator is installed. Make sure once again that the ground terminal is removed from the battery and connect all wires to the generator.
Remember that there are three of them: paired wires are attached with a nut to a stud on the back wall of the generator, and the “female” is inserted into the “male”.
Now you can put the negative terminal on the battery and start the car. I am sure that all your work was done correctly, and the generator began to produce the voltage necessary for the machine to operate.
To ensure proper operation of the generator, check the output voltage with a voltmeter. Good luck to you on our roads!
Replacement
The procedure cannot be called complicated, but it is very important to strictly follow the instructions. Based on our recommendations, as well as video tutorials, you can carry out the replacement yourself without any problems.
You have already found out what bearings are on VAZ 2110 generators, purchased a set of new spare parts, so you can start repairing.
Dismantling works
Front bearing
- Slightly unscrew the mounting nut on the generator, and also loosen the adjusting bolt.
- Reset the alternator belt and start the engine. This will allow you to verify that the problem is with the generator.
- If the noise disappears, then we move on. There is still a lot of work ahead of you.
- Let's move on to the battery, from which the negative terminal should be removed. This is important from a safety point of view and protection against accidental short circuits during repairs.
- Once the terminal is removed, unscrew all the wires going to your generator.
- If you have a crankcase guard, unscrew the mounting bolts and remove it. This will allow you to reach the lower mount of the generator and remove the device. Remove the generator by pushing it through the engine compartment.
- Using a regular screwdriver or other handy tool, you need to block the generator rotor and then unscrew the pulley.
- The next step is to look for special latches. By pulling them to the side, you will be able to dismantle the device body.
- Next, the generator brushes are unscrewed, as well as the mounting bolts holding the halves of the generator assembly. There should be 4 of these bolts in total.
- We recommend marking both halves of the generator housing to avoid problems during reassembly.
- Use a flathead screwdriver to pry up the cover and remove it.
- Practice shows that it is more convenient to remove the rotor from the front cover bearing in the following way. Take a nut and screw it onto the rotor threads. Then hit it with a hammer, first placing a wooden block under it.
- Find a part whose diameter will coincide with the diameter of the bearing being removed. For example, a 27 millimeter head may be perfect.
- Gently start tapping the element so that the bearing comes out of its seat.
- Take the new bearing and prepare to reinstall it.
- The first step is to treat the new bearing with lubricant so that it lasts as long and reliably as possible.
- To install a new component, you will need the old bearing. Place it on top of the new device and lightly tap with a hammer to install.
That's it, the front bearing has been removed and replaced. Let's move on to the back.
Press-fitting
Rear bearing
- To remove the rear element, you will need a special puller;
- If you don't have a puller, you will have to knock out the component with a chisel. An alternative option is a metal rod and a powerful, strong screwdriver;
- The selected tool is used to strike the bearing with a hammer. Here you definitely need to move along the surface, moving in the opposite direction;
- Some people can easily cope with dismantling; they use a regular strong open-end wrench;
- Now take the socket that you used to remove the front bearing and the old generator element that was removed. With their help, a new bearing is driven into its seat;
- If you don't like this method, use a tubular wrench or a metal pipe whose diameter matches the diameter of the rear bearing.
Replacing the VAZ 2109 generator bearing: features and procedure
Replacing a bearing in a generator
Replacing the VAZ 2109 generator bearing is simply necessary, since otherwise the generator will fail. And this will lead to the fact that it will be impossible to use the machine, since it does not work without a generator, and that, in turn, does not function without a bearing. If any defects are noticeable in the operation of the generator bearing, it must be replaced. Replacing the bearing on a VAZ 2109 generator can be done on your own.
Diagnostics
Before you begin replacing the bearing, you should check its operation and other parts of the generator for wear or damage.
Checking the rear bearing
Replacing a bearing in a VAZ 2109 generator
To check if the rear bearing is working correctly, you should:
- Visually determine if there are scratches, cracks or other damage on its surface.
- Check its rotation speed.
- Lightly rock the outer ring of the bearing from side to side.
- Twist it sharply clockwise.
Note: The bearing should not seize during this time. Otherwise it will have to be replaced.
Checking the front bearing
Replacing bearings for a VAZ 2109 generator
It's done a little differently:
- Hold the pulley with your left hand.
- With your right hand, smoothly scroll the front cover, first forward, and then back.
Note: if the bearing or its cover jams, it must be urgently replaced.
Checking the generator cover
Replacing bearings on a VAZ 2109 generator
In order to check the generator cover, you must:
- Remove the cover.
- See if there are any defects on it.
- Put her in her place. If it is firmly attached back, then it does not need to be changed yet.
Typically the bearing is rolled into the cap. Therefore, replacing it also means replacing the cover itself. However, the cost of the cover is quite high, so some people prefer to remove the bearing and then repair or replace it.
VAZ 2114 generator bearing numbers
Once we were convinced that bearing replacement was inevitable, all that was left was to simply select the bearing and replace it. In general, everything is simple, but with the huge number of fakes that flood the market, it would not hurt to know the dimensions of the bearing so as not to get into trouble. Since there are only two ways to find out the dimensions of the bearing - remove the generator and measure it with a caliper, or ask knowledgeable people. Knowledgeable people say that: the front bearing of the generator has an internal diameter of 17 mm and an external one of 47 mm; the rear bearing has an inner race with a diameter of 15 mm, and its seat is 35 mm; The width of the bearing race of the VAZ 2114 generator is 11 mm at the rear and 14 mm at the front.
The front bearing should be marked 6302, and the rear bearing - 6202. The price of a generator bearing for a VAZ 2114 should not be higher than 220 rubles. Although, depending on your luck. And also, if you are too lazy to play with pressing the bearing out of the cover, as an alternative, you can buy a cover assembled with a bearing. It will cost no more than 400 rubles, and the replacement will be much more pleasant.
Imported or domestic
Belarusian 90-amp BATE and Japanese Denso generators have bearings of the same size.
Imported analogues of bearings have a slightly different designation, namely:
Most 80-amp generators have bearings of similar sizes, at least this applies to domestic ones. If the generator has already been replaced before you, then you may be faced with the fact that a generator from a different manufacturer is installed and the bearings are of different sizes. Depending on the generator manufacturer, bearings of other sizes are sometimes found, for example, in the fairly common Bosch 14V 53-98A 0124 415 038 generator, bearings 6003-2RS (rear) are installed, the dimensions of which are 17 × 35 × 10 and 6303-2RS (front) , respectively, 15×35×14. The same bearings can be found in other imported generators. However, there are options where the rear bearing is designated as 6000-2RS, and the front bearing – 6203-2RS.
In order to accurately determine the dimensions of the bearing, it will have to be removed. If the markings on the bearing are not visible, then it is best to turn to professionals (you should not trust a caliper).
If you have decided on the size of the bearing, then to the repeated question “What bearings are on the VAZ-2110?” The answer suggests itself - original!
The quality of bearings varies from manufacturer to manufacturer; some prefer to install bearings from domestic manufacturers on their generators, while others prefer imported ones. When repairing a generator, everyone decides this issue for themselves, but after listening to numerous tips, some car enthusiasts are inclined to choose imported ones. If you focus on price-quality ratio, many experts recommend DAS LAGER Germany. But there are other suppliers of quality bearings: the French company SNR; FAG is one of the leading companies in Germany; NSK is another major bearing manufacturer from Japan; NTN – Japan; Kouo - part of the Toyota concern of Japan; Kraft or BOSCH.
We also supply bearings from Chinese manufacturers, but the attitude of motorists towards generators and bearings from the Middle Kingdom is far from flattering. A bearing is considered original if it is approved by the vehicle manufacturer for sale on the market. It usually corresponds to what is (or was previously) supplied to the assembly line. The car manufacturer guarantees that these bearings will not let you down.
If you are considering various options, then all the bearings with the corresponding markings at first glance look the same, but after opening the package, you need to pay attention to the marking, which, in addition to the designation of the bearing itself, consisting of digital and letter designations, must contain an indication of the manufacturer and necessarily the country of origin. If this is not the case, then it is quite possible that it is a fake. In this case, the money lost will not be that big (most often up to 100 rubles per bearing). But you will lose significant time and nerves.
Dismantling and disassembling the unit
Spray the generator fasteners with WD40 liquid. Wait 30 minutes and unscrew the bolts and nuts. They will be much easier to unscrew.
Now the generator is on your table, start repairing:
— remove the brush holder and voltage regulator; to do this, you need to unscrew all the fasteners;
— remove the tension bolts and the cover with the stator;
- disconnect the phase windings from the output wires that go to the rectifier unit;
— use a puller and remove the pulley, which is located on the generator shaft.
If your generator winding is shorted or the winding is broken, you will need to replace the wires with new ones. As a rule, winding damage occurs near the contact rings. Just in case, check if the ends of the winding are unsoldered. To eliminate this, rewind the turn of the wire in the area of the break in the generator winding;
— next you need to remove the broken end of the winding, which is located on the slip ring. Solder the wire that was rewound;
- if a weak or very strong electric charge is detected that the generator produces, this indicates a malfunction of the relay.
Replace the generator relay and you will eliminate the problem;
- with a working generator and a flashing light, this is a direct indication of the failure of the power diode. It also needs to be replaced;
- noise in the bearing area - it is worn out. Disassemble the generator and check the bearing. If it is worn out, replace it.
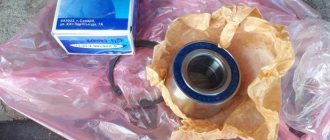
Selection and search of bearings for a car generator
- Guarantee
- Affiliate
- Articles
- Question answer
- Public offer
- Guarantee
- Affiliate
- Articles
- Question answer
- Public offer
Many motorists operating older cars with mileage of more than 100,000 km have probably encountered the need for repair or scheduled maintenance of the generator. And, as is known, bearings are subject to the greatest wear in the entire generator structure. Diagnosing generator bearing failure is often not at all difficult. If an extraneous hum appears during engine operation, increasing as the number of revolutions increases, then one of the sources of its origin may be the generator bearing. For a more accurate diagnosis, it is necessary to loosen the generator belt tensioner, then remove the belt and release the generator pulley. Next, we start the engine and, if the hum disappears, then the reason is clear. The generator bearing needs to be replaced.
Replacing Generator Bearings VAZ 2108
VAZ 2108 2109 21099 Generator repair
You will need: “8” wrench, flat-blade screwdriver, universal puller, tubular mandrel, hammer, ohmmeter (autotester), indicator.
4. Mark the relative position of the generator covers.
5. Unscrew the four connecting bolts around the generator circle.
6 and reset using a screwdriver.
7. Remove the generator cover.
8. Remove the stator.
9. Inspect the stator. There should be no traces of attachment to the stator on its inner surface. If there is wear, the bearings or alternator covers must be replaced.
10. Remove the rotor shaft from the bearing. If necessary, screw the pulley nut onto the rotor shaft and, using a wooden spacer, use a light hammer to press the rotor shaft out of the bearing.
11. Inspect the drive side cover (complete with generator bearing). If, as the bearing rotates, you feel tilting between the rings, rolling or jamming of the moving parts, the safety rings are damaged or there is a lubricant leak, replace the bearing, and if there are cracks in the cover, especially where the generator is installed, the generator cover should be replaced.
12. To replace the bearing or cover, tighten the four screws that secure the bearing washer.
13. and remove the washer.
14. Using a mandrel of suitable diameter with light hammer blows, press the bearing from the generator cover
15. Press the new bearing into the cap using a socket of the appropriate diameter.
16. Inspect the sliding rings. If there are abrasions, marks, scratches, signs of brush wear and other defects, the rings should be sanded. If it is not possible to remove the rings with sandpaper, sand the rings on a lathe, removing a minimum layer of metal, and then sand.
Generator bearings How to replace.
If the channel brings you real benefit, then support the project! The quantity doesn't matter! CARD (SBERBANK).
17. Check the resistance of the rotor windings using a tester by connecting it to the slip rings. If the tester shows infinity, this means that the rotor winding and its open circuits must be replaced.
Caps and bearings
There are bearings in the front and rear covers, which are attached to the stator housing. They are necessary to ensure the normal functioning of the generator. With their help, the rotor rotates more freely, but most importantly, it is centered strictly along the axis of rotation. Consequently, the rotor magnetic circuit does not touch the stator winding during operation. The covers are made of light metal - aluminum, which performs several functions at once.
Firstly, aluminum perfectly absorbs and releases heat. And the VAZ 2108 generator gets very hot during operation. Secondly, aluminum is lightweight, which makes the entire structure lighter. In addition, an impeller is mounted on the generator, in the front part. As the rotor rotates, it generates a stream of air that enters the mechanism body. Due to this, additional cooling occurs.
How to disassemble the device to recharge the battery
To make it convenient to replace the bearing, you will again need to disassemble the VAZ generator. First, you should loosen and then unscrew the fastenings of the rotor shaft impeller. For this operation you will need a 19mm wrench and a vice. It is necessary to clamp the device body in a vice and, holding the impeller with a screwdriver, unscrew the nut counterclockwise with a wrench. The impeller is attached to the shaft using a metal bobbin, which after removal must be removed and hidden; it will be needed during assembly. Carefully remember the location of the fasteners; each model differs in their relative orientation, regardless of how it is indicated in the instructions.
Video “More visual replacement instructions”
You can replace the generator bearing either at a car service station or in a garage. The only condition for replacing it yourself is that you must have a vice, as well as a special puller for dismantling. From the tool kit, you will need a standard mechanic's tool, including screwdrivers, wrenches and a hammer (the author of the video about replacement in garage conditions is the Expert R channel).
- First you need to disconnect the battery and remove the timing belt. To do this, use a 13 wrench to unscrew the fastening nut, and then, using a 10 wrench, loosen the tensioner; the fastening screw itself must be unscrewed.
- You need to disconnect all the wires from the generator device, after which you need to unscrew the lower clamp using a 13mm wrench, remove the screws, and dismantle the assembly itself.
- After removal, we proceed to disassemble the mechanism. First, unscrew the pulley, for this you use a 24mm wrench, at this stage you may need a vice. To remove the pulley from the axle, you must use a puller.
- After removing this element, the brush assembly, control device, capacitor, and diode rectifier are dismantled. All these components are located under a plastic cover. To disassemble, you will need to unscrew the four mounting bolts; they are used to secure the second part of the case. These bolts are typically welded and can be difficult to remove, so spray them with WD-40 and wait a few minutes before removing them.
- When the bolts are unscrewed, the front cover of the device can be removed - the front bearing is installed in this cover. To remove this device, you will have to use a special mandrel, and its diameter should be slightly smaller than the diameter of the outer ring. Alternatively, you can use a piece of pipe. The mandrel is mounted directly onto the ring, after which a hammer will be used to knock out the bearing part.
- When the device is removed, a new part is mounted in its place, then it is pressed into the cover, for this a mandrel with a hammer is also used.
- After completing these steps, the rear bearing is replaced; to do this, it is necessary to dismantle the stator. After removal, the plastic support of the part is pushed out and removed from the rotor. Only by doing this will you gain access to the bearing.
- The procedure for dismantling the device is carried out with a puller; when the part is dismantled, a new bearing is installed. Only in this case, the diameter of the mandrel must correspond to the size of the inner ring. When installing, try not to damage the ring itself; also during installation, keep in mind that under no circumstances should you clamp the rotor in a vice. This is because the rear part of the rotor is quite soft; therefore, when it is installed in a vice, scuffing may occur. And they, in turn, will not allow you to assemble the unit correctly.
- It is best to use a hydraulic pump to mount the part, but if it is not available, then the rotor should be placed on a wooden surface during installation. It is necessary to screw any nut directly onto the thread itself on which the pulley is installed; this will make it possible to further protect the thread from possible damage.
- When the bearing element is pressed into the structure, you can begin assembling the unit. The assembly procedure is carried out in reverse order.
Price issue
The cost of devices varies depending on the manufacturer. On average, prices for bearings vary around 70-150 rubles.
The video below provides more detailed and visual instructions for repairing a generator set and replacing bearings (the author of the video is Ivan Kirillov).
Installation of a generator on a VAZ
Assembling the generator and installing the unit on the car is carried out in the same way as during dismantling, only in the reverse order.
After installing the generator, you need to check the correctness of its operation and your repairs.
To do this, follow these steps:
— turn on the engine;
— listen to the generator work. If there are no extraneous noises, it means you did everything right;
- pay attention to the movement of the belt. It should not squelch or whistle. The belt itself must be worn so that there is no spontaneous displacement or slipping of it.
— Gently tighten the generator mount without overtightening the fasteners. Since when the motor and the generator housing itself heat up, cracks may form in the metal.
Now, using previously prepared instruments for measuring current and voltage, it is necessary to check all the electrical characteristics of the installed generator.
Use a voltmeter, ammeter and rheostat for this. The instrument readings must be the same as in the characteristics of the car’s technical passport.
Be sure to check the generator rotor speed. This can be determined with a tachometer. It is located on the instrument panel.
The optimal tachometer indicator is considered to be numbers from two thousand to five thousand revolutions per minute.
And you should also know that the generator and battery work together.
Of course, the generator is the basis for generating electrical energy for the car.
The battery functions as a backup source of electricity. It is needed naturally to start the engine and to power electronic devices when the engine is not running.
The condition and operation of the battery depends on how efficiently the generator operates.
Therefore, by monitoring the operation of the generator and maintaining it in good condition, you extend the life of the battery.
You see, you have completed the task of repairing your car’s generator on your own. And most importantly, we didn’t spend a single penny for this and without involving expensive specialists from a service station.
But if you have any questions or unexpected problems during the repair, please contact me in the comments.
I will always be happy to help you with advice.