Many motorists have encountered the fact that the voltage in the on-board network of a VAZ-2114 car has dropped. This is due to the fact that malfunctions appeared in the generator. Direct causes may be brushes and diode bridge . Of course, repairing this unit is usually expensive and the car enthusiast tries to either repair the part on his own or buy a used one. It is not a fact that the second option will last long, so it is recommended to repair the original one, which will certainly last longer.
The video below will tell you about checking the operation of the generator on the VAZ-2114 (+ its overhaul):
The video will tell you about the design of the generator, and also tell you about the repair, nuances and details of the process
GENERATOR DEVICE
First you need to see the device of the VAZ 2114 generator.
Repair of the VAZ 2115 generator is carried out as follows:
- First you should disconnect the terminals from the battery.
- Next, unscrew the nut from the contact screw; by doing this, you can disconnect the wiring.
- Then remove the screw that secures the strap tensioner and the two screws that secure the tension frame.
- Next, unscrew the nut, which is located to the right of the mechanism. You need to lift the part and remove the pin - you won’t be able to pull it out completely, so remove it as far as possible. To dismantle the unit, the pin will have to be cut, and during subsequent installation a new pin will be installed, only on the opposite side.
- After this, the unit is removed and disassembled. The tension screws are unscrewed, as well as the bolts that secure the phase winding and the capacitor device to the cover. If necessary, the capacitor element can be disconnected from the rectifier unit.
- The phase windings should also be disconnected directly on the block itself.
- Next, you need to unscrew four more tightening bolts, and then remove the back cover with the rotor mechanism and stator.
- Now the rotor should be clamped in a vice and disassembled, unscrewing all the necessary nuts and removing the pulley with the ring. All failed elements - voltage regulator, bearings and other components are replaced if necessary. After this, the unit is assembled and put into place.
Have you ever repaired a generator yourself?
| Name | Indicators |
| Maximum voltage | 13.18 V - 14.70 V |
| Maximum current | 80 Amps |
| Belt drive deflection | 0.8 cm per 10 kg |
| Weight | 5.0 kg |
| Electrical energy source | KATEK 2114 / 15 |
| Rated voltage | 12 Volt |
| Power | 450 W |
Expert opinion
It-Technology, Electrical power and electronics specialist
Ask questions to the “Specialist for modernization of energy generation systems”
How to check the generator on your own: checking the generator without removing it from the car, relay-regulator, diode bridge Installation The new regulator is installed in its place in the reverse order of removal, so you should not have any difficulties in installing it. Ask, I'm in touch!
Instructions for removing the generator
To remove the generator from the car you will need an inspection hole, a lift or an overpass (author of the video channel “In Sandro’s Garage”).
Tools and materials
To remove the VAZ 2114 generator, you need to prepare the following tools:
- wrench for “10” and “13”;
- open-end wrench 17x19;
- mount;
- head at "15".
You should prepare a rag to clean surfaces from dirt.
Stages
The removal procedure includes the following steps:
- First you need to remove the protection from the engine.
- Next, loosen the drive belt tension roller placed on the pulley.
- Then first unscrew the upper mounting bolt of the generator, and then the lower one.
- Loosen the air conditioning compressor mount.
- We remove the drive belt from the pulley and dismantle the generator, moving it to the right side closer to the battery.
- After unscrewing the bolt securing the air conditioning compressor, we hang the device.
- Unscrew the generator set mounting bolts.
- Having disconnected the terminals of the generator, we remove it for repair.
Next, you can repair the removed unit.
REASONS FOR CHANGING BRUSHES
- Inexplicable chaotic shutdown of various electrical equipment in the car.
- A noticeable decrease in the brightness of headlights and other lamps both inside the car and on the body.
- Battery that discharges too quickly and problems with voltage levels.
These are the readings given by the on-board engine when the engine is running. We begin to treat the patient.
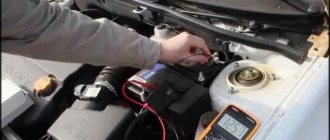
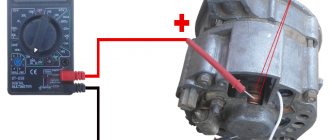
(To begin with, of course, disconnect the positive terminal from the battery, so as not to cause a short circuit and fire.) Next, unscrew the positive wire on the generator
What kind of lighting do you prefer?
Built-in Chandelier
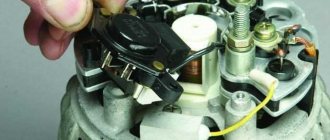
We begin to dismantle the protective casing of the generator, under which the cause of our illness is located (brush assembly)
Unscrew the two bolts and disconnect the wiring going to the brushes.
This is, in fact, the reason for the lack of charging, or rather, the brushes have run out.
For comparison, old and new brushes. (how long should the brushes be)
Be sure to check the stem at anchor. (the place where the brushes come into contact with the generator shaft)
In my case, I need to grind the anchor... the offset is quite large. But to do this you need to remove the generator. Unfortunately, there is simply no time or opportunity for this, since it needs to be clamped into a lathe. so I’ll install the brushes like this (knowing in advance that they won’t last for a long time) ASSEMBLY IN THE REVERSE ORDER!
Features and principle of operation of the device
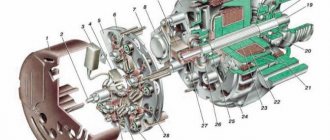
The conversion of energy from one type to another is carried out according to the principle of a magnetic field. The design of the unit consists of two main working elements - the rotor and the stator.
The stator is a hollow ring consisting of separate steel parts, each of which is insulated from the winding. Inside the stator grooves there is a winding made of fairly thick copper wire. The stator is a stationary element of the generator design.
The rotor is a moving structural element. It has a monolithic steel core, on the edges of which there are steel tips assembled from thin sheet metal. At the tips there are excitation coils, to which external power is supplied.
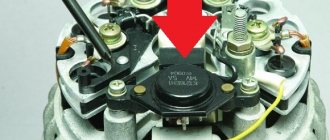
The rotor and stator are hidden in a metal housing, which also houses bearings, on which the rotor rotates, a voltage regulator, a diode bridge, an impeller and a pulley. The pulley is the drive of the device; it is made in the form of a groove on which the belt is fixed. Using a belt, the mechanical energy generated by the fourteenth engine is transmitted to the generator.
The device body is prefabricated and consists of a front and rear part, which are connected to each other using bolts. The stator is also fixedly fixed with bolts on the inner surface of the housing. The electric generator has two bearings - front and rear: the rear bearing is located on the rotor shaft, the front one is pressed into the device housing. Separate replacement of the front bearing, if it breaks, is impossible; you will need to change the entire corresponding part of the housing.
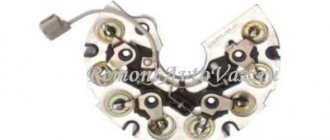
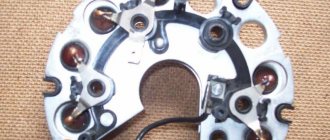
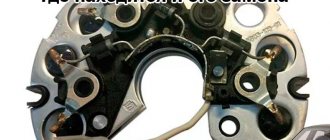
How to check a generator diode bridge with your own hands
- The headlights may dim when driving.
- The air conditioner or heater becomes weaker.
- The battery is no longer charged.
- Unstable operation of the audio system.
- The starter turns under pressure.
There are several ways to check. Using a tester, lamp or tensile test. Each method is described in detail below so that you can check it yourself. It is not necessary to contact the service; having a multimeter and knowing how to use it is enough. We will describe everything else below.
The method is the most labor-intensive of the three presented. The diode bridge must be completely dismantled. Each diode is then tested individually.
- The tester must be set to test mode. When two electrodes of the tester are short-circuited, it will squeak. You can set it to the 1 kOhm .
- Connect the electrodes to both ends of the diode, then swap the leads. A diode is considered to be working if it shows 400-700 ohms and infinity in the other. If you have infinity in two directions, the diode is broken . If there is resistance, but it is small or the same on both sides, the diode is broken and requires replacement.
- Broken diodes can be replaced, but it’s easier to go and buy a new one. Practice shows that soldering does not give the desired result, and ultimately, we will go for a new bridge.
Expert opinion
It-Technology, Electrical power and electronics specialist
Ask questions to the “Specialist for modernization of energy generation systems”
Generator 2115 replacement and repair yourself. How to disassemble and repair a VAZ 2115 generator. Removing, disassembling and repairing a VAZ 2115 generator. The part needs to be lifted and the pin removed; it will not be possible to pull it out completely, so remove it as far as possible. Ask, I'm in touch!
Features of using the unit 94.3701 on the VAZ 2114
- The electric unit must not be allowed to operate with the battery disconnected. This causes voltage surges with possible damage to generator components and vehicle systems.
- Make sure that the plus of the battery is always connected to the terminal of the electrical unit, and the minus to ground. If you mix up the contacts, a stronger current will flow through the diodes and they will suffer a breakdown.
- Under no circumstances should you test a car electrical unit for a “spark”; the diodes will instantly break due to a surge in electricity. It is necessary to check only with the help of special meters or on a stand.
- The valves cannot be controlled with a voltage greater than 12 V or with a megger, this may lead to a short circuit.
- The car's electrical wiring should only be checked with a megger or voltage greater than 12 V with the electrical unit turned off.
- If it is necessary to electrically weld components or body parts, it is imperative to disconnect the wires from all terminals and connection points of the electric generator and battery.
Signs of generator malfunction and ways to eliminate them
The operation of the generator is controlled by a signaling device on the instrument panel. When the ignition is turned on, the window should light up and go out after the engine starts. If this happens, then everything is fine, the generator is working.
Too bright or too weak illumination of the indicator already indicates certain malfunctions of the generator system parts. In any case, insufficient battery charge always indirectly indicates problems with the generator.
The generator does not supply charging current at all
If the drive belt tension is weak, the generator cannot operate at full power, which leads to a gradual discharge of the battery
Checking the auxiliary diodes
- We connect the probe of the positive terminal of the voltmeter (red probe) to the common bundle of auxiliary diodes (Fig. 1), connect the negative probe (black) to the opposite terminal of any of the auxiliary diodes (Fig. 2).
- We look at the voltmeter readings: a working diode - the readings go to infinity.
- We swap the tester probes and look at the readings of the same diode. A working diode - the readings will be approximately 300-700 Ohms.
- We perform this operation with the two remaining auxiliary diodes.
Recharging the battery
Sometimes when the generator breaks down, the battery overcharges. This can be noticed not only when taking measurements with a multimeter, but also in the readings of the on-board vehicle. And if the set voltage is greatly exceeded, various electrical equipment may fail or the battery may boil out. Also, the headlights may shine brighter than usual, and the battery charge indicator on the dashboard will constantly light up. These are the main symptoms of overcharging. It occurs most often due to a faulty voltage regulator. This part on the VAZ 2114 can be easily changed with your own hands.
And the battery and generator diagnostics described above will help determine the exact presence of the problem.
The operating principle of the VAZ 2109 - 2114 generator.
In order to understand why on the VAZ 2109 - 2114 the generator gives little charge or does not charge at all, you need to understand how it works and know the principle of its operation.
The generator consists of five main parts shown in the figure below: armature - 5, stator - 6, relay-regulator paired with brushes - 10, diode bridge - 9, housing - 3.7.
- a positive wire goes from the battery to the diode bridge (9) and the diode bridge (9) is connected to ground through the housing (3.7) of the generator
- voltage through the diode bridge (9) is supplied to the stator (6) of the generator and a magnetic field appears in the stator
- when the car starts, the engine, using a belt drive, turns the generator rotor (5)
- in the rotor (5), rotating in the magnetic field of the generator (6), a current appears
- The current is removed from the rotor by brushes (10) and through a relay-controller (10) is supplied to the car battery.
Failure to comply with any of the points leads to a malfunction of the VAZ 2109 - 2114 generator.
Where is the generating unit installed on VAZ vehicles?
To find the generator in AvtoVAZ cars, just lift the hood and inspect the front left corner. The device is located behind the radiator in a rather inaccessible place.
Appearance of the VAZ 2108-2115 generator
To remove the generating unit, specialists often use lifts or dismantle it from the pit. Due to the difficulty of carrying out such operations, it is important to know that you can check the charging of the generator with a multimeter on a VAZ 2110 car and other modifications of the manufacturer without removing the device.
Which electric generator should I buy (articles, manufacturers)?
When checking a generator, it sometimes turns out that the device needs to be replaced. To choose the appropriate version of the generating unit for a VAZ, you need to take into account the type of engine (with a carburetor or injector) and the configuration of the internal combustion engine.
It is better to install models of generating units manufactured by VAZ partners. Among the latter, electric generators KZATE 9402.3701 and 372.3701 are distinguished. The first option produces a current of 80 A and is installed on the engines of AvtoVAZ 2111 cars. Devices 372.3701 are less powerful, delivering 55 A.
The most popular brands of generators for VAZ internal combustion engines
If you cannot find one of the above parts, you can give preference to compatible generating units. Among the most famous manufacturers of electric generators at VAZ are:
- LKD - the brand is distinguished by the production of devices that are not of the highest standard, but still suitable for use.
- Fenox - the manufacturer stands out for its high-quality assembly of products.
- “Pramo” - generating units of this brand have a different design than models from previous manufacturers, which makes it possible to obtain power up to 100 A;
- “StartVOLT” - devices from this manufacturer are equipped with digital voltage regulators and a pair of additional diodes. The latter help to increase the productivity of the electric generator (up to 120 A).
If you want to save money, you should choose Chinese brands of generators. Domestic manufacturers produce electric generators with an optimal ratio of quality and cost.
Reasons why the VAZ 2109 - 2114 generator does not charge.
To find the reason why the VAZ 2109 2114 generator does not work or does not charge well, you need to check for serviceability each of the points above that describe the operation of the generator.
Point one: the diode bridge does not receive positive voltage from the battery.
The cause of the malfunction in this case may be the wire itself or its connection to the diode bridge or battery. Try cleaning the connection terminals, and if that doesn’t help, test the wire.
Poor contact with the negative wire is not considered, since in this case the engine would not start at all.
Point two: diode bridge and generator stator.
If voltage comes to the diode bridge, but charging does not occur, then it should be checked for functionality. To find out how this is done, read the article “Checking the diode bridge of VAZ 2109 - 2114”.
After checking the diode bridge, if it is working properly, we ring the stator winding. To do this, select the continuity mode on the multimeter and apply the probes to the first and second contacts of the stator, and then to the first and third.
If there are no cliffs anywhere, we move on.
Point three: VAZ 2109 - 2114 alternator belt.
The carburetor version of the VAZ had a thin V-belt, and the injection models have a wide belt with cores, but this does not change the operating principle. Charging may not go well due to belt slippage. This malfunction is manifested by a strong belt whistle. The belt may also start to whistle when you turn on energy consumers such as headlights, heated glass, stove fan, etc. If you hear a belt whistle, try to replace it as soon as possible. This is one of the reasons why the VAZ 2109 -2114 generator does not charge well.
Point four: generator armature VAZ 2109 -2114.
There should be no breaks in the armature, as well as in the stator. Test it by placing the multimeter probes on the brush tracks.
If the anchor does not ring, it should be replaced.
Point five: brushes with a relay-controller.
The brushes of the VAZ 2109 -2114 generator wear off over time on the armature tracks. If their length is less than 5 millimeters, then they are not able to press tightly against the anchor, thereby not charging the vase battery.
But it happens that the relay-regulator fails before the brushes are worn out. To check it you will need:
- 12 volt light bulb
- car battery
- two 1.5 volt batteries
- several wires