Rear brakes
On Zhiguli of the classic 2107 family and others, a drum brake system is used. Because its installation is explained by savings and a reduction in the overall cost of the machine. Moreover, the VAZ of previous years did not have high speeds, so installing rear disc brakes was not advisable, although their efficiency is higher.
Design
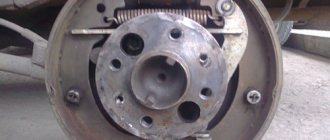
- Drum. It consists of two parts: the first is mounted on the axle (fixed), the second is on the hub and rotates with the wheel
- Brake pads
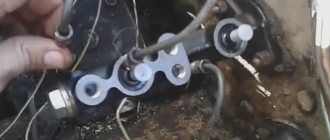
- Brake slave cylinder
- Tension springs
- Spacer plate
- Parking brake lever
Principle of operation
To fully activate the rear brakes, the driver needs to press harder on the pedal. In this case, the second piston of the GTZ starts working and another brake circuit is activated, which is responsible for transmitting force to the brake mechanisms of the rear wheels.
The pressure in the working cylinder (there is only one) pushes the pistons, which are located on the sides, apart. They rest against the brake pads, spreading their upper part to the side. The pads are seated on support posts. They can turn on them and move left or right. That is, the upper part moves to the side, the lower part, turning on them, tries to come together. But, the lower edges of the pads rest against the rivets, the force of the pistons moves them on the support posts towards the drum cover, and they evenly adhere with their entire surface to the moving part of the drum, which is connected to the wheel and, under the influence of friction, the rear axle slows down.
By releasing the pedal, the pressure in the brake line and cylinder decreases. The pistons return to their original positions (recessed inside), and the pads, under the action of return springs, converge, moving away from the drum cover. These springs do not allow the pads to move spontaneously, braking the hub.
Video of how the rear brakes work on the “seven”:
Malfunctions
The “sores” are the same as those of the front brake system. Due to the design features, new ones are added to them.
- Broken or stretched pressure springs. In this case, the rear axle will spontaneously begin to brake.
- Cracks, chips on the inside of the drum. Dirt can accumulate on it, rust can form, which can jam the wheels, although the pads will be brought together, since there is a miniature gap between them and the drum cover
The principle of operation of the braking system
- Press the brake pedal
- It is secured by a rod with the piston of the main brake cylinder (MBC)
- The force from the pedal is transmitted through the rod to the piston, which compresses the brake fluid located in the tubes and cylinders
- Compression energy is transmitted to the working cylinders, which move the pistons along with the brake pads to the disc. He starts to slow down.
The harder we press the pedal, the more the brake fluid is compressed and the more energy is transferred to the pads, which means the faster the car will slow down, until it comes to a complete stop.
The principle of operation is perfectly demonstrated in the video below:
Bleeding the system
The procedure for bleeding the brake system of a VAZ-2106 (like any other car):
- Rear right and left wheels.
- Front right and left.
When working, you move from the far brake mechanism to the near one (relative to the GTZ). Your goal is to get rid of air jams. When pumping, carefully monitor the fluid level in the tank and top up if necessary.
The principle of operation of the master brake cylinder on the VAZ-2106 is that two pistons create pressure in the system. This pressure pushes out the calipers and sets the pads in motion. If there is even a little air in the system, the brakes will not work.
Bleeding the brakes: step-by-step instructions
To better pump the brakes of the “Seven” you will need an assistant. One will be under the car and work on the brake cylinders, while the other presses the brake pedal inside the car. The following tools will be useful in your work:
- head for 8 and 10 caps;
- head for 8 and 10, open-end or for brake pipes;
- transparent container for waste;
- hose of the required diameter.
Pumping starts from the furthest tire from the GTZ, therefore, start from:
- right rear tire;
- left rear;
- right front;
- left front.
To bleed the rear tire brakes, go under the car. All work related to the front brakes is carried out after the tires have been removed in advance. Otherwise the procedure is identical:
Remove the protective cap from the brake cylinder fitting. Loosen the fitting slightly with an 8 and 10 mm wrench. Connect the hose to the fitting and place the opposite end into a container. Press the brake pedal until hardness appears and keep it pressed. Unscrew the fitting half a turn. The fuel fluid will begin to flow out of the hose, the pedal is pressed to the floor. Do not release the pedal until the liquid stops oozing. Tighten the fitting and repeat the process until liquid and air come out of the tube. Repeat the manipulations with the remaining tires of the VAZ-2107. To bleed the front brake, simply remove the wheel. To complete the pumping, close the fitting with a rubber cap. During pumping, you should monitor the fluid level in the expansion tank.
It is important that there is no air in the system.
How to remove air from the brake system
When the driver changes the drive cylinder, air enters the brake system. It's almost inevitable. Air bubbles accumulate in the brake hoses, making normal braking difficult. So the driver will have to remove air from the system using the recommendations outlined below. It should be noted here that to perform this operation you will need the help of a partner.
- The front wheel of the car is jacked up and removed.
Access to the brake fitting is provided. A piece of plastic tube is put on it. Its second end is directed into an empty bottle. Then the nut on the fitting is carefully unscrewed. When bleeding the brake system, the second end of the tube is placed in an empty bottle - The brake fluid will begin to come out into the bottle, and it will bubble strongly. Now the partner sitting in the cabin presses the brake pedal 6-7 times. By pressing it the seventh time, he should keep it in a recessed position.
- At this moment, you should loosen the fitting a couple more turns. Liquid will continue to flow out. As soon as it stops bubbling, the fitting is screwed back on.
- The above steps must be done with each wheel of the VAZ 2106. After this, you should add brake fluid to the reservoir and check that the brakes are working properly by pressing them several times. If the pedal does not sink and its free play is normal, then bleeding the brakes can be considered complete.
Replacing the master cylinder of the VAZ 2106 brakes
In the vast majority of cases, replacing the cylinder is the best repair option. The fact is that it is not always possible to find individual parts of brake cylinders (pistons, return springs, spacers, etc.) on sale. It is much more common to find sets of seals for cylinders on sale, but the quality of these seals sometimes leaves much to be desired. In addition, they are often counterfeited. That is why car owners prefer not to bother with repairing the old cylinder, but simply install a new one on their “six”. To do this, we will need the following tools:
- set of spanners;
- pliers;
- flat screwdriver;
- rags;
- medical syringe;
- canister of brake fluid (capacity 0.5 liters);
- 5 x 6 bolts (they will be used as plugs for the brake hoses).
On my own behalf, I can add that recently even original VAZ repair kits for seals for the master cylinder have become of very mediocre quality. Once I purchased such a kit and installed it in the leaking cylinder of my “six”. At first everything was fine, but six months later the leak resumed. As a result, I decided to buy a new cylinder, which is still in the car to this day. Three years have passed, and I have not yet noticed any new brake fluid leaks.
Sequence of work
When starting to replace the master cylinder, you should make sure that the car engine is completely cool. In addition, all brake fluid should be drained from the reservoir. The most convenient way to do this is with a medical syringe (if you don’t have one at hand, a medical bulb will do). Without these preparatory measures, it will not be possible to change the cylinder.
- Use an open-end wrench to unscrew the fastening nuts on the brake hoses. The hoses are carefully removed from the cylinder body. 8 bolts are screwed into the vacated sockets. They will serve as plugs and will not allow the brake fluid to leak out when tilting and removing the cylinder. The brake hoses are also sealed with 6mm bolts to prevent leakage.
- Using a 13-mm open-end wrench, unscrew the two fastening nuts holding the cylinder to the filter housing. After this, the cylinder should be carefully pulled towards you, always trying to keep it horizontal so that the liquid does not leak out of it.
- The removed cylinder is replaced with a new one. The fastening nuts on the amplifier body are tightened. Then the fastening nuts of the brake hoses are tightened. After this, a portion of brake fluid is added to the reservoir to compensate for the leakage that inevitably occurs when replacing the cylinder.
- Now you should sit in the passenger compartment and press the brake pedal several times. Then you need to slightly unscrew the fastening nuts on the hoses. After unscrewing them, a characteristic hissing sound will be heard. This means that air is coming out of the cylinder, which ended up there during the repair and which should not be there. As soon as brake fluid drips from under the nuts, they are tightened.
Disassembling the cylinder and installing a new repair kit
If the driver decides to do without replacing the cylinder and change only the sealing collars, then the cylinder will have to be disassembled. The sequence of actions is listed below.
- First, use a screwdriver to remove the rubber seal located in the cylinder body on the side of the mounting flange.
- Now the cylinder should be placed vertically in a vice. And using a 22-mm open-end wrench, slightly loosen the front plug. Use a 12 wrench to unscrew the limiting bolts located next to it.
- The loosened plug is unscrewed by hand. There is a thin washer underneath it. You need to make sure it doesn't get lost. After completely unscrewing the stops, the cylinder is removed from the vice.
- The cylinder is placed on the table (before this you need to lay something on it). Then a regular screwdriver is inserted into the body from the flange side, and with its help all the parts are pushed out onto the table.
- A rag is inserted into the empty body. The body is thoroughly wiped. Then it should be inspected for scratches, deep cracks and abrasions. If any of this is discovered, then the point of replacing the seals is lost: you will have to replace the entire cylinder.
- The rubber rings on the pistons are removed manually and replaced with new ones. The retaining rings on the fittings are pulled out with pliers. The gaskets located under these rings are also replaced with new ones.
- After replacing the sealing collars, all parts are installed back into the housing, then the plug is installed. The assembled cylinder is installed on the amplifier flange, then the brake circuit hoses are connected to the cylinder.
Where is the brake cylinder of the VAZ 2106
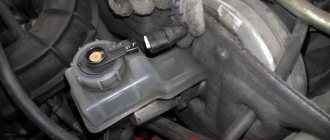
The brake master cylinder is installed in the engine compartment of the VAZ 2106, above the engine. The device is located about half a meter from the driver. Just above the cylinder there is a small expansion tank into which brake fluid is poured.
The brake cylinder is attached to the vacuum booster
The cylinder has an oblong shape. The body is made of high quality steel.
The brake cylinder has an oblong shape and a mounting flange with two holes
The housing has several threaded holes for screwing in contour brake pipes. This device is screwed directly to the brake booster using two 8mm bolts.
Main function of the cylinder
In short, the function of the master brake cylinder is reduced to the timely redistribution of brake fluid between several brake circuits. There are three such circuits on the “six”.
The “six” has three closed brake circuits
There is one circuit for each front wheel, plus a circuit for servicing the two rear wheels. It is from the master brake cylinder that the fluid comes, which then begins to put pressure on the wheel cylinders, forcing them to tightly compress the brake pads and stop the car. In addition, the master cylinder performs two additional functions:
- abductor function. If the brake fluid has not been completely used by the working cylinders, then the remainder goes back into the reservoir until the next braking;
- return function. When the driver stops braking and removes his foot from the pedal, the pedal rises to its original position under the action of the master cylinder.
How the cylinder works and how it works
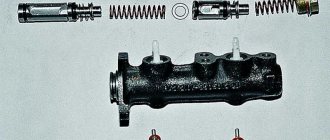
The VAZ 2106 drive cylinder has a lot of small parts, so at first glance the device seems very complex. Nevertheless, there is nothing complicated about it. Let's list the main elements.
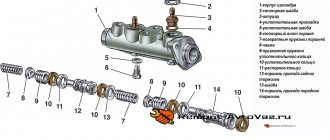
The brake cylinder of the VAZ 2106 consists of 14 parts
- The case is steel with two internal chambers.
- Washer fixing the main fitting.
- Brake fluid drain fitting (it connects directly to the expansion tank).
- Union seal.
- Washer for the limit screw.
- Stopper screw for brake piston.
- Return spring.
- Support cap.
- Compensator spring.
- O-ring for the brake piston (there are 4 such rings in the cylinder).
- Spacer washer.
- Rear brake circuit piston.
- Small spacer washer.
- Front brake piston.
A steel plug is installed at one end of the cylinder body. The second end is equipped with a flange with mounting holes. And the master cylinder works as follows:
- Before pressing the pedal, the pistons stand in the cylinder body at the walls of their chambers. Each spacer ring is restrained by its own limiting screw, and the chambers themselves are filled with brake fluid;
- after the driver, by pressing the pedal, releases the entire free play of this pedal (this is approximately 7–8 mm), the pusher in the cylinder begins to put pressure on the main piston, moving it to the opposite wall of the chamber. At the same time, a special cuff blocks the hole through which the brake fluid goes into the reservoir;
- when the main piston reaches the opposite wall of the chamber and squeezes out all the liquid into the hoses, an additional piston is activated, which is responsible for increasing the pressure in the rear circuit. As a result, the pressure in all brake circuits increases almost simultaneously, which allows the driver to use both front and rear pads for braking;
- As soon as the driver releases the brakes, the springs return the pistons back to their starting point. If the pressure in the cylinder was too high and not all of the liquid was consumed, then its remains are drained into the tank through the outlet hose.
Video: principles of operation of brake cylinders
Brake system design 2106
Today we are going to bleed the brakes, but we will briefly recall the design of the brake system of this car so that the actions are reasonable and deliberate. And so that stupid questions do not arise about which wheel the system needs to be bled from. Now let’s remember its design, and then all questions will automatically disappear.
The brake system of the six, like all Ladas, is hydraulic, dual-circuit. This means that all hydraulics are rigidly divided into two independent branches. There are about a dozen schemes for organizing brake system circuits, but the Italians settled on parallel. This means that the front and rear wheels brake in pairs.
This was done so that in the event of damage to one of the working brake cylinders, at least two wheels would brake as if nothing had happened. It’s a convenient and safe system, but unfortunately, not everyone knows about it, which is why such questions arise. The brake lines are filled with brake fluid, and the system is sealed. Brake fluid has a special composition that allows it to transfer kinetic energy with virtually no compression losses. Ideally, with complete and reliable sealing, the system is eternal and if it is not overheated, air will not get inside. And if it overheats, then the brake fluid begins to boil, releasing air bubbles. In this case, without visible violations of integrity, the system becomes airy and must be pumped.
When to replace a brake cylinder
VAZ 2109 brake master cylinder
A well-known fact is that the complex brake system includes the main and auxiliary cylinders. Their main practical role is to regulate the level of brake fluid. The main causes of brake cylinder malfunction:
- a decrease in the level of brake fluid in the reservoir as a result of its departure due to any mechanical defects;
- at the junction of the main cylinder and the brake booster, drops of brake fluid are visible to the naked eye;
- the brake pedal literally sinks during braking, which indicates a significant decrease in pressure due to a sharp drop in the volume of brake fluid.
GTZ repair
To repair the master brake cylinder, you will need to do the following:
- There should be a clean rag on the table on which to place the brake master cylinder body.
- The mechanism has two pistons (that’s exactly how many circuits there are in the brake system). The pistons have slots in the lower parts that limit the stroke inside the cylinder. The pistons are secured using two locking bolts located in the slots.
- Remove the boot and unscrew the bolt that secures the first piston.
- If the piston does not come out under the influence of the spring, you need to lightly press on it so that it sinks a little in the cylinder. After this manipulation, the piston will come out of the cylinder without any problems.
- A similar action is performed for the second cylinder. Unscrew the bolt that secures the element. And in the same way the piston of the second circuit is removed.
- Be sure to place all the elements that you remove from the master cylinder in the order in which you removed them.
- Install new cuffs using the plastic cone included in the repair kit.
The design of the master brake cylinder on the VAZ-2106 is simple, there are only a few key elements in the design. But they affect the functioning of the entire braking system.
Be sure to make sure that the inner surface of the cylinder is perfectly mirror-like. If there are sinks or other damage, it is necessary to replace them - repair is useless. If the inside has taken the shape of an ellipse, then it is unlikely that you will be able to bleed the brake system, and even if you do, the new cuffs will not last long.
Master Cylinder Assembly
Assembly is carried out in reverse order. If you have repaired the main brake cylinder of a VAZ-2106, then you must:
- Install new cuffs.
- Insert the secondary circuit piston and return spring into the cylinder. Before installing them, lubricate the inner surface of the cylinder with brake fluid.
- Secure the position with a bolt.
- Insert the primary circuit piston with the return spring and secure its position with a bolt.
After this, check the tightness of the fixing bolts and install the cylinder:
- Using two nuts, tighten onto the vacuum booster studs.
- Screw the tubes to the GTZ.
- Install the hoses and secure them with clamps.
After all the work has been done, you need to pour liquid into the expansion tank.
How to remove the GTZ?
Replacing the master brake cylinder on “sixes” is carried out according to the following scheme:
Use a bulb to completely drain the fluid from the expansion tank of the brake system. Loosen the clamps that secure the hoses coming from the brake fluid reservoir
Please note that if factory compression rings are installed, they may not need to be removed. It is enough to pull the hoses towards you with little effort. Using a special wrench, you need to unscrew the brake pipes from the master cylinder. Move these tubes so that they do not interfere with the work. Using a 13mm wrench, unscrew the two nuts that secure the device to the vacuum booster.
After all this work, you can completely remove the GTZ.
Signs of a broken master cylinder
The main signs characteristic of a breakdown of the main brake cylinder on a VAZ-2106 are the following:
- The presence of traces of brake fluid on the vacuum booster and inside it.
- The brakes cannot be pumped.
- Jamming and sinking of the brake pedal.
- The presence of jerks when pressing the brake pedal.
When repairing the master brake cylinder, there is no need to place the car on an inspection hole or overpass. Everything is done much simpler here. The master cylinder can be replaced by simply opening the hood.
But it’s best to pump the brakes on an overpass. Otherwise, you will need to lift the wheels one by one using a jack. If all work is carried out on a lift or inspection pit, you can not only bleed the system, but also at the same time adjust the tension of the handbrake cable.
Repair of chassis and transmission
Most often, the rubber bushings of the anti-roll bar and rear links, the boots of ball joints and steering rod pins are changed due to wear. Next comes the replacement of the ball joints themselves, the steering linkage and silent blocks. The bearings of the front hubs and rear axle shafts need to be changed as they wear out; a faulty part makes itself felt with a characteristic hum.
Brake pads are a consumable item, but the front discs last quite a long time and are replaced when grooves and grooves are detected on the working surface. Cracks in the front beam are not that uncommon. Minor defects can be eliminated by welding, but you must keep in mind that such car repairs are temporary; the cracked beam will continue to deteriorate.
In the brake system, the working cylinders on the wheels often fail. This happens due to the fact that the rubber sealing rings become unusable. Car enthusiasts are well aware of the rule: it is easier to replace the brake wheel cylinder once than to replace rubber seals many times. Not so often, but still there are problems with the main brake distributor and clutch slave cylinder for the same reason.
Transmission parts that are well known to the owners of the “classic” are clutch parts, which are quite difficult to change on a VAZ 2106 car with your own hands. These are the clutch disc and release bearing, the lifespan of which ranges from 20 to 50 thousand km, depending on the quality of the product.
The difficulty is that to replace these parts you need to remove the gearbox, and before that the driveshaft. The latter has 2 crosspieces installed, which serve approximately 20 thousand km. The transmission unit, which sometimes makes itself felt with a continuous humming sound of varying volume and tonality, is the rear axle gearbox. Repairing it is expensive, since it cannot be done without the involvement of a serious specialist.
To save money, a car enthusiast can only remove the gearbox from the car to take it to a mechanic for repairs and subsequent adjustments, and then put it back. The VAZ 2106 gearbox is quite reliable, only in the latest 5-speed models there were sometimes some problems with 5th gear. The result is the same as with the gearbox - a trip to a specialist.
Which cylinder to choose for installation
A driver who decides to replace the brake master cylinder will inevitably face the problem of choice. Practice shows that the best option is to install an original VAZ cylinder purchased from an official auto parts dealer. The original cylinder number in the catalog is 2101–350–500–8.
However, it is not always possible to find such a cylinder, even from official dealers. The fact is that the VAZ 2106 was discontinued a long time ago. And spare parts for this car are becoming increasingly rare on sale. If this is the situation, then it makes sense to look at the products of other manufacturers of cylinders for the VAZ classics. Here they are:
The products of these companies are in high demand among owners of "sixes", although the price of cylinders from these manufacturers is often unreasonably inflated.
I once had the opportunity to compare prices of brake cylinders from different manufacturers. That was six months ago, but I don’t think the situation has changed much since then. When I went to a spare parts store, I found an original VAZ cylinder on the counter, which cost 520 rubles. Nearby lay a Belmag worth 734 rubles. A little further along were the LPR and Fenox cylinders. LPR cost 820 rubles, and Fenox - 860. After talking with the seller, I found out that original VAZ cylinders and LPR cylinders are in greatest demand among people, despite their high cost. But for some reason the “Belmags” and “Phoenoxes” were not dismantled so actively.
Selecting brake fluid and the procedure for replacing it on a VAZ 2114
For the normal functioning of the vehicle’s vehicle with maximum efficiency, it is important for the car owner to correctly select the working fluid for the hydraulic brake drive. Modern TG, such as “Rosa” and its varieties, are based on polyglycols and this accounts for from 93 to 98 percent of the total composition. The rest is various additives that are necessary to combat oxidation of fuel fluid and prevent corrosion of metal parts of the vehicle.
The rest is various additives that are necessary to combat oxidation of fuel fluid and prevent corrosion of metal parts of the vehicle.
When purchasing a vehicle, you need to pay attention to the following parameters:
- boiling point, it should be high to reduce the likelihood of plug formation from steam bubbles;
- good viscosity, which characterizes the ability to pump liquid in the system;
- the ability to absorb water, that is, hygroscopicity;
- ability to lubricate internal surfaces;
- neutrality in relation to rubber parts of the braking system;
- oxidation resistance and corrosion resistance.
According to the TZh class for the VAZ 2114, they are marked DOT 3.
How to change the brake fluid on a VAZ 2114 - for the correct actions you need to carefully study the car’s operating manual.
Before starting work, you need to prepare the necessary tools and materials:
- TJ in the amount of 0.5 liters;
- keys and screwdrivers;
- transparent flexible hose;
- container for draining spent fuel oil;
- rags to wipe surfaces, especially plastic and painted ones, since the liquid is toxic and aggressive to these surfaces.
To replace the turbocharger, you need to hire an assistant, because it requires bleeding the system using the brake pedal.
- Open the lid on the GTZ tank and place it on the prepared surface. The cover is combined with the float of the fuel fluid level sensor and there are remnants of old toxic fuel fluid on it.
- Unlock the rear brake lever using a screwdriver, which must be inserted between the piston and the plate.
- Clean the air outlet valve of the right rear brake from dust and dirt and unscrew the rubber cap that closes this valve.
- Place a flexible hose, previously inserted into a transparent container, onto the fitting of this valve.
- At intervals of two seconds, press the pedal all the way four times, and on the fifth press, lock it in the pressed position.
- Unscrew the valve at least half a turn. As the fuel drains, the pedal should fall. As soon as the liquid stops flowing, immediately close the air valve.
- During these actions, it is necessary to monitor the fluid level in the tank, constantly adding it to prevent an air lock. It is necessary to add and drain the fluid until new, clean fluid flows from the tube.
Didn't find the information you are looking for? on our forum.
We recommend reading:
VAZ on methane
Wiring diagram of VAZ 11113 Oka with description
Injector for VAZ
How to replace the bearing in the rear hub on a VAZ 2109
Replacing hydraulic compensators on a VAZ 2112 16 valves
Lada Vesta which gasoline is 92 or 95. Recommendations from the manufacturer
VAZ 2110 how to insulate a car
Exhaust for VAZ 2110 8 valves
repair of the main brake cylinder on VAZ 2108, VAZ 2109, VAZ 21099 cars
1. Remove the main brake cylinder from a VAZ 2108, VAZ 2109, VAZ 21099. 2. Using a wooden spatula as a lever, remove the brake reservoir 13 (see Fig. 8.5) from the main brake cylinder. 3. Remove connecting sleeves 12 from the main brake cylinder body. 4. Remove two locking screws 10 (Fig. 8.11). 5. By hand, remove the pistons of the first and second chambers with cuffs, washers and springs from the main brake cylinder body. In this case, the piston 11 of the second chamber may not come out freely. To remove the piston with the remaining parts, push the piston through the first chamber by hitting the end of the brake master cylinder body from the side of the first chamber on a clean board. To remove the piston, you can also use compressed air, which must be supplied to the outlet of the second chamber, while closing the hole under the tank. 6. Carefully inspect and make sure that the mirror of the master brake cylinder and the working surface of the pistons are completely clean, that there is no rust, marks or other irregularities. Otherwise, replace the parts with new ones. 7. Replace cuffs that are torn, swollen, or have lost elasticity. It is recommended to replace the cuffs with new ones whenever disassembling the master cylinder, regardless of the condition of the cuffs. 8. Check the elasticity of the piston springs, the length of which should be under a load of 38.26-46.1 N (3.9-4.7 kgf) 41 mm, under a load of 81.81-99.47 N (8.34-10 ,14 kgf) - 21 mm, in a free state - 59.7 mm. Replace springs that have lost their elasticity. 9. It is recommended to replace gaskets 12 (see Fig. 8.11) under the locking screws with new ones. 10. Before assembling the master cylinder, wash all parts with clean brake fluid. Do not allow parts to come into contact with mineral oils, gasoline, kerosene or diesel fuel, as even residual traces of these liquids can lead to destruction of the rubber seals.
WARNING The time for washing the sealing rings in isopropyl alcohol is no more than 20 seconds, followed by blowing with air.
11. Assemble the brake master cylinder in the reverse order of disassembly. In this case, lubricate all parts with brake fluid.
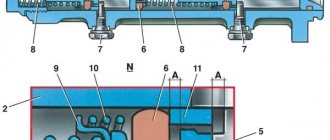
Rice. 8.5. Main brake cylinder with brake reservoir for VAZ 2108, VAZ 2109, VAZ 21099 cars:
1 — main brake cylinder body; 2 - low pressure sealing ring; 3 — piston of the left front-right rear brake circuit drive; 4 - spacer ring; 5 - high pressure sealing ring; 6 — pressure spring of the sealing ring; 7 — spring plate; 8 — piston return spring; 9 — washer; 10 - locking screw; 11 — piston of the drive circuit of the right front-left rear brake; 12 — connecting sleeve; 13 — brake tank: 14 — emergency brake fluid level sensor; A - gap
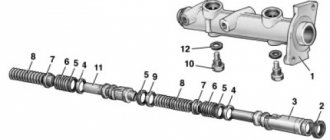
Parts of the main brake cylinder of VAZ 2108, VAZ 2109, VAZ 21099 cars:
1 — main brake cylinder body; 2 - low pressure sealing ring; 3 — piston of the left front-right rear brake circuit drive; 4 - spacer ring; 5 - high pressure sealing ring; 6 — pressure spring of the sealing ring; 7 — spring plate; 8 — piston return spring; 9 — washer; 10 - locking screw; 11 — piston of the drive circuit, right front - left rear brake; 12 - sealing gasket
Source
Digital speedometer in the instrument panel of VAZ-2107
I have long dreamed of replacing the standard speedometer driven by a flexible cable on my Lada with a digital one (powered by a speed sensor), but after reviewing all the forums, using the Yandex, Google and other search engines, I realized that I couldn’t find such an article, especially a standard digital one for this There is no dashboard provided (the main injector was installed, the speed sensor was screwed into the box, but apparently there wasn’t enough strength to do the rest...
Yes, of course, there were radical articles with a complete replacement of the dashboard, including from the Volga, Tens, etc., but I just wanted to replace the speedometer, especially since the layout of the instruments suited me quite well (what can I say - classic).
Modernization of the master cylinder and replacement of the vacuum brake booster of VAZ-2106
The brake system of the VAZ-2106 is not of particular quality. Let's look at how to upgrade the brakes of the six in order to maximize the quality of braking of the car.
Heavy pressing of the brake pedal and an increase in the braking distance of the car may be indicators of incorrect operation of the vacuum booster, which is one of the main operating mechanisms of the brakes. The serviceability of the unit is checked in the car with the engine turned off.
Brake pedal: 1 — vacuum booster; 2 - pusher; 3 — brake pedal; 4 — brake light switch buffer; 5 — switch nut; 6 — brake light switch; 7 — pedal release spring; 8 – main cylinder
Let's look further at how to check the vacuum brake booster. To do this, you need to press the brake pedal five or six times and then start the engine. If the pedal moves forward a little, then the amplifier is working correctly. Otherwise, you need to look for the cause of the malfunction. This could be poorly tightened clamps or fasteners, or a rupture in the hose connecting to the engine intake manifold. If the hose is not damaged and after tightening the fasteners and clamps the problem does not go away, then the fault is in the amplifier itself.
Most often, the VAZ-2106 vacuum brake booster is not repaired, but replaced with a new product. In order to remove the booster, you must first remove the brake master cylinder. It also needs to be replaced with a larger volume product. The standard cylinder of the car cannot cope with the formation of the required pressure in the brake system.
The amplifier fastening elements are located on the driver's side under the mat and carpet. First you need to unscrew the four bolts, and then use a flat-head screwdriver to pull out the lock washer and rod that connect the pedal and the power steering linkage. There are no additional fasteners on the side of the engine compartment, so the amplifier can be pulled out and replaced with a new product. Everything is assembled in the same way in reverse order.
During assembly, special attention should be paid to the integrity of all rubber hoses and pipes
It is important to tighten the fasteners to the maximum, as they are responsible for braking efficiency. After installing the VUT, it is important to adjust it correctly, adjust the length of the rod or pedal free play
The length of the rod is adjusted using a bolt located on the vacuum booster. Ideally, it should rise 7.1 millimeters above the amplifier. If the bolt is tightened further, then the pedal will not return to its standard position after pressing. The fact that the screw is tightened is weakly indicated by pressing the pedal hard. It is important to find the timing of valve actuation by adjusting the stem
After installing the VUT, it is important to adjust it correctly, adjust the length of the rod or free play of the pedal. The length of the rod is adjusted using a bolt located on the vacuum booster
Ideally, it should rise 7.1 millimeters above the amplifier. If the bolt is tightened further, then the pedal will not return to its standard position after pressing. The fact that the screw is tightened is weakly indicated by pressing the pedal hard. It is important to find the timing of the valves by adjusting the stem.
The most correct option would be to carry out a comprehensive replacement of the amplifier and cylinder. Experts advise, instead of classic spare parts, to purchase a nine-inch VUT assembly from Niva 21214 along with an enlarged master cylinder. And also for installation, a bracket from the same car model is purchased. The reinforced VUT and cylinder can be installed on the VAZ-2106 without modifications to the fasteners.
After connecting all the elements, you need to bleed the brakes and check the operation of the vacuum booster again.
Vacuum amplifier: 1 - tip mounting flange; 2 - amplifier housing; 3—rod; 4 - cover; 5 - piston; 6 — amplifier mounting bolt; 7 - spacer ring; 8 — valve spring support cup; 9 - valve; 10 — valve support cup; 11 — return spring support cup; 12 — protective cap; 13 — holder of the protective cap; 14 — pusher; 15 — air filter; 16 — valve return spring; 17 — valve spring; 18 — housing cover seal; 19 — retaining ring of the seal; 20 - thrust plate; 21 - buffer; 22 — valve body; 23 - diaphragm; 24 — valve body return spring; 25 — rod seal; 26 — master cylinder mounting bolt; 27 — rod seal cage; 28 — adjusting bolt; 29 — hose tip; 30 - valve; A - vacuum cavity; B - channel connecting the vacuum cavity with the internal cavity of the valve; C - channel connecting the internal cavity of the valve with the atmospheric cavity; E - atmospheric cavity
When you press the brake pedal you can hear a hissing VAZ 2114
Why do you hear a hissing sound when you press the brake pedal?
Most drivers react sensitively to various sounds that accompany the operation of car mechanisms. An exception is the case when a hissing sound is heard when you press the brake pedal. But it is not always worth panicking - especially in cases where the hissing of the brake pedal when pressed does not in any way affect the efficiency of the braking system. In order to understand the nature of this sound, let's take a closer look at the operation of the vacuum brake booster.
Vacuum booster circuit
The figure shows only a simplified circuit of the amplifier - the details of the device are, as they say, “omitted” - to make it easier to understand.
What happens when you press the brake pedal while the engine is running?
The brake pedal pusher simultaneously affects the booster rod and the so-called follower (in the diagram - “air” valve).
The follower valve opens, and air begins to flow into the amplifier cavity, separated by a diaphragm, from the pedal side. And since a vacuum has been created in the cavity on the side of the main brake cylinder (the check valve prevents air from entering it), the air entering through the air valve begins to put pressure on the diaphragm. The latter, rigidly connected to the rod, increases the pressure on the piston of the main brake cylinder created by the driver’s foot through the pusher. When the pedal travels when you press the brake, you can often hear a slight hiss emitted by the incoming air.
At the moment when the pedal travels, when you press the brake, you can often hear a hissing noise emitted by the air entering the amplifier housing. When the driver takes his foot off the brake pedal, the master cylinder piston and diaphragm rod return to their original position under the influence of the return springs (the vacuum booster return spring is not shown in the diagram). At the same time, since the follower valve opens only to release air (due to the fact that the driver stops pressing the pedal), it is squeezed out of the cavity by the same return spring - it also presses on the diaphragm.
While the driver does not press the pedal and the engine is running, a vacuum is maintained at all times on the side of the master brake cylinder in the amplifier cavity. The monitoring valve is closed, so the diaphragm is in a state of “equilibrium”, i.e. does not have any effect on the master cylinder rod.
Of course, this is only a general diagram of the operation of a vacuum brake booster, typical for all cars. On modern machines, it can be equipped with solenoids that increase the force on the master cylinder piston, and electric pumps can be used to extract vacuum. However, the operating principle of the amplifier remains the same.
Let's now consider how you can check whether everything is in order if, when you press the brake pedal, you hear a hissing sound from its side.
Vacuum booster diagnostics
If the brake booster does not work, it becomes noticeable - the brake pedal becomes hard.
But an indirect sign of a malfunction can also be a change in idle speed when the pedal is pressed. This is due to a lean fuel mixture caused by “excess” air entering the engine cylinders, which may even stall if the “suction” is too strong.
If the brake booster does not work, this becomes noticeable as the force required to press the pedal when braking increases.
Most often this is due to damage to the brake booster diaphragm. And it’s not necessarily due to old age - sometimes the sealing rings of the main brake cylinder leak brake fluid, and it gets into the booster housing.
Some car owners manage to rebuild the brake booster themselves - they even sell repair kits for domestic cars. But, in general, this is a thankless task - the body of the “vacuum generator” is non-separable, and not everyone can carefully and tightly connect its parts. In addition, the operation of the brake system is also affected by adjusting the protrusion of the “vacuum rod” from the housing - incorrect adjustment can reduce the efficiency of the booster or cause incomplete “release of the brakes” of the working brake cylinders.
What is needed for pumping?
In order to carry out repairs without problems, you will need a set of standard tools and spare parts
Please note that it is advisable to install new fittings - on old ones the edges wear off very quickly and it is impossible to work with them
For repair you will need:
- A set of wrenches – open-end and socket wrenches for “8” and “10”.
- Balloon.
- Jack.
- Wheel chocks - at least two pieces.
- The supports are several wooden beams.
- Keys to "17" and "13".
- Special wrench “8” and “10” for unscrewing fittings and brake pipes.
You definitely need to purchase penetrating lubricant, prepare a small jar and a transparent tube. The inner diameter of the latter should be the same as the outer diameter of the bleeder fitting.
GTZ malfunctions
Replacing the VAZ-2107 master brake cylinder is required when this part simply fails. You can determine the malfunction of the GTZ in the following ways:
The red warning light comes on, indicating a problem with the brake mechanism. This lamp comes on when the level in the brake cylinder reservoir drops below normal.
In this case, it is important to find out the reason for the decrease in fluid and, if necessary, add it. If the leak occurs due to a malfunction of the turbocharger, it should be replaced. Presence of leaks on the GTZ If, upon opening the hood, you can see signs of a fresh fluid leak on the GTZ, then it’s time to pay attention to repairing the mechanism
It is possible to repair the main brake cylinder of a VAZ-2107, but at the same time you can extend the life of the product for a short time, the quality of modern spare parts is to blame. If the product fails, or rather, the cuffs and oil seals have dried out, then experienced craftsmen recommend replacing the GTZ. Many desperate amateurs strive to find the answer to the question of how to repair the master brake cylinder, but subsequently everything ends with its replacement.
The GTZ for a VAZ-2107 costs about 500 rubles, so it makes no sense to spend time and money to repair it. Let’s find out in more detail how the GTZ is replaced with a VAZ-2107.
Features of replacing the GTZ
Replacing the mechanism in question will not take much time, so first you should purchase a new product, and then make sure you have a standard set of tools and a special pipe wrench. This key looks like this:
The list of standard tools includes:
- wrench set to “10”;
- wrench set to “13”;
- flat screwdriver.
Now let's start the workflow. The product is located directly under the hood in the engine compartment on the driver's side. The product looks like this:
- Initially, you should remove the remaining brake fluid from the reservoir.
- It is necessary to loosen the fastening clamps, and then disconnect the hoses of the fluid reservoir from the fittings.
- Using a special wrench, it is necessary to unscrew the threaded bushings that secure the steel tubes to the GTZ.
- Two nuts are unscrewed, with which the cylinder is secured to the vacuum booster housing.
- Now you can remove the device in question.
- After removing the old device, you can install a new GTZ. The protective plug should be removed from a newly purchased device and a new oil seal should be installed in its place. After installing the new product into the seats, it should be secured with fastening nuts.
- We use a clean medical syringe from which the needle should be removed. We fill the syringe with brake fluid and then fill the installed device with it.
- TJ should be poured until it goes into the holes. As soon as the mechanism, or rather, the system, is filled, you can begin screwing the tubes with a special key.
- Taking this opportunity, you can remove and clean the tank for refueling the TJ, if necessary. It’s easy to determine the need; to do this, you need to look inside the tank. If there is sediment, it is better to clean the tank and rubber hoses.
- We fill the reservoir with brake fluid, and then be sure to bleed the system.
This completes the procedure for replacing the main brake cylinder on a VAZ-2107. The procedure is not complicated, so even an inexperienced driver can cope with it. A serious malfunction is solved quickly and inexpensively, and the car owner can forget about this part for 3-5 years
The VAZ master brake cylinder has this name for a reason, so you should pay special attention to it if you detect the slightest sign of a malfunction
How to replace the main brake cylinder on a VAZ 2108-VAZ 21099?
Note! It is better to do all the work of replacing the brake cylinder from start to finish with an assistant!
Removal: 1) First, by hand, disconnect the block with wires from the brake fluid level sensor, which is located on the brake reservoir cap.
Note! Before you begin to disconnect the wire block from the sensor, first read the “Important” paragraph, which is located at the very bottom of this article!
2) Next, when the wire block is disconnected from the sensor, unscrew the tank cap by hand and then remove it from the car engine.
3) Now, using a syringe or a rubber bulb, pump out all the brake fluid from the brake reservoir until it is completely empty.
4) Then use a wrench and then unscrew the four union nuts that secure the brake pipes to the cylinder.
Note! Unfortunately, one brake pipe is not visible in the photo above, but to make its location clearer to you, know one simple thing: all the pipes that are connected to the brake master cylinder are located parallel to each other!
5) Next, when all the nuts are unscrewed, remove the four brake pipes from the cylinder holes.
6) Next, without removing the wrench from your hands, use it to unscrew the right and left nuts that secure the brake cylinder to the vacuum booster.
7) And then remove the brake master cylinder, together with the reservoir, from the car engine.
And at the end of the operation, when the brake cylinder is removed, use a screwdriver to pry up the brake reservoir on both sides, and then remove it from the cylinder.
Note! Under the place where the brake reservoir is installed in the cylinder there are two bushings, which, if they are deformed or severely damaged, must be replaced with new ones!
Installation: 1) First, install the brake reservoir onto the new brake master cylinder.
2) And after that, together with the tank, install the cylinder in its place, tightening the two nuts that secure it.
3) Now prepare a small container, or an ordinary rag, and then place it under the brake cylinder.
4) Next, fill the reservoir with brake fluid, and then close all four holes in the brake cylinder with your fingers so that fluid does not leak out of them.
5) Next, ask your assistant to sit in the driver’s seat, and let him slowly press the brake pedal several times until brake fluid begins to flow from the holes in the brake cylinder.
6) Then let the assistant continue to hold the brake pedal depressed, and at this time, with sharp movements, first connect the first two tubes to the front holes of the cylinder, and then the rear two, and then tighten the nuts securing these tubes until they stop.
7) And to complete the operation, install its cap on the brake reservoir, and then screw it all the way, and after screwing it in, connect the wire block to its sensor.
After all the completed operations, get into the car and try to press the brake pedal several times; the pedal travel should be hard, but if the pedal travel is soft, then, together with an assistant, bleed the brake system of your car. (How to bleed the brake system of a car, see the article: “Bleeding the brakes”)