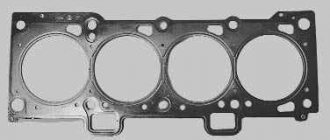
Often, drivers want to repair their car themselves and in order for everything to work out correctly, they simply need repair manuals. Today we are publishing another article on repairing the VAZ 2106 engine: replacing the cylinder head gasket.
1. Remove the cylinder head from the engine complete with intake and exhaust manifolds.
2. Disconnect the wire from the negative terminal of the battery. Drain the coolant.
3. Remove the carburetor.
4. Remove the ignition distributor with high-voltage wires.
5. Remove the block head cover.
6. Remove the camshaft assembly with the bearing housing. Disconnect the exhaust system from the exhaust manifold and remove the coolant drain pipe from the heater radiator.
7. Remove the chain from the camshaft sprocket.
8. Disconnect the supply hose from the heater radiator pipe.
9. Remove the hoses from the two pipes of the cylinder head.
10. Using a 13mm wrench, unscrew the bolt securing the cylinder head near the ignition distributor.
11. Using a “12” socket, unscrew the ten bolts securing the head to the cylinder block.
12. Remove the bolts from the holes.
13. Remove the cylinder head assembly with manifolds
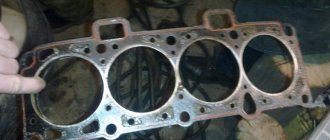
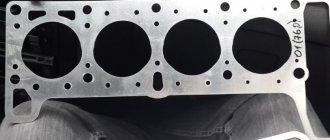
14. Then remove the head gasket.
15. Install the head in the reverse order. We replace the head gasket with a new one.
16. To center the gasket and head, two bushings are installed in the block.
17. Tighten the cylinder head bolts in two steps. First, tighten bolts No. 1–10 with a torque of 33.3–41.16 N.m, and then tighten them with a torque of 95.9–118.3 N.m. Lastly, tighten bolt No. 11 to a torque of 30.6–39 N.m.
The procedure for tightening the cylinder head bolts on the VAZ 2106 engine. Note that the previous article was about repairing the starter yourself.
We remove the VAZ 2106 cylinder head from the engine complete with intake and exhaust manifolds. Disconnect the wire from the negative terminal of the battery. Drain the coolant. We remove the carburetor. Remove the ignition distributor (distributor) with high-voltage wires. Remove the cylinder head cover of the VAZ 2106. Remove the camshaft assembly with the bearing housing. Disconnect the exhaust system from the exhaust manifold and remove the coolant drain pipe from the heater radiator.
Removal and installation of cylinder head VAZ 2106
Remove the chain from the camshaft sprocket
Disconnect the supply hose from the heater radiator pipe
We remove the hoses from the two pipes of the cylinder head
Using a “13” wrench, unscrew the bolt securing the cylinder head near the ignition distributor
Using a 12mm socket, unscrew the ten bolts securing the head to the cylinder block
Remove the bolts from the holes
Remove the cylinder head assembly with manifolds
Remove the head gasket of the VAZ 2106 block. Install the cylinder head in the reverse order. Replace the head gasket with a new one
To center the gasket and head, two bushings are installed in the block. Tighten the head bolts in two steps. First, tighten bolts No. 1–10 with a torque of 33.3–41.16 N.m, and then tighten them with a torque of 95.9–118.3 N.m. Lastly, tighten bolt No. 11 to a torque of 30.6–39 N.m.
The engines of the Volzhsky Automobile Plant are quite reliable, but sooner or later they need repairs. Often, various internal combustion engine breakdowns occur due to the fault of the car owners themselves; replacing the VAZ cylinder head gasket is required in case of engine overheating.
Signs of a malfunction of the cylinder head
There are several reasons for the head gasket to burn out on VAZ cars:
- motor overheating;
- poor tightening of cylinder head bolts;
- crack in the block head;
- deformed surface of the cylinder head or cylinder block.
The main cause of burnout of the cylinder head is overheating; the engine temperature is determined by the sensor on the instrument cluster. The engine can overheat due to various factors:
- insufficient level of antifreeze (antifreeze) in the cooling system;
- the ignition is set incorrectly (too late);
- the main cooling radiator is clogged;
- Intake and exhaust valves are jammed.
If there is severe overheating, the cylinder head may fail and the piston rings may become stuck. If, after replacing the cylinder head, the gasket burns out again, it is necessary to carry out more serious repairs and deal with the cause of the recurring defect.
Head milling
There are several cylinder head malfunctions that you cannot fix on your own. When the engine overheats systematically, the aluminum cylinder head becomes deformed. The perfectly flat surface of contact between the head and the engine block ceases to be so.
This leads to the gasket between the block and the head starting to leak. Replacing it with a new one does not solve the problem. In this case, grinding the adjacent surface may be the solution. Milling is performed on a special machine, which allows the work to be completed with perfect precision.
In the conditions of your garage, it is unlikely to carry out such a procedure yourself. Using a hand sander (as some garage “kulibins” advise) for this purpose means completely ruining the adjacent surface. In this case, repairing the cylinder head will lead to a complete replacement of the head - it is impossible to grind it indefinitely.
Replacing the cylinder head gasket of a VAZ 2106
Replacing the cylinder head gasket of a VAZ classic on an engine with a chain drive is generally a fairly simple job; the main difficulty is aligning the crankshaft and camshaft marks during assembly. If the marks are set incorrectly, the engine will not work normally, or may not start at all.
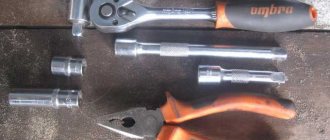
You can change the cylinder head on a “Classic” without a pit or a lift; before performing work, you should prepare the necessary tools and a container for draining the coolant. From the tool you will need:
- a set of car keys;
- slotted and Phillips screwdrivers;
- pliers;
- knob with extension;
- head 19 (for old style bolts) or multi-faceted head 12 (for new type bolts);
- hammer;
- mount.
We replace the PGBC on engines 2101/03/06 as follows (on a carburetor engine):
- turn off the ignition, put the car in neutral gear and on the handbrake;
- remove the terminal from the battery;
- drain the antifreeze from the radiator, also from the cylinder block. Even if the coolant is gone, there is still some left in the radiator;
- unscrew the nuts securing the air filter housing, remove the housing to the side;
- disconnect the gas rod and choke cable from the carburetor;
- free the block head from the water pipes (radiator and upper stove);
- discard the vacuum brake booster hose;
- unscrew the four nuts securing the exhaust pipe of the muffler;
- disconnect the high-voltage wires from the head;
- remove the distributor (you don’t have to dismantle it, but it will get in the way);
- disconnect the gasoline hose from the carburetor;
- remove the valve cover and place it aside;
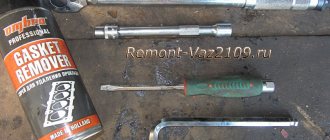
- unscrew the 13 mm bolt with edges securing the cylinder head;
- remove the chain tensioner, unscrew the camshaft gear fastening;
- we throw the chain off the sprocket (gear), the chain can be dropped down, and then it will not be difficult to get it;
- unscrew the camshaft nuts (key 13), remove the shaft,
- pull off the cylinder head mounting nuts, unscrew the bolts and remove the cylinder head. In order not to lose the rocker, it is better to remove them from the head.
Illusory repair possibilities
It should be said right away that repairing throttle position sensors is extremely rare. Firstly, the part itself, even the most expensive one, costs only a few dollars, and it makes sense to spend the money. Secondly, in most cases it is simply impossible to make repairs, for example, to restore a worn-out base layer. However, in some models you can slightly shift the resistive tracks relative to the slider and thereby extend the life of the device.
So, there is a special screw on the sensors. With its help, the position of the tracks is fixed. If they are already worn out, then you should loosen this same screw, this will change the location of the slider a little, and you can be a little patient with replacing the device. But don't count on long-term respite. Naturally, we remember that the contactless sensor cannot be repaired. This completes the adjustment, repair and replacement of the throttle position sensor, now you can operate the car for several more years and not even think about such issues.
To check the supply voltage, disconnect the wire block from the sensor. Turn on the ignition and use a tester to measure the voltage between terminals “A” and “B” of the wire block. The supply voltage should be about 5V. To check the sensor, we connect the block of wires to it and, with the ignition on, measure the voltage (the wires of the block can be pierced with thin needles connected to the terminals of a voltmeter) between the sensor terminals “B” (“ground”) and “C” (slider) - it should not be more than 0.7V. Turning the plastic sector of the drive by hand, fully open the throttle valve and measure the voltage again - it should be more than 4V. Turning off the ignition, disconnect the wire block and connect an ohmmeter between terminals “C” and “A” (or “B”) of the sensor. Slowly turning the drive sector, we monitor the readings of the tester arrow. There should be no jumps in the needle throughout the entire working range. To replace the sensor, remove the throttle body from the receiver studs without disconnecting the coolant inlet and outlet hoses from it (see Removing the throttle body).
Using a Phillips screwdriver, unscrew the two screws securing the sensor to the throttle body...
...and remove the sensor.
The sensor is marked 2112-1148200
Remove the sealing foam ring installed under the sensor.
Install the sensor on the throttle body in reverse order. In this case, the damper must be in the closed position. The tightening torque for the sensor mounting screws is 2 N•m.
The VAZ 2107 throttle sensor, together with a mass air flow sensor and oxygen concentration control, acts as an element that controls the supply of fuel to the combustion chamber depending on the position of the throttle valve. As with any repair to replace electronic fuel injection sensors, they must be checked for functionality. To check, you will need a regular multimeter with the function of measuring resistance in the power circuit and a set of standard tools.
To check the throttle sensor:
- Disconnect the package with wires from the sensor.
- The connector body will be marked. Connect the ohmmeter leads to terminals “B” and “C”. We open the throttle valve; for a working sensor, the resistance will increase from 2.7 to 8.2 kOhm.
- Next, we switch the multimeter to voltmeter mode and connect its negative terminal to engine ground, turn on the ignition in the circuit, and the positive probe will turn on. For a working sensor, the voltage should be approximately equal to 5V, if absent or significantly different from the norm, there is a malfunction in the power circuit or in the computer. After measuring the voltage, turn off the ignition.
After confirming that the throttle sensor is not working and deciding to replace it, you must:
- To remove the sensor, use a Phillips screwdriver to unscrew the two screws securing it to the throttle body and remove it.
- There will be a foam gasket between the sensor and the housing.
At this point, the repair work to check and remove the VAZ 2107 throttle sensor is completed. The installation must be carried out with the damper closed, aligning the protrusion of the damper axis with the groove on the sensor body.
Sources
- https://carnovato.ru/proverka-regulirovka-datchika-polozhenija-drosselnoj-zaslonki/
- https://www.autofizik.ru/VAZ/VAZ-210721047/features-of-repair-of-a-VAZ-2107-20-with-engine-VAZ-2104/checking-and-replacing-position-sensor-d
- https://remont-vaz2106.ru/datchik-drosselnoj-zaslonki-vaz-2107
Replacing the cylinder head gasket of a VAZ 2107 (engine 2105)
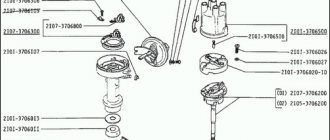
The 2105 engine has a timing belt drive, so replacing the cylinder head gasket differs only in removing and installing the gas distribution mechanism parts. The marks are set as shown in the figure below.
The cylinder head 2105 itself is slightly different, but the work is done in the same order as on other VAZ classic engines.
Replacing the cylinder head gasket VAZ 2109 (21099)
On all carburetor cars of the 2108-09-099 family, replacing the head gasket is quite simple, first remove the cylinder head:
- disconnect the battery terminal (ground wire) and drain the antifreeze;
- remove the air filter housing;
- We pull off the crankcase ventilation hose from the valve cover, having first unscrewed the clamp;
- as on the “Classic”, we disconnect from the carburetor: the gas cable, the choke cable, the gasoline hose from the fuel pump;
- remove all pipes from the cylinder head - vacuum booster, radiator, stove hose;
- unscrew the nuts securing the exhaust pipe; you can get to them from above, from under the hood;
- remove the timing belt cover;
- dismantle the valve cover (2 nuts);
- unscrew the cam gear mounting bolt;
- loosen the tension roller, remove the belt and the gear itself;
- unscrew the bolt securing the iron timing case to the cylinder head;
- we unscrew ten cylinder head bolts, the rest need not be removed (the carburetor, distributor and intake manifold remain in place).
Replacement of cylinder head gasket VAZ 2114(2115)
On VAZ models 2113-14-15, injection 8-valve engines are mainly installed, so replacing the cylinder head gasket of a VAZ 2114 (2115) is slightly different from replacing the cylinder head gasket on a “nine”.
Unlike 2109 on the “fourteenth” and “fifteenth” models:
- the air filter housing is removed differently, and along with it you also need to disconnect the injector corrugation (pipe) and the plug from the air flow sensor;
- otherwise the fuel hoses are disconnected;
- there is no distributor on the engine, but the pipe goes behind the cylinder head;
- it will be necessary to remove the high-voltage wires, and it is better to remember their installation order (sometimes they are not numbered);
Otherwise, there are no fundamental differences in replacing the cylinder head gasket 2114 from 2109.
Replacing the cylinder head gasket VAZ 2110 (2112)
On VAZ 2110 and 2112 cars, a 16-valve four-cylinder engine is often installed; it has almost the same cylinder block, but the cylinder head is different - it is two-shaft. It is somewhat more difficult to remove such a cylinder head; the timing marks are also installed differently.
We replace the PGBC as follows:
- We prepare everything for dismantling the cylinder head (remove the battery terminals, drain the antifreeze);
- completely disconnect the air filter housing with pipes;
- remove the oil filler cap, dismantle the decorative cover of the cylinder head (4 fasteners);
- disconnect the high-voltage wires, remove the ignition module;
- dismantle the upper timing belt casing, the most difficult thing to get to is the lower bolts;
- unscrew the tension roller, remove the timing belt;
- dismantle both camshafts, unscrew the bolts of the iron timing case to the cylinder head. You should immediately remove the dowels carefully, otherwise you may lose them. Before removing the gears, it is recommended to rotate the crankshaft and immediately set the timing belt to the marks;
- remove the intake manifold; after unscrewing the nuts, you need to pull it out of place;
- dismantle the valve cover by unscrewing all its fastening bolts;
- We disconnect all the existing wires and cylinder head fastenings, as well as the fuel rail, gasoline hoses (we unscrew the fittings with two horns and wrenches). When unscrewing the fittings, it should be taken into account that there is pressure in the fuel system, so it is better to bleed it off first;
- remove the protective cover of the exhaust manifold, disconnect the exhaust pipe of the muffler. It is inconvenient to get there; it is better to unscrew the nuts from below;
- unscrew the thermostat bolts (3 pcs., 5mm hexagon);
- twist the cylinder head mounting bolts (10 pcs.);
- Having disconnected everything that can hold the cylinder head under the hood, remove the cylinder head.
We clean the surfaces, install a new gasket, and mount the cylinder head in place. Before installing the cylinder head, it is necessary to set the piston of the 1st cylinder to TDC, and on the head itself you should check the installation of the camshafts by placing the gears on them - the marks should face up. Having replaced the cylinder head gasket of the VAZ 2110, we start the engine and, as the engine warms up, add antifreeze to the cooling system.
How to grind in correctly - the process of completing the work
The grinding process begins with desiccation of the valves. First, we place an object under the valve plate that serves as a stop for it.
To facilitate the memorization process and to ensure that errors are eliminated when installing rockers, experienced car enthusiasts recommend removing and grinding the valves one at a time. A popular way to remove valves is using a special puller (purchased at a car dealership or car market), but sometimes the crackers on the cone stick and are not immediately removed. In this case, according to the experienced Kulibins, you can take a tube of suitable diameter and, placing it on the top of the valve (cracker), lightly “bale” it with a hammer. A light blow breaks off the crack if it is stuck and makes it easier to remove the valve with a puller.
After removing the spring, pull the valve out of the seat and visually inspect it. After a long period of work, even if it hasn’t burned out, there is still carbon deposits on it, so we grind in the valves. To do this, you will need a special grinding powder or paste (Permatex Valve Grinding Compound, GOI paste, VPM-Auto, M-14 - M-40, etc.). The pastes are used immediately, and the powders are diluted with engine oil, resulting in a viscous substance that is applied to the chamfer of the valve plate. Pastes and powders have different grain sizes: coarser for initial grinding, finer for final grinding.
After spreading the bevel of the seat with paste or diluted powder, insert it back into the seat, press lightly and turn so that the paste is evenly distributed along the bevel of the plate and hits the seat. After this, on the back side of the cylinder head, attach the chuck of a drill or screwdriver to the valve stem (a drill is better because it has more pure revolutions).
Important! Do not distort the drill under any circumstances in order to grind the valves correctly.
It is better to carefully pull the drill up with your fingers, resting them in the area of the chuck, and holding it by the handle
First, the drill should work in one direction for a while, then switch to the opposite direction (turn on reverse). After several minutes of work in each direction (1 minute in each direction), the valve is removed and inspected. The result is visible to the naked eye; the valve seat is shiny or matt gray. If inclusions or stains remain, repeat the procedure, applying finishing paste. The same applies to the saddle, if it has inclusions, shells or uneven color, the grinding is repeated. If the valve is properly ground to the seat, it is installed in place, having first replaced the oil seal with a new one.
Important! Valve seals MUST be changed! This is a one-time use item. Otherwise, all the work will go down the drain, the valve will feel loose in the seat, will not provide a complete seal, and oil will flow through it into the cylinders. Something else useful for you:
Something else useful for you:
- How to Replace Valve Guides
- Self-adjustment of valve clearances on a VAZ 2110
- Crankshaft position sensor - check, device, signs of malfunction
The oil seal is removed using pliers. They grab the oil seal and, turning it from side to side, remove it from the groove. The main thing is not to hit the guide bushing so as not to damage it.
When the old oil seal is removed, install a new one. To do this, it is recommended to insert the valve into the seat so that it serves as a guide and facilitates the installation process. The new oil seal is placed on the valve stem, a tube of suitable diameter is taken, and by lightly tapping the tube with a hammer, we put the oil seal in place. We can tell by the sound that the seal is in place. At first it is heard only in the area of the oil seal, and after it is in place, the sound begins to spread throughout the cylinder head.
Don’t forget that a hole is formed at the end of the rod, which we must remove. If you leave it, the motor will run intermittently. It can be easily ground, for example, on a sharpening machine, the main thing is that the surface of the end of the rod is smooth (even slightly convex is allowed).
Having dried the valve, we move on to the next one. The drying process is simple, even if there is no special puller, use an open-end wrench, but then you will need outside help. One person presses the spring with an open-end wrench, and the other installs the cracker.
Having carefully wiped the end of the valve and the rocker from dust, dirt and mechanical particles, we assemble the unit and install the rocker, securing it with a spring. We move on to the next valve, observing the same sequence of operation.
After grinding in, we check whether the valve is loose or not? The cause of valve play can be either the wear of the guide bushing or the valve itself. If there is wear on the valve, then we can see it with the naked eye, and then it is worth changing it, and if it is in order, then we change the guide sleeve.