The brake system is a key element that ensures safe movement in a car. Brake malfunctions are highly likely to lead to accidents, so car owners are required to pay attention to the condition of the brake system cylinders and hoses. At the first hint of a brake malfunction, it is necessary to check their elements and repair or replace parts. The most important component of the brake system is the VAZ 2107 master brake cylinder.
The device of the main brake cylinder VAZ 2107
“Seven”, like other modern passenger cars, is equipped with a dual-circuit hydraulic braking system. Dividing the brakes into front and rear circuits allows for braking even if one of the circuits fails. So, if the rear brake cylinder of a VAZ 2107 breaks and depressurization of the rear circuit occurs, the front brakes will remain operational (although to activate them you may need to “pump” the brake pedal a couple of times, since the pedal travel will increase).
The master cylinder is the heart of the braking system. It changes the pressure in the brake circuits as the position of the brake pedal changes. When you press the pedal, the master cylinder creates increased brake fluid pressure in the system, causing the pistons in the working cylinders to extend and press the pads against the brake discs and drums.
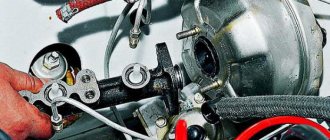
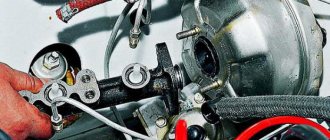
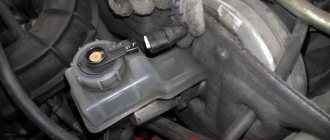
The main brake cylinder of the VAZ 2107 is fixed in the engine compartment on the vacuum booster housing under a two-section brake fluid reservoir. The latter is designed to replenish brake fluid in case of minor leaks from the system. Markings on the reservoir bodies allow you to visually monitor the brake fluid level.
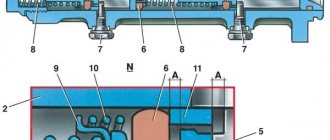
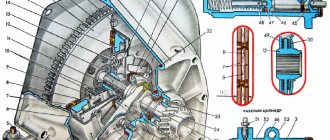
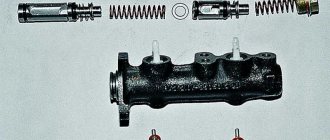
The cylinder body contains two pistons with seals, which are located one behind the other. The first cylinder is driven by the pedal pusher, the second moves due to the movement of the first. Springs located inside the cylinder ensure that the pistons return to their place after the driver releases the brake pedal.
↑ Design of the main cylinder of the hydraulic brake drive
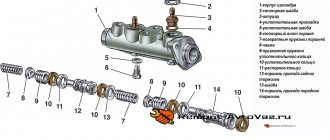
1 - plug; 2 — cylinder body; 3 — rear brake drive piston; 4 — washer; 5 — front brake drive piston; 6 - sealing ring; 7 — locking screws; 8 — piston return springs; 9 — spring plate; 10 — pressure spring of the sealing ring; 11 — spacer ring; 12 — inlet; A - compensation hole (gaps between sealing ring 6, spacer ring 11 and piston 5)
Signs of a faulty master cylinder
There are three main types of brake master cylinder failure:
- swelling of seals;
- damage to seals;
- piston jamming.
Often the third type of breakdown becomes a direct consequence of the first.
There are two signs of a malfunctioning master cylinder:
- brake fluid leak;
- pedal failures or “softness”.
To eliminate the problems, the VAZ 2107 master brake cylinder needs to be repaired. To do this, it must be removed, disassembled, worn (damaged) parts replaced, and the cylinder reinstalled. . Alternatively, the brake master cylinder can be replaced with a new one.
What is needed to repair the master brake cylinder of a VAZ 2107
To remove, repair and replace the brake cylinder, you will need:
- keys for 13;
- special wrench for brake pipes;
- syringe;
- brake fluid container;
- flat screwdriver;
- brake master cylinder repair kit;
- brake fluid.
Auto repair school - Do-it-yourself car repair
Jun 13, 2022 VAZ 2101, VAZ 2102, VAZ 2105, VAZ 2106, VAZ 2107, Zhiguli, Classics by admin
There are two main reasons to replace or repair a brake master cylinder (MBC). First, it's leaking. Traces of brake fluid leakage are clearly visible on the vacuum booster or, in the absence of vacuum, in the car interior. The second reason is a “soft” and ineffective brake pedal. The second reason becomes relevant only after checking the serviceability of the working brake cylinders of the rear and front wheels, and all brake pipes and hoses. If you are faced with similar problems and you are the happy owner of a VAZ-2101, VAZ-2104, VAZ-2105, VAZ-2106, VAZ-2107, Classic car , then this article on replacing and repairing the brake master cylinder will be of interest to you. I can immediately say that this work is not difficult, it only requires your desire, time and attentiveness. So, read on and get down to business with confidence)))
In this case, everything is simple with spare parts. If you have a standard VAZ master brake cylinder , then we buy a repair kit from Balakovo (photo 1). In the event that the main brake cylinder has already been changed and a GTZ from Fenox or Basalt , then we are looking for repair kits from these manufacturers in the car markets (photos 2 and 3). The fact is that the Belarusian manufacturer (Phenox), and subsequently Basalt, changed (or, as the engineers of these enterprises believe, improved) only one cuff (responsible for the tightness of the cylinder), see photo 4 (standard on the right, Phenox on the left). It is because of this cuff that you need to buy a branded repair kit. True, it is worth noting the excellent set of repair kits from Basalt (these repair kits are suitable for the Phoenix); the manufacturer, as they say, took care of the little things.
Plus, replacing or repairing the GTZ means further pumping and replacing all the brake fluid. So, we buy brake fluid without fail. Although there is only 0.4 liters of fluid in the brake system, I recommend taking 0.8-1 liters of DOT-4 brake fluid . If you wish, you can also bleed the clutch))).
By tool... To replace and repair the master brake cylinder on VAZ-2101, VAZ-2104, VAZ-2105, VAZ-2106, VAZ-2107, Classic cars you will need - keys for 10, 12, 13, a small screwdriver, a special key for unscrewing the brake pipe fittings.
Now let's get to work! Description and photo report of the replacement and repair of the main brake cylinder on VAZ-2101, VAZ-2104, VAZ-2105, VAZ-2106, VAZ-2107, Classic cars :
Use a blower or syringe to remove the brake fluid from the brake cylinder reservoir. Using a ten key, unscrew the nut securing the plastic tank (photo 5). Use a special wrench to unscrew the brake pipe fittings (photo 6). The ends of the brake pipes can be plugged with rubber plugs (photo 7).
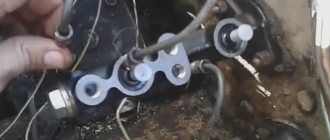
Next, use a 13mm wrench to unscrew the two nuts and disconnect the master brake cylinder from the vacuum brake booster (photo 8). We remove the reservoir from the mounting bracket and remove the brake master cylinder from the car.
Further, read only those who are planning to repair the master brake cylinder, and not change it entirely))).
For convenience, we can disconnect the brake reservoir from the GTZ. After this, you can unscrew the locking screws one by one. First, unscrew the first locking screw from the cylinder plug, unscrewing the second screw, hold the piston from “ejecting” (photo 9).
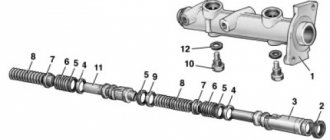
The front brake drive piston will “pop out” from the cylinder without any problems. But the second piston (rear brake drive) with cuffs will have to be shaken out from the brake cylinder. We lay out everything that we managed to get from the brake cylinder sequentially. The picture you should get is the same as in photo 10. The components of the GTZ mechanism are shown in more detail in photo 11 and figure 12. This should help you correctly assemble the parts of the main brake cylinder.
The structure of the main brake cylinder of VAZ-2101, VAZ-2104, VAZ-2105, VAZ-2106, VAZ-2107, Classic cars : 1 - cylinder body; 2 — lock washer; 3 - fitting; 4 - sealing gasket; 5 - sealing washer; 6 — piston lock screw; 7 — piston return springs; 8 - cup; 9 — pressure spring of the sealing ring; 10 - sealing ring; 11 — spacer ring; 12 — rear brake drive piston; 13 — washer; 14 — front brake drive piston.
After the insides are taken out, we inspect the condition of the mirror in the cylinder itself (photo 13). If there are traces of corrosion, deep scratches and cavities on the mirror, the GTZ should be thrown into scrap metal. Since further repairs will have a short-term result, and the cylinder will work for another week, two or a month, and will remind itself again.
If everything is ok with the cylinder, then you can start replacing the cuffs (photo 14). After all the cuffs have been changed, you can fill the pistons with springs into the housing, having first lubricated the cuffs with brake fluid. Install the locking screws. Using a screwdriver (simulating pressing the pedal) we check the operation of the cylinder.
We fix the tank pipes and install the GTZ on the car. We do not tighten the brake pipe nuts, pour brake fluid into the reservoir and wait until it begins to pass through the fittings. At first, the liquid will come out with air bubbles, and when the liquid comes out without bubbles, you can tighten the fittings. Under favorable conditions, the brake system does not need to be bled after this. And if you still have to bleed the system, it will be much easier to do.
Something like that!)))
When using an article or photographs, an active direct hyperlink to the website www.avtorem.info is required!
Did you like the article? Share it on your page!
Dismantling the main brake cylinder VAZ 2107
To avoid unnecessary losses of brake fluid from the reservoirs, it must be poured from there into a prepared container using a syringe. The procedure for removing the cylinder is as follows:
- loosen the clamps securing the rubber hoses to the brake cylinder fittings;
- remove the hoses coming from the brake fluid reservoirs to the cylinder fittings;
- use a special wrench to unscrew the three brake pipes;
- unscrew the nuts securing the brake master cylinder to the vacuum booster cover;
- remove the brake cylinder.
Vacuum booster
The braking system of a car certainly cannot be called perfect, so it has to be supplemented with devices that help improve efficiency. One of them is a vacuum booster.
Application and purpose
Today, a vacuum amplifier is in great demand because it is highly efficient.
Its tasks are extensive, but the amplifier copes with them all perfectly:
- The degree of resistance of the brake pedal increases;
- Reduces the load on the brake system;
- Acts as a highly efficient auxiliary unit;
- Has a positive effect on the service life of the brake system, etc.
If we take into account the design of the vacuum booster, it includes a complex unit directly connected to the master cylinder of the vehicle’s brake system.
This element has the following components:
- Dense body, for the manufacture of which a high-strength polymer is used;
- The diaphragm, which is also called the collecting node;
- Monitoring or control specialized valve;
- Pusher. It allows you to return the engine elements to their original position when there is no power;
- Main piston rod of the brake system cylinder (main);
- Switch return spring.
The body of this spring has two cellular divisions, which are divided into vacuum and atmospheric. Cells are often called chambers.
- The vacuum chamber is a cell directly connected to the brake master cylinder.
- The atmospheric chamber is a cell located opposite the brake pedal. Its open part of the body rests on the brake pedal.
It is also worth noting the diaphragm, which performs two very important tasks:
- Corrects the position of the piston in space;
- Pumps brake fluid to the main brake cylinders.
Installing a vacuum booster involves a serious change in the sensitivity of the pedal, so it is strongly recommended not to apply a large and sudden force to it in the “first couple”. Pressing should be done carefully and smoothly.
Main brake cylinder VAZ 2107: repair
In order not to lose parts or stain the main brake cylinder of the VAZ 2107, repairs should be carried out on a prepared table. To disassemble the cylinder you will need a vice.
The repair procedure is as follows:
- clamp the cylinder in a vice and loosen the plug nut;
- place the cylinder on the table, carefully unscrew the plug nut and remove the parts from the cylinder;
Note: the plug nut must be unscrewed extremely carefully so that the cylinder parts do not fly apart under the influence of the springs.
- replace the rubber seals on the pistons;
- Assemble the master cylinder parts and tighten the plug nut.
Malfunctions
There are two types of brake master cylinder failure:
- Damage or swelling of rubber seals;
- Piston jamming.
Signs that it is time to repair or replace an element are:
- leakage of liquid;
- changes in the pressure of the brake pedal: it became softer or began to fail.
To eliminate breakdowns, it is necessary to dismantle the master brake cylinder and then install a new element, or to repair it, namely, change the boot, rubber seals, clean parts from dirt, corrosion, etc.
If the GTZ breaks down, the entire braking system of the vehicle is susceptible to malfunctions. At the right moment, when you press the brake pedal, the car may stop much more slowly than usual, or may not respond to the signal at all. And this can cause a traffic accident.
If, when squeezing the pedal, you feel that it has become softer or the car is braking more slowly, you should check the brake system in general and the brake master cylinder in particular. With a little time, you can improve the safety of your vehicle.
Brake master cylinder price
The cheapest cylinders cost around 400-700 rubles 1,500 rubles . Replacing a cylinder in a car service will cost from 400 rubles , but to save money it is quite possible to do it yourself.
Principle of operation
Now let's look at how it all works: due to the action of springs, the pistons are set in their original position. In this case, the compensation channels are open, the chambers are completely filled with liquid (the system is connected to the atmosphere).
When the driver presses the brake pedal, the rod connected to it moves. This rod, overcoming the force of the spring, pushes the first piston. As it moves, it closes the compensation channel, which leads to sealing of the circuit (it is disconnected from the atmosphere) and opens the bypass (liquid from the tank enters the cavity behind the piston). At the same time, the pressure in the chamber begins to increase. One part of the liquid from it goes into the pipelines, acting on the brake mechanisms, while the other pushes the second piston. While moving, it does the same thing as the first one - it closes one channel and opens another, and also pushes liquid into the pipelines.
When the pedal is released, the springs return the pistons to their original position. At the same time, the liquid present behind the pistons returns back to the tank through the bypass channel (all this eliminates the occurrence of vacuum). Having returned to the initial position, the pistons open the compensation channels, connecting the system to the atmosphere (the pressure in it is equalized).
Now let's look at how the GTZ works if one of the circuits has lost its tightness. First, let's analyze the situation when the circuit for which the first piston was responsible is damaged. Since it is depressurized and there is no liquid in front of the piston, when you press the pedal, the pressure in the chamber will not increase. The piston, encountering no resistance, will move all the way and will mechanically begin to influence the second piston. And he, in turn, moving, will fulfill his function - ensure the injection of fluid into the mechanisms of his circuit.
Replacement
Replacing the part yourself is not difficult. To do this, you need to arm yourself with the following set of tools:
- screwdriver;
- keys 10, 13;
- 5 – with a cubic syringe or bulb;
- brake fluid;
- clamps.
If during disassembly you find that the old rubber hoses have become hard, it is recommended to replace them with new ones.
- Remove the belt from the expansion tank and put it aside.
- Using a ten key, unscrew the fastenings of the brake fluid reservoir and open the lid.
- Drain the brake fluid into a container.
- To prevent brake fluid from entering the engine compartment, it is necessary to place a piece of dense material under the cylinder.
- Loosen the clamps on the hoses extending from the tank and remove them.
- Disconnect the three brake pipes and move them a little.
- We unscrew the two nuts securing the cylinder to the amplifier, using a 13mm wrench.
- Remove the brake master cylinder.
- We clean the seat of the spare part from dirt and brake fluid residues.
- Let's move on to a new element. We remove the protective seal and install the oil seal there.
- We insert the new cylinder into place and tighten the nuts.
- We remove the plugs and use a syringe to inject brake fluid into the cylinder cavity until it is completely filled.
- We assemble the remaining elements.
The final stage of repair work will be bleeding the car's brake system.
The principle of operation of the braking system
The operation of a hydraulic drive is based on the property of a liquid not to be compressed by external influences. Thanks to this, the liquid perfectly performs the role of a force transmitter without any losses, but provided that there is no gas in its composition.
The principle of operation of a hydraulic brake system is very simple: the driver presses the brake pedal, thereby beginning to act on the brake fluid located in sealed pipelines. Since it does not compress, the force leads to its movement through pipelines, the ends of which are connected to working mechanisms. Because of this, the pressure in the cavities of the mechanisms increases, and the pistons of the mechanisms come out of their seats, pressing the pads against the discs or drums - the movement slows down. When you stop pressing the pedal, the pressure drops (the fluid returns) and the pistons of the mechanisms return to their original position.
Video: How the braking system works
GTZ malfunctions
Replacing the VAZ-2107 master brake cylinder is required when this part simply fails. You can determine the malfunction of the GTZ in the following ways:
- The red warning light comes on, indicating a problem with the brake mechanism. This lamp comes on when the level in the brake cylinder reservoir drops below normal. In this case, it is important to find out the reason for the decrease in fluid and, if necessary, add it. If the leak occurs due to a malfunction of the turbocharger, it should be replaced.
- Presence of leaks on the GTZ. If, upon opening the hood, you can see signs of a fresh fluid leak on the GTZ, then it’s time to pay attention to repairing the mechanism. It is possible to repair the main brake cylinder of a VAZ-2107, but at the same time you can extend the life of the product for a short time, this is due to the quality of modern spare parts. If the product fails, or more precisely, the cuffs and seals have dried out, then experienced craftsmen recommend replacing the gas turbine unit. Many desperate amateurs strive to find the answer to the question of how to repair the master brake cylinder, but subsequently everything ends with its replacement.
The GTZ for a VAZ-2107 costs about 500 rubles, so it makes no sense to spend time and money to repair it. Let’s find out in more detail how the GTZ is replaced with a VAZ-2107.
Features of replacing the GTZ
Replacing the mechanism in question will not take much time, so first you should purchase a new product, and then make sure you have a standard set of tools and a special pipe wrench. This key looks like this:
The list of standard tools includes:
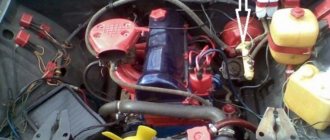
Now let's start the workflow. The product is located directly under the hood in the engine compartment on the driver's side. The product looks like this:
- Initially, you should remove the remaining brake fluid from the reservoir.
- It is necessary to loosen the fastening clamps, and then disconnect the hoses of the fluid reservoir from the fittings.
- Using a special wrench, it is necessary to unscrew the threaded bushings that secure the steel tubes to the GTZ.
- Two nuts are unscrewed, with which the cylinder is secured to the vacuum booster housing.
- Now you can remove the device in question.
- After removing the old device, you can install a new GTZ. The protective plug should be removed from a newly purchased device and a new oil seal should be installed in its place. After installing the new product into the seats, it should be secured with fastening nuts.
- We use a clean medical syringe from which the needle should be removed. We fill the syringe with brake fluid and then fill the installed device with it.
- TJ should be poured until it goes into the holes. As soon as the mechanism, or rather, the system, is filled, you can begin screwing the tubes with a special key.
- Taking this opportunity, you can remove and clean the tank for refueling the TJ, if necessary. It’s easy to determine the need; to do this, you need to look inside the tank. If there is sediment, it is better to clean the tank and rubber hoses.
- We fill the reservoir with brake fluid, and then be sure to bleed the system.
This completes the procedure for replacing the main brake cylinder on a VAZ-2107. The procedure is not complicated, so even an inexperienced driver can cope with it. A serious malfunction is solved quickly and inexpensively, and the car owner can forget about this part for 3-5 years. The VAZ master brake cylinder has this name for a reason, so special attention should be paid to it when the slightest sign of malfunction is detected.
