Lada Kalina cars use an APS-6 or 6.1 immo block. If a malfunction occurs in its operation, you first need to find the cause and try to eliminate it. You will need to disable the immobilizer on Kalina if repairing the device does not produce results.
Where is the immobilizer located on Kalina?
The immobilizer control unit on the Lada Kalina is located deep in the instrument panel in the area of the central air duct of the microclimate system. The ring-shaped signal reader antenna is located in the ignition switch. The chip itself is mounted in the head of the key and is read automatically when the key is inserted into the lock.
Device access
To access the block you will need the following tools:
- Phillips screwdriver;
- plastic screwdriver for removing decorative elements on the panel;
- extension with universal joint and head for Phillips screws (for removing the block).
The sequence of disassembling the panel on a basic Kalina 1 without air conditioning:
- Disconnect the battery from the on-board network.
- Open the ashtray and unscrew the four screws securing the housing, remove it from the socket.
- Remove the two plugs located on the sides of the alarm button.
- Unscrew two more fastening screws that are located under the plugs.
- Remove the rotary switches for temperature and air flow direction.
- Pull the central trim towards you and remove it from the latches.
- Disconnect electrical connectors to trim-mounted components.
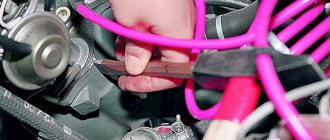
- Remove the standard unit, secured in a plastic case under the central air duct, using two screws.
- Disconnect the wiring plug from the unit by pressing the latch.
The photo shows the main stages of removing the immobilizer unit on a VAZ Kalina.
Ashtray mounting screws
Removing the ashtray housing
Removing the plugs
Removing connectors
Wiring harnesses
Immobilizer internal board
Resynchronization of remote control codes
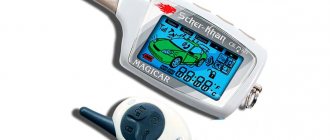
In cases where the remote control buttons are pressed outside the range of the radio channel, the “floating” code counter in the remote control goes out of synchronization with the counter in the system control unit. If the number of button presses outside the signal reception area of the system exceeds 1000, the system stops responding to remote control commands. In this case, the remote control training procedure should be repeated.
Updated August 01, 2022
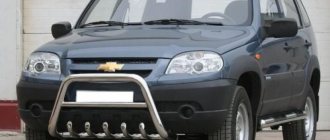
Due to the increasing number of cases of lost training (master) keys for car owners of Kalina, Priora, Grant, Niva-Chevrolet, we are introducing a new type of service: registration of working keys in these cars, without a master key!
Usually in such cases, it is necessary to change a set of blocks: ECU (electronic engine control unit), APS unit, glass control unit, ignition switch complete with door cylinders and new keys, etc.
Now in our company you can register a working key with buttons without a training key, and for an additional fee you can receive a new training (red) key for your car. For this procedure, you need to come by car and leave it while the work is being carried out.
The work includes dismantling the necessary units (ECU, APS, etc.) from the car, programmatically changing data, installing units on the car and registering keys.
We emphasize that a key registered in this way will cost more than registering a remote control yourself if you have a training key, but naturally cheaper than buying and replacing a set of blocks with new ones.
Update January 05, 2022
Attention! It is now possible to make a duplicate chip for autostart using a working key with remote control buttons! A master or training key is not required. The chip obtained in this way can be used both for installation in the immobilizer bypass unit to implement autostart, and for everyday use, starting the engine of Lada Kalina, Priora, Niva-Chevrolet cars.
Such a duplicate is more expensive than a regular chip, which can be registered using a master key, but this is a real solution in cases where the master (training) key is lost. To create a duplicate, you need a car, a working key with remote control buttons (and it doesn’t even matter if it is partially faulty, for example, the buttons don’t work, etc., the main thing is that the ignition key starts the engine).
The entire copying procedure takes 10-15 minutes. Contact us by phone in contacts.
How to activate the immobilizer?
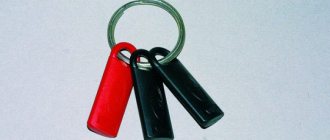
Kalina 1 and 2 cars are equipped with two ignition keys - black and red. The second is used to activate the immobilizer and is sometimes called the master key.
Before activation, the car owner should make sure that there are at least 10 liters of gasoline in the car’s tank. This is necessary so that the warning buzzer about the emergency fuel level does not interfere with the immobilizer settings.
Activation sequence:
- Sit behind the wheel and close the door.
- Insert the red key into the lock and activate the ignition.
- After three beeps, turn off the ignition and remove the key.
- Within 5 seconds, insert the black key and activate the ignition.
- After five (three and after a while two more) buzzer signals, turn off the ignition and remove the key.
- Within 5 seconds, install the red key and place it in the ignition switch position.
- Wait for the buzzer to sound five times and deactivate the ignition. The key must remain in the lock.
- A single buzzer will sound, after which you must turn on the ignition within 5 seconds.
- Wait another 5 seconds, after which the hazard warning lights should flash and the horn sound briefly.
- Turn off the ignition and, holding the key in the lock, wait for the immobilizer symbol on the instrument cluster to disappear.
On some vehicles, visual rather than audible indication is possible by flashing the immobilizer warning light on the instrument cluster.
The video from the avtohelpII channel shows the activation of the immobilizer on the Kalina 2 car.
Diagnostics of the Lada-kalina security system. guarding the borders
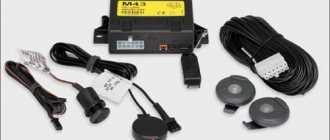
- This is the first domestic car on which even in the simplest “norm” configuration the plant installs a full-fledged security system. Its main links are shown in photo 1. This is controller 1 (Bosch M7.9.7), control unit 2 of the automobile anti-theft system (APS-6), working ignition key 3 with a remote control and transponder (coding device), training key 4 with its own transponder (in a red shell), ignition switch 5 with a built-in communication coil, block 6 of the remote control system.
Let us note one of the advantages of the new APS-6 immobilizer over the previous APS-4, familiar to owners of “Samar” and “Ten” cars: now there is no need to apply the key to the receiving device located away from the ignition switch. The key in the Kalina lock immediately ensures connection between the transponder and the coil - without unnecessary manipulations!
The APS-6 control unit reads the code hidden in the key transponder and transmits it to the controller, which compares this code with that recorded in non-volatile memory. If someone else's key was inserted into the lock (the probability is quite low!), starting will not work - the codes will not match.
At the same time, it is worth remembering that if you lose a working key, you can start the engine with a training key and drive until you buy a new working one. It is clear that he will have to be re-programmed (trained).
By the way, VAZ does not recommend selling cars with a non-activated security system - if the buyer refuses it, a corresponding entry must be made in the service book. But life is complicated...
Having purchased a Kalina with an activated APS-6 system, you received two keys - a training one and a working one. But there are already “clean” working keys on sale: where is the guarantee that an unscrupulous seller has not trained another working key (the system allows this) and passed it on to “interested parties”? That is why it is better to retrain APS-6 immediately, on a new machine. Let's do this.
During subsequent manipulations, we will need to quickly replace one key with another, so we will release both from the bunch. And one more thing: let's fill the tank, otherwise the warning light may come on and the buzzer will sound at the same time, confusing - we only need those signals that are related to training!
So, let's get behind the wheel. Are the doors closed? We can begin.
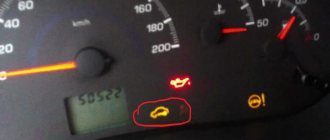
1. Having turned on the ignition with the training key, do not start the engine. In the instrument cluster there is an APS status indicator - 1 in photo 2. It turns on and does not blink - the system is not trained. Didn't turn on - trained. Flashes for 20 seconds - the system is faulty. In our case, the “car with a key” does not light up - it is trained.
2. Turning off the ignition, remove the key - the indicator blinks.
3. Turn on the ignition with the working key. The buzzer of the APS control unit will sound three times, and after 6 seconds twice more.
4. Turning off the ignition, remove the working key and...
5. ...No later than 6 seconds, insert the training one and turn on the ignition! (Otherwise the system will remain silent and you will have to do everything again.) The buzzer sounds three times, and after 6 seconds twice.
6. Turn off the ignition, but do not remove the training key. The buzzer will sound once. The indicator will start flashing quickly. It takes up to 15 seconds to enter this mode - wait!
7. Turn on the ignition. After the buzzer sounds once (but no later than 10 seconds), the direction indicators will flash three times, the buzzer will sound in time with them, and the horn will sound once. During this operation, the system remembers the codes, so you cannot turn off the ignition without waiting for three confirmation beeps from the buzzer. The waiting time is at least 5 seconds.
Emergency immobilizer shutdown
To disable the immobilizer, a digital code is used, which must first be written into the memory of the control unit.
To do this, you need to go through the activation procedure described above, and then follow the steps:
- Turn the red key to the ignition on position and wait until the immobilizer warning light on the instrument cluster goes out.
- Dial the numbers of the future six-digit code. For this, any numbers from 1 to 9 are allowed. The dialing is performed by quickly pressing the gas pedal all the way. When pressed, the immobilizer lamp will light up, and when released, it will go out. After dialing the number, press the gas pedal and hold it until the immobilizer indicator goes out (about 5-6 seconds). Then you can dial the second number and so on. If you make a mistake when typing and saving, the immobilizer indicator will not go out, but will start flashing. In this case, the entire procedure is carried out again, starting with activation.
- After dialing and recording the last digit, the immobilizer indicator will not go off. You need to hold the gas pedal for another 10 seconds and release.
- Turn off the ignition and remove the red key from the lock.
In case of problems with starting, you need to disable the immobilizer using the previously recorded code, for this you will need:
- Turn on the ignition system. If you use a key with a damaged or unrecognized chip, the starter may briefly engage, which will not lead to starting, since the fuel supply and ignition circuits are disconnected. The immobilizer indicator on the instrument cluster will activate and flash.
- Wait about a minute until the icon goes out.
- Enter the code by pressing the gas pedal. To enter a number, quickly press the pedal all the way. The number of presses corresponds to the code number. To separate between numbers, use a long press on the pedal (about 6 seconds). The input procedure essentially repeats the process of programming the code.
- After entering the sixth digit, the fuel pump circuit will turn on, and the immobilizer indicator will also light up. If you enter a number incorrectly, the icon will flash. In this case, the code entry procedure is repeated from the first digit.
What's the result?
Taking into account the above information, it becomes clear that the immobilizer on the Lada Kalina, in case of malfunctions in its operation, should be turned off and turned on again. Such a “reboot” in some cases allows you to start the engine and continue to operate the car without problems.
You can also try disabling the immobilizer if the device malfunctions quite often. In any case, it is important to know the immobilizer code to disable it, as well as the algorithms for deactivating and activating IMMO. As a rule, without special equipment, this is actually the only way to solve the problem.
We also recommend reading the article about what a transponder is in a car. From this article you will learn about the purpose and operating features of this device, as well as what types of transponders there are in a car.
If it is necessary to completely remove the immobilizer, then certain manipulations with the unit will be required, which are not recommended to be performed independently. In this case, you need to contact experienced specialists who specialize in repairing such devices.
Finally, we note that in addition to the standard immo, starting the engine can also be blocked by a car alarm. In this case, it is necessary to accurately determine the source of the problem, and then select the most appropriate methods to eliminate any failures or malfunctions of the alarm system, immobilizer (both standard and third-party) or the entire security system in the car.
How to disable the immobilizer with your own hands?
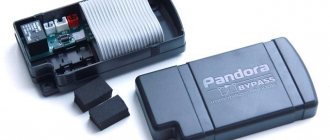
There is an option to temporarily disable the immobilizer, which may be required when installing an alarm system with auto start.
To install the bypass system, use:
- A control unit with a key or tag embedded in it. A key or chip is inserted into a device located deep in the dashboard. When autostart is activated, the alarm relay activates the unit and the engine starts, bypassing the main circuit.
- Blockless immobilizer bypass unit. A separate control device is installed that emulates an ignition key with a chip.
Another way to disable the immobilizer on Kalina depends on the type of ECM (control unit).
Bosch M7 4 block
Before you begin performing an operation on a car with a Bosch M7.4 unit, you must prepare:
- a computer or laptop with Winflashecu v.1.14 preinstalled (the distribution is available for free download);
- adapter and cord K-Line, for example, VAG-COM 409.1;
- pre-downloaded software for the unit with disabled immobilizer support;
- several wires with different lengths.
To disable the immobilizer on Kalina, you need to perform the following steps:
- Remove the wires from the battery terminals and disconnect the wiring harness connectors from the ECM installed under the hood of the vehicle. To disconnect, you need to remove the protective top cover and pull out the flat connector lock. All work is carried out on a large block. The small block can not be disconnected from the block.
- Insert the wire into contacts A4 and B2 from the harness side. These cables will be used to supply additional 12 V positive voltage. To do this, they are connected to the battery terminal through an intermediate switch.
- Reinstall the connector and fasten the fastener.
- Connect the adapter to the diagnostic connector located in the passenger compartment. The connector is located under a plastic cover installed on the center console.
- Set the data transfer rate to 38400 bps in your computer settings.
- Launch the Winflashecu application and select the port number, speed (38400 bps) and block type M7.4 in the dialog box. In the lower right corner of the window there will be a message “No connection”.
- Apply additional power to pins A4 and B2.
- Turn on the ignition. The “No communication” notification should change to “Communication with the ECU” and the buttons for starting operations will become active.
- Read the EEPROM (unit software) data and save it to the computer's hard drive.
- Select new software and load it into the unit’s memory using the “Write EEPROM” button.
- Wait for confirmation that the download was successful.
- Close the program and turn off the ignition.
- Remove the auxiliary power wires.
- Check whether the car can be started with a key without a chip. The immobilizer symbol will light up in the instrument cluster when starting and go out after a few seconds.
Connector pinout
Setting up the program
Flashing functions
Bosch block 7 9 7
When installing the Bosch 7.9.7 control unit (Euro 2 standards), it must be modified by resoldering one resistor. It is best to entrust this task to a person who has experience with soldering small electronic components. After this, the block is “reflashed” according to the procedure described above.
Block January 7 2
In the case of using ECM type January 7.2, the procedure has a completely different look.
Before starting work you need to prepare:
- K-Line adapter, for example, VM9213;
- computer or laptop with ChipLoader 1.97.7 installed;
- soldering iron with a power of 25-40 W;
- solder and rosin;
- wires and switch;
- resistor with a resistance of 3.6 to 5 kOhm;
- plugs for connecting wires to the control unit;
- 12 V battery (standard or from an uninterruptible power supply);
In order to remove the immobilizer function from the unit, you should:
- Disconnect power from the vehicle's on-board network and remove the ECU.
- Wrap the block body with insulator.
- Assemble the diagram in accordance with the photo.
- Connect the adapter to the computer.
- Using the toggle switch, simulate turning on the ignition.
- Launch the application and establish a connection with the block.
- Read the factory data of the unit and save it to the hard drive.
- Read the EEPROM and click the “Delete IMMO” button. Wait for the confirmation window to appear with the text “Immobilizer successfully removed.”
- Close the application.
- Turn off the ignition with the toggle switch.
- Before installing the control unit on the car, you must turn off the signal from the immobilizer device. If the block is removed from the IMMO block, then it is necessary to close the contacts numbered 9 and 18.
Connection diagram
Connection diagram with circuit elements
Connecting the January block
Application dialog box with a sequence of actions
Immobilizer disabled
Diagram for installing a jumper in the unit plug
Block January 5 1
To disable the immobilizer in the January 5.1 block, it is necessary to unsolder and reprogram the EEPROM flash memory. It is not recommended to perform this operation yourself, but rather to perform it in a workshop, since in the process of performing the task you will need a programmer and a hot air gun for soldering.
Controller January 7-2
In order to disable the immobilizer on Kalina with ECU January 7.2 yourself, you must:
- Turn off the on-board power supply and remove the unit from the vehicle.
- Connect the controller connector in accordance with the diagram.
- Install the adapter on your computer.
- Apply voltage using the switch, simulating the operation of the ignition.
- Launch the software on the computer and establish communication with the programmable unit.
- Read the firmware and save it on your hard drive.
- Read the EEPROM data and delete it programmatically (using the “delete IMMO” button). If the deletion is successful, a corresponding message will be displayed.
- Turn off the program, “turn off” the ignition switch.
- Gain access to the immobilizer unit installed on the vehicle and remove the harness from the connector. It is necessary to connect pins 9 and 18 in the plug, which will ensure the normal functioning of the car’s electronics.
The photo below shows some steps to remove immo January from memory.
Why does the immobilizer not work and how to fix it?
The main reasons for immobilizer failure are:
- Inactivated control unit and desynchronization of key and vehicle. To correct these faults, a reactivation procedure is usually sufficient.
- Liquid getting into the inside of the block. In this case, the device will have to be removed from the machine and dried. If after this the system functionality is not restored, the unit must be replaced.
- Failure of the power supply fuse. The immobilizer is powered by a 10-amp (on Kalina 1) or 15-amp (Kalina 2) fuse installed in the mounting block in the instrument panel. If after replacing the fuse the device does not work or the fuse link fails again, the car should be towed for a thorough diagnosis to a service center.
Instructions for programming the key in Lada Kalina, Priora, Grant, etc.
- Close all doors. Turn on the ignition with the training key and wait in the on state for at least 6 seconds.
- Turn off the ignition. The indicator light in the warning lamp unit should flash quickly (at a frequency of 5 times per second) while the learning procedure is being carried out correctly. If the lamp stops flashing quickly, it indicates an incorrect operation, an out-of-time interval, or a malfunction. Remove the training key from the ignition switch.
- While the warning lamp is flashing (about 6 seconds), insert the remote control and turn on the ignition.
The immobilizer buzzer should emit three beeps. If the buzzer does not sound and the indicator has stopped flashing, this means: - the time interval of 6 seconds has been exceeded and it is necessary to repeat the learning procedure, starting from step 1; -immobilizer is faulty - Wait 6 seconds for the buzzer to emit two more beeps and turn off the ignition.
- If it is necessary to train the second remote control, then you should perform steps 3...4 again, using the second learning remote control to turn on the ignition. If not, continue from step 6.
- After turning off the ignition for no more than 6 seconds, while the indicator is flashing, remove the remote control, insert the learning key and turn on the ignition. The buzzer should beep three times. Wait 6 seconds until the buzzer beeps two more times.
- Turn off the ignition without removing the training key, wait 6 seconds until the buzzer sounds a single sound signal. The indicator should flash twice as fast. If the sound signal does not sound and the flashing indicator stops, you should return to step 1 and repeat the learning procedure. If a repeated failure occurs when performing step 7, this means that the ECM was previously trained with a different key, in which case the controller should be replaced.
- After the buzzer gives a single sound signal, no later than 3 seconds, turn on the ignition for 2...3 seconds and then turn it off (after turning on the ignition, the buzzer will sound three times and the indicator will stop flashing). The hazard warning lights should flash and the car horn should beep.
- Remove the learning key. Wait with the ignition off for at least 10 seconds. Insert the working key and turn on the ignition. Wait 6 seconds, if the indicator does not flash, test start the engine, the engine should start. If the indicator flashes, turn off the ignition and wait at least 10 seconds. Turn on the ignition. The warning light should not flash and the engine should start. If, after turning on the ignition, after 6 seconds the indicator lights up with a constant light, then the learning procedure must be repeated, starting from step 1.
New Lada: The car jerks when driving at low speeds, during acceleration, injector and carburetor
Peculiarities
Owners of Lada Kalina believe that the car has practically no problems, except for the sometimes freezing immobilizer. Not only the car thieves, but also the owner cannot start the car. Let's talk about how to disable the immobilizer on Kalina.
All new Ladas produced with an injection engine are equipped with APS-4 - a typical anti-theft device. The principle of the anti-theft device is as follows. It transmits data about the performance of the system to the unit that controls the car, and blocks the fuel pump and ignition circuit until they are unlocked with a special key.
The electronic anti-theft device on Kalina is very sensitive and changeable. It can be damaged by a request to diagnose the system while the engine is running, or even by a ringing mobile phone. In general, the owner has to solve many problems from frequent software failures and immobilizer malfunctions.
The reason for everything is the Kalin line. In response to numerous complaints and requests from Lada Kalina owners - such as “the immobilizer does not start” - the company has thought through and equipped the cars with an alternative function for starting the engine in the event of an anti-theft failure.
To do this, the driver must enter a secret six-digit code. The owner of a non-travelling immobilizer must press the accelerator pedal a set number of times, then only the system will allow you to enter the code, turn on the emergency mode and allow one trip.
After such ordeals, only one thing comes to mind: deactivate the immobilizer. How to do it yourself?
Principle of operation
The immo's task is to prevent an attacker from starting a car in order to steal it. The device body is small in size and is located in places that are difficult to break into. If a standard alarm can only scare away a thief, then the immobilizer does not allow the car to start if the person does not have a special electronic key (tag).
There are 3 groups of protective devices:
- contact;
- code;
- contactless.
Contact and code immobilizers give away their location to an attacker due to the presence of a reader or device for entering a code. To start the motor, you need to enter a code or touch the chip to the contact pad. These devices will only prevent the engine from starting during initial startup. This protection mode resembles the operation mode of a secret button. Installing a secret button is cheaper than the cost of these devices, so they have not gained much popularity.
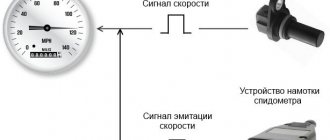
Modern Russian cars are equipped with standard contactless immobilizers, in which a chip with a code is located in the ignition key. The protection device works as follows:
- The driver inserts the key into the ignition switch; when the key is turned, current from the on-board network is supplied to a coil of copper wire wound around the lock.
- The generated electromagnetic field pulse, propagating in space, induces current in the microantenna, which is located in the ignition key body, and charges the capacitance that supplies voltage to the chip containing the code.
- The complex electromagnetic signal generated by the chip is transmitted back to a coil wound around the ignition switch. The code in the form of an electrical signal is sent to the immobilizer, which carries out the recognition procedure. If the immo confirms the authenticity of the code, it sends a command to the electronic engine control unit (ECU) to start the car engine.
This type of protective device tests the chip once when the engine is started; more advanced immobilizers have a “WAIT-UP” relay that does not block engine operation when the vehicle is not moving. This anti-theft system tests the chip at specified intervals.
Such systems operate at 2.4 GHz, are miniature in size and are located in a wiring harness to hide them from intruders. The tag is equipped with a battery, and it is tested by the anti-theft system at a specified frequency. The encoded chip should be stored separately from the ignition key. This increases the vehicle's protection from possible theft. If the driver is forcibly removed from the car, the engine will stall after a preset time.
If, when you turn the ignition key, the immobilizer icon blinks or does not go out, and the engine does not start, then most likely there is a malfunction in the anti-theft system in the car.
What disables immo in a car?
Structurally, this device includes electronic controllers that block the main vehicle systems - the driveshaft and engine. The immobilizer can also deactivate the ignition and fuel supply systems to the engine.
Should I disable the immobilizer myself?
It is better for inexperienced car enthusiasts not to do this; if the immobilizer detects an attempt to break into or open elements of the device, it will block the engine. As a result, you will have to turn to specialists.
Removing the immobilizer control unit
1. Remove the negative terminal of the battery.
2. Remove the instrument panel trim.
3. Using a Phillips screwdriver, unscrew the two screws securing the unit to the instrument panel, holding the screw nuts with a 10 mm wrench.
4. Remove the block from the instrument panel and disconnect the harness block
Removing the remote control unit
Raise the rear seat cushion. Loosen the screws securing the carpet in the rear left door opening.
3. Having folded back the edge of the carpet and the sound insulation, disconnect the wiring block from the remote control unit.
4. Using a 10 mm socket wrench, unscrew the two nuts securing the block to the body.
5. Remove the remote control unit.
Installation is carried out in reverse order
If the immobilizer keys are lost
If you lose a working key, you need to purchase a blank and cut it to work with the ignition switch. Then you need to perform the immobilizer training procedure using a training key and a new working key.
APS activation process
How is the immobilizer activated? This goes according to the following algorithm:
- the ignition is turned on, the APS LED on the dashboard will light up;
- bring the red key, but do not insert it into the well;
- turn off the ignition, do not remove the red key;
- a squeak should be heard and the LED will start flashing;
- bring the black key;
- a squeak will be heard and the LED will go out;
- bring another black key;
- a squeak will be heard and the LED will go out;
- zoom in on the red key;
- a squeak will be heard and the LED will light up;
- turn on the ignition;
- a squeak will be heard and the LED will go out;
- turn off the ignition.