The main brake cylinder on the VAZ-2106 is necessary to create high pressure in the pipe system and on the calipers. This pressure compresses the brake pads, which lock the discs. The brake system is one of the most important, so it must be maintained in good condition. If there is the slightest malfunction, repairs must be made. Quite often, the cause of a breakdown is the gas turbine engine, but before repairing it, you need to make sure that it is the one that is faulty.
Typical malfunctions of the brake system
Before repairing the master cylinder, make sure that the following problems are not present:
- Very often air gets into the hydraulic brake system. As a result, work efficiency decreases several times. Make sure there is no air at all. To do this, you need to bleed the system.
- Carefully examine all elements of the brake system for leaks. If there are any, then it is necessary to replace the damaged elements and completely bleed the system.
- Jamming of the working pistons or the turbocharger can occur due to uneven wear; the problem is solved by completely replacing the turbocharger.
- If the vacuum seal is broken, the brake pedal will be pressed with very great force.
- If the handbrake cable is jammed, the rear wheels may rotate tightly.
As soon as you make sure that all the above malfunctions are absent, you need to turn your attention to the brake cylinder. The cuffs and pistons may fail, resulting in brake fluid leakage. If the return springs are faulty or broken, the pressure in the system will be constantly high. And if there is fluid leakage on it, braking efficiency decreases several times.
Basic faults
Despite the simplicity of the design and the small number of moving elements, the GTZ often ceases to perform its functions normally due to malfunctions.
It is not difficult to detect a breakdown of the GTZ. The first signals of a malfunction will be given by the brake pedal. Any change in its behavior when pressed (lightness, increase in force, etc.) indicates a breakdown. But it will signal the emergence of problems throughout the system. Checking the system on the highway allows you to more accurately identify the malfunction (the car accelerates, and then emergency braking is performed). And then the traces determine how the system works. Afterwards, all that remains is to visually inspect all the components of the drive for leaks.
The main malfunctions of the master brake cylinder are:
The master cylinder loses its seal, usually due to severe wear or damage to the sealing collars. In this case, liquid can flow between the chambers and also come out of the housing. This allows air to enter the system. As a result, the pressure decreases significantly and the effectiveness of the braking system deteriorates.
Signs of a broken master cylinder
The main signs characteristic of a breakdown of the main brake cylinder on a VAZ-2106 are the following:
- The presence of traces of brake fluid on the vacuum booster and inside it.
- The brakes cannot be pumped.
- Jamming and sinking of the brake pedal.
- The presence of jerks when pressing the brake pedal.
When repairing the master brake cylinder, there is no need to place the car on an inspection hole or overpass. Everything is done much simpler here. The master cylinder can be replaced by simply opening the hood.
But it’s best to pump the brakes on an overpass. Otherwise, you will need to lift the wheels one by one using a jack. If all work is carried out on a lift or inspection pit, you can not only bleed the system, but also at the same time adjust the tension of the handbrake cable.
Instructions
Here's how to replace brake pipes on a VAZ 2110. First of all, you need to remove the wheel on the side where the pipe will be replaced. Next you need to find the brake hose. It is connected at one end to the caliper, and at the other end to the tube. Using a special wrench, carefully unscrew the nut on the tube, holding the hose with another wrench. The second end of the tube is connected to the GTZ. In the same way, unscrew the tube nut from the brake cylinder.
Then a new one is screwed in place of the old line. First, tightly wrap the tube to the GTZ, and then to the brake hose on the caliper. Before connecting the line to the system, you should lay the pipe along the body the way it was installed. At this point, the replacement of brake pipe 2110 can be considered complete. But since the system has been depressurized for some time, the brakes should be bled. It is not necessary to fully bleed the brakes. This is done only where there has been a replacement. Remember that the tubes are connected diagonally.
For example, if the right brake pipe at the front was replaced, then you should start bleeding the system from the rear left wheel and vice versa if the left front pipe was changed.
How to remove the GTZ?
Replacing the master brake cylinder on “sixes” is carried out according to the following scheme:
- Use a bulb to completely drain the fluid from the expansion tank of the brake system.
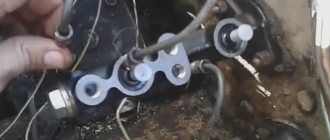
- Loosen the clamps that secure the hoses coming from the brake fluid reservoir. Please note that if factory compression rings are installed, they may not need to be removed. It is enough to pull the hoses towards you with little effort.
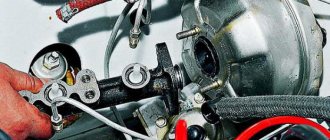
- Using a special wrench, you need to unscrew the brake pipes from the master cylinder.
- Move these tubes so that they do not interfere with the work.
- Using a 13mm wrench, unscrew the two nuts that secure the device to the vacuum booster.
After all this work, you can completely remove the GTZ.
How is the replacement performed?
The process of replacing a brake pipe will require the car owner to have plumbing skills and abilities. You will have to use traditional and special tools. Tube repair is performed when it is impossible to replace the line with a new one.
To replace, unscrew the tube from the brake cylinder, and the opposite end is unscrewed from the master brake cylinder. Then a new product is purchased. The tube can be purchased at auto parts stores, but it is important to remember the thread pitch. For foreign cars, this is a 10 thread with a pitch of 1. This spare part already has two nuts and is flared. The length of the tubes on sale may vary, but it must be selected based on the vehicle. So, on some car models the part may be laid with a reserve, but on another model there is no such reserve. Replacing a brake pipe involves unscrewing the old one and screwing a new one in its place.
GTZ repair
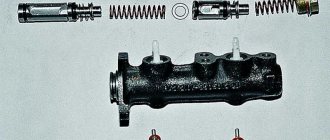
To repair the master brake cylinder, you will need to do the following:
- There should be a clean rag on the table on which to place the brake master cylinder body.
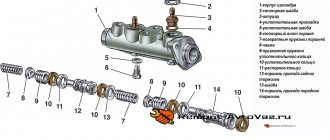
- The mechanism has two pistons (that’s exactly how many circuits there are in the brake system). The pistons have slots in the lower parts that limit the stroke inside the cylinder. The pistons are secured using two locking bolts located in the slots.
- Remove the boot and unscrew the bolt that secures the first piston.
- If the piston does not come out under the influence of the spring, you need to lightly press on it so that it sinks a little in the cylinder. After this manipulation, the piston will come out of the cylinder without any problems.
- A similar action is performed for the second cylinder. Unscrew the bolt that secures the element. And in the same way the piston of the second circuit is removed.
- Be sure to place all the elements that you remove from the master cylinder in the order in which you removed them.
- Install new cuffs using the plastic cone included in the repair kit.
The design of the master brake cylinder on the VAZ-2106 is simple, there are only a few key elements in the design. But they affect the functioning of the entire braking system.
Be sure to make sure that the inner surface of the cylinder is perfectly mirror-like. If there are sinks or other damage, it is necessary to replace them - repair is useless. If the inside has taken the shape of an ellipse, then it is unlikely that you will be able to bleed the brake system, and even if you do, the new cuffs will not last long.
Repair and replacement of the brake master cylinder repair kit
After you have found out the cause of the breakdown, you need to buy a repair kit for the brake master cylinder. They are divided into two main types - complete and incomplete. Some cars require an additional special key (for example, for a VAZ 2110). The complete set includes: plastic cones for installing new cuffs on the piston body, washers, springs, boots, all the necessary cuffs. If the kit is incomplete, then, as a rule, it only includes GTZ cuffs.
How to change the brake master cylinder repair kit? The algorithm for performing the work is as follows:
GTZ repair kit for VAZ 2108-2109
- Remove the negative terminal from the battery and the terminal from the brake fluid reservoir. This is done so that the electronic control unit does not display an error message in the future.
- Next, you need to drain the working fluid from the system. This is done using a medical syringe and tubes. Some liquid will still remain in the system, so prepare a rag in advance to remove drips. All disconnected pipelines must be “plugged”.
- After this, you need to start removing the GTZ itself. This process will literally differ slightly for each car model, so it is impossible to give definite recommendations within the framework of one article, but one thing can be said with confidence that it is screwed to the vacuum seal with only two studs.
Further repairs to the brake master cylinder must be carried out on a workbench. As practice shows, major repairs of the gas turbine engine in a garage are impossible or do not bring the desired results. Therefore, we will limit ourselves to considering the case of replacing rubber seals from the brake cylinder repair kit.
- To dismantle it is necessary to unscrew the locking and fastening bolts of the mechanism. Then disassemble the body. This must be done carefully. so that the springs inside do not fly apart.
- Remove all old rubber seals and cuffs from the body, and then clean their seats from possible dirt, dust and oil.
- When reassembling, all new rubber seals must be lubricated with the used brake fluid (preferably new). It is better to replace the copper rings under the locking bolts with new ones. It is better to coat the fastening and locking bolts with copper grease (spray or paste) so that in the future, if necessary, they do not stick and they can be easily unscrewed.
Replacing the master brake cylinder repair kit
Using a repair kit for the VAZ GTZ
Assembling and installing the cylinder in place is performed in the reverse order. Don't forget to connect the terminal to the battery. It is imperative to fill the system with new working fluid (new rubber sealing parts are lubricated with it), after which the brake system is pumped to remove air from it.
Master Cylinder Assembly
Assembly is carried out in reverse order. If you have repaired the main brake cylinder of a VAZ-2106, then you must:
- Install new cuffs.
- Insert the secondary circuit piston and return spring into the cylinder. Before installing them, lubricate the inner surface of the cylinder with brake fluid.
- Secure the position with a bolt.
- Insert the primary circuit piston with the return spring and secure its position with a bolt.
After this, check the tightness of the fixing bolts and install the cylinder:
- Using two nuts, tighten onto the vacuum booster studs.
- Screw the tubes to the GTZ.
- Install the hoses and secure them with clamps.
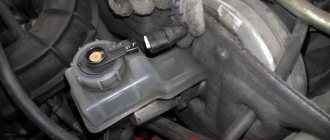
After all the work has been done, you need to pour liquid into the expansion tank.
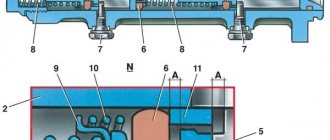
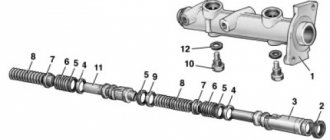
Master cylinder with reservoir
1 – main cylinder body;
2 – low pressure sealing ring; 3 – drive piston of the “left front–right rear brake” circuit; 4 – spacer ring; 5 – high pressure sealing ring; 6 – pressure spring of the sealing ring; 7 – spring plate; 8 – piston return spring; 9 – washer; 10 – locking screw; 11 – drive piston of the “right front–left rear brake” circuit; 12 – connecting sleeve; 13 – tank; 14 – brake fluid emergency level sensor; A – clearance Master cylinder with sequential arrangement of pistons. A tank 13 is mounted on the master cylinder body, in the filler neck of which a sensor 14 for emergency brake fluid level is installed. The high pressure O-rings 5 and the rear wheel cylinder rings are interchangeable.
Bleeding the system
The procedure for bleeding the brake system of a VAZ-2106 (like any other car):
- Rear right and left wheels.
- Front right and left.
When working, you move from the far brake mechanism to the near one (relative to the GTZ). Your goal is to get rid of air jams. When pumping, carefully monitor the fluid level in the tank and top up if necessary.
The principle of operation of the master brake cylinder on the VAZ-2106 is that two pistons create pressure in the system. This pressure pushes out the calipers and sets the pads in motion. If there is even a little air in the system, the brakes will not work.
The best brakes in the Soviet Union
And before you start pouring bile into the comments that Moskvich does not slow down in principle, read this:
In front of you, in the photo above, is Moskvich 2140. Being a forced step of the plant, and already morally obsolete by the time it was released, it is still -it was still noticeably different from its predecessor, Moskvich-412. And not only externally. One of the noticeable technical differences was the new braking system, which received disc brakes with a rigid bracket at the front, dual-circuit and a vacuum brake booster.
In the title I ventured to say that this system is
the best among all Soviet cars
, and then I will explain why I think so. I propose to look at everything in more detail:
1. Let's start from the beginning: Master Cylinder and Vacuum Brake Booster.
It's no secret that the effectiveness of the brakes largely depends on the effectiveness of this pair. The plant did not reinvent the wheel, and a license for the GTZ was purchased from Girling for this role. This, by the way, is a very striking example for those who believe that Moskvich is a copy of something, or that its engine is a copy of something. The reality is that when it was necessary to reduce time or money for the development of a similar unit, the plant could afford to buy a license from leaders in its field, as was done in our case, with brakes, or with a clutch mechanism (Borg and Beck, also a license )
The first copies of the original “Girling” appeared on the very latest Moscow 412s, and then the “forties”, after which the version produced by us under license, manufactured in the city of Kineshma, began to be installed.
2. Front brakes
This is where a surprise awaits many: the Moskvich brake caliper is a rigid, four-piston
caliper that does not float anywhere, clamping the brake disc on both sides with a death grip
. This design is typical for sports cars today, but not for small sedans! Why was such a redundant mechanism needed?
3. Rear brakes
remained virtually unchanged.
The signaling device and the sorcerer have little effect on the effectiveness of braking, so we will leave them without attention in this story. The alarm device, by the way, carried a very useful functionality - it instantly signaled
the depressurization of one of the circuits: when the pressure in one of them drops, in contrast to the limit switches in the lids, which give an alarm signal only after a significant decrease in the level of fuel fluid in the tank. By the way, I mentioned two circuits - one of them included the brake cylinders of the rear wheels and the small cylinders of the front wheels, and the other included the large cylinders of the front wheels.
As you can see, the braking system was quite modern, the components used were reliable and efficient, and for individual components there was even a huge margin of safety.
Only one question remains: why, despite all this, we have heard and continue to hear so many complaints about the Moskvich’s braking system.
The devil is in the details, as always. A license is a wonderful thing, but over time, due to the general moral and economic decline, the quality of domestic production fell, inevitably deteriorating the efficiency and reliability of components. Powerful multi-piston calipers needed more
Moreover, they required lubrication and regular driving - otherwise the pistons could become sour, gradually lose mobility and not brake properly. After all, the brake disc is not very large and unventilated, which also sometimes played a role. (But it practically lasted forever and very rarely required replacement - that’s cool :)
Here's a video of me putting the entire brake system together. The machine is gradually gaining functionality :)
To summarize, I would like to summarize: most of the troubles associated with insufficient brake efficiency in 40-s Moskvich cars occur due to poor condition and lie in insufficient care of the components. Any design has its own tricks and requires its own approach. In good condition, the Moskvich’s braking system is very effective and sufficient even for today. Good brakes to you. Love Muscovites, drive Muscovites, and see you again!
Source
Master cylinder: its purpose and functions
During the braking process, the driver directly acts on the brake pedal, which is transmitted to the pistons of the master cylinder. The pistons, acting on the brake fluid, actuate the working brake cylinders. From these, in turn, pistons extend, pressing the brake pads to the drums or discs. The operation of the brake master cylinder is based on the property of brake fluid not to be compressed under the influence of external forces, but to transmit pressure.
The master cylinder performs the following functions:
- transmission of mechanical force from the brake pedal using brake fluid to the working cylinders;
- ensuring effective braking of the car.
In order to increase the level of safety and ensure maximum system reliability, two-section master cylinders are installed. Each section serves its own hydraulic circuit. In rear-wheel drive cars, the first circuit is responsible for the brakes of the front wheels, the second - the rear. In a front-wheel drive car, the brakes of the right front and left rear wheels are served by the first circuit. The second is responsible for the brakes of the left front and right rear wheels. This scheme is called diagonal and is most widespread.