The brake master cylinder is the main part of a car's braking system. With its help, the brakes on the car are controlled. The performance of the entire brake system and the safety of both surrounding road users and people in the car itself depend on the condition of this part.
The structure of the VAZ 2107 master brake cylinder includes a body, a reservoir, pistons, and return springs. Due to two working sections, the unit is able to function even if one of them is damaged, but the quality of work may noticeably deteriorate.
We repair the main brake cylinder of a VAZ 2107 with our own hands
The brake master cylinder (MBC) is one of the main elements of the brake system, which determines how safe the vehicle will be used. The driver is obliged to ensure that it is in good condition. If malfunctions are detected, action must be taken immediately. Negligence and delay in repairs can lead to an accident. You can identify faults and repair the VAZ 2107 GTZ yourself.
GTZ: device and purpose
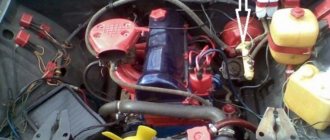
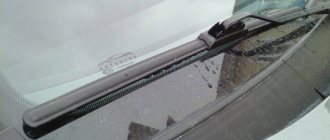
The VAZ 2107 is equipped with a hydraulic brake system consisting of two circuits. When one of the circuits fails, the other continues braking. This improves traffic safety. The master cylinder changes the pressure in the circuits depending on the position of the brake pedal. The GTZ is located on the rear wall of the engine compartment. It can be found under the expansion tank of two sections, which is filled with brake fluid (TF). It looks like an oblong cylinder with holes for connecting brake hoses.
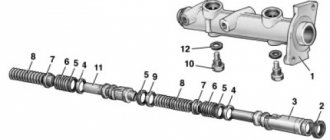
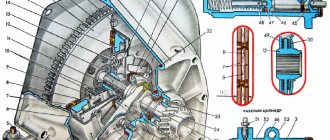
The GTZ housing contains 2 pistons with sealing collars. They are located sequentially one after another. The first one moves due to the influence of the pedal pusher on it and serves the contour of the rear wheels. It forces a second piston to move, which acts on the two brake circuits of the front wheels. Springs that are located between the pistons return them to place when the driver releases the brake pedal.
GTZ performs the following functions:
- distributes the fuel fluid over two brake circuits, which separately serve the front wheels;
- transmits the force of the brake pedal using fluid to the working cylinders (WC);
- directs excess fuel fluid to the expander;
- returns the pedal and rod to their initial position when the driver no longer presses the pedal.
To avoid problems with the brakes during further operation, for replacement you need to buy an original product, preferably from a Tolyatti plant with article number 21013505008.
Diagnostic methods and possible malfunctions of the GTZ
The need to diagnose HTC arises when the following symptoms appear:
- an indicator lights up on the dashboard warning of insufficient brake fluid level;
- in order to brake, you need to press the pedal hard;
- large free play of the pedal, sometimes it falls through;
- when braking sharply, the car moves away from the direction of travel;
- the car slows down, the pedal is depressed as much as possible;
- leakage of fuel fluid from the tank.
First, the area under the gas turbine engine is inspected for drips. They are usually visible on the side member and vacuum booster. If the tank body is intact, you need to remove and repair or replace the GTZ.
To identify malfunctions of the master cylinder without diagnosing other parts of the brake system, you need to perform the following steps:
- Using a wrench, unscrew the brake pipes from their sockets and screw in screws with fine threads in their place;
- plug the outlet openings of the dismantled removed pipes with wooden choppers or pegs;
- Next you need to press the pedal several times.
If the GTZ is working properly, after several presses the chambers will fill with liquid and it will be impossible to press the pedal. On the faulty element, the sealing cuffs allow liquid to pass through, and it flows back into the expander, and the pedal continues to fail. To confirm a malfunction of the turbocharger, you need to unscrew the nuts on the cylinder and move it away from the vacuum booster; the fuel fluid will flow out of the hole.
Sometimes the seals of the second chamber become unusable, while in the first they cope with their function. In this case, when checking, the brake pedal will fall slower. If the gas turbine engine is working properly, the pedal cannot be pressed more than 3 times, since there is nowhere for fluid to flow out of the cylinder.
How to replace the GTZ and change the cuffs
Problems with GTZ are solved in two ways:
- Disassembling and cleaning the device and replacing the seals from the repair kit.
- Complete replacement of the GTZ.
The most reliable option is the second one.
To carry out the work you need to prepare:
- a set of keys;
- special wrench for unscrewing brake pipes;
- screwdriver;
- bulb or syringe;
- narrow nose pliers;
- plastic bottle for liquid;
- rags;
- repair kit or new GTZ.
For the plugs, you need to prepare wooden choppers 6 mm long with a pointed end. After repairs, be sure to bleed the brake circuits. For this procedure, you need to prepare brake fluid, a wrench for unscrewing the fittings on the working cylinders, a wheel wrench, a transparent tube and a bottle. If the cuffs are changed, they must be selected in accordance with the GTZ. Products from different manufacturers may vary. You should buy the original GTZ
Removing and installing the master cylinder
To preserve the fuel fluid from the tank, it is pumped out using a bulb or syringe into a prepared container. Dismantling of the GTZ is carried out according to the following algorithm:
- Having loosened the clamps, disconnect the brake pipes from the GTZ and lower them into a plastic bottle.
- Next, unscrew the three brake hoses. We take them out of the sockets and insert the manufactured plugs.
- Unscrew the nuts securing the GTZ to the amplifier and remove it from the studs. When removing the master cylinder, you need to remove the washers so that they do not fall to the floor.
- If a replacement is carried out, a new one is installed in place of the removed cylinder. Assembly is carried out in the reverse order, carefully tightening the fasteners.
Replacing the repair kit for the main brake cylinder of a VAZ 2107.
Disassembling the GTZ and replacing the cuffs
Before disassembling the unit, you need to drain the remaining fuel fluid and wipe the body with a rag. Further work on replacing the cuffs is a sequence of actions:
- Use a flat-head screwdriver to remove the boot, which is installed inside the cylinder.
- We clamp the GTZ in a vice and loosen the limiting bolts. Unscrew the end cap. We remove it together with the copper washer.
- We take the product out of the vice and completely unscrew the bolts.
- Having laid the cylinder on a flat surface, carefully push out the insides and lay them out in order.
- We clean the part from dirt both inside and outside. We inspect visually. If traces of wear or sinkholes are found, you will have to completely replace the turbocharger.
- Using a screwdriver, remove the rubber seals from the pistons and replace them with new ones. We also change the gaskets.
- Next, we push the parts into the GTZ according to the order.
- Screw in the plug nut and limiting bolts. When pressing on the first piston, check that the springs push the rod back. We install a new boot.
- We install the assembled device in its original place.
After completing the work, we bleed the brakes.
How to properly bleed brake circuits
When performing repairs and replacement of brake system elements, there is a possibility of air getting into it, which will lead to the formation of air locks. Their presence reduces the effectiveness of the brakes. Therefore, it is necessary to bleed the brake circuits according to the instructions. Bleeding begins from the right rear wheel. The process consists of the following steps:
- We place the car on a lifting device.
- We check the fuel fluid level in the tank, it should be at the maximum level. Top up if necessary.
How to correctly replace the working cylinder of a VAZ-2107 caliper
Brake pads are replaced with new ones when the lining thickness is 1.5 mm or less, when the linings are detached from the base, chipped or otherwise damaged on the surface, as well as when replacing worn brake discs. The pads can only be replaced as a set on both sides of the car.
The slave cylinder is replaced when brake fluid leaks through the o-ring or when the piston is seized due to corrosion. Indirect signs of piston jamming are heating of the hub when driving, steering wheel pulling to the side when braking, increased wear of the brake lining on the side of the faulty cylinder.
Only faulty cylinders are replaced individually
.
For work we will need:
— A set of new pads and a new brake cylinder — A spare set of pins, springs, clamps, cotter pins, boots, brake pipe (optional) — Wrenches for 8, 10, a special wrench for the brake fittings (if necessary) — Screwdriver, hammer, iron brush — Spatula or large flathead screwdriver - Pliers or needle-nose pliers - Jack, supports, block of wood, clean container - DOT-4 brake fluid - Special grease for guides and piston (optional) - Graphite or copper grease - WD or other penetrating lubricant
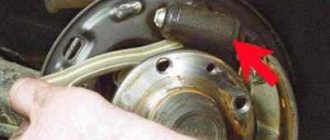
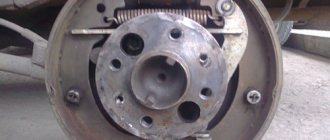
We hang and remove the wheel, securely fix it on the support. Using a spatula or screwdriver, being careful not to damage the working surface, remove the pads from the brake disc.
The piston of a working cylinder should enter smoothly without jamming with relatively little effort. In our case, the outer right cylinder of the right wheel caliper is jammed, which is also indicated by a more worn block.
You can try to develop a cylinder, but it is more advisable to replace it. At the same time, it should be borne in mind that all four working cylinders of the calipers are different and are not interchangeable.
We clean the caliper, treat the guide grooves and the nut securing the connecting tube to the cylinder with penetrating lubricant.
We prepare the rubber cap in advance as a plug (can be removed from the new cylinder). We unscrew the nut with a 10mm wrench, slowly and carefully so as not to burst, move the tube to the side and put on the cap so that the brake fluid does not leak out. This will allow us not to completely air out the system.
Next, we recess the spring-loaded clamp with a screwdriver and, without releasing it, use a hammer to move the cylinder along the guide grooves. We remove the screwdriver and lightly tap the cylinder from the caliper using a wooden block or a rubber hammer.
Before installing a new cylinder, clean the grooves and lubricate them with grease.
We also check the condition and residual thickness of the brake disc in at least three places, having first filed off the outer shoulder.
It's time to replace the disk
The thickness must be at least 9 mm, otherwise the disc must be replaced. Deep risks and cracks are not allowed.
We remove the boot of the new cylinder, evenly coat its inner part and the edge in contact with the piston with the existing factory lubricant.
Also, to improve performance and prevent corrosion and souring of the cylinder, it is advisable to additionally lubricate the friction surfaces with a special lubricant.
Put the boot back on. Also, to prevent acidification, lubricate the threads of the bleeder fitting and the tube nut with graphite or copper grease. We insert the retainer with the spring into the cylinder body.
We press the clamp and install the cylinder into the guide grooves of the caliper. Similarly, with light blows of a hammer, we press the cylinder through the spacer until it stops, making sure that the latch comes out in place.
It is highly not recommended to use cutting nails, electrodes, etc. as a retainer, since in the future there may be problems with dismantling the cylinder.
We install the connecting tube in place, avoiding its distortion, otherwise a loose connection and leakage may occur.
We check the fluid level in the brake reservoir; if it is normal, then it will be enough to pump only this side.
To do this, we insert the old pads into place, put a hose (preferably transparent) over the bleeder fitting and lower it into a clean container. Press the brake pedal 4-5 times and hold it down, unscrew the fitting 3/4 of a turn, continuing to press the pedal, displace the liquid with air bubbles into the container.
After the pedal reaches its lowest position and the flow of liquid stops, tighten the fitting and repeat the operation until air bubbles stop coming out. In this case, it is necessary to monitor the fluid level in the tank and top it up on time, avoiding re-airing.
We put a protective cap on the fitting. We check the operation of the new cylinder in the same way as checking the old one.
If everything is in order, we retract the cylinder pistons all the way in and install new pads. We clean and check the fingers for deformation and wear; deformed ones must be replaced. The same applies to springs. We lubricate the “ears” of the cylinders and the guides themselves with a special high-temperature lubricant, and install all the parts in place in the reverse order.
Press the pedal several times to set the pads to their working position. It should be borne in mind that at first, until the pads are worn in, the braking efficiency will be significantly lower than usual.
A short video:
How does the brake master cylinder work?
The brake master cylinder is the very heart of the braking system. It changes the pressure in the brake system when you press the brake pedal. It creates increased brake fluid pressure, causing the cylinder pistons to extend and press the pads against the drums and brake discs.
The brake cylinder body contains two pistons with sealing rings that follow each other. The first cylinder is driven by the brake pedal, the second moves due to the movement of the first. Springs ensure that the pistons return to their place after the brake pedal is released.
How it works?
When you press the brake pedal, the two pistons in the master cylinder begin to move forward, pushing the brake fluid lines. The resulting pressure acts on the brake pistons of the calipers, which are located on each wheel.
When you release the pedal, the springs push the pistons back, thereby returning them to their original position. After this, the fuel fluid that was in the lines returns to the expansion tank and fills the cylinders again. When heated, the liquid can expand, and to avoid excess pressure, there are two holes that lead to the expansion tank. An integral part of the GTZ is the vacuum brake booster (VBR), which increases pressure and helps put pressure on the pistons, making life easier for the driver and making braking more productive.
How does a malfunction of the brake master cylinder manifest itself, as well as possible causes!
Despite the apparent simplicity and primitiveness of the GTZ, problems often arise in its work that can have very dire consequences. Problems in the operation of the system can be recognized by the following signs:
- You press the brake pedal, but the car stops very slowly and inefficiently. The culprits for this phenomenon may be cuffs that have become “stiff” or leaky. Also, a malfunction of the VUT can manifest itself in a similar way; it could be a crack in the membrane or depressurization of the joints of the hose that removes engine vacuum.
- The pedal travel is very short. Most likely, the compensation hole is clogged; the liquid inside the cylinder simply has nowhere to go and excessive resistance arises. The second option is deformation of the rubber seals, which have swollen and blocked the passage.
- The pedal has to be pressed with great effort. This can happen as a result of deformation or partial destruction of the rubber piston seals.
- The pads get hot and do not open completely; they do not release the discs or drums. There are several options here; it could be a jammed piston, a clogged bypass hole, or other reasons that impede the movement of the fuel fluid in the brake system.
- The brake pedal falls. This is perhaps the most common phenomenon that most of us have encountered. When you press the brake pedal, it seems to fall through, there is no feeling of pressure or resistance, and the braking itself occurs at the very end of its movement. This happens when there is critical wear on the cuff, as a result of which the liquid easily passes through the piston and returns to the expansion chamber. Simply put, the cylinder “bypasses” the fuel fluid. The failure of the brake pedal can also be observed if the system is airtight, that is, leaky, or depressurization has occurred on one of the brake cylinders.
There are other symptoms indicating a malfunction of the gas turbine engine.
- When braking at speed, the car pulls to the side. This happens when one of the circuits or brake cylinders on the wheel is faulty.
- The appearance of a squeaking or knocking noise during braking. It could also be pads that are time to be replaced, but it happens that the problem is in the GTZ.
- The pads can jam, heat up and heat up the brake disc on a particular wheel.
Replacement
Replacing the part yourself is not difficult. To do this, you need to arm yourself with the following set of tools:
- screwdriver;
- keys 10, 13;
- 5 – with a cubic syringe or bulb;
- brake fluid;
- clamps.
If during disassembly you find that the old rubber hoses have become hard, it is recommended to replace them with new ones.
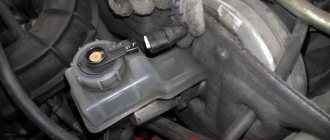
- Remove the belt from the expansion tank and put it aside.
- Using a ten key, unscrew the fastenings of the brake fluid reservoir and open the lid.
- Drain the brake fluid into a container.
- To prevent brake fluid from entering the engine compartment, it is necessary to place a piece of dense material under the cylinder.
- Loosen the clamps on the hoses extending from the tank and remove them.
- Disconnect the three brake pipes and move them a little.
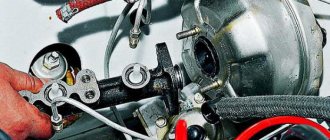
- We unscrew the two nuts securing the cylinder to the amplifier, using a 13mm wrench.
- Remove the brake master cylinder.
- We clean the seat of the spare part from dirt and brake fluid residues.
- Let's move on to a new element. We remove the protective seal and install the oil seal there.
- We insert the new cylinder into place and tighten the nuts.
- We remove the plugs and use a syringe to inject brake fluid into the cylinder cavity until it is completely filled.
- We assemble the remaining elements.
The final stage of repair work will be bleeding the car's brake system.
Removal and repair
To remove, repair and reinstall, you will need a minimum of tools:
- key to 13;
- special wrench for brake pipes;
- flat screwdriver;
- brake master cylinder repair kit;
- brake fluid container;
- syringe;
- brake fluid.
To avoid spilling brake fluid from the reservoir, it must be poured into a prepared container using a syringe. The procedure for removing the cylinder is as follows:
- loosen the rubber hose clamps on the brake cylinder fittings;
- remove the hoses coming from the brake fluid reservoir to the cylinder fittings;
- use a special wrench to unscrew the three brake pipes;
Note: the tightening torque of the brake pipes is very high; attempts to unscrew them using a conventional open-end wrench can lead to the edges breaking off.
- unscrew the nuts securing the main brake cylinder to the vacuum booster;
- remove the brake cylinder.
Now it is necessary to disassemble the master brake cylinder and inspect it for scratches or shells; if they are not found, if the mirror is clean, then repair is possible, otherwise, replace the master brake cylinder with a new one. At this stage there should not be any problems - you need to unscrew the locking screws one by one, starting from the plug. When you unscrew the second screw, hold the piston so that it does not fly out under the force of the spring. The first piston will come out on its own, the second will need to be knocked out, tap the body on a piece of wood.
- remove all o-rings from the pistons and thoroughly wipe all parts - pistons, springs, housing;
- replace the rubber seals on the pistons;
- Assemble the master cylinder parts and tighten the plug nut.
Screw it to the vacuum body, connect the tubes and hoses from the tank. The tubes should not be screwed in completely; fill the reservoir with brake fluid and, as soon as it begins to flow out from under the tubes, screw them in completely. After final assembly, the system will most likely need to be bled to remove air from it, and the fluid will be completely replaced.
We check the connections and the main brake itself for leaks. It is also necessary to check the effectiveness of the brakes. If everything is fine, then your car is ready for further use.
Comments
The GTZ will need to be replaced. Thank you.
- Login to leave comments
Well written. At
Well written. With a certain amount of skill, if you are clever and quickly “close” the fittings of the main pipes when removing, you can do without pumping, or do the bleeding “by gravity.” Caps from GTZ are excellent for closing fittings.
From personal experience, I will say that the VAZ GTZ is complete nonsense at a cost of 80-100 UAH (10-15 $) and a service life of 1-1.5 years. Two main disadvantages: 1. Low-pressure nylon fittings are held in place by crown-springs (bad metal), and with a little effort they pull out of the socket - they were adjusting the valves and accidentally touched the repair belt. I used the kit as a temporary measure. 2. after 20 thousand-30 thousand km the piston in the cylinder begins to bypass. It manifests itself - the pedal is either soft or hard, there is a dependence on the ambient temperature and the intensity of the impact on the pedal, pumping the brakes does not help.
After replacing two VAZ stock units every year, I installed an Italian one (I don’t remember the name) and forgot about the existence of such a part as a GTZ in my car. The main difference from the VAZ one is the metal low-pressure fittings. issue price 25-30$
- Login to leave comments
ATTENTION EVERYONE.
Author I'll kill you))) joke. Because of the author, I postponed everything since the repair was on the street. I am writing to EVERYONE who will do this procedure on the street, instead of having a key for 13 > with a knob. Otherwise, you won’t be able to unscrew the bolt that holds the GTZ to the vacuum seal; there’s very little room for the wrench to fit through.
GTZ malfunctions
Replacing the VAZ-2107 master brake cylinder is required when this part simply fails. You can determine the malfunction of the GTZ in the following ways:
- The red warning light comes on, indicating a problem with the brake mechanism. This lamp comes on when the level in the brake cylinder reservoir drops below normal. In this case, it is important to find out the reason for the decrease in fluid and, if necessary, add it. If the leak occurs due to a malfunction of the turbocharger, it should be replaced.
- Presence of leaks on the GTZ. If, upon opening the hood, you can see signs of a fresh fluid leak on the GTZ, then it’s time to pay attention to repairing the mechanism. It is possible to repair the main brake cylinder of a VAZ-2107, but at the same time you can extend the life of the product for a short time, this is due to the quality of modern spare parts. If the product fails, or more precisely, the cuffs and seals have dried out, then experienced craftsmen recommend replacing the gas turbine unit. Many desperate amateurs strive to find the answer to the question of how to repair the master brake cylinder, but subsequently everything ends with its replacement.
The GTZ for a VAZ-2107 costs about 500 rubles, so it makes no sense to spend time and money to repair it. Let’s find out in more detail how the GTZ is replaced with a VAZ-2107.
Why did it happen so?
Perhaps the automatic requests do not belong to you, but to another user accessing the network from the same IP address as you. You need to enter the characters into the form once, after which we will remember you and be able to distinguish you from other users exiting from this IP. In this case, the page with the captcha will not bother you for quite a long time.
You may have add-ons installed in your browser that can make automatic search requests. In this case, we recommend that you disable them.
It is also possible that your computer is infected with a virus program that is using it to collect information. Maybe you should check your system for viruses.
If you have any problems or would like our support team, please use the feedback form.
A fully operational brake system of a VAZ 2107 car is a key element in ensuring safe movement in a car for both passengers and the driver. Therefore, you should pay special attention to it, and if minor signs of malfunction appear, begin repairs immediately.
The brake master cylinder is one of the main elements of the car's braking system. Basically it can have two faults. The first is the appearance of a fluid leak from the main brake, the second is a decrease in the effectiveness of the brakes, which can be determined by the failure of the pedal or its “softness”. Both of these faults can be eliminated by a not very complicated repair of the main brake; this repair consists of replacing the o-rings and boot, but in some cases the problem can only be solved by replacing the cylinder.
Master brake cylinder
It is not uncommon to discover problems with the master cylinder when checking the condition of the brake assembly.
GTZ
When changing the vacuum seal, it would be logical to study the current state of the gas turbine engine and, if necessary, replace it.
Many are trying to repair the GTZ. But in practice, this only brings a temporary effect, plus you have to constantly worry whether the node will fail at the most inopportune moment. The best solution is replacement.
The replacement procedure itself is as follows.
- Disconnect the negative terminal from the battery.
- Disconnect the wire block from the fuel oil level sensor. It is located in the tank and is built directly into the lid.
- Use a special wrench for brake pipes to loosen their tension. There is no need to unscrew it completely.
- Unscrew the pair of nuts that secure the GTZ to the vacuum chamber. Only now can the brake pipes be completely unscrewed.
- Remove the cylinder from the studs.
- If necessary, remove the brake fluid reservoir itself at the same time. To do this, you need to carefully rock the tank and remove the leg from the bushing.
- Assess the condition of the removed cylinder. Also be sure to check for any defects on the tank. If there are any, be sure to replace the brake fluid reservoir with a new one.
- Armed with a new GTZ, put it in place and tighten the nuts. Fasteners can be fully tightened immediately.
- Install the reservoir and fill it with brake fluid to the maximum mark.
- Now a very important step is to extract air from the cylinder. To do this, you need to close the holes in the front brake pipes with your fingers. At the same time, your assistant should gently, but not sharply, press the brake pedal. This will create pressure in the system. Continue this manipulation until you feel liquid coming out of the holes.
- As soon as the liquid flows, put on the tubes, install and fix them in place. In this case, the brake pedal cannot be released.
- By analogy, the rear tubes are connected. When they are installed in place, there must be pressure in the system, that is, the brake pedal is pressed to the floor.
Why is the cylinder leaking?
In general, everything is not so rosy with security systems in cars designed in the 60s. In addition to the fact that among the full-fledged safety systems in Tolyatti cars there were only brakes with two brake circuits, the quality of the components very often led to the failure of system elements. If we talk about the main brake cylinder, then its durability and performance can be affected by several points at once:
- compliance of the brake fluid with the level of resistance of rubber seals and cuffs to
- chemical exposure;
- the quality of Neva brake fluid or its analogues, which is even worse;
- the quality of anthers, protective seals and the cuffs themselves;
- class of processing of the mirror of the main brake cylinder and its pistons;
- timely replacement of the working brake fluid.
Replacing brake cylinders, procedure
So, before you begin this procedure, you first need to completely remove the caliper with the cylinders. After this, it is advisable to lubricate the cylinder seating areas with penetrating lubricant. Then take the key and unscrew the brake connecting pipes. It all looks roughly as I showed in the picture:
After this, take a screwdriver and press on a special metal clamp, which is located in the slot of the caliper on the side. You can look at it in more detail here:
And at the moment when the latch is pressed, with light blows of a hammer we knock out the brake cylinder from the caliper seat.
In this case, I was unable to unscrew the brake pipes, since they had not been unscrewed for years and were eaten away by rust. So I decided to simply cut the tubes with pliers and then replace them with new ones.
All is ready. We carry out replacement in the reverse order. The price of new brake cylinders for a VAZ 2106 is about 1,500 rubles for a set of two pieces along with a caliper.
Symptoms of a GTZ malfunction
The first signs of a brake malfunction, and sometimes the only reason why replacing the master brake cylinder of a VAZ 2107 is necessary, is a signal that is simple and understandable to any teapot - a red lamp on the instrument panel. It will tell a careless driver that the level of brake fluid in the reservoir is critically low. There is no need to panic right away. Perhaps the fluid began to drain a long time ago, and if you fill the tank to the MAX mark, the car will be able to last for some time without repair. However, if the fluid level drops again, then repairs are necessary.
Diagnostics of the brake system is simple and straightforward - if there are leaks on the main cylinder itself, it needs to be replaced or repaired. Its price is about 500 rubles assembled, regardless of the manufacturer, and can fluctuate within hundreds, depending on the greed of the seller. The most desperate car enthusiasts disassemble the master brake cylinder and try to change the cuffs and seals. Often this leads to the expected result, but only if you managed to buy a good complete repair kit with all seals, gaskets and cuffs.
General structure of the vehicle
The diagram of the brake system of the VAZ 2107 car consists of two main components - the drive mechanism and the brake actuators. Due to the drive mechanism, a braking signal is sent to the actuators, thereby bringing the vehicle to a complete stop or reducing the speed.
Braking is performed by increasing the friction energy of friction units with rotating parts. The brake system of the VAZ 2107 is designed in the traditional version:
- The front part is implemented through the use of disc brakes, which are considered one of the most reliable.
- The rear part is equipped with drum devices, the operation of which is also based on friction force.
The brake system drive can be of different types, but the seven uses exclusively a hydraulic type. The hydraulic drive system uses fluid, which acts as the basis of the VAZ 2107 brake system. Brake fluid has the necessary characteristics and is used as a conductor to transmit force from the brake pedal to the actuators - the pads.
Replacing the master brake cylinder
Replacing the GTZ on VAZ classic cars (2101-07) is not difficult; you can do this work yourself. To perform such an operation you will need the following tool:
- 10mm wrench (or special bleeder wrench);
- Phillips screwdriver;
- combination wrench for 13 (you can additionally use a head with a knob and a ratchet for convenience).
It is not necessary to use a pit or a lift to perform the work; replacement can be done outside in dry weather or in the garage. The work should be performed in the following sequence:
- unscrew the three brake pipes from the bottom of the device (key for ten);
- loosen the clamps of the two hoses (at the bottom of the GTZ), pull off the hoses;
- unscrew the two nuts securing the GTZ to the vacuum booster (you need a 13mm wrench or a socket with a wrench);
- We dismantle the part, install the new gas turbine unit in place, and reassemble it.
After the operation, you should add fluid to the vehicle reservoir, then be sure to bleed the brakes well.
Replacing brake cylinder 2114
The work of replacing the GTZ on VAZ 2108-15 models is carried out approximately the same way, there are only some design differences.
We make the replacement as follows (using the example of the VAZ-2114):
- Unscrew the four tubes on the sides (two on the left and two on the right). It is better to use a special pipe wrench; you can roll up the edges of the nuts with an open-end wrench;