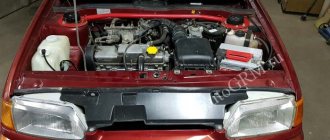
Daewoo Nexia engine SONS 8 valves, forced replacement of the timing belt. I’ll make a reservation right away when the timing belt breaks on this engine, the valves do not bend. The client came to replace the thermostat, but on this engine, in order to replace it, you need to remove the timing belt. We'll change it at the same time. We do not touch the rollers since we changed them four months ago along with the belt. Let's say thank you to the Germans for this unforgettable adventure, since the Nexia got the engine from Opel.
Important! When the timing belt breaks on this engine, all the valves bend.
Tools and accessories
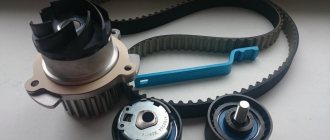
There is one peculiarity: the belt is tensioned by a pump and for this we need a special key for 41.
Actually, the key itself and the pump.
The price of the issue is 500 rubles, but if the replacement is a single one, then you can make it yourself by cutting it out of a sheet of metal 1 - 2 mm thick and bending the handle at an angle of 45 degrees. It won’t be very convenient, but you can tighten the belt with such a key, check it yourself.
Patient.
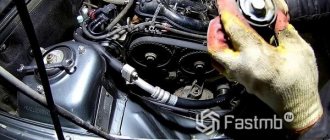
I apologize for the quality of the photo; my partner’s hands were shaking with excitement.
About belt wear and life
The main reason for belt breakage is wear and tear of the product during operation. If you do not perform diagnostic procedures, this will definitely happen. Over time, the rubber loses its elasticity and resilience, cracks or bulges appear on the surface of the belt, and the ends become frayed. Also, jamming of the tension roller or camshafts can cause the drive to break.
The manufacturer of Daewoo Nexia says that the belt needs to be changed after 50,000 km. Of course, this may actually be the case, but it’s still better to focus not on mileage, but on the actual condition of the belt drive. And in order not to miss the beginning of its end, you need to look under the hood more often.
Now, if you decide to make the repairs yourself, let's talk about how to do it quickly and efficiently. Here is a list of tools that we will need for work:
- jack;
- socket wrenches;
- spanners;
- screwdrivers with different tips;
- hexagon;
- new belt drive kit.
Advice: it is better to buy consumables from trusted manufacturers, since a low-quality drive will quickly fail.
Step-by-step instruction
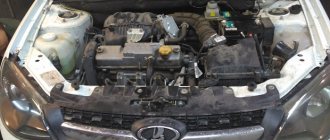
We remove the air intake pipes, the air filter housing and everything connected to them. This is the picture we get.
Unscrew the bolts securing the protective timing cover and remove it. We also loosen the bolts securing the power steering pulley. So that he doesn’t swear later trying to stop him.
Loosen the generator mounting bolt, move it towards the engine and remove the generator belt.
Remove the right wheel and the plastic mudguard from below. Drain the antifreeze.
Now we see the crankshaft pulley.
Set the top dead center
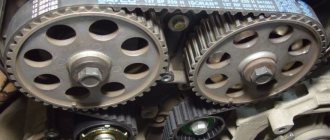
Use the crankshaft bolt to rotate the entire gas distribution mechanism until the mark on the camshaft pulley and the housing coincide.
Remove the power steering pulley. The photo has already been taken. But the crankshaft mark is visible and it coincides with the pointer. Unscrew the two hydraulic booster mounting bolts. Do not drain the power steering fluid!
We remove the crankshaft pulley and see that the marks on it match. Unscrew the crankshaft bolt with the help of a partner. We engage fifth gear, press the brake and unscrew it with a slight movement of the hand.
Unscrew the bolts of the lower protective cover and remove it.
Replacing the pump
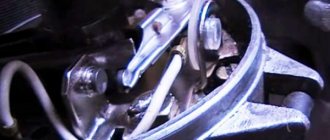
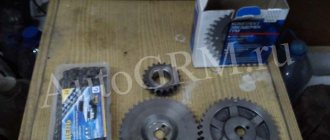
Loosen the three pump mounting bolts; they are hexagonal. They are not visible in this photo; after removing the protective casing, I will mark them. Using a special wrench, turn the pump until the timing belt loosens and remove it. Remove the camshaft pulley. The bolts for fastening the protective casing were hidden under it. And two more below. We unscrew them.
We move the casing and see just three bolts securing the pump.
Replacing the thermostat
And on top is the hero of the occasion, the thermostat in its own housing. We remove it and change it.
We remove the water pump and lubricate its gasket with a thin layer of sealant to prevent it from leaking later. There is no point in changing it, it is still new.
Thermostat, special key and water pump.
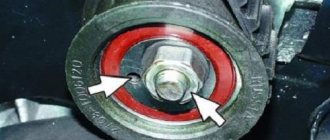
We put the water pump in place. There is a tension indicator on the tension roller; after tensioning the belt, the arrow should be opposite the groove.
Replacement timing
Manufacturers recommend replacing worn parts of the timing mechanism drive with a mileage of no more than 50 thousand kilometers. Most owners follow this recommendation, but there are exceptions.
The service life of the belt depends not only on the manufacturer of the spare part, but also on the operating conditions of the vehicle and the technical condition of the engine. The condition of the belt is adversely affected by technical fluids that can get into its operating area. If even the slightest leaks of engine oil are noticed, they are immediately eliminated and the belt is replaced with a new product.
Installing a new timing belt
We put the protective cover in place, screw it and the tension roller. We install the camshaft pulley and align the marks, if they do not match, we also check the crankshaft marks. Then we install a new timing belt so that the descending branch of the belt is tensioned. The principle is this: first we put it on the crankshaft, pump and tension roller. Then we turn the camshaft pulley a few degrees clockwise, put a belt on it and return it back. It turns out that the right branch of the belt is tense, and the left is free.
Be sure to place the belt in the direction of rotation,
There is a special mark on the belt, unfortunately we didn’t take a photo here, but you can see it in the article about Logan.
Using a special wrench, turn the pump until the arrow on the tension roller is against the groove and tighten it.
We check all the marks again. If everything is normal, install the lower casing and crankshaft pulley, tighten it in the same way as you unscrewed it. We turn the crankshaft twice and check the marks.
We screw back everything that was unscrewed and put everything that was removed in the reverse order of removal. Tension the generator belt. Fill with antifreeze. We start the car and accept congratulations from family and friends.
Overall the car is quite good. The front suspension couldn't be simpler, two silent blocks and a ball, which is very difficult to kill. Engines last 300,000 without problems. He does not have a high appetite. The only thing is that there are several congenital electrical defects, and the body rots if not treated. But otherwise, for the money it’s worth, it’s a perfectly acceptable option. These were discussions on a free topic.
Let's sum it up
Taking into account the above information, it becomes clear that replacing the timing belt of the Daewoo Nexia, or rather the timing belt, is a mandatory and responsible procedure. At the same time, it is important to change the belt not only according to the regulations, but also to take into account certain factors that can shorten its service life.
One way or another, if necessary, work on replacing the timing belt on a Daewoo Nexia can be done with your own hands in a regular garage. Of course, certain skills will be required (it is important to be able to correctly set timing marks, drain and refill antifreeze if necessary, replace the pump, etc.).
We also recommend reading the article about which is better, a timing chain or a timing belt. From this article you will learn what advantages and disadvantages the specified types of timing mechanism drive have, as well as what subtleties and nuances need to be taken into account when selecting a car and internal combustion engine with one or another type of timing mechanism drive. However, having the necessary set of tools on hand, replacing the belt and other elements can be completed independently, which will significantly save money. Finally, we note once again that when replacing the timing belt on a Nexia or any other car, you also need to pay attention to: the condition of the tension roller, pump, seals on the crankshaft and camshaft.
If it has been determined that any element needs to be replaced or replacement will be required soon, in parallel with replacing the timing belt, additional work should be carried out to replace worn or failed elements.
Ignoring this rule for complex replacement may cause the old roller to jam, as a result of which the new belt will still be torn off with all the ensuing consequences.
Why are timing marks needed?
The timing marks are marks along which the timing belt is adjusted, as well as the drive belt is replaced. This element is quite important because it directly affects the operation of the power unit.
What happens if, when replacing a belt, you set the marks incorrectly or don’t set them at all? In this case, you can knock down the gas distribution mechanism, which will lead to many problems. Namely:
- Since the gas distribution has been disrupted, the injection and release of exhaust gases will be carried out incorrectly. Subsequently, the engine may start to stall, stall, fail to start, or consumption may increase. In turn, this can lead to consequences, such as increased wear, burnout of the valve mechanism and piston group, and others.
- Everyone remembers what happens when the timing belt breaks - valve bending. This happens because the gas distribution process is disrupted and the pistons hit the valves, which are subsequently deformed. The exact same principle works in this case. A broken timing mechanism will cause the piston group to fight against the valves, which will simply deform them.
- Shifting the timing mark when changing a belt or adjusting will result in fuel being injected too early or too late. The consequence of this may be flooding of the spark plugs or suction of exhaust gases into the combustion chamber.
How to set tags
Setting the timing marks is quite simple. Let's consider the sequence of actions:
We stop the car at the inspection hole. We go down into the pit and dismantle the right side of the engine crankcase protection.
First you need to remove the timing belt protective cover. To do this, unscrew the mounting bolts. Of course, the easiest way is to do this with the engine removed, but if you only need to replace the belt and roller, then it is not advisable to dismantle the entire power unit.
Remove the accessory belt.
Remove the accessory belt.
We remove the power steering pump pulley (it is held on by 3 bolts) if the car is equipped with a power steering. Dismantle the upper part of the timing belt protective casing.
Unscrew the crankshaft pulley. You should first ask an assistant to depress the brake pedal.
Rotate the crankshaft pulley until the marks on the pulley and the housing coincide. Additionally, we control the position of the marks on the camshaft pulley. On a Daewoo Nexia with a 16-valve engine, the marks on the camshaft pulleys should face each other.
The mark on the accessory drive pulley must also match the mark on the cylinder block. The camshaft pulley is secured against rotation, and subsequent operations are performed.
We loosen the timing belt tension using the eccentric on the water pump. The eccentric is turned with a special key to 41.
- This is how the timing marks are set easily and simply.
Video of replacing the timing belt of an eight-valve Nexia
Some details are not shown, but the general procedure is covered quite well. I recommend viewing. Good luck on the roads. Not a nail or a rod!
The Daewoo Nexia 8-valve is an improved Opel Cadet. The machine is very popular in many regions of the Russian Federation and other CIS countries. In the period from 1996 to 2002, it was equipped with the G15MF power unit. The timing mechanism drive is driven by a timing belt, which requires careful, timely maintenance.
Most owners replace the timing belt on this car by service station specialists, but some of them perform this operation on their own. Nexia, which has 8 valves in the block head, is a reliable machine, unpretentious in maintenance.