Malfunctions
There are two types of brake master cylinder failure:
- Damage or swelling of rubber seals;
- Piston jamming.
Signs that it is time to repair or replace an element are:
- leakage of liquid;
- changes in the pressure of the brake pedal: it became softer or began to fail.
To eliminate breakdowns, it is necessary to dismantle the master brake cylinder and then install a new element, or to repair it, namely, change the boot, rubber seals, clean parts from dirt, corrosion, etc.
If the GTZ breaks down, the entire braking system of the vehicle is susceptible to malfunctions. At the right moment, when you press the brake pedal, the car may stop much more slowly than usual, or may not respond to the signal at all. And this can cause a traffic accident.
If, when squeezing the pedal, you feel that it has become softer or the car is braking more slowly, you should check the brake system in general and the brake master cylinder in particular. With a little time, you can improve the safety of your vehicle.
Brake master cylinder price
The cheapest cylinders cost around 400-700 rubles 1,500 rubles . Replacing a cylinder in a car service will cost from 400 rubles , but to save money it is quite possible to do it yourself.
Vacuum brake booster
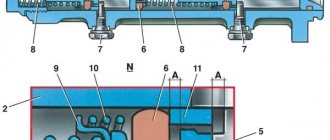
A rod connected to the amplifier is connected to the pedal. The design of the VAZ-2107 vacuum brake booster is quite interesting; it is shown in the figure:
The amplifier is a sealed container, internally divided into 2 chambers by means of a membrane. The chamber located closer to the pedal is called atmospheric, and the chamber separated from it by a membrane is called vacuum. The diaphragm itself is connected to the piston rod of the master cylinder.
The vacuum chamber is connected by a pipe to the intake manifold of the engine, where the vacuum comes from. The design also includes a follower valve controlled by the pedal rod, which does all the work.
When the pedal is released, this valve connects the chamber cavities through a channel, providing identical pressure. When the pedal is applied, the valve closes the channel connecting the chambers and opens the channel connecting the atmospheric chamber with the atmosphere. Since a vacuum is maintained in the second chamber, atmospheric pressure begins to put pressure on the membrane. Since it is connected to the piston rod of the master cylinder, due to the movement of the piston, fluid is displaced from the cylinder into the pipelines.
Replacement
Replacing the part yourself is not difficult. To do this, you need to arm yourself with the following set of tools:
- screwdriver;
- keys 10, 13;
- 5 – with a cubic syringe or bulb;
- brake fluid;
- clamps.
If during disassembly you find that the old rubber hoses have become hard, it is recommended to replace them with new ones.
- Remove the belt from the expansion tank and put it aside.
- Using a ten key, unscrew the fastenings of the brake fluid reservoir and open the lid.
- Drain the brake fluid into a container.
- To prevent brake fluid from entering the engine compartment, it is necessary to place a piece of dense material under the cylinder.
- Loosen the clamps on the hoses extending from the tank and remove them.
- Disconnect the three brake pipes and move them a little.
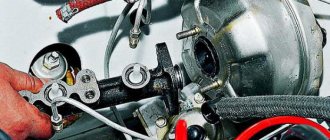
- We unscrew the two nuts securing the cylinder to the amplifier, using a 13mm wrench.
- Remove the brake master cylinder.
- We clean the seat of the spare part from dirt and brake fluid residues.
- Let's move on to a new element. We remove the protective seal and install the oil seal there.
- We insert the new cylinder into place and tighten the nuts.
- We remove the plugs and use a syringe to inject brake fluid into the cylinder cavity until it is completely filled.
- We assemble the remaining elements.
The final stage of repair work will be bleeding the car's brake system.
The device of the "seven" brake mechanism
The system is designed for smooth or emergency stopping. As we have already determined, it is the main security system, and operation of the car is prohibited even if the slightest malfunction is detected.
In a classic braking system, the pedal is mounted on the same axis as the clutch pedal and is equipped with a return spring. This mechanism has a built-in sensor for turning on the rear brake light lamps.
Next comes the brake master cylinder. It is attached to the body in the engine compartment with two bolts and has working braking circuits for the front and rear wheels.
Now you can find vacuum boosters to reduce the effort applied to the pedal. The drive of such an amplifier is a fitting . It is mounted in the intake manifold, connected by a rubberized pipe. For reliability purposes, the front circuit has two fittings per wheel, and the rear circuit has one fitting.
Piston disc brakes are used on the front wheels. They are installed for greater braking efficiency, since a greater load is placed on the front wheels than on the rear ones.
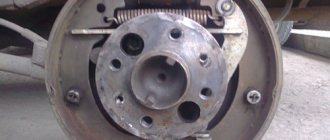
The rear wheels are equipped with drum brakes. Structurally, they are much simpler than disk ones. As is known, their efficiency is extremely low, but is quite sufficient for rear-wheel drive vehicles. In addition, it is not profitable for the manufacturer to install more expensive disk mechanisms. A parking brake mechanism is also built into the rear wheel brakes.
An important mechanism of the system is hidden under the bottom of the car in the rear - this is the pressure drop regulator in the system. This mechanism distributes the pressure that is created during braking between the front and rear circuits.
GTZ malfunctions
Replacing the VAZ-2107 master brake cylinder is required when this part simply fails. You can determine the malfunction of the GTZ in the following ways:
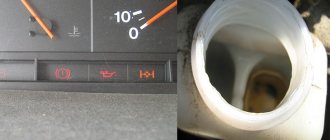
- The red warning light comes on, indicating a problem with the brake mechanism. This lamp comes on when the level in the brake cylinder reservoir drops below normal. In this case, it is important to find out the reason for the decrease in fluid and, if necessary, add it. If the leak occurs due to a malfunction of the turbocharger, it should be replaced.
- Presence of leaks on the GTZ. If, upon opening the hood, you can see signs of a fresh fluid leak on the GTZ, then it’s time to pay attention to repairing the mechanism. It is possible to repair the main brake cylinder of a VAZ-2107, but at the same time you can extend the life of the product for a short time, this is due to the quality of modern spare parts. If the product fails, or more precisely, the cuffs and seals have dried out, then experienced craftsmen recommend replacing the gas turbine unit. Many desperate amateurs strive to find the answer to the question of how to repair the master brake cylinder, but subsequently everything ends with its replacement.
The GTZ for a VAZ-2107 costs about 500 rubles, so it makes no sense to spend time and money to repair it. Let’s find out in more detail how the GTZ is replaced with a VAZ-2107.
Features of replacing the GTZ
Replacing the mechanism in question will not take much time, so first you should purchase a new product, and then make sure you have a standard set of tools and a special pipe wrench. This key looks like this:
The list of standard tools includes:
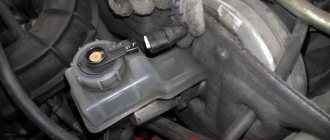
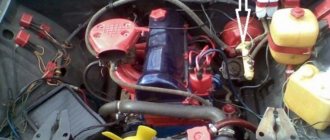
Now let's start the workflow. The product is located directly under the hood in the engine compartment on the driver's side. The product looks like this:
- Initially, you should remove the remaining brake fluid from the reservoir.
- It is necessary to loosen the fastening clamps, and then disconnect the hoses of the fluid reservoir from the fittings.
- Using a special wrench, it is necessary to unscrew the threaded bushings that secure the steel tubes to the GTZ.
- Two nuts are unscrewed, with which the cylinder is secured to the vacuum booster housing.
- Now you can remove the device in question.
- After removing the old device, you can install a new GTZ. The protective plug should be removed from a newly purchased device and a new oil seal should be installed in its place. After installing the new product into the seats, it should be secured with fastening nuts.
- We use a clean medical syringe from which the needle should be removed. We fill the syringe with brake fluid and then fill the installed device with it.
- TJ should be poured until it goes into the holes. As soon as the mechanism, or rather, the system, is filled, you can begin screwing the tubes with a special key.
- Taking this opportunity, you can remove and clean the tank for refueling the TJ, if necessary. It’s easy to determine the need; to do this, you need to look inside the tank. If there is sediment, it is better to clean the tank and rubber hoses.
- We fill the reservoir with brake fluid, and then be sure to bleed the system.
This completes the procedure for replacing the main brake cylinder on a VAZ-2107. The procedure is not complicated, so even an inexperienced driver can cope with it. A serious malfunction is solved quickly and inexpensively, and the car owner can forget about this part for 3-5 years. The VAZ master brake cylinder has this name for a reason, so special attention should be paid to it when the slightest sign of malfunction is detected.
Installing the brake caliper
Installation of the brake caliper on the VAZ 2107 is carried out in the reverse order of its dismantling.
After installing the brake caliper, it is imperative to bleed the brake system, removing air from it. Until this operation is completed, operating the vehicle is strictly prohibited.
The left and right wheel calipers are slightly different, so you need to pay attention to this when purchasing new ones. After repairing and installing the VAZ 2107 brake caliper, it is necessary to check the brake system for fluid leaks and, if necessary, repair them
After repairing and installing the VAZ 2107 brake caliper, it is necessary to check the brake system for fluid leaks and, if necessary, repair them.
Replacing the main brake cylinder on a VAZ 2101-VAZ 2107
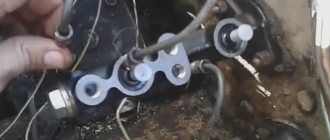
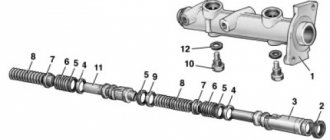
Welcome! The main brake cylinder - consists of a rod and a piston (the piston is located inside the cylinder) and from a housing into which brake fluid is poured, its operating principle is quite simple, when you press the brake pedal, the rod moves forward (see photo below) and thereby presses on the piston , he pushes the brake fluid into his (Brake fluid is not water, it does not compress and therefore it goes further through the brake system and ultimately it reaches the point where it pushes the pistons in the working brake cylinders, and they, in turn, press the brake pads to brake disc and therefore the car slows down), when you remove your foot from the pedal, the rod returns and thereby the fluid stops putting pressure on the working brake cylinders and braking is interrupted, in more detail all this information can be found in the article under title: “The principle of operation of the brake caliper”, everything is said there in very detail.
Note! To replace the brake master cylinder, you will need: All the keys you have, as well as special ones. a wrench for bleeding the brakes, it is convenient for unscrewing the brake pipes (you won’t break the threads if you unscrew them) and the fittings on the calipers that are located, in addition, stock up on a medium-sized flat screwdriver and a medical syringe or a rubber bulb (Using the latter, you can pump out the brake fluid will be from the brake reservoir of the brake system)!
Summary:
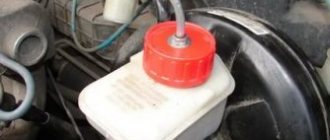
Where is the brake master cylinder located? Finding it will not be difficult, the most important thing is not to confuse it with the clutch master cylinder, they are very similar to each other, but still they have differences in installation, we will give a lot of examples, firstly, the clutch cylinder itself is not as long in shape as brake cylinder and the most important difference, the main brake cylinder (Indicated by a red arrow) is inserted into the vacuum brake booster (Indicated by a blue arrow) while the clutch cylinder is simply screwed to the body, but in some cars there is no vacuum brake booster (In cars such as VAZ 2101, VAZ 2102, VAZ 2103 it is simply absent) and therefore you need to especially rely on it, and by the way, another obvious difference is that the brake cylinder is located to the right, and the clutch cylinder to the left, all this is connected with the pedals, turn it on what level they are located and where exactly depends on where the cylinder will be located.
When should the brake master cylinder be replaced? If fluid begins to leak from the brake reservoir (It can either leak due to poorly screwed brake pipes, torn brake hoses and, of course, due to the master brake cylinder), if when you press the brake pedal, the pedal itself sinks much more than usual (It almost touches the floor), and if obvious leaks are visible under the brake cylinder (namely, under the place where it is located), then it must be replaced with a new one.
Removing the brake caliper
To remove the caliper you must do the following:
- lift the car on a lift or jack up the wheel on which the brake caliper needs to be removed;
- Using a wrench, remove the bolt securing the brake hose bracket;
- remove the bracket so that it does not interfere with further actions;
Important: under the bracket fastening bolt there is a spring washer, which must not be lost when dismantling the bolt and bracket
- unscrew the bolt securing the brake hose;
- remove the bolt after first removing the two o-rings;
- insert a rubber tube or bolt of a suitable diameter into the hole in the brake hose tip to prevent brake fluid from leaking out;
- Use pliers to remove the cotter pins securing the brake pad pins;
- pull out the pins securing the brake pads and remove them using a bit or a thin, but not sharp, screwdriver;
- remove the retaining springs from the brake pads;
- remove the brake pads;
Advice: if you plan to use the brake pads in the future, they should be marked with a marker so that during reassembly they can be installed in the same place where they were. If this is not done, they will wear out faster and brake worse.
- bend the locking plates of the washers on the caliper mounting bolts;
- unscrew and remove the bolts securing the caliper to the steering knuckle;
- Remove the brake mechanism (caliper) of the VAZ 2107 from the brake disc.
Important: the upper and lower caliper mounting bolts differ in the shape of the head. When installing the unit in place, you must not mix them up.
How to remove the front brake pads of a VAZ
- We lift the car on a jack and install a safety log under the lever (a safety measure to prevent the car from falling off the jack).
- Lubricate the contact points between the caliper and the guide pins with WD-40 or its equivalent.
Dirt often accumulates in these places and corrosion occurs. To simplify the work process and remove the guides without problems, it is necessary to lubricate these places with a special lubricant.
- Pull out the cotter pins that secure the guide pins
The cotter pin (retainer) may “resist.” To remove it, lightly press on the guide rod to relieve tension on it. Use a screwdriver or pliers to remove it from its seat. At this point, the fasteners may become damaged. Therefore, it is recommended to buy a repair kit in advance, which will contain new ones. This will save you from inconvenience when installing them in place.
- Use a punch to knock out the guides, holding the pressure springs from flying out
They serve to press the pads to the caliper, to the guide pins, so that when the car moves, the brake pads do not rattle in the pits. Over time, these springs lose their properties, stop pressing tightly, and on bumps, drumming occurs in the area of the front brakes. If you press the brake at this moment and the noise disappears, it is the springs (“chains”) that have weakened and must be replaced.
- Using pliers we open (retract) the pistons of the brake cylinders
We grasp the bottom of the cylinder with one edge of the pliers or a mechanic's wrench, and with the other we grasp the protruding side of the block. Smoothly squeeze the pliers, pushing the cylinder piston inside. We do it without “fanaticism” so as not to crush the cylinder.
You don't have to do this, maybe you can pull out the pads this way. But it is worth remembering that when replacing them, you will install new ones with thicker friction linings. There is a possibility that they will not fit into the old sizes of worn parts. In this case, you will still have to recess the cylinders to fit new ones.
- We take out the pads
Installation is carried out in reverse order.
Important points
When repairing the brake system of a VAZ 2107, you should remember several very important nuances. Without mentioning them, this article would be incomplete. So:
- On later VAZ 2107 models, spring washers began to be installed under the fastening bolts of the brake brackets. They are thin and very easy to lose when removing the bracket. To prevent this from happening, it is advisable to spread some newspaper or rag under the caliper. If the puck does pop out, it will be much easier to find it;
- If the driver does not plan to change the brake pads when replacing the caliper, then before removing them they should be marked with a marker or chalk so that they can be installed in the same place during reassembly. If you change the original location of the pads, they will become unusable much faster;
- If the driver decides to leave the caliper in place and plans to change only the brake pads, then he will have to buy not one, but two sets of pads, since these parts are always changed on two wheels, and not on one. If you leave old pads on one of the wheels, this will inevitably lead to rapid wear and new problems in the operation of the brake system;
So, replacing a brake caliper is not at all as difficult a task as it might seem at first glance. The main thing that the driver should remember when changing this part is its extreme importance. If a mistake is made when installing the caliper or pads, this does not bode well for either the driver or the car. It is for this reason that the article described in as much detail as possible all the nuances of installing a brake caliper. And it is strongly recommended to pay close attention to these nuances.
Source
Bleeding the system
The procedure for bleeding the brake system of a VAZ-2106 (like any other car):
- Rear right and left wheels.
- Front right and left.
When working, you move from the far brake mechanism to the near one (relative to the GTZ). Your goal is to get rid of air jams. When pumping, carefully monitor the fluid level in the tank and top up if necessary.
The principle of operation of the master brake cylinder on the VAZ-2106 is that two pistons create pressure in the system. This pressure pushes out the calipers and sets the pads in motion. If there is even a little air in the system, the brakes will not work.
Sequence of actions when replacing rear pads
Preparatory stage: a set of automotive tools, rags, liquid for removing deposits, a new parking brake cable, graphite-based lubricant.
We install the car on the inspection hole, fix the front wheels with wheel chocks, remove the rear wheel; Underneath the bottom, we unscrew (loosen) the handbrake cable for the convenience of carrying out maintenance work; Gently tap the drum guide bolts with a hammer. During operation, installation/disassembly, the bolts stick and are difficult to unscrew
If tapping does not help, spray with liquid to remove deposits, wait 10 minutes, then start unscrewing; After removing the drum cover, pay attention to the position of the parking brake lever. If it is not located near the lever, it means it is bitten and must be replaced
If you ignore this signal, it will be problematic to install the drum in its normal position; Remove the upper pressure spring, press the strut support, and turn it until it completely coincides with the slot. Remove the two cups and the spring from the stand; Disconnect the cable shank from the handbrake lever. We clean the disc from dirt, deposits, and rust; We carry out troubleshooting of the brake cylinder and seals. If there are signs of wear, leakage, or deformation, replace it with a new repair kit; We remove the parking brake lever from the old pads, take out the cotter pin and washer; Please note that the left and right levers are different and not interchangeable. Next, you need to install a spacer bar and move the pads apart. When installed correctly, the lugs are vertical; We start a new cable, fix it in the eye; We install new pads and assemble the structure in reverse order. If you have any difficulties with installation, it is better to watch the video presented in this manual.
The final stage: adjusting and tensioning the handbrake lever. In accordance with the requirements of the instruction manual, the handbrake should clamp the pads already at 5–6 clicks. Exceeding the norm indicates weakening, and decreasing indicates excessive tension.