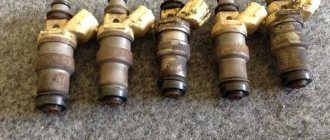
Not everyone knows that the main reason for clogging and failure of injectors and injectors is the low quality of Russian gasoline. Therefore, the procedure for cleaning the power system is most in demand in this country.
However, washing the injector and nozzles without removing them is a fairly simple operation. Although disassembling and cleaning the injector at a service center is quite expensive. But you can save on this procedure by cleaning the injectors in the “field” conditions, in your garage with your own hands. In this article we will tell you how to do it yourself.
When cleaning injector nozzles may be useless
Routine washing of the injector and injectors without removing it yourself or at a service center should be carried out every 10-20 thousand kilometers. If you clean the injectors after a longer distance, there is a risk that this procedure will no longer be useful.
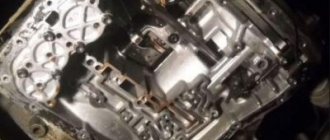
Such neglect can ultimately lead to severe damage not only to this part, but also to other interconnected engine components. In this case, simply cleaning the injector will not get rid of it; the engine will need repair.
Buying new components, including injectors, is labor-intensive and not cheap. Therefore, cleaning the injector should not be put on hold, especially in cases where signs of a malfunction have already appeared.
But the best option is to prevent the problem from occurring by cleaning the injectors from time to time without removing them, for example, before changing the engine oil. Such prevention will help protect your car from unnecessary problems with engine injectors.
Is this type of cleaning reliable?
Definitely yes. If everything is done correctly, such “home” cleaning will be no different from a similar one done in a workshop. Your sprayers may not look as new on the outside as they did after ultrasonic baths, but professional chemistry will make them new on the inside.
Cleaning injectors in a workshop ranges in price from 2,500 rubles to the limits of the impudence of a particular service. The liquid costs from 150 rubles. Add 2 hours of your time and get solid savings on everything.
Signs of clogged injector nozzles
If the problem still cannot be avoided, there are several signs by which you can determine that it is necessary to clean the injectors much earlier:
- Loss of engine power (a small amount of fuel-air mixture is supplied to the combustion chamber);
- Increased fuel consumption;
- Periodic pops (detonation) while the engine is running;
- Exhaust of black smoke from a car muffler;
- Unstable engine operation (engine speed jumps).
It is worth noting that if any of the above symptoms appear, you should not immediately try to clean the injector. The fact is that the cause of the malfunction may be other problems in the system, for example, a clogged particulate filter or a breakdown of another part. In any case, first you need to conduct a thorough diagnosis of the engine, and only then, after making sure that the injectors are clogged, proceed to flushing the injector.
Do-it-yourself methods for washing the injector and injectors without removing them
There are two methods to clean the injectors without removing them from the engine:
- Pouring a special cleaning agent into the fuel tank;
- By connecting a homemade device with a cleaning mixture to the fuel system of the power unit.
The first method is the simplest and takes very little time from the driver. It is used to clean injectors after a short mileage (less than 15 thousand kilometers) and only for prevention. In case of pronounced deviations in engine operation, this method is ineffective.
The second method is a little more complicated and requires more time from the car enthusiast. However, the effect of washing injectors with this method will be more noticeable, since its efficiency is an order of magnitude higher. It is used in more advanced cases, in case of obvious problems with the injector or after 15-20 thousand kilometers. Below we will analyze each of these injector flushing methods in more detail.
Flushing injectors through the fuel tank
To flush with this method, a special product, additives, are used that are designed to clean the entire gasoline supply system. As the name suggests, it is poured directly into the fuel tank. You can buy it in almost any store that specializes in selling components and consumables for cars.
The procedure for cleaning the injector system occurs in several stages:
- First of all, you need to replace the fuel filter.
- After this, one bottle of cleaning agent is poured into the fuel tank.
- Next you need to drive 250-300 kilometers.
- Then the fuel filter is replaced again.
The calculation of the proportion of gasoline and cleaner specified by the manufacturer should be strictly observed. Otherwise the motor may be seriously damaged.
It is necessary to focus your attention in more detail on the importance of the first stage - replacing the fuel filter. The fact is that dirt separated from other parts of the power system enters the filter and remains there.
If you do not change it, then heavy soot particles will reach the injectors, and the injector flushing procedure will completely lose its meaning. Therefore, before you start washing the injectors in this way, you should definitely replace the fuel filter. Since without this it will not be possible to effectively clean the injectors.
The best cleaners, as recognized by car enthusiasts themselves, are the following brands:
- Liqui Moly;
- Injector Cleaner;
- Kerry KR-315;
- Hi Gear.
Flushing the injector by connecting a homemade device to the main line
In order to clean the injectors using this method, the first step is to build a small apparatus, which we will attach to the power unit. In this case, other parts of the fuel line (pressure regulator, pump, filters) will not be affected during flushing. To make this device we will need:
- One meter of gasoline hose;
- Fuel filter, inexpensive;
- Two-liter plastic bottle with cap;
- Electric or manual pump with pressure gauge;
- Two valves from tubeless tires, one with a spool valve, the other without it.
First of all, holes are made at the bottom of the bottle and its cap, the diameters are adjusted to the size of the valve. A valve without a spool is inserted into the hole in the lid, and with a spool it is attached to the bottom of the bottle.
Then we take the hose, cut it in half and insert the fuel filter between the two pieces. Next, observing the direction of fuel flow (from the bottle), insert one end of the hose into the valve on the lid. We connect the pump accordingly to the bottom of the bottle. We naturally fasten this whole thing with clamps. Thus, the injector washing apparatus is ready.
For convenient operation, it is better to attach the bottle to the open hood and only with the bottom up. But it's still too early to start cleaning. Before flushing the injectors, it is necessary to warm up the engine to operating temperature. For this, 15 minutes of idling is quite enough.
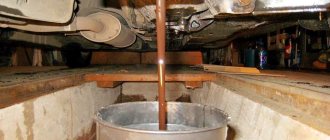
Next, you need to reduce the pressure in the fuel rail and only then connect a homemade device to it. To do this, you need to place a cup under the process fitting built into the end of the ramp and press the valve with a sharp object. Excess fuel will drain, thereby reducing the pressure.
Stages of injector flushing
Injector flushing takes place in six main stages:
- First of all, the ramp is disconnected from the fuel line, and a homemade device is connected to the latter.
- Next, you need to turn off the fuel pump and remove its fuse. Otherwise, place a canister under the power unit, where gasoline will drain from the fuel pump.
- After this, the cleaning agent with gasoline in the required proportion is poured into the bottle. The connected pump creates a pressure of about 3 bar in the bottle (no more!).
- Let's start the engine. Thus, the engine should idle for 15 minutes.
- Next, turn off the engine and wait another 15 minutes. Over this period of time, the cleaning liquid will thoroughly soften the deposits. After which the engine must be started again.
- The washing process will stop when all the product has run out. In this case, it is necessary to ensure that the pressure in the bottle remains at 3 bar.
At the end of the flushing, it is necessary to carefully dismantle the homemade device and connect the engine to the standard fuel supply system. After which you should start the engine for another 10 minutes, during which time the cleaning agent will completely burn out of the system. Along with this, you can check the tightness of the standard fuel system. If no problems were noticed in the operation of the engine, then flushing the injectors can be considered successful.
Carburetor cleaner
Fuel system cleaner for carburetors becomes a tool that can help quickly clean injectors. First you need to collect a small list of tools, then proceed to the main steps.
Since the procedure will be carried out with the element removed, it will need to be connected to something that will be able to open the nozzle. This item is included in the list of tools needed to implement this method:
- Electrical tape, battery, cable.
- Liquid for flushing the carburetor fuel system of a gasoline engine.
- A small piece of oxygen hose, an awl.
Some of the listed items can be replaced with others that can perform the functions specified in the instructions.
To clean the injectors with carburetor cleaner, simply follow these steps:
- Removing the nozzle and cleaning its outer part using a soft brush or brush.
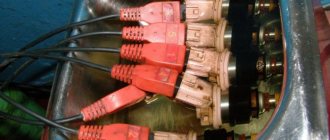
- The prepared cable is cut into two equal parts and the insulation is removed from one side on each resulting wire.
- Connecting the wires to the battery and wrapping them using electrical tape.
- Cutting an adapter from a rubber hose, then connecting the cap of the fuel system cleaner, the adapter and the injector.
- Connect the wires from the battery to the contacts on the injector so that it opens.
- Press the cap of the cleaner and gradually clean the injectors.
It is important to put on plastic glasses before pressing on the carburetor cleaner cap. The jet will be strong enough to cause splashes. The solution may get into your eyes, causing irritation and other consequences.
Let's sum it up
When choosing a method for washing the injector and injectors without removing it yourself, we rely on the option that is most suitable for you. The choice in favor of one method or another remains with the car enthusiast himself. Each of them copes with their task perfectly. However, several important points should be emphasized once again.
The cleaning agent should be poured into the fuel tank every time the engine oil is changed, and only as a preventative measure to avoid the harmful consequences that arise from malfunctions in the power supply system of gasoline engines. If there are obvious signs of a malfunction, this option can even cause harm, aggravating the problem even more.
The second option is more effective, but it does not always save the driver. Sometimes you still have to spend both time and money on dismantling, cleaning or replacing injectors. Therefore, in order not to let the situation become critical, follow appropriate preventive measures. To ensure your injector has a long and trouble-free service life.
New articles
- How to lubricate car door locks to prevent them from freezing in winter? Choosing the best remedy
- How much will it cost to replace a cylinder head gasket? Let's figure it out