Replacing the VAZ 2108-2109 gearbox rod seal
A faulty gearbox rod seal causes oil leakage from the gearbox. Replacing the VAZ 2108-2109 gearbox seal can be done in two ways: by dismantling the box or on the car itself. Let's take a closer look at the second option.
How to independently diagnose the gearbox seal
The first indicators indicating the need to replace the gearbox seal are oil marks on the asphalt after the car has been idle for a long time. But it is important to understand that there may be several reasons for this defect (for example, an incompletely tightened oil filter). But, if the problem is still with the oil seal, it is important to detect and fix the problem in time, because oil outside the box can lead to the need to replace it. To avoid such consequences, it is worth periodically checking the oil and monitoring its level in the gearbox and in the engine. In addition, a malfunction of the oil seal can cause a crunching noise when changing gears.
Replacing seals on a VAZ 2109 gearbox
The cause of oil leakage from the gearbox is a failed CV joint seal and gearbox rod seal. There are two ways by which you can replace the gearbox seal on a car:
— dismantle the gearbox;
- perform the replacement on the machine itself.
Let's look at the second method in more detail.
Where is the gearbox seal located and what is it needed for?
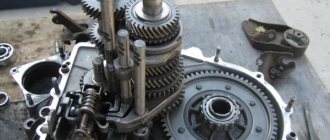
In the VAZ 2109, the gearbox oil seal is located in the clutch housing. To get to it, you will have to disassemble the gearbox. The oil seal is designed to seal the gearbox housing by sealing the gaps between the stationary body of the gearbox and the rotating drive shaft.
Also check out
- Self-replacement of the VAZ 2110 CV joint
- Checking the throttle position sensor (TPS) VAZ 2110
- Manufacturing and installation of a short-stroke rocker on a VAZ 2109
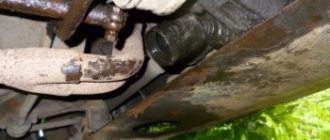
- Bend back the wide part of the boot. At the bottom there is a cardan attached to the rod.
- To access the oil seal, you need to use a key set to “13” to disconnect this cardan from the rod, and then disconnect it from the gear shift lever.
Replacing the VAZ 2108-2109 gearbox rod seal
- Unscrew the nut, loosening the connection between the cardan and the lever.
- Remove the cardan from the lever (1st or 3rd gear will engage).
- Use a 10 key to disconnect it, moving the lever to the side.
Replacing the VAZ 2108-2109 gearbox rod seal
- Remove the rubber boot. The oil seal is located in the recess - the place where the rod enters the box. To remove the required part, you will have to use an awl or a self-tapping screw.
- Before replacing the VAZ 2108-2109 oil seal, it is important to clean the seat, removing oil, sand, and other accumulated dirt.
- Install a new transmission rod seal.
- Secure the new gearbox oil seal in the seat.
- Replacing the VAZ 2108 gearbox seal is easier to do with a plastic bottle cap. In this case, the inner part of the plug must be cut out and a new oil seal installed through it.
Assembly is performed in reverse order.
Causes of clutch oiling
The reason for oily clutch is a leak of the crankshaft rear oil seal or the gearbox input shaft oil seal. Transmission and engine oils have different smells. Therefore, an experienced car enthusiast can recognize by the smell of oil which of the seals has failed and requires replacement. In this case, you will have to remove the gearbox from the car.
Replacing the input shaft oil seal
- To remove the box, remove the CV joints as described above.
- Instead of one of the CV joints, we insert an old one or a special plug to prevent the differential from falling apart.
- We unscrew the fastening bolts (there are three of them) and remove the clutch housing shield.
- Loosen the bolts and nuts securing the clutch housing to the block.
- We place suitable wooden blocks located in the area of the strut supports on the wing flanges and install a cross beam on them to hang the engine.
Warning: The beam rests solely on the wing flanges! Otherwise, you risk denting the body.
- We attach the engine to the beam using a long bolt with a hook.
- A strong rope or wire is also suitable for this.
We hook the engine by the eye to the beam. The beam rests only on the wing flanges
- Unscrew the two nuts securing the rear engine mount to the body.
- Unscrew the nut and take out the left support bolt.
- Unscrew the three nuts securing the left engine mount to the gearbox and remove the mount.
Unscrew the three nuts securing the left support to the gearbox
- We finally unscrew the bolts (three pieces) and the nut (on the back of the gearbox).
- When removing the gearbox from a VAZ 2109, we first move it horizontally away from the engine to remove the input shaft from the clutch discs.
- Be careful not to damage the clutch spring petals.
- Remove the clutch release bearing.
- We unscrew the three bolts securing the guide bushing (there are spring washers under the bolts).
- Remove the guide sleeve.
We unscrew the bolts that secure the guide sleeve. After removing the bushing we take out the oil seal
- Using a suitable wire hook, remove the oil seal from the gearbox.
- We press in a new one using a mandrel of suitable diameter.
- The working edge is directed inside the gearbox.
Tip: Before installing the gearbox on a VAZ 2109, it is recommended to lubricate the outside surface of the guide bushing and splines of the input shaft, as well as the release bearing, with grease. Align the clutch driven disc using a special drift (an old input shaft with good splines will do)
- We install a gearbox on the car.
- Before attaching the front wheel drives, we replace the retaining rings at the ends of the inner CV joints.
- Otherwise, there is a possibility that the drives will jump out of the gearbox when the vehicle is moving.
- We finally tighten the nut that secures the brace to the lever on the loaded suspension while the car is already on the ground.
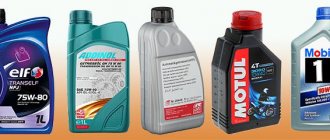
- Change the oil in the gearbox (see VAZ 2109 changing gearbox oil - do it right).
This is how oil seals are replaced, there is nothing super complicated about it, in addition you can watch the video.
Be careful!
Working with the cardan shaft mount (including the box seal) leads to displacement of the rocker, so difficulties arise with switching some speeds. The reason for them is in the fastening and adjusting screw at “13”, connecting the cardan and the gear shift lever. Therefore, after the new oil seal is installed, you need to check the position of the lever and adjust it if necessary.
After everything is assembled, it is worth checking the oil level and, if necessary, adding it. Then check the work to make sure there are no leaks.
Removing the drive
You can now remove the disk. Even replacing the VAZ 2109 external CV connection boot is better and faster when the drive is completely removed. But not only this trick. The fact is that when replacing the boot, you should wash off the hinge and pour new lubricant into it. This way you can increase the service life, unless, of course, you “kill” the discs with an aggressive driving style. Unscrew the nut completely from the hub. Now you can remove the outer CV ball from it.
To do this, carefully, trying not to damage the brake tube, pull the stand while holding the disc. The hub should be easily removed from the splines on the disk. That's it, now you need to extract the internal one. Consider the fact that you have already dried the oil out of the box. So, using a small chisel that you place between the gearbox and the joint, and a hammer, knock the CV joint out of the gearbox. Do not try to catch the crowbar; in this case, only a weak but sharp blow will save you.
Spare parts
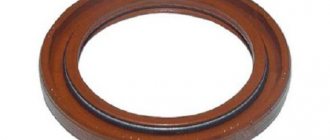
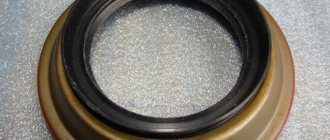
It’s a no-brainer that replacing the drive oil seal of a VAZ 2108, 2109 involves purchasing a new one, but here lies a little secret - the oil seals on the left and right sides differ from each other by oil-removal notches, which are marked on the inside of the oil seal. You ask - what is the use of them? The thing is that the oil seal holds oil inside the mechanism body not only due to the tight fit of its inner part to the rotating shaft, but also due to the effect of oil reflection from the oil seal created by these very notches. Therefore, the direction of these notches must coincide with the direction of rotation of the shaft. In order for the replacement of the drive seals of the VAZ 2108, 2109 to occur without any unpleasant surprises, the manufacturer marks the drive seals in three ways (indicated by arrows in the photo):
- Drawing arrows on the inside (on the right oil seal the arrow is directed to the left, on the left to the right);
- Numbers in the catalog number (the number of the right cuff ends with an even number, on the left with an odd number);
- In addition, the Balakovo manufacturer paints the drive cuffs in different colors: the right one is black, the left one is brown.
So, it’s time to move on to the most interesting part of this article, in which we will change the drive seals with our own hands. Although the price of the cuff is cheap, the services for replacing it are quite expensive.
- We drive our car into a pit (overpass), place wheel chocks under the rear wheels and drain the oil from the gearbox;
Advice! If you subsequently do not intend to change the oil in the gearbox, then it is not necessary to drain the entire volume; you can get by with one liter.
Advice! Since the tightening torque of the hub nut is quite significant, it must be removed before the car is jacked up and the front wheel is removed.
- We put the car on the stops and unscrew the two bolts of the ball joint securing it to the steering knuckle;
Conclusion
After replacing all the hinges, do not forget to fill the box with oil. If you try to move from a standstill, you hear that the box is rotating, but the movement is not transmitted to the wheels, then the diagnosis is clear. Some internal hinge did not fit into place and did not hit the slots. We will have to find out what is wrong and reinstall it following all the recommendations. It is also worth noting that replacing the CV connection without removing the VAZ 2109 drive can be done, but it will be much more difficult. Spend a lot of time and effort.
Now at a service station they replaced the inner CV joint oil seal on a VAZ 21099. And when they hammered in the new oil seal, they did not lubricate it with oil, what consequences could there be?
- How can you clog the inner CV joint oil seal on a VAZ 2109? – 3 answers
- There is oil oozing from the side where the internal grenade is inserted, VAZ 21099 - 3 answers
- The inner CV joint cannot be removed. What should I do? – 5 answers
- Is it possible to change the camshaft oil seal on a VAZ 2110 without removing the camshaft? – 2 answers
- Do new oil seals need to be lubricated with sealant 2109 when installed in the gearbox? – 2 answers
But how do you know whether it was lubricated or not, the master stood under the car, hooked the oil from the seat with his finger and lubricated what was needed. Nothing will happen to your seal, there is no need to worry so much. And if it drips, it will most likely be due to the quality of the oil seal itself or because of wear on the drive. It usually flows along the shaft, and not outside.