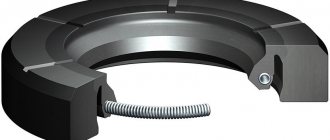
We will show you how to replace the gearbox gearbox seal of a shaft with grenades on VAZ 2115 VAZ 2114 VAZ 2113 with your own hands. During this repair, you will find the instructions on how to remove the shaft with grenades in the material “replacing the internal grenade of a VAZ 2115 2114 2113” useful. When the shaft is removed, use a screwdriver to pry up the oil seal and pull it out of its seat. Oil seals:
Different for the right and left sides. Black right, brown left. The arrows indicate the direction of shaft rotation:
Before installation, degrease the seals with a solvent, then coat them with sealant. Using the old oil seal, carefully hammer the new one into the hole.
Video of replacing the gearbox oil seal, shaft with grenades in a VAZ 2115 2114 2113
:
Backup video on how to replace the gearbox seal in a VAZ 2115 2114 2113:
You can replace the internal grenade seal of a VAZ yourself at home. To do this, you don’t need to be a specialist, you just need to have a head and hands.
Replacing the gearbox seal of the gearbox rod on a VAZ 2108-2109
The gearbox is an auxiliary organ of the engine, without which the car also cannot go anywhere. Today we will talk about gearbox seals, or more precisely, the gearbox rod seal, which allows moving parts to operate without losing oil from the crankcase. So, how is the gearbox seal (gearbox rod) replaced using the example of a VAZ 2108-2109?
How to recognize a malfunction?
There are only two ways to diagnose a problem.
- The first is that an oil stain forms under the car after a long period of parking, which clearly indicates an oil leak from the gearbox. Unfortunately, many drivers blame this problem on poor tightening of the oil filter.
- The second method is a visual inspection of the checkpoint on an inspection pit or overpass. In the place where the oil seal is installed, you can see oil stains, which indicate that the oil seal needs to be replaced.
If you do not change this part in time, there is a possibility that the oil will completely come out of the gearbox, and then the entire mechanism will run dry. In this case, you will have to carry out a major overhaul of the gearbox or even replace it, which will cost much more. It is strongly recommended to immediately change the painful node after detecting a malfunction.
How to change the rod seal on VAZ cars
There are only two ways to change such an oil seal. The first necessarily involves the dismantling of the gearbox with further disassembly of the unit and replacement of the faulty part. And the second involves replacing the oil seal without removing the transmission. We will consider the second method, since it is less labor-intensive and takes less time.
Required tool:
- Wrenches for 10 and 13
- The most common awl
- Soda cap
- Bent slotted screwdriver. You can also use a crochet hook.
Be prepared to have to crawl under the car. It is best to use a viewing hole or overpass, but you can also raise the car using jacks. Don't forget to be safe!
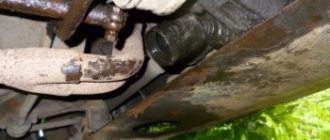
- Find the gearbox rod under the front of the car and bend its boot so that you can access its transition into the gearbox.
- Unscrew the cardan mounting bolt and remove it from the rod. Do not forget to disconnect the universal joint from the rod so that it does not interfere with the further replacement procedure. Now remove the boot completely. Immediately behind it you will see the same problematic gearbox rod seal.
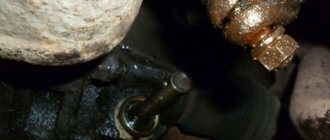
- Now drain the oil from the gearbox, otherwise after removing the oil seal, it will simply pour out. The oil seal itself is not easy to pull out; here you will need a special tool in the form of an awl. Many car repairmen screw the screw into the oil seal and simply pull it towards themselves. This creates a corkscrew effect.
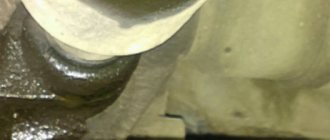
- Wipe the seat where the oil seal is inserted from dirt and transmission oil. It is best to use a completely old unnecessary rag or dry rags for these purposes.
After this, you can insert a new oil seal. Installation can be done in any available way. For example, you can use a regular plastic stopper for this. Cut out its center and press the oil seal into its seat using light pressure. However, no one forbids using another method; the most important thing is not to damage the new part, otherwise all the work will be done in vain.
Reassemble all components in reverse order and fill with transmission oil. After this, it is necessary to set up the correct engagement and shifting of gears, since the 13 bolt that holds the cardan on the rod has an adjustment purpose and its movement may make it impossible to engage first or reverse gear. Carry out adjustment work and tighten the bolt. There is no specific provision, because all drivers adjust the scenes “to suit themselves”.
To check the oil seal, start the engine and try to drive the car. If there are no leaks after this, then you did everything correctly.
As you have already noticed, it was not difficult at all. We hope that this article helped answer the question of how to change the gearbox rod seal.
Product delivery options
Note! Below are the shipping methods available specifically for this product. Payment options may vary depending on the shipping method. Detailed information can be found on the “Delivery and Payment” page.
Parcel by Russian Post
Available payment methods:
- Cash on delivery (payment upon receipt)
- Using cards Sberbank, VTB, Post Bank, Tinkoff
- Yandex money
- QIWI
- ROBOKASSA
Shipping throughout Russia. Delivery time is from 5 to 12 days.
Parcel by Russian Post 1st class
Available payment methods:
- Cash on delivery (payment upon receipt)
- Using cards Sberbank, VTB, Post Bank, Tinkoff
- Yandex money
- QIWI
- ROBOKASSA
Shipping throughout Russia. Delivery time is from 2 to 5 days. More expensive than regular delivery by Russian Post, approximately 50%. Parcel weight up to 2.5 kg
Express Parcel EMS
Available payment methods:
- Cash on delivery (payment upon receipt)
- Using cards Sberbank, VTB, Post Bank, Tinkoff
- Yandex money
- QIWI
- ROBOKASSA
Shipping throughout Russia. Delivery time is from 3 to 7 days. More expensive than regular delivery by Russian Post, approximately 100%.
Transport companies
Available payment methods:
- Using cards Sberbank, VTB, Post Bank, Tinkoff
- Yandex money
- QIWI
- ROBOKASSA
Delivery is possible to any locality where there is a representative office of the transport company. Delivery time is from 2 to 10 days. Sending large parcels is approximately 50% more profitable than by Russian Post.
Procedure for replacing the rod seal
Replacing the camshaft oil seal on a VAZ 2109.
Replacing the rod is carried out in parallel with replacing the oil seal; all this can be done while simultaneously repairing the gear shift drives. During repairs, you will need a certain set of tools: an “11” wrench (necessarily a socket one), a metal rod with a diameter of 4 millimeters, and a mandrel for pressing.
During repairs, you should follow the following sequence:
- The car must be placed on a level surface.
- Place wheel chocks under the wheels, and the gearshift lever must be moved to the neutral position.
- Then the spring clamp is removed, and the axle is pulled out - thereby the forks of the mechanism are disconnected.
- Next, use a socket wrench to unscrew the mechanism cover bolts.
- After this, swinging the installed cover on the guides, remove it from the box. You need to know that if your car has air conditioning and power steering, this makes the task a little more difficult.
- The pin is knocked out using a metal rod. The rod itself is removed.
- Use a screwdriver to pry up the oil seal and remove it. Only after this is the new oil seal pressed in using a head of the appropriate diameter.
- After replacement, you need to find the cause of this breakdown.
- After the mechanism is assembled, it is placed carefully on the box.
Failure of the rod can be caused by cracks, small, almost imperceptible scratches or gouges on the rod. If this is the problem, then of course such a rod should not be installed with a new oil seal, otherwise the oil seal will quickly deteriorate and you will have to do it all over again. It is worth remembering that the developments on the axis are very noticeable. This has the effect of increasing the backlash in the drive mechanism responsible for shifting gears.
Remember that the lever of the mechanism must align with the grooves of the forks.
When installing the cover back, make sure that the gear shift knob is in the neutral position. And after installation, check the adjustment of the rocker. To do this, you need to remove the plastic plug on the gear selection mechanism and insert a 5 mm drill there. Then turn the fork so that it fits into the hole on the mechanism (you will feel how it sits deeper). After that, having removed the cover from the gearbox, you need to install a screwdriver in the control hole, fixing the gear selection lever in the desired position. You tighten the clamp on the slide and remove the screwdriver, put the casing back on, pull out the drill, and put the plug in place.
The procedure will probably cause you a lot of trouble and will take a lot of time, but the work done will definitely bring you pleasure!
Box nuances
The VAZ 2114 uses a five-speed manual gearbox. It is quite simple in design, which allows you to independently carry out preventive and repair work.
Device diagram
Experts recommend identifying a malfunction at the initial stage of its occurrence, since delaying means wasting even more time, effort and money.
A very simple way to replace the internal grenade seal
Lada 2110 Logbook 13 Replacing the drive oil seal and the input shaft oil seal. Changing engine oil
Grenade seals are divided into left and right, so when changing the seal, be sure to place the left seal on the left side, and the right seal on the right side. The left oil seal is brown (it is on the driver's side), the right oil seal is black (the passenger's side).
Photo. Internal grenade seals.
The first thing to do is to lift the front wheel on a jack; on the side on which you are going to change the oil seal, be sure to place a stump or bricks next to the jack for insurance. Remove the wheel and unscrew the hub from the ball.
Photo. The arrow shows which bolts need to be unscrewed to disconnect the hub from the ball, there are two of them with a wrench head, seventeen.
All that remains is to pull the grenade out of the box, here’s the most interesting thing, you can pull directly on the brake disc, trying to pull the grenade out of the box, if the grenade pops out well, or the drive may pop out from the internal or external grenade, then it’s an extra hassle to put the drive in place.
Photo. Removing the internal grenade using a pry bar and tube.
Removal
3. Remove the clutch drive parts from the crankcase (see “Clutch - replacement”).
10 mm socket wrench
Unscrew the three bolts securing the clutch release bearing guide sleeve.
5. Remove the bushing from the gearbox input shaft.
6. Carefully, so as not to scratch the input shaft of the box, use a small chisel or punch to punch through the oil seal.
7. Use pliers (with curved jaws) to remove the oil seal from the seat.
Replacing the rear oil seal on a VAZ 2109 gearbox
— Find the box rod under the rubber boot (if the seal is faulty, it can be easily detected by an oil stain).
— Bend down the wide part of the boot.
- Find the cord that is attached to the rod (located at the bottom).
— Disconnect this cord from the rod using a key at “13“, and then disconnect it from the gear shift lever.
— Unscrew the nut, while loosening the connection between the cardan and the lever.
— Remove the cordan from the lever (the first and third should turn on
broadcast).
— Using a size 10 wrench, disconnect it, while moving the lever to the side.
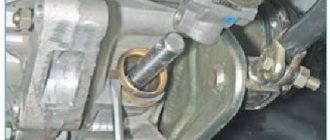
— Remove the rubber boot. The oil seal is located in the recess where the rod enters the gearbox.
- Take a self-tapping screw and an awl, and remove the necessary part. Before replacing the oil seal, first clean the seat and remove all accumulated dirt, sand and oil.
— Install a new gearbox rod seal.
— Secure the new oil seal in the seat.
— Carry out the assembly procedure in reverse order.
Attention!
When working with the cardan mount and the oil seal, the rocker may be displaced, which may result in difficulties with shifting gears. The reason may be an adjusting and fastening screw of size “13”, connecting the lever and the gear shift knob. Therefore, when installing a new oil seal, check the position of the lever and, if necessary, adjust it.
What is a short-stroke link?
Let's dive a little into the history of the creation of the node in question. It all started with auto racing. If you study the history of the origin of many working units that today are attributes of a modern car, you will notice that all of them, or almost all of them, came to us from motorsport. This is where the constant search for new products, upgrades, improvements, and driving comfort takes place. The same thing happened with the backstage.
Racing drivers once came to the conclusion that when they have to save every second, they waste time changing gears. It’s distracting, disruptive, inconvenient, and ill-conceived. Auto mechanics took care of the problem, and as a result, a short-stroke rocker was created.
At first, KK was used exclusively on sports cars and was their calling card, as it significantly reduced the time for changing gears. It became an excellent novelty, which was quickly adopted by all the world's manufacturers of sports models. Over time, the device migrated to ordinary cars.
An undeniable advantage of the system is the reduction of strokes during gearbox shifting. The short-stroke rocker ensures that the gearbox operates without backlash. Thanks to the CC, gear fixation becomes clearer and easier. And now about the minuses, or rather about the minus, in this case there is only one. This is a possibility of synchronizer failure. This happens due to increased load during gear shifting.
Making a knot yourself
If you wish, you can make a CC yourself, and it will be perfect for any car, including the VAZ 2114. To work, we will need the following:
- a small tube with a diameter of exactly 15 mm;
- RPP from the VAZ 2114 model;
- ball nut;
- steering cardan;
- VAZ 2114 axle and bushings (repair kit for backstage).
The work takes place in several stages. First, you need to cut off the ball from the RPP and adjust the lower edge so that you can then install a pipe here. Scalding is carried out. A nut is attached to the pipe from the bottom edge and welded. Then comes the installation of the ball. The cardan is mounted to the gearbox lever.
Having carried out such an operation once under the supervision of an experienced car mechanic, you will understand that in fact there is nothing impossible or complicated here. The entire process of manufacturing the CC takes about two hours and is almost the same as replacing the rocker seal. And every second car owner performs such work almost with his eyes closed.
The CC device is quite simple. Easier gear shifting is achieved by reducing the lever travel, and this depends on how long the lever is. In order for the standard rocker to become short-stroke, you just need to lift the fastener of the “piece of iron”, which extends from the gearbox towards the lever. In this case, you do not have to dismantle the standard rocker, which allows you to significantly save both time and effort.
Extending the service life of gearboxes
You will be able to use your car for many years without going to car repair shops if you can follow basic recommendations. They will extend the service life of the gearbox, minimize possible problems, breakdowns and the need for repair work.
Transmission shaft assemblies
There are only two recommendations.
- Always try to monitor the oil level in the gearbox. If it drops, be sure to top it up immediately, do not delay the procedure until later. When the oil becomes unusable, change it completely, rather than fill in the missing amount.
- Avoid aggressive use, do not jerk the gears sharply, accelerate smoothly, and brake similarly. A simple caring attitude towards the gearbox will allow you to avoid wear and tear and numerous breakdowns.
As you can see, solving problems with checkpoints is not so easy. Therefore, the best option is to prevent their occurrence.
New or refurbished old?
If replacing the gearbox cannot be avoided, it is worth considering one very attractive option - installing a rebuilt gearbox. To do this, companies purchase old, damaged boxes, restore them to the highest possible quality and offer installation with a guarantee.
Disassembled gearbox
As practice shows, such gearboxes are approximately 30-70% cheaper than purchasing a new gearbox.
Sports
We noted that for the VAZ 2114 you can install a sports short-throw rocker. Outwardly they are quite similar, but the difference in work is felt immediately. On a sports unit, gears shift faster and smoother. It's all about the design of the backstage itself. Unfortunately, it is precisely because of this that the process of independent replacement becomes almost impossible.