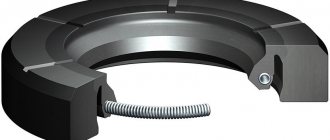
Complete set of seals: input shaft, left and right drive, gear shift rod
Our instructions will tell you in detail how to eliminate the problem of oil leakage from the gearbox due to failure of the gear shift rod seals, input shaft, or inner CV joint seals. Replacing the VAZ 2109 gearbox seals can be done in two ways. The first method (when replacing the input shaft oil seal) requires dismantling the box. The second method (replacing the oil seal on the rod or the CV joint oil seal) is done without removing the gearbox on the car itself. The method without removing the box is faster and simpler, which is why we are talking about it first.
REPLACING THE INPUT SHAFT SEAL
To replace the gearbox seals, especially the input shaft, the gearbox must be removed from the engine. Having removed the gearbox, carefully inspect the installation locations of the cuffs. And first of all, you need to dismantle the release bearing and remove its guide. Under it you will find the input shaft oil seal.
To remove the seals we need a flat-head screwdriver. By prying it from the inside, you can remove the cuff from its seat. The input shaft oil seal has dimensions 25x45x9. Catalog number 2110-2301043Р. It is better to install it with sealant. The outer race of the oil seal must first be degreased, and then a thin layer of sealant must be applied.
When installing, you must ensure that the inner race of the oil seal does not turn outward and the cuff spring does not jump out of its place. We install it in its place and carefully, using a pipe, lightly tapping, hammer the cuff into place. In this case, it is necessary to ensure that the plane of the input shaft oil seal lies exactly in relation to its seat.
Then we install the release bearing guide in place. It is secured with three bolts, which should be tightened evenly so that it fits into place without distortion.
Next, we immediately install the release bearing. When installing it, you must immediately put on the wire springs, which are placed on the legs of the release bearing and fix it in place.
Now it's time for the drive seals. There are two of these seals, the left one is red and the right one is black. They also differ in the direction of rotation. This direction is shown by arrows on the seal housing. These arrows are located on the inside of the oil seals, on the right oil seal the arrow points to the left, and on the left oil seal the arrow points to the right. This can also be determined by the oil removal notches applied to the inside of the cuff.
They act to deflect oil away from the cuff. They are applied at opposite angles, in the direction of shaft rotation. Typically, the manufacturer labels it in three ways:
- Catalog numbers. The number of the right oil seal ends in an even number 2110-2301034Р, and the number of the left one ends in an odd number 2110-2301035Р.
- Arrows, left arrow on the right, right arrow on the left.
- Color. The left one is red. The right one is black.
REPLACING DRIVE SEALS
YouTube channel video: Engine repair and interesting things!
The left and right drive seals are also removed using a screwdriver or a pry bar. There is no shaft on the right “black” oil seal (see video), so here you can insert a mounting bracket inside and remove it with a light blow. We also thoroughly clean the seat with a cloth.
Then, after degreasing the outer diameter, we apply sealant. After this, we install the cuff in place, and make sure that it sits evenly, without distortion, in its seat. Tapping with a flat object, we hammer it in until its outer plane is level with the body.
Then you need to insert a round block of suitable diameter into the hole; this is necessary to fix the satellites so that they do not move out of their places. You can also use a branch from a tree of a suitable diameter, sawing off a straight piece of the appropriate length, or a shaft from an old CV joint.
Next, place the gearbox vertically on the clutch housing.
We insert a flat mounting between the gearbox housing and the CV joint, or you can use a nail puller and, by hitting it, remove the CV joint from the gearbox. Next, using a powerful screwdriver or a flat mount, remove the “red” oil seal of the drive from the housing.
Process in detail (algorithm)
Having prepared a workplace and a set of tools, you can begin to work. To replace the gearbox seal, you need to do the following:
- Most often, the VAZ-2110 wing is closed with a rubber boot. If this part is covered in oil, this immediately indicates that the oil seal is really worn out. The boot needs to be bent. To do this, you just need to pull it by the wide part.
Oil leaking from under the “glass” - the rocker seal definitely needs to be changed.
- After this procedure, you will be able to see the cardan.
- Now it needs to be disconnected. Otherwise, you will not be able to access the cuff. The cardan is disconnected from the lever and rod using a 13 key.
Before loosening the clamp, you need to put a mark so that you don’t have to adjust the link later.
- The nut must be completely unscrewed. This will loosen the connection between the driveshaft and the lever. First, the lever is removed.
- Now you need to disconnect the cardan from the rocker. To do this, you need to switch to first or third gear. After disconnecting, the part is removed.
- Now the boot is removed.
- Only after these procedures will access to the oil seal itself be opened. The part will be in the recess. It is from there that it needs to be extracted.
The oil seal is located deep in the bushing.
- It is very difficult to remove the rocker seal without special tools, so you will have to use various hooks. Alternatively, you can simply screw a self-tapping screw into the old oil seal, using it like a corkscrew.
We screw the self-tapping screw into the oil seal.
We take out the oil seal using pliers.
- After the old part is removed, you need to prepare a seat for replacement. It is cleaned of dirt and rust.
Only after this you need to press the new part into the rod. This procedure is quite complicated, since there should be no distortions. Many drivers use various homemade devices when pressing
When working, it is very important not to damage the new part, otherwise everything will have to be redone.
After the spare part is in its place, assembly is carried out in strictly the reverse order.
The work of replacing the rod seal on a VAZ 2108-2109 takes place in several stages:
- A faulty oil seal can be seen by an oil slick. Even a less experienced motorist can easily find the oil seal that needs replacement. You need to get to the box rod, which is covered with a rubber boot or other dense material. We bend the boot in the wide part: this way we get access to the cardan, which, in turn, is attached to the rod. Using a 13mm wrench, this cardan must be disconnected from the gear shift lever and rod.
Attention: the nut is unscrewed completely, due to which the connection between this cardan and the gearshift lever is weakened. The lever must be removed from the cardan (and thereby engage third or first gear). Move the gear shift lever to the side and use a 10mm wrench to disconnect the cardan from the rod. Now the cardan can be completely dismantled.
Tip: After completing assembly work, check the oil level. If necessary, top up to the required level.
Assembly is carried out in the same way, in reverse order.
When assembling, special attention should be paid to the screw connecting the gearshift lever and the cardan shaft. This screw performs both the actual fastening and adjustment functions, so the position of the lever upon completion of assembly, special attention must be paid to it and the gear shift lever. If the lever is fixed in the wrong position, the rocker in the cabin may move greatly, and this, in turn, will make it impossible to switch some speeds.
Congratulations! Replacement of the gear shift rod oil seal has been successfully completed!
Complete set of seals: input shaft, left and right drive, gear shift rod
Our instructions will tell you in detail how to eliminate the problem of oil leakage from the gearbox due to failure of the gear shift rod seals, input shaft, or inner CV joint seals. Replacing the VAZ 2109 gearbox seals can be done in two ways. The first method (when replacing the input shaft oil seal) requires dismantling the box. The second method (replacing the oil seal on the rod or the CV joint oil seal) is done without removing the gearbox on the car itself. The method without removing the box is faster and simpler, which is why we are talking about it first.
How to replace the universal joint
In most cases, it is not the rocker itself that fails, but the cardan. Due to its displacement, even a small one, a failure occurs in the gear shift mechanism.
Standard VAZ-2109 scenes are rarely installed during repairs; similar parts from Lada Kalina are used. The replacement looks like this:
- Using two keys set to “13”, unscrew the clamp securing the cardan to the rod.
- Using a screwdriver, pull the boot towards the box housing. If desired, you can remove it completely, and if it has cuts or other damage, replace it with a new one.
- Unscrew the fixing bolt with a “10” key.
- Knock down the cardan with a hammer, strike carefully so as not to damage anything.
- The Kalinovsky universal joint is much more durable and reliable, so install it instead of the standard one.
- Reassemble the entire structure in reverse order. But do not rush to tighten the bolt on the clamp - adjustment is necessary.
Diagnosis of the problem
- Signs indicating the need to replace the gearbox seal are, first of all, oil traces left on the asphalt after the car has been parked.
- Before changing the oil seal, you should first make sure that this is the problem.
- Because oil leakage is often caused by a poorly screwed oil filter.
- Failure to identify an oil leak problem in a timely manner can have serious consequences.
- If you do not detect an oil leak from the gearbox in a timely manner, it will leak out completely, and then instead of the oil seal, the price of which is 50-100 rubles, you will have to repair the gearbox (see Repairing the VAZ 2109 gearbox - we do it right), and the price will increase significantly.
- To prevent this, it is necessary to periodically check the oil level in the engine and gearbox.
- Insufficient oil level in the gearbox can be manifested by a characteristic crunching sound that occurs when changing gears.
Replacing the gearbox rod seal of a VAZ 2109
- An awl like a crochet hook or something similar.
- Keys for 10 and 13.
- The awl is ordinary.
- Plastic cork from a mineral water bottle.
Replacement is carried out on an inspection pit or a lift. If there is nothing else, you can use a cheap alternative in the form of two spare tires laid flat. We take two stronger boards and drive onto this improvised elevation. Naturally, the work will have to be done lying down.
Attention: After driving onto a pit or overpass for repairs, secure the car for your own safety using the handbrake and additional wheel chocks.
Replacing the oil seal in a VAZ 2109 gearbox is carried out in the following sequence:
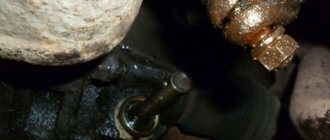
- We get to the rod that changes gears; it is covered on top with a rubber boot.
- If it leaks oil, then it is very easy to find it by looking at the oil stain (see photo below).
Gear shift rod
- We bend the wide part of this boot to get to the cardan located underneath it, which is attached to the rod.
- To gain access to the oil seal, it is necessary to disconnect the cardan from the shift lever and from the rod.
- For this we use the key 13.
- We unscrew the nut completely, this will help loosen the connection of the lever with the cardan.
- We take the lever out of the cardan, thus engaging 1st or 3rd gear.
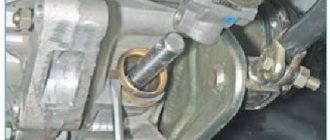
- We use a 10mm wrench to disconnect the cardan from the rod; to do this, we move the lever to the side.
- We dismantle the cardan.
Disconnect the cardan from the rod
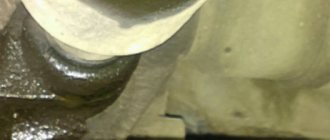
- Next, we remove the rubber boot, now we see the reason for the repair - it is the gearbox rod oil seal.
- It is located in a special recess - this is the place where the rod enters the box.
- Removing this oil seal without using a special tool is impossible, so we take a special awl and get to work.
- You can use a self-tapping screw as an option, the principle is very simple - you need to screw the self-tapping screw into the oil seal and “uncork” it like a corkscrew.
- When you have removed the old one, you can start replacing it.
- It is first necessary to thoroughly clean the seat from sand, oil, and other contaminants.
- Now you can press the new oil seal into the seat.
Replacing the VAZ 2109 gearbox seal is easier using a plastic bottle cap:
- This is done this way: cut out the inside of the plug and install a new oil seal through it.
- You can do without a traffic jam, this is a matter for the owner.
- We assemble the lever in the reverse order of disassembly.
- When the oil seal was replaced or any work was done related to fastening the gearshift lever and cardan, the rocker located in the car interior shifted greatly, which makes it impossible, in some cases, to change gears.
- Here the whole problem is hidden in the 13 screw, which connects the cardan itself and the lever that switches the speeds.
- Not everyone knows that it (screw 13) is not only fastening, but also adjusting.
- Therefore, upon completion of the work, be sure to check what position your lever is in and adjust its position, if necessary.
- Only now can you safely collect your tools and wash your hands.
- After assembly, be sure to check the oil level; if the level is low, you need to top it up, after which we can check the operation.
- Drive a couple of laps and make sure that the oil is not leaking anywhere else.
- That's all, I hope our instructions were useful to you. As you yourself have seen, replacing this oil seal is not difficult, and there is no point in overpaying for service stations.
Important points!
Sometimes, after replacing the gearbox seal or similar work related to fastening the cardan and gearshift lever, the rocker in the cabin moves greatly, which in some cases makes it impossible to switch some speeds. The problem lies in the mounting screw at “13”, it connects the cardan and the gearshift lever.
After assembly, check the oil level, top up if necessary, then you can check the operation. Do a few laps and make sure nothing is leaking anywhere. That's all for today, I hope the article was useful to you. As you can see, replacing the gearbox seal is not difficult at all, so there is simply no point in overpaying for a service station.
Replacing CV joint seals
- To replace the seals of the internal CV joints (constant velocity joints), be sure to drain the oil from the gearbox.
Note: Replacement of CV joint oil seals is carried out without removing the gearbox from the car for VAZ 2109.
Warning: When unscrewing the hub nuts, the machine must be on the ground! We loosen and tighten the bolts that secure the wheels only on the car standing on the ground. The tightening torque for bolts is 65-95 Nm (which corresponds to 6.5-9.5 kgf-m).
- We brake the VAZ 2109 car with the parking brake, install thrust bars (shoes) under both rear wheels of the car and lift the front part, installing reliable supports.
- Remove the front wheel from the car.
- Then unscrew it completely and remove the hub nut.
- Using a screwdriver, remove the thrust washer.
- We take out the cotter pin that secures the nut securing the ball joint of the rod to the lever.
Tool for work
To complete all the work on replacing the VAZ 2109 CV joint, you need to have some tools at your disposal. This is something worth talking about. Firstly, it is desirable to have metal supports that will need to be installed under the side of the car on which the repair is being carried out. Secondly, it is necessary to have stops that will prevent the car from rolling away. Thirdly, you need a reliable jack. Fourth, you will need some special tools.
The most important thing is a good 30mm wrench. Preferably a socket wrench with a strong handle. With its help, the hub nut is unscrewed, which is tightened with a large torque. You also cannot do without a steering rod puller. In some cases, a ball puller may be required. But it is needed when the balls have become unusable. Of course, a vice, a hammer, chisels and a set of keys. However, you can begin to prepare for repairs.
Causes of clutch oiling
The reason for oily clutch is a leak of the crankshaft rear oil seal or the gearbox input shaft oil seal. Transmission and engine oils have different smells. Therefore, an experienced car enthusiast can recognize by the smell of oil which of the seals has failed and requires replacement. In this case, you will have to remove the gearbox from the car.
Replacing the input shaft oil seal
- To remove the box, remove the CV joints as described above.
- Instead of one of the CV joints, we insert an old one or a special plug to prevent the differential from falling apart.
- We unscrew the fastening bolts (there are three of them) and remove the clutch housing shield.
- Loosen the bolts and nuts securing the clutch housing to the block.
- We place suitable wooden blocks located in the area of the strut supports on the wing flanges and install a cross beam on them to hang the engine.
Warning: The beam rests solely on the wing flanges! Otherwise, you risk denting the body.
- We attach the engine to the beam using a long bolt with a hook.
- A strong rope or wire is also suitable for this.
We hook the engine by the eye to the beam. The beam rests only on the wing flanges
- Unscrew the two nuts securing the rear engine mount to the body.
- Unscrew the nut and take out the left support bolt.
- Unscrew the three nuts securing the left engine mount to the gearbox and remove the mount.
Unscrew the three nuts securing the left support to the gearbox
- We finally unscrew the bolts (three pieces) and the nut (on the back of the gearbox).
- When removing the gearbox from a VAZ 2109, we first move it horizontally away from the engine to remove the input shaft from the clutch discs.
- Be careful not to damage the clutch spring petals.
- Remove the clutch release bearing.
- We unscrew the three bolts securing the guide bushing (there are spring washers under the bolts).
- Remove the guide sleeve.
We unscrew the bolts that secure the guide sleeve. After removing the bushing we take out the oil seal
- Using a suitable wire hook, remove the oil seal from the gearbox.
- We press in a new one using a mandrel of suitable diameter.
- The working edge is directed inside the gearbox.
Tip: Before installing the gearbox on a VAZ 2109, it is recommended to lubricate the outside surface of the guide bushing and splines of the input shaft, as well as the release bearing, with grease. Align the clutch driven disc using a special drift (an old input shaft with good splines will do)
- We install a gearbox on the car.
- Before attaching the front wheel drives, we replace the retaining rings at the ends of the inner CV joints.
- Otherwise, there is a possibility that the drives will jump out of the gearbox when the vehicle is moving.
- We finally tighten the nut that secures the brace to the lever on the loaded suspension while the car is already on the ground.
- Change the oil in the gearbox (see VAZ 2109 changing gearbox oil - do it right).
This is how oil seals are replaced, there is nothing super complicated about it, in addition you can watch the video.
Preparation and disassembly
To remove a leaking Chevrolet Niva oil seal yourself, you will need the following tools:
- standard set of keys;
- slotted screwdriver and wheel wrench;
- connector;
- hammer;
- wooden stand;
- fabric gloves.
When repairing a car, never neglect gloves: they will protect your hands from damage due to accidental impacts. The height of the wooden stand must be sufficient to support the rear axle with the wheel removed and the shock absorber unscrewed, otherwise oil will leak from it.
Before removing the old oil seal, you will have to disassemble the rear bushing and remove the axle shaft. Dismantling is carried out in the following sequence:
- Park the car on a level surface and secure it with anti-roll bars. Make sure the parking brake is off.
- Loosen the wheel nuts, lift the jack up to the car, and remove the wheel.
- Remove rust from the rear axle flange protruding from the brake drum. Additionally, you can treat this area with WD-40 lubricant.
- Unscrew the 2 drum mounting bolts with a 12mm wrench, then lightly tap with a hammer to move it.
- The drum is removed in two ways: by extrusion using the same bolts that are screwed into the other holes, or by hitting the wood with a hammer. Techniques can be combined, but do not hit the edge of the drum.
- After disassembly, clean the axle seat again to make it easier to remove after the drum.
The next step is to unscrew and remove the bridge axle. In the VAZ 2131 Niva Chevrolet, 4 bolts securing it hold the bracket holding the shock absorber with the other hand.
To prevent this from happening, you must first install a stand by raising the car higher with a jack. The rear axle stock must rest on the other side to prevent oil from leaking.
As in regular Niva VAZ 21214 and 21213, the shock absorber is attached to the spring cup, and not to the rear bushing; it does not need to be unscrewed. There is no need for a stand here either; a jack is enough for lifting.
READ Nissan X Trail CVT Oil Change
The 4 bolts securing the rear axle axle are unscrewed with a 17 mm wrench
Please note to manufacturers: they should not get lost in the brake mechanism. If you ignore the manufacturer’s loss and install a new one, then the old one will eventually end up between the unit and the drum while driving, and the wheel will jam
Unscrew the bolts and sharply remove the shaft bearing from the cage. If this is not possible, tighten the studded wheel with 3 nuts and try to pull it. Last option. use a special inertial puller for removal. There is also a popular method of tying the axle shafts with a rope to the metal garage door leaf and tapping it with a hammer to knock it out of its holder. But to do this you need to carefully park the car closer to the gate.