One of the main problems of the Russian automobile industry is factory assembly. Designers produce a crude product, which is prohibited from being further improved. The same problem affected model 2114. At the factory, the rear wheels are equipped only with drum brakes, because such an assembly reduces the cost on the Russian automobile market. Tuning of cars such as the VAZ 2114 can only be done in specialized workshops.
What is the disadvantage of the domestic brake system? The fact is that the 2114 brake was inherited from the “nine”. And therefore they do not have any special improvements: they feel great in dry weather - the braking distance is quite short, but as soon as precipitation appears and the road becomes wet, braking becomes harder and this distance increases significantly. But that's not the whole problem.
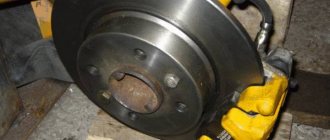
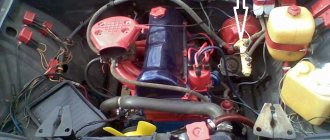
Rear disc brakes
It has often happened to many motorists that during frequent and intense braking at speeds above one hundred kilometers, the brakes overheated and the brake pedal “failed.” This unpleasant effect is most often associated with boiling brake fluid, which begins to boil when the discs rub against the pads. The temperature of system parts can reach 600 degrees, which is quite a lot. Sometimes you can notice overheating visually: in the dark, the disks begin to emit a dark red backlight. Well, if in addition you haven’t changed the special fluid for a long time, then the entire brake mechanism will not last long.
Lada Kalina Sport
I remind you once again that it is prohibited to make any replacements or changes in the brake system of the VAZ 2114; I am writing this article solely for informational purposes. AvtoVAZ finally began installing brake discs, but it only started with the Lada Kalina Sport, which was launched into mass production only in 2011. The principle of operation of the car's braking system has not changed, so all previous models operate on drum brakes.
Required materials and tools
To work you will need such a set.
| Element | Quantity |
| Brake calipers | 1 standard set for model 2114 |
| Brake pads | 1 set from a trusted manufacturer |
| Brake hoses | 1 set of front brake hoses (standard metal ones are too short) |
| Grovers and bolts | 12 pieces |
| Distance washers | 8 pieces |
| Standard diameter brake discs | 1 kit |
| Faceplates | 2 pieces (non-standard part) |
Rear and front disc brakes must necessarily differ in diameter, and the rear ones will definitely be smaller. Otherwise, travel will turn into a big risk.
Brakes
Installation process
If any difficulties arise during dismantling, then it is worth looking into the VAZ 2114 service manual, there is a detailed description of the removal and installation of all mechanisms. And now to work:
- The cable tension must be loosened and the rear pads must be brought together. After this, you can use the 12th key to remove the guide pins. The seat must be thoroughly cleaned with a metal brush, and then the drum must be knocked down. It is not recommended to use a metal tool for these purposes, as it can damage the seat. The best solution would be a rubber hammer;
Important point! Sometimes one pin hole in a mechanism is smaller than the other. It is not recommended to adjust this size yourself. The best solution would be to go to a workshop where the diameter can be quickly adjusted.
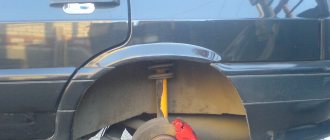
- The caliper can be located in front or behind the wheel axle. This should not affect the operation of the mechanism in any way, but usually owners of the VAZ 2114 prefer to install it on the rear axles, since symmetry will have a positive effect on braking. The next step is to join the faceplate and hub. You should check that the centering has been carried out thoroughly. If there are defects, the docking must be repeated;
Dismantling
To install disc brakes back, the first step is to remove the old drum mechanisms. For this:
- Remove the wheel rim, loosen the tension on the handbrake cable and move the rear pads together;
- Unscrew the two guide pins with a 12mm wrench;
- Use a hammer to carefully knock down the brake drum, after cleaning its seat with a wire brush and WD40;
- Strike carefully, gradually around the entire circumference. If it does not give in, constantly turn the drum and hit it with a rubber hammer;
- Using a screwdriver, pry up the spring that tightens the pads and remove it;
- Next, the small guide springs are removed. They press the pads against the boot;
- Grasp the bottom of the shoe and lift it up, resting its top against the brake cylinder;
- Remove the spacer bar, remove the shoe from the cylinder and remove the shoe tension spring;
- Remove the handbrake lever from the cable;
- Remove the second block;
- Unscrew the bolts securing the hub to the beam. Be careful not to cut off the edges;
- Remove the brake pipe with a split wrench. Having torn it off, unscrew it completely and bend it slightly to the side;
- Close the tube with the cap from the brake cylinder bleeder fitting to seal the hole;
- You have reached the point of no return. The hub is now held only by the seat of the beam;
- You need to hit the element as accurately and forcefully as possible. Hit the support disk from the inside. First from below, then from above and so on alternately;
- Don't be afraid to ruin the support because you won't need it;
- When the hub separates from the beam, begin striking with less force;
- Tap the hub completely.
Upon completion of this stage, be sure to carefully check the integrity of all elements, so that after replacing the drums on the BDT, you do not have to disassemble the structure again for the purpose of additional repair of individual components of the brake system.
Dismantling works
Disadvantages of TRT
Naturally, where there are advantages, there are always several disadvantages:
- First of all, it is worth noting the price, which is significantly higher than that of drum brakes.
- The need for high-quality adjustment, which may cause a call to the service center.
- Poor-quality installation leads to the fact that the safety of the car is reduced - the car skids.
- In the case of the VAZ-2109, like any other VAZ model, the installation of an anti-aircraft protection device is not a certified event and may result in a fine from the traffic police.
- If you get into an accident, most likely, the expert will find you at fault, since the improvements to your car will be illegal.
- The lack of high-quality tuning can lead to the fact that the rear wheels can brake much better than the front wheels, which is fraught with serious consequences and emergency situations.
In other words, self-installation of the HCD on the VAZ-2109 is recommended only if you are confident in your capabilities. Otherwise, it is recommended to contact a service center. Despite the fact that the safety of your car with such tuning will increase, you may encounter problems with the traffic police, since such improvements are not legal.
Benefits of rear disc brakes
Rear disc brakes on the VAZ-2109 are in demand in the automotive spare parts market for a number of obvious reasons:
- with them the braking distance of the car is significantly reduced;
- ZDTs greatly simplify pad maintenance;
- the reliability of the brakes is greatly increased, which improves the safety indicator;
- Braking power is applied evenly across all wheels;
- due to the special method of thermal dissipation, overheating of the heat exchanger is eliminated;
- unsprung mass is reduced;
- in the winter season you don’t have to deal with such a problem as frozen brakes after washing;
- From an aesthetic point of view, the wheels look better.
Lada 2109 by GARAGE 32 › Logbook › installation of an air defense valve on a VAZ 2109
TankestadoR last online more than a month ago
In the morning, with a sore head, I trudged into the garage with the thought (what a banana the handbrake doesn’t hold), but oh well, the store-garage route has not been canceled =) I pulled it into the garage from the store, started looking, pulled it - it doesn’t hold (the thought flew through my mind “ what the heck?), climbed further along the chain of events. After the 2nd bottle of beer, a thought clicked in my brain (100% will be good for the pads, because the brakes were very light), I threw off the wheel at the speed of sound, unscrewed the guides and angrily swore at the fact that I didn’t buy a puller to remove the drum, well I had to do occupational therapy with a sledgehammer)) 2 hours of torment and long live horror)) the work on the drums was simply unearthly depth (3mm collar) with the idea of installing new drums, a set of pads and a brake cylinder, I finished it right away! It makes sense to invest so much money when half of the spare parts from 21099 are lying in the garage (inherited from my father-in-law) I rummaged around and found the required front calipers assembled) fermented in the WD for an hour and started unwinding, untwisted, went through the bracket and painted it in the color of the front ones (light green) so as not to be rusty)) the brake discs were cockroached by a turner, to be machined for the inner landing diameter of the hub (59.8 mm), I sharpened them and went online to find what I was looking for, namely the adapter faceplates for disc brakes) more than one was killed evening in search, but! long live the miracle! what I was looking for turned out to be right under my nose (3 stops on the trolleybus) I came running, all washed up with a gas mask to the advantage, to that same treasured store with spare parts aaaand... then the bird “OBLOMINGO” (maybe you know this one) visited me, the seller Pavel Sh. says that You can order such faceplates from them, but the delivery time is 2-4 weeks, what should I do? I order faceplates, but without despair I put my skis in the treasured garage and diligently begin to twist the hubs, a long, tedious process, but with beer and music it’s still more fun) after I finally twisted the hubs, a small question arose, namely how should I unscrew 2 bolt for fastening the support disk (on which the pads and cylinder were attached) on the bolts, where I later found out there should have been a cross for a screwdriver, which I did not find, but instead I saw something that most likely should have resembled it (thanks to the previous owner! ) well, “the grinder is the best friend - said the cutting disc to the support”, with the help of simple movements, he ground the head of the bolts to an unrecognizable shape and with the calmest soul knocked the hub out of the support disc, then there was a lot of WD, mat and pliers (obscene language) they unscrewed, were happy, got drunk with joy) several days passed (I won’t name the number, because I’m afraid to lie) my long-awaited transition faceplates arrived, flying from the store to the garage at the speed of sound, bypassing the store (which I later regretted), I began installing the faceplates and... as always, maliciously I cursed and realized that I forgot to buy the bolts that were written about in the installation guide, what should I do? I had to go to the store and look for bolts, which ended up taking 2 days (since a bolt m10x1.25x30 is a rare thing), I found and took the last ones from a guy in the market for 20 rubles apiece (12 in total), bought 4 tensioner pulley washers Timing belt, thinking I’ll do one side first, then I’ll move to the other, if necessary, I’ll buy more (luckily there are enough of them everywhere), crawling into the garage I install it, after straightening the rear beam with a sledgehammer on one side of the hub, then I put on the brake disc and throw on the bracket for fitting and O miracle! my instincts did not let me down, I put 1 tensioner washer under the bracket bolt and, rummaging through the supplies, another one 2mm thick, screw it on and voila! The ZDT is installed, the only thing left is to screw on the brake tubes, realizing that they are too long, I go to the store and buy 2 smaller tubes (in my case from the sorcerer to the beam from the 10 VAZ model), I bleed the brakes with a friend and put the faceplate on the second side in in a leisurely manner. Of course you ask, what about the handbrake? My answer to this question is simple, you don’t have it in this configuration, therefore you need to install a hydraulic one, but that’s a completely different story)))) To use the information material on installation, I went to the Internet, THANK YOU to the Author for describing it in such detail installation of the HDT, low bow to you) www.vazclub.com/vaz/2108-…ad-diskovih-tormozov.html
Price tag: 2,000 ₽
Advantages of disc brakes
Installing new elements in the rear wheelset is not a whim, since disc brakes significantly increase the safety of the driver and his companions, other motorists, as well as pedestrians. The two main advantages of a disk system are described below:
- Stable work. Weather conditions have little effect on how disc brakes perform. The same cannot be said about drum brakes, since they only perform well in dry weather. When there is light rain, the braking distance increases significantly;
- Resistance to overheating. Owners of Samara have probably noticed that when braking frequently at speeds above 100 km/h, the brake pedal begins to “fail.” This defect usually occurs due to overheating of the brake fluid. Intense friction occurs between the pads and discs, as a result, the parts of the drum mechanism can heat up to 600 degrees.
The most popular car among beginners and experienced drivers is the VAZ-2109. Over time, the realization comes that the car is not ideal and, first of all, there is a desire to change drum brakes to disc counterparts, since they have many advantages.