Print this article Font size 16
The vacuum brake booster (VUT) makes it easier to operate the brake pedal. This assembly is divided into two chambers - one has a permanent connection with the intake manifold, and the second is connected to the atmosphere when the brake pedal is pressed.
The unit is located under the hood behind the brake master cylinder. Through the rod it is connected to the brake pedal.
Symptoms of problems
The general technical condition of the car (including the brake system) can be checked using a personal diagnostic adapter - a car scanner. These types of devices are widespread and have a wide price range.
We would like to draw your attention to the budget model of Korean production Scan Tool Pro Black Edition
At a cost of about 2 thousand rubles. This scanner is capable of fully diagnosing your car (engine, gearbox, transmission, abs, srs and much more), which will pay for itself in 1-2 trips to the service station. The adapter is quite easy to use, has Russian-language software and is compatible with most cars produced in 1993. The device will also be useful when buying a used car, as it can show its real mileage and VIN.
The fluid brake system consists of many parts that can become unusable: pipes, wheel cylinders, calipers, drums and pads. Typical signs of a faulty master cylinder:
- After pressing the pedal, the car stops slowly. The reason is that the cuffs of one or two pistons have lost their tightness - they have cracked or “floated”.
- To slow down, you need to press the brake pedal hard. The phenomenon occurs due to swelling of the rubber of the piston seals.
- The brake pedal travel is too short. The fluid inside the cylinder has nowhere to go because the compensation hole is clogged. Another option is that the passage is blocked by a swollen rubber seal.
- A common symptom is pedal failure, the brakes coming on at the end of the stroke. This indicates complete wear of the cuffs; as a result, liquid penetrates behind the piston and rushes into the expansion tank - the cylinder “bypasses.”
- The pads do not release the brake discs and drums and get very hot when driving. Options: one of the pistons is jammed or the bypass hole is clogged.
The listed symptoms of a GTZ malfunction are similar to malfunctions of other elements. Pedal failure also occurs when a large amount of air enters the tubes or loss of fluid in one of the working cylinders. Sluggish deceleration and increased force on the pedal are often caused by a breakdown of the vacuum booster - a cracked membrane or a lack of tightness at the joints of the hose that takes off engine vacuum.
There are signs that clearly indicate the performance of the main hydraulic cylinder and the malfunction of other elements:
- during braking, the car pulls to the side - the problem lies in a certain circuit or wheel;
- jamming of the brake mechanisms of one wheel;
- creaking and squeaking when braking;
- heating the discs and pads on one wheel.
If you eliminate these symptoms, it will become easier to check the brake master cylinder in a garage. This also includes obvious brake fluid leaks and the knocking sound of worn calipers.
Replace or repair?
Please note that the cost of a VAZ-2109 brake cylinder is about 500 rubles. And it doesn’t matter whether you change it or carry out repairs, you definitely need to drain the liquid. And pumping cannot be avoided. But if you replace the rubber O-rings, there is a considerable probability that the spare parts from the repair kit (usually made in China, or even worse - underground) will turn out to be unsuitable. And do not forget that there is a groove on the inner surface of the cylinder that will not allow the required pressure to be developed. Therefore, replacing the VAZ-2109 brake cylinder is the most suitable option.
Replacement procedure for VAZ 2108-VAZ 21099
Note! Before starting work, the brake reservoir must be filled with fluid to the MAX mark or slightly above the middle. It is necessary to work with the brake pipes, disconnect them, which means fluid begins to leak out. If there is not enough of it in the reservoir, it will quickly become empty, and the brake system will become airy and will need bleeding (Just in case, read the article about Samara: “Bleeding brakes on cars”)
Removal
First, remove the brake drum to get to the cylinder (for step-by-step instructions, read the article: “Changing rear brake pads on a VAZ 2109”). Unscrew the brake pipe indicated by the blue arrow and disconnect it. Immediately plug the tube with a cap that fits onto the brake fitting (see small photo) - this way the liquid will not leak out. Now unscrew the two cylinder mounting bolts (indicated by green arrows), holding the cylinder with your hand, preventing it from spinning, and remove it.
Installation
The cylinder is installed in the reverse order, after completing which it is necessary to bleed the car’s brake system, because the new cylinder contains air. There is no need to go through all the circuits (only if you did not press the brake pedal when the new cylinder was installed, otherwise the circuit will have to be bled).
Additional video A short and informative video on the topic of the article:
Compound
Replacing brake fluid on a VAZ 2109 is quite quick and easy. Before starting this matter, you should carefully study its composition.
It would be ideal if it consists of:
- Motor oil
- Synthetic base
- Mineral base
Note: it is advisable to pour liquid into the tank without additional additives. That is, the way it was purchased in its original form.
General properties
By pressing the brake, the force is transferred to the brake mechanisms. Actually, due to this, braking is carried out. However, if the fluid overheats during this process, the following may occur:
- It will boil (it boils at different temperatures and this depends on how old it is).
- So-called “plugs” of steam will appear.
- It will become compressible.
- The pedal will fail and will not return to its original position.
- All this leads to braking failure.
Note: to prevent this from happening, you must use only the liquid that is suitable for the “nine”.
Requirements
Brake fluids must meet the following requirements:
No negative impact on parts made of rubber material. If this requirement is neglected, the rubber cuffs located between the cylinders and pistons will become deformed. That is, the rubber will increase significantly in volume.
Note: Parts must not swell as this will cause brake failure.
They must protect the metal from corrosion. Different parts of the brake system are made up of different particles. There are also metal, steel, cast iron elements. Substances are added to some fluids that protect against rust. You should find just such a liquid.
- Must act as a lubricant. It is this property that ensures maximum mobility of the elements, thereby significantly increasing their service life.
- Must be able to withstand temperature changes. In the system, temperature, like pressure, is not constant. Therefore, the task of brake fluid is to maintain its primary properties at temperatures from -40 to +100 degrees.
Checking the fluid level
The sequence for checking the fluid level is as follows:
- Prepare the car for this operation.
- Remove the cap from the brake fluid reservoir.
- You need to look at the fluid level.
Note: It is important that it is above the Max mark. Brake fluid "doesn't go anywhere"
A “fluid cycle” occurs in the system. That is, the liquid circulates to all parts and returns back to its desired place.
Once the cover with the sensor is installed, its level will rise automatically. This is due to the fact that the volume of the sensor will “squeeze” it out.
Note: When lowering the level, you need to check whether the pads are working correctly. Because this usually leads to their breakdown.
To refill the tank, remove the cap and pour in liquid up to the Max mark.
Note: TJ consists of chemical elements, so if it gets on soft parts, it will begin to corrode them.
Close the lid.
Repair of the rear wheel brake cylinder of VAZ 2108, 2109, 21099 cars
- 10 mm spanner
- 12 mm spanner
- 13 mm spanner
- a special wrench for unscrewing the brake pipe
— place the car in the pit, the handbrake should be lowered, the wheels should be supported
— loosen the rear wheel bolts, jack it up and remove it
— weaken the tension of the parking brake cable (handbrake)
To facilitate this operation and improve access to the parking brake actuator adjusting nut, you can disconnect the connection between the muffler and the resonator. Using a 13 mm wrench, unscrew the nuts securing the clamp at their connection and disconnect it.
Using a 13 mm wrench, unscrew the lock nut on the handbrake rod with another 13 mm wrench while holding the adjusting nut. Using the same wrench, unscrew the adjusting nut while holding the handbrake rod with pliers.
- unscrew the guide pins of the brake drum and remove it
If the pins do not turn away, lightly tap them with a hammer. If the drum cannot be removed, we also tap it with a hammer on all sides through a wooden spacer. We clean its mounting hole from contamination and treat it with a high-pressure spray.
— alternately remove the thrust ends of the brake pads from the slots in the cylinder pistons
— lightly press the brake pedal so that the pistons move out of the brake cylinder as far as possible
— unscrew the fastening of the brake pipe to the cylinder
We use a special key for this. After disconnecting, put a rubber cap on the tip of the tube to prevent brake fluid from leaking out.
— unscrew the two bolts securing the brake cylinder to the brake mechanism shield and remove it
We use a 10mm spanner.
If the tip of the brake pipe is rusty and when you try to unscrew it, it may break off along with the brake pipe, then unscrew it after removing the brake cylinder. At the same time, hold the tip with a “10” key or a special key, and rotate the brake cylinder itself.
Replacement of sealing rings (cuffs) of the rear wheel brake cylinder of VAZ 2108, 2109, 21099 cars
— remove the rubber boots from both pistons of the brake cylinder
- use pliers to pull the pistons out of the cylinder body
The operation requires considerable effort, since it is necessary to overcome the resistance of the steel rings of the automatic gap maintenance device installed on each of the pistons.
If it is not possible to pull the pistons out of the cylinder, then we simply knock them out of it. We drive one of the pistons into the cylinder with a hammer, the second one falls out. We put on the mandrel and knock out the second piston.
- remove the old cuffs and install new ones
You can use a screwdriver or an awl for removal and installation. Before installation, lubricate the rubber cuffs, pistons and cylinder mirror with brake fluid.
- drive the pistons into the cylinder and reassemble in the reverse order
Notes and additions
— After repairing the brake cylinder, you should bleed both circuits of the vehicle’s brake system to remove air from the brake system. And adjust the handbrake.
More articles on the braking system of VAZ 2108, 2109, 21099 cars
Vehicle design VAZ 2109
Speaking about the VAZ-2109 vehicle, it should be recognized that it would be more correct to use the term “VAZ-2108 brake system”. It was on the G8 that the scheme of the specified vehicle was implemented.
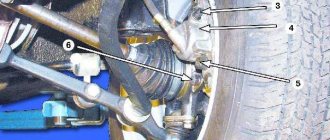
The components, parts and assemblies of the “nine” were modified and optimized, but the vehicle was not fundamentally different from the braking system of Russian rear-wheel drive cars. Its main design feature is the diagonal separation of the brake circuits, which significantly increases the level of safe operation. The hydraulic drive circuit is responsible for the operation of the front right and rear left brake mechanisms, and the brake circuit is responsible for the operation of the rear right and front left ones.
A peculiar division of “areas of responsibility” made it possible to ensure fairly effective braking of the vehicle in the event of a malfunction of one of the circuits. By redistributing functions between circuits, the risk of negative consequences arising from the failure of one of the vehicle elements is compensated.
The fundamental principle of the brake functioning scheme is the action of friction mechanisms (using the friction principle). The vast majority of “nines” were equipped with two types of brake mechanisms: disc (front) and drum (rear).
Main elements of the system
The vehicle's vehicle includes many auxiliary parts, but the main design element is the TC, which creates pressure in the pipes. This element is made of a piston moving along a perfectly flat surface. Rubber rings are used to seal connections between components.
The structure of the vehicle includes two more main elements: a mechanism that directly brakes the rotation of the wheel, and a drive that transmits the converted braking force from the driver to the brake mechanism. The hydraulic drive of the “nine” vehicle differs little from the element installed in most classic models of the Volzhsky Automobile Plant.
- GTZ - master brake cylinder;
- vacuum booster;
- pedals;
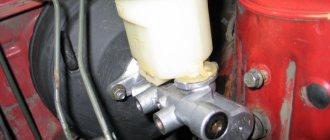
- expansion tank equipped with a working fluid level sensor;
- front and rear mechanisms;
- pressure regulator with lever and elastic drive lever;
- pipelines of two separate circuits;
- front and rear wheel flexible hose system;
- brake fluid.
The parking brake (handbrake), installed on the “nine”, has a cable drive and is based on braking the rear wheel drums with shoes by moving them apart.
Brake system diagram
The VAZ 2109 brake system diagram does not have complex parts, which simplifies repairs and makes this car ideal for novice motorists.
Components of the working vehicle of VAZ 2108, 2109, 21099 vehicles.
- Front left wheel mechanism (caliper).
- Hose.
- A tube.
- GTZ
- Front right wheel mechanism (caliper).
- Hose.
- A tube.
- GTZ tank.
- Vacuum amplifier (VA).
- Pedal.
- A tube.
- Hose.
- Rear right wheel mechanism.
- Fluid pressure regulator (PR) in the rear wheel mechanisms.
- RD lever.
- Rear left wheel mechanism.
- Hose.
- A tube.
Diagnostics and repair
From the signs listed above, it is easy to understand that in most cases there is only one source of problems - rubber products that have become unusable. The cuffs crack and swell, as a result they leak liquid and close the discharge holes. Hence the recommendation: all “rubber bands” of the brake system should be changed at intervals of approximately 100 thousand km, without waiting for critical wear.
Before checking the GTZ for operability, make sure there are no other faults:
- Inspect the wheel assemblies from the inside for leakage of brake fluid from the working cylinders.
- Check the integrity of the expansion tank and the fluid level in it.
- Start the engine and at idle speed, press the vacuum take-off pipe to the amplifier. If the engine speed has increased noticeably, there is an air leak and the master cylinder is most likely working.
A clear symptom indicating a breakdown of the main hydraulic cylinder is drops of brake fluid on the body. If you discover a leak, feel free to dismantle the unit and disassemble it to look for the cause. Another common problem - fluid flowing through the seals - is diagnosed as follows:
- Open the cover of the expansion tank and place an assistant in the driver's seat.
- Listening to sounds in the tank, give the command to an assistant to press the pedal.
- If the pedal moves easily and gurgling is heard in the reservoir, liquid is entering there. The reason is that worn cuffs are unable to create pressure in the circuits; liquid seeps through the leaks and enters the container.
Also, problems with the GTZ are indicated by jamming or too little pedal travel.
Sit behind the wheel, press it several times, and start the engine while holding the pedal with your foot. If it sinks to the floor or does not budge, disassemble the hydraulic cylinder. To replace or repair the master brake cylinder, you need to remove the unit from the vehicle. Work is carried out in the following order:
- Suck out the liquid from the tank with a syringe. If the cuffs are leaking, press the pedal several times and suck out the excess fluid.
- Remove the expansion tank.
- It is not necessary to drain all brake circuits. Substituting a small container, unscrew the nut of the first tube and carefully move it to the side, plugging it with a wooden stick.
- Repeat the operation with the second tube, unscrew the fastening of the GTZ flange and remove the unit.
Further actions depend on the design of the master cylinder. If the element is completely disassembled, change the rubber seals. Otherwise, you will have to replace the pistons assemblies. Pre-wash the body and all openings with alcohol; do not use gasoline. After assembly, add fluid and bleed the brake system to remove air.
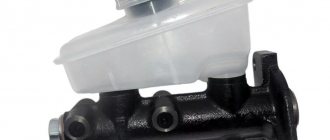
Brake master cylinder device
The basis of the GTZ is a cast iron pipe with a polished inner surface, in which the pistons move. When the driver presses the brake, a rod attached to the pedal activates the VUT. The VUT rod presses on the rear piston of the GTZ, which closes the compensation hole and creates pressure in the brake pipes.
As it moves forward, the rear piston increases pressure in the front chamber both through the vias and with the help of a spring that connects it to the front cylinder piston. The piston of the front cylinder begins to move, closes the compensation hole and increases the pressure in the front chamber and brake pipes.
Design
Replacing the front brake cylinder on a VAZ 2109
The front cylinder, which helps brake the car, consists of the following elements:
- Brake fluid reservoir. Actually, it is thanks to it that braking is carried out. And thanks to a special sensor, the liquid level is regulated.
Note: If this sensor fails, the cylinder will also stop working. Due to the increase in pressure in it, it will break.
Note: It also protects the brake fluid. That is, it helps prevent it from leaking. If a small hole appears in it, it will leak out, causing the cylinder to stop functioning normally.
- Return springs. When the driver presses the brake, the pistons change their position. It is these springs that allow them to return to their place.
Replacing the front brake cylinder of a VAZ 2109
- Sealing cuffs. With their help, the pressure in the tank does not change, but remains optimal for the car.
- Pistons.
- Differential pressure sensor.
Note: It allows the driver to monitor whether the cylinder has failed.
How to repair a handbrake lever
Repairing the device consists of replacing the worn mechanism with a new one after removing it from the VAZ 2109 car. Damage can be: wear of the locking teeth, jamming or breakage of the lever, failure of the locking mechanism. So:
- The battery is turned off.
- Under the car, the nuts securing the equalizer to the drive cable are unscrewed, first the lock nut is unscrewed, then the adjusting nut.
- The equalizer is removed from the handbrake lever rod.
- In the car interior, all decorative trim between the front seats is removed. The plastic cover of the tunnel is removed, before this the cover is removed from the handle for shifting gears. The hatch into the tunnel is removed.
- The carpet is moved to the side.
- The retaining ring and drive rod are removed from the axle.
Repair of handbrake drive lever
- If necessary, the handle is unscrewed and removed, and the tension spring is changed.
- Assembly of the mechanism is performed in reverse order.
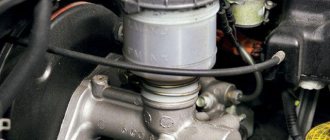
Replacement of VUT
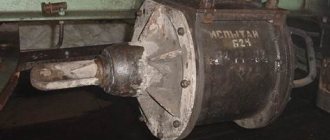
First, remember that repairing the vacuum booster is impossible. This unit is removed and replaced with a new one. In theory and in practice, some do. But at your own responsibility.
Now about the replacement itself.
- Disconnect the brake pedal from the booster rod. The units are connected to each other by a pin. Dismantling is carried out in the area of the pedal assembly and here you will need a simple flat-head screwdriver.
- Let's go and open the hood.
- Disconnect the power supply to the brake fluid level sensor.
- Remove the bracket that holds the hydraulic lines to the frame. A 10mm socket is useful, which is used to unscrew the nut.
- Disconnect the brake master cylinder. To do this, unscrew the 2 nuts holding it to the vacuum unit. Assess the condition of the GTZ. If necessary, replace it too.
- It is not necessary to disconnect the hydraulic lines from the brake cylinder (master). The pipes are quite long, so they can easily be moved to the side so that they do not interfere with the work process.
- Disconnect the pipe that connects the vacuum chamber to the intake manifold.
- Remove the spacer from the front struts.
- Unscrew the 4 nuts that hold the vacuum housing to the car body studs.
- Remove the unit from the studs and pull it out through the engine compartment.
- On the drive fork side, there is a seal with a bracket on the return of the amplifier. He secures the assembly to the frame with 4 studs. They need to be removed. To do this, use a 17mm head to remove 2 nuts, after which the iron structure is removed. Just pull it towards you. Be sure to pull the boot off the stem.
- Install the mounting bracket and a new rubber seal onto the new vacuum booster. Now you can begin full reverse assembly.
Reassembly
If you decide to dismantle and reassemble yourself, be sure to follow several recommendations when installing a new VUT:
- The vacuum rod and the brake pedal are connected to each other immediately after the device is seated on the mounting studs. That is, before they started tightening the nuts.;
- Experienced VAZ 2109 owners recommend applying sealant between the vacuum brake booster and the brake cylinder. This is due to imperfect design;
- The vacuum rod, which acts on the main brake cylinder, may move during transportation of the part. Also, displacement often occurs during the installation process. Therefore, be sure to check this fact and install it correctly if necessary. To do this, press the rod all the way.
If the stem is not installed correctly during assembly, the brakes simply will not operate properly. The consequences are hardly worth talking about.
Checking status
The corresponding signs may indicate the need to change the vacuum booster or the brake master cylinder.
The primary sign of VUT failure is an increase in the force that must be applied to the pedal to brake.
To be sure of the problem, perform the following check:
- Turn off the engine;
- Press the brake pedal 5-6 times in a row;
- Press the pedal to the floor;
- Start the engine;
- If the VUT is working properly, the pedal will immediately go up.
Checking the condition
If you have a VAZ 2109 carburetor engine under the hood, you can determine the VUT malfunction a little differently in the initial stages:
- Initially, the pedal will work normally, you will have to apply a little force, braking occurs normally;
- But at the same time the engine stalls at idle;
- When you press the brake pedal, the idle speed calms down;
- By pressing the gas in neutral gear, failures occur in the carburetor;
- If such symptoms are observed, with the engine running, remove the pipe from the VUT fitting and plug it with your finger or other available tool;
- Has the idle speed stabilized? In this case, replacing the vacuum seal cannot be avoided.
If such a malfunction is detected while driving, you can continue driving only if the VUT is turned off.
How does the GTZ function?
The unit consists of the following parts:
- metal housing with holes for supplying brake fluid, pedal rod and connecting the expansion tank;
- 2 pistons with rubber seals;
- 2 return springs;
- guide bushings;
- end plug with gasket.
An expansion tank is attached to the top of the main distributor body, where excess fluid goes through compensation holes. Inside, the element is divided into 2 cylinders with separate pistons standing on the same axis.
The blind end of the housing is closed with a threaded plug; on the other side there is a flange for attaching to the vacuum booster. The brake pedal rod is attached to the first piston. The brake circuit pipes are connected to the lower holes - separately for the front and rear wheels.
The operating principle of the master brake cylinder looks like this:
- When you press the pedal, both pistons simultaneously move forward and push fluid into the circuit tubes. Under its pressure, the wheel cylinders are activated, compressing the pads on the discs.
- Part of the liquid that does not have time to pass into the tubes flows into the expansion tank through special bypass holes.
- When the driver releases the pedal, the springs push the pistons back, returning them to their original position. Liquid from the tubes and reservoir refills the cylinders.
- To compensate for the expansion of the liquid (for example, from heating), another pair of holes is provided leading to the expansion tank.
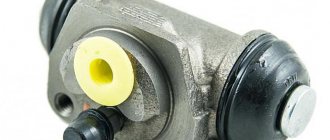
Repair of VAZ rear brake cylinder
Well, I’ll take a more complicated route and try to repair the brake cylinder. To do this, it needs to be disassembled. It is disassembled quite simply - the body is clamped vertically in a vice, we place an impact screwdriver on the upper piston and lightly tap it in. Drive until the bottom piston falls out. Be careful, if there is an impact, the brake fluid remaining in the cylinder may splash out of the tube connection hole. Turn the cylinder over and carefully knock out the second piston in the opposite direction.
Now we remove the old cuffs, wipe all the parts well and pull on the new cuffs from the repair kit. Before installing new rubber bands, it is recommended to wet them in clean brake fluid.
After the repair kit has been replaced, slightly moisten the pistons with brake fluid and install them in the cylinder. They enter very tightly, so we help them do it faster with a hammer and light tapping.
In this simple and not tricky way, you can repair the rear brake cylinders of a VAZ or replace them. After installing the cylinders, do not forget to bleed the brakes. There is 100% air in the brake system that needs to be removed.
Leaking brake cylinders of the rear wheels of VAZ 2108, 2109, 21099 cars are a very common malfunction.
Required Tools
- 10 mm spanner
- 12 mm spanner
- 13 mm spanner
- a special wrench for unscrewing the brake pipe
Preparatory work
— place the car in the pit, the handbrake should be lowered, the wheels should be supported
— loosen the rear wheel bolts, jack it up and remove it
— weaken the tension of the parking brake cable (handbrake)
To facilitate this operation and improve access to the parking brake actuator adjusting nut, you can disconnect the connection between the muffler and the resonator. Using a 13 mm wrench, unscrew the nuts securing the clamp at their connection and disconnect it.
Using a 13 mm wrench, unscrew the lock nut on the handbrake rod with another 13 mm wrench while holding the adjusting nut. Using the same wrench, unscrew the adjusting nut while holding the handbrake rod with pliers.
- unscrew the guide pins of the brake drum and remove it
If the pins do not turn away, lightly tap them with a hammer. If the drum cannot be removed, we also tap it with a hammer on all sides through a wooden spacer. We clean its mounting hole from contamination and treat it with a high-pressure spray.
— alternately remove the thrust ends of the brake pads from the slots in the cylinder pistons
— lightly press the brake pedal so that the pistons move out of the brake cylinder as far as possible
— unscrew the fastening of the brake pipe to the cylinder
We use a special key for this. After disconnecting, put a rubber cap on the tip of the tube to prevent brake fluid from leaking out.
— unscrew the two bolts securing the brake cylinder to the brake mechanism shield and remove it
We use a 10mm spanner.
If the tip of the brake pipe is rusty and when you try to unscrew it, it may break off along with the brake pipe, then unscrew it after removing the brake cylinder. At the same time, hold the tip with a “10” key or a special key, and rotate the brake cylinder itself.
Replacement of sealing rings (cuffs) of the rear wheel brake cylinder of VAZ 2108, 2109, 21099 cars
— remove the rubber boots from both pistons of the brake cylinder
- use pliers to pull the pistons out of the cylinder body
The operation requires considerable effort, since it is necessary to overcome the resistance of the steel rings of the automatic gap maintenance device installed on each of the pistons.
If it is not possible to pull the pistons out of the cylinder, then we simply knock them out of it. We drive one of the pistons into the cylinder with a hammer, the second one falls out. We put on the mandrel and knock out the second piston.
- remove the old cuffs and install new ones
You can use a screwdriver or an awl for removal and installation. Before installation, lubricate the rubber cuffs, pistons and cylinder mirror with brake fluid.
- drive the pistons into the cylinder and reassemble in the reverse order
Notes and additions
— After repairing the brake cylinder, you should bleed both circuits of the vehicle’s brake system to remove air from the brake system. And adjust the handbrake.
Five more articles on repairing VAZ 2108, 2109, 21099 cars
Basic technical information about the braking system
Replacing the cuff of the main brake cylinder VAZ 2109
To have a practical understanding of the functioning of the car braking system, it is necessary to at least roughly consider its structure. So, the vehicle consists of:
VAZ 2109 disassembling the main brake cylinder
When the car moves, not only the wheel rotates, but also the brake disc.
Note. The main thing is to practically understand how the brake disc reduces the rotation speed. It is the brake pads, which are located next to the disc, that are the starting point for activating the vehicle. As soon as the disc is clamped on both sides by the pads, due to friction forces its speed either decreases or stops altogether.
In this case, it is useful to know that:
- In order for the brake pads to press the TD, pistons are needed, which in turn directly press the pads themselves. The pistons themselves are enclosed in the brake cylinders. As soon as they are filled with a specialized liquid, the pistons begin to press the pads, and they, in turn, directly press the disc itself. Thus, due to the creation of a high degree of friction, the speed of the vehicle is significantly reduced, and sometimes it stops altogether.
- When a driver presses the brake pedal, it begins to push the rod, which in turn pushes the piston, which compresses the specialized brake fluid. As a result, the created brake fluid pressure is directed directly to the wheel cylinder. This fluid then presses on the brake pistons, which in turn exert pressure on the brake pads. Thus, the braking system functions on almost all cars from the national manufacturer.
Note. It is very important to understand, at least in general terms, the holistic mechanism of functioning of the car braking system. To do this, you need to thoroughly study the information described above.
The nuances of operating the brake system
- While the brake pads rub against the disc due to a high degree of friction, they wear out (thinner) over time and lose their functional ability. Due to this phenomenon, it is necessary to regularly replace the pads. Replacing brake pads is a simple procedure, however, if possible, it is better to entrust it to a specialist and a car service center.
- There is another practical subtlety in operating the brake system, namely: a special reservoir is installed above the main cylinder, which stores a supply of brake fluid. This brake fluid can often leak, and in order to avoid getting into an extremely awkward situation, you need to periodically check the brake fluid. You can determine the level of brake fluid visually; to do this, simply visually inspect the level of brake fluid in the spare tank.
How to check the GTZ? Signs of master brake failure
Good afternoon dear friends. We continue the series of articles about the structure of a car. Today the turn has come to the brakes - the system responsible for the safe movement of vehicles. For ease of understanding, we will consider its devices using the example of the VAZ 2107 brake system.
Why did they take her as an example? – Because the Zhiguli of the classic family has the simplest circuit that can be found in modern cars. There are no electronic assistants, no anti-lock braking system or various sensors, just the driver, pedal and brake mechanisms. And the principle of operation of brakes in all cars is the same, so we will move from simple to complex.
Let's consider the design, diagram and principle of operation of the entire braking system and each of its components separately. By tradition, the lesson is “seasoned” with educational videos and screenshots with detailed explanations. Let's start with the basics of how a car's braking system generally works.
How to replace the main brake cylinder on a VAZ 2108-VAZ 21099?
Note! It is better to do all the work of replacing the brake cylinder from start to finish with an assistant!
Removal: 1) First, by hand, disconnect the block with wires from the brake fluid level sensor, which is located on the brake reservoir cap.
Note! Before you begin to disconnect the wire block from the sensor, first read the “Important” paragraph, which is located at the very bottom of this article!
2) Next, when the wire block is disconnected from the sensor, unscrew the tank cap by hand and then remove it from the car engine.
3) Now, using a syringe or a rubber bulb, pump out all the brake fluid from the brake reservoir until it is completely empty.
4) Then use a wrench and then unscrew the four union nuts that secure the brake pipes to the cylinder.
Note! Unfortunately, one brake pipe is not visible in the photo above, but to make its location clearer to you, know one simple thing: all the pipes that are connected to the brake master cylinder are located parallel to each other!
5) Next, when all the nuts are unscrewed, remove the four brake pipes from the cylinder holes.
6) Next, without removing the wrench from your hands, use it to unscrew the right and left nuts that secure the brake cylinder to the vacuum booster.
7) And then remove the brake master cylinder, together with the reservoir, from the car engine.
And at the end of the operation, when the brake cylinder is removed, use a screwdriver to pry up the brake reservoir on both sides, and then remove it from the cylinder.
Note! Under the place where the brake reservoir is installed in the cylinder there are two bushings, which, if they are deformed or severely damaged, must be replaced with new ones!
Installation: 1) First, install the brake reservoir onto the new brake master cylinder.
2) And after that, together with the tank, install the cylinder in its place, tightening the two nuts that secure it.
3) Now prepare a small container, or an ordinary rag, and then place it under the brake cylinder.
4) Next, fill the reservoir with brake fluid, and then close all four holes in the brake cylinder with your fingers so that fluid does not leak out of them.
5) Next, ask your assistant to sit in the driver’s seat, and let him slowly press the brake pedal several times until brake fluid begins to flow from the holes in the brake cylinder.
6) Then let the assistant continue to hold the brake pedal depressed, and at this time, with sharp movements, first connect the first two tubes to the front holes of the cylinder, and then the rear two, and then tighten the nuts securing these tubes until they stop.
7) And to complete the operation, install its cap on the brake reservoir, and then screw it all the way, and after screwing it in, connect the wire block to its sensor.
After all the completed operations, get into the car and try to press the brake pedal several times; the pedal travel should be hard, but if the pedal travel is soft, then, together with an assistant, bleed the brake system of your car. (How to bleed the brake system of a car, see the article: “Bleeding the brakes”)
Important! While you are replacing the brake cylinder, try to remove the “-” terminal from the battery in advance of disconnecting the wire block from the brake fluid level sensor, and at the end of the operation, after the wire block is connected back to the sensor, install the terminal on its place! (How to remove the “-” terminal, see the article “Replacing the battery”, point “1”; the terminal is installed in its place in the reverse order of removal). Source
Source
Choice
We will give some recommendations regarding the choice of a new vacuum amplifier.
| Selection criterion | Required parameters |
| Price | The cost of a good vacuum cleaner is now about 2.5 thousand rubles. These are not the most expensive, but not the cheapest Chinese options. Optimal for VAZ 2109 |
| Package | This packaging, used by a genuine manufacturer, is made of corrugated cardboard |
| Label | The label should be clearly legible - the production batch number, the production date of the part and the name of the manufacturer itself |
| vendor code | The vacuum unit corresponding to the technical parameters of the VAZ 2109 has article number 2108-3510010TM |
| Point of sale | You should not buy from market traders. There are many good, trusted spare parts stores in any city. Don’t be shy to ask for certificates, documents for parts |
Choosing wisely
Now there are a lot of fakes on the market. Such parts cost the same as the originals, but last much less.
The operating principle of the GTZ in simple words
The process is activated by pressing the brake pedal. The result of mechanical force is a load inside the cylinder, carried out using a rod. It directs the pistons along the desired path, overcoming the force of the return spring. The movement of the pistons is accompanied by the closure of the compensation channels, which causes the opening of the bypass channel and sealing of the entire circuit.
At the same time, pressure is created that drives the caliper. Part of the liquid flows into the pipelines, activating the vehicle, the other pushes the second piston, which, when moving, performs the same functions.
The calipers compress the brake discs with the help of the pads, and the car stops. The pistons return through the compensation hole to the initial position after depressing the brake pedal. The initial mode of the pistons inside the circuits is established by the action of springs. Having returned to their original position, the pistons again open the compensation channels, thereby equalizing the pressure in the vehicle. The waste liquid slowly flows back into its reservoir.