How to tighten the steering rack on a VAZ-2115
Many car enthusiasts are mistaken in believing that the steering rack on a VAZ is not adjustable and it is impossible to do it yourself. This is a misconception and adjustment of the steering rack on a VAZ car can be carried out by any car enthusiast independently. We will now explain how to tighten the steering rack on a VAZ-2115.
On the website of the official Moscow VAZ dealer, read the description of the entire model range, pay attention to the Lada Largus - what configuration the car is currently offered, with what engines and in what version. For each Lada Largus model, exact prices are indicated
Choose a new car!
Now let's tighten the steering rack:
How to tighten the steering rack on a VAZ-2115
So, if you have a question about how to tighten the steering rack on a VAZ 2115, you will have to purchase a special octagonal wrench, the size of which is 17 mm.
A VAZ 2115 car requires adjustment of the steering rack when a knocking noise occurs when the steering mechanism operates. When you feel a knocking sound from the steering mechanism while driving your car, this is a signal that it needs to be adjusted.
Typically, a slight kickback in the steering wheel of a car occurs when it hits an obstacle or the car wheel gets into a hole.
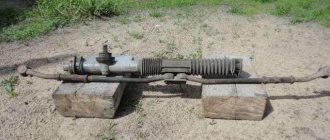
The steering rack is adjustable only on an overpass or lift, and you can also drive into the inspection hole to do this.
First of all, it is necessary to remove the engine protection and it is almost impossible to do this without an inspection hole or a lift. After removing the protection, you need to take a carrying lamp and a flat-head screwdriver. From the back of the subframe you get to the back of the rack and at the place where the steering shaft and rack intersect, you need to find the adjusting nut on the body.
Many novice car enthusiasts may confuse the adjusting nut with a plug; it is also difficult to find, since it is covered with a layer of dirt. This nut can only be adjusted with a special wrench that you have already purchased.
If no one has touched the steering mechanism before, then there will definitely be a green plastic plug on the nut, which plays the role of a stopper and is installed at the factory. The specified plug must be removed using a screwdriver; although it is quite fragile, you will not be able to turn the adjusting nut until it is removed.
After removing the stopper, using a special wrench, tighten the adjusting nut clockwise. It is not recommended to press it all the way; the level of clamping depends on how hard the steering mechanism was knocking before.
To check the level of tightening of the nut, you need to sharply turn the rack in one direction and the other; if there are no extraneous sounds or noises, then the nut is tightened enough. If you decide to put the stopper back, you can do it, but it won't do any good.
How to tighten the steering rack on a VAZ-2115 - the entire adjustment of the steering mechanism will take you no more than 20-30 minutes if you are doing it for the first time and the main thing is that you will do it all yourself. Many service stations do not want to adjust the steering rack, since this is a cheap operation; it is much easier for them to replace the specified mechanism, but this already costs the car owner.
Thus, having carried out a fairly simple adjustment of the steering rack, spending no more than half an hour on this, the car enthusiast is convinced that the VAZ 2115 car has an adjustable steering mechanism and can do this independently.
We told you how to tighten the steering rack on a VAZ-2115 - try it!
This blog is already read by 4756 people. Read it too!
Steering wheel
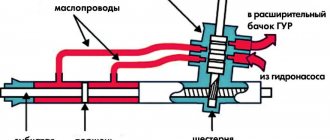
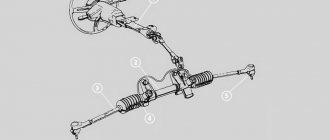
The steering control of the VAZ-2109 car is built according to the following scheme:
- steering wheel;
- column;
- cardan or intermediate shaft (cardan);
- rail;
- rods and tips.
Let's look at the meaning of each element of the chain.
Steering wheel
The steering wheel - the steering wheel, the steering wheel, the steering wheel - is an important part of the control system - is in the hands of the driver. The device transmits a person’s muscular force to the wheels of a car to set them in one direction or another.
The steering wheel is the visible part of the system. The remaining components are hidden in the steering column and under the hood.
VAZ steering wheel
The steering wheel of the VAZ 2108 is a simple 2-spoke design, covered in leather. You can find the “native” steering wheel using catalog number 21083-3402012. In the fifteenth version of the Zhiguli, the steering wheel became 3-spoke, but it cannot be called modern and multifunctional.
Cardan or intermediate shaft
Cardan joint - universal joint - a movable joint between the steering rack and column. The unit ensures easy rotation of the drive wheels.
The element consists of two sliding U-shaped forks connected by a cross. At the joints there are miniature needle bearings, which are prone to souring if water gets on them.
The steering of the VAZ-2110 car has two cardan shafts. In designs with one element (the Soviet Volga), the transmission of rotation to the wheels occurs intermittently, in pulses. Cars 2108-2115 have two hinges: the upper one is located in the driver’s feet, the lower one is located near the steering rack under the bottom.
Crosspieces are considered maintenance-free. This is due to the fact that the elements operate in gentle conditions - they are not influenced by external factors. The service life of the intermediate shaft under favorable conditions is up to 500 thousand km.
But the entire mechanism bears the same loads as the transmission when driving on uneven roads. In fact, the cardan may succumb to corrosion (stop bending) or wear out (play will appear). To repair parts, buy a set of crosspieces and bearings of a suitable size.
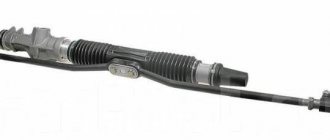
Rail
There are no secondary components in the system. But the rack in the steering device of the VAZ-2109 car plays a special role. The part is responsible for the maneuverability of the vehicle, turning the wheels of the car in the desired direction at the command of the driver. The rack cannot be called the main element of the mechanism, but the comfort and safety of travel depends on it.
The assembly looks like this: a gear rack is placed in the crankcase. Protection from dust and dirt is in the form of anthers - rubber accordions, like on CV joints. There are two threaded holes on the bar - these are sockets for securing the end rods. There is a drive gear, support rings for smooth sliding and a stop mechanism that regulates the amount of clearance of the rack-pinion pair.
Rack VAZ
This is a loaded unit with high efficiency. Wear of the mechanism affects the controllability of the vehicle. The steering wheel turns hard, there is play, and there is a knocking sound coming from underneath when the car maneuvers.
However, the steering rack is a simple mechanism that can be easily repaired in a garage.
Traction
They transmit force from the steering mechanism to the wheels. Technically, the rod is made like a metal bar. One side of the bar is attached directly to the steering rack through a hinge. Here, special mounting sockets are provided for the rods. On the other side there is a regular thread for attaching tie rod ends.
Fingers (tips)
The steering system in a car is rigidly fixed, while the wheels are movable. The rods, in order to transmit the driving force to the wheels, are connected to the steering knuckle lever through the steering tips (fingers) - the last link in a long steering-wheel chain.
The tie rod end is an extremely simple, and therefore reliable, hinge. It consists of a housing with an axle shaft and a threaded ball pin. And also an insert for fixing the finger. The device body is closed with a lid. The cover is fixed to the finger with a ring, the latter is attached to the body with a spring.
The Teflon liner holds your finger tightly. Therefore, steering tips last a long time. But when the liner wears out, play appears. The protection (anthers) can also be broken.
A problem with the tips is indicated by kickback in the steering wheel on any bump and a dull sound when turning. The phenomenon is prevented by timely maintenance and repair of the steering control of the VAZ-2110 car. Driving with a faulty mechanism is not only uncomfortable, but also dangerous.
Shock absorber struts
In cars without springs (which is practically all modern vehicles), shock absorbers or shock absorber struts are installed. These are mechanisms of different design and functionality that inexperienced drivers confuse:
- A shock absorber is an oil pump that dampens vibrations that occur when the car is moving. The term "telescopic strut" refers to a shock absorber.
- The shock absorber strut, in addition to softening the ride of the car, sets the geometry of the suspension. Another function is to create multiple support points.
The design of the unit is complex. The key components work in pairs - the shock absorber and springs themselves. The latter are compressed when the car hits obstacles and, due to elasticity, are released. The springs then continue to oscillate up and down until they reach equilibrium.
Shock absorber struts VAZ
Vibrations are transmitted to the car body. But here a shock absorber is connected - a cylinder, inside of which a piston moves in a gas or oil environment. The strut shock absorber dampens unnecessary vibrations of the springs. If the body begins to sway strongly or the car begins to roll, you need to check the condition of the shock absorber struts.
What racks and rods were installed on 2108-2115
Modernization of Tolyatti VAZs has always been slow. Starting in 1984, there were no changes in the suspension, engines, or steering for 20 years.
The steering rack of the VAZ-2108 was under catalog number 2108-3400009-20, passed from model to model until the release of the “ten”. The article number of the VAZ-2110 part, called “old-style slats”, is 2110-3400009-20.
What is the difference between racks and rods of different models?
The factory equipped V8s with straight-toothed racks developed in the 70s with a full steering rotation of 3.7 turns.
Subsequent modifications of the car were equipped with such elements. And initially the tenth model. But then the rack was improved: it, like the drive gear, became helical. The manufacturer strengthened the VAZ-2110 steering gear housing and used a “figure-of-eight” gear-rack pair. The latter received the name “rasp” from auto mechanics. The full stroke of the new-style helical rack became 4.2 turns of the steering wheel. The catalog number has changed - 2110-3401068.
The Lada Kalina came off the assembly line with a shortened helical rack with a full steering rotation of 3.1 turns. The part number is 11183-3401068-00 (11183-3401068-01).
Are racks and rods of different models interchangeable?
The topic of interchangeability is lively discussed on automotive forums. The answer is yes, but with some nuances:
Are racks and rods of different models interchangeable?
On the VAZ 2108-2115 model from 1984 to the present day, you can install steering racks:
- manufacturer code – TRIALLI, article – CR 108;
- from AVTOVAZ the part goes under catalog number 2108-099,2113-2115. 2108-3400009-20.
Steering rods: manufacturer VIS ZAO, article number 21080-3414060-00.
Dimensions: length, width, height of rods – 370x50x50 mm.
The main faults of the steering rack on the VAZ 2115
Let's highlight the main symptoms of a malfunction and their possible causes:
- The rotation of the steering wheel is too tight, and unnecessary sounds appear in the form of a whistle. A possible reason is leakage of power steering fluid and its reduction to the minimum level, abrasion of the rotor pair.
- The rotation of the steering wheel is difficult, but after gaining speed the situation returns to normal. At the same time, an unpleasant “itching” noise appears. The main reason is the appearance of scoring on the rotor part and the mating surface.
- It is difficult to turn the steering wheel only to the left or right and when the power steering temperature is low (below 25-30 degrees Celsius). As soon as the liquid warms up to 55-60 degrees, the noise disappears.
- The driver's turn of the steering wheel does not coincide with the actual turning angle of the car's front wheels. When such a problem occurs, the car ceases to be controllable and starts tossing around corners.
- There is strong vibration in the steering wheel when driving on a bad road. If you turn the steering wheel in one direction or the other, the sound may disappear.
- The steering rack is leaking. In this case, power steering fluid appears on the boots. In this case, the leak will be noticeable by a decrease in the level in the power steering reservoir. If you do nothing, the shaft seals may fail, increase wear, or cause rust.
- The steering wheel refuses to return to its original position, or it does, but very tightly. The reason for this problem is the deformation of the rack shaft or housing.
But that is not all
You should pay attention to malfunctions of the power steering itself
Here, signs of steering rack problems may be as follows:
- Increased foaminess of power steering fluid. It's easy to diagnose - just look into the tank;
- excess noise appears when turning the steering wheel and power steering operation;
- At idle speed the power steering does not work at all. As the speed increases, it is easier to turn the steering wheel;
- The effort disappears when turning the steering wheel in both directions. As a rule, the cause of this problem is the destruction of the rubber ring.
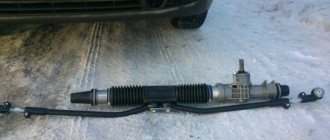
Car steering
One of the important components of a car is the steering mechanism. The steering rack in a car is the most important part of the unit. Through it, the force applied by the driver to the steering wheel with the help of tips and rods is transmitted to the turning levers, which are connected to the steered wheels through axles. It follows from this how important the serviceability of the steering rack is for the safe movement of the car.
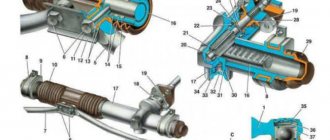
Steering design
The photo shows the elements that make up the steering control design.
Steering rack device
Steering rack assembly components:
The locking ring prevents the nut from unscrewing. There are marks on the steering gear housing and boot to facilitate correct assembly of the unit.
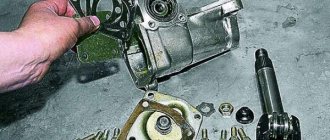
Steering rack repair
The car is secured against unexpected movement by installing stops under the rear wheels. Pull the handbrake and lock the steering wheel.
So:
The front wheels are removed. Using a puller, remove the fingers from the lever struts, having first unscrewed the tip nuts. After installing the puller, tighten the screw until it stops. When the key is in tension, the finger is knocked out of the lever with a hammer. The nuts securing the rack brackets are unscrewed. The bolt on the steering shaft is loosened from inside the passenger compartment. Having completed all preliminary operations carefully so as not to damage the splines, using oscillatory movements, the gear shank is disconnected from the steering shaft. The entire assembly is pulled out through the right hole in the car body.
Steering mechanism with tie rods
Next, the VAZ 2115 steering rack is directly repaired:
- The structure is clamped in a vice. Use a special brush or a cloth soaked in white spirit to clean all surfaces of the product.
- The steering rods are removed. To do this, unscrew the bolts on the bracket securing them, after bending the “antennae” of the locking plate, using a “22” key.
- The locking and connecting rod plates are removed.
- The tie rods are removed.
- On the right side, the support and retaining ring are removed from the steering gear housing.
- The clamps with which the protective cover is attached are cut off. Disposable parts are made of plastic.
- The protective cover is removed.
- On the left side of the device, the support and protective cap are removed.
- Using a “17” wrench with an octagonal head, the rack stop nut is unscrewed, the part is removed, the spring and the retaining ring are removed.
Removing the nut, spring and retaining ring
The rack stop is knocked out of its socket. To do this, the crankcase hits a wooden stand. For sealing, a rubber ring is mounted in the groove of the stop.
- The seal is removed.
- The gear boot is removed by simply prying it off with a screwdriver.
- The lock washer is removed.
- Use a special 24mm wrench with an octagonal head to unscrew the nut that secures the gear bearing.
- The nut is removed from the shaft.
- Using a “14” wrench, the gear is removed from the crankcase along with the bearing.
Removing the gear with bearing from the housing
- The rack is removed.
- The bushing is removed. To do this, use a screwdriver to pry up the support sleeve, its protrusions should fit into the crankcase holes and the part can be freely removed.
Removing the support sleeve
- A new bushing is installed. To do this, new damping rubber rings are put on it so that the thin parts of the ring are located opposite the cuts in the bushing. The protrusions of the bushing must fit freely into the holes in the crankcase.
- Along the edges of the bushing, the rubber rings are cut and the cut off parts are removed.
- The retaining ring is removed from the gear shaft.
- Using a two-jaw puller, the ball bearing is pressed.
Removing the ball bearing
Pressing out the needle bearing is done using a special puller. If it is not there: two holes with a diameter of two millimeters are drilled in the end of the crankcase to allow the needle bearing to exit onto the ring. Through it, the bearing is knocked out of the crankcase.
Pressing out the needle bearing
The crankcase cavity of the structure is washed. The needle bearing is pressed into place using a piece of pipe. After this, the hole is sealed with preparations similar to “cold welding”. Bearings, drive gear and teeth on the rack are generously lubricated with FIOL-1 lubricant.
UNIOL-1 lubricant is placed in the cavity, which is located above the nut holding the bearing of the drive gear. The steering rack assembly is assembled in the reverse order. The protective cover is attached and secured with clamps. The rack stop and nut are adjusted so that there is a gap of 0.12 millimeters between them. After adjusting the rack clearance, the stop nut is capped to prevent unwinding.
Steering system diagnostics
Suppose you notice an uncharacteristic rattling sound in your car when driving? How do you still understand that it is time to repair the rack? There are not so many diagnostic methods; they are extremely simple and do not require any special sophistication from you:
- 1. Check the steering mechanism at the point where the steering shaft and rack combine. If it gives in to force and a characteristic knock is heard, most likely the problem is the lack of lubrication of the needle bearing;
- 2. The presence of play due to a worn bushing or a banal insufficient tightening of the main components can be concluded by grasping the joint of the steering rod under the hood of your car.
If we have already decided on the need to restore the rack, it’s time to decide on the method of repairing it.
It’s worth immediately making a reservation about repairing the steering rack from a VAZ 2110 with your own hands - the process is very labor-intensive, nervous and thankless. It is recommended to decide what is easier for you: perhaps spend the whole day doing hard and painstaking work, buy a new rail, or pay about 3,000 rubles. for repairs at a service center?
In defense of do-it-yourself repairs, we note that only you yourself are capable of performing the work with due seriousness and responsibility, dictated by the love for your own car. Repairing the VAZ steering rack on your own will be much cheaper, but it is advisable to enlist the help of a friend when reinstalling the rack and pinion mechanism in its place under the hood - doing this alone is absolutely impractical.
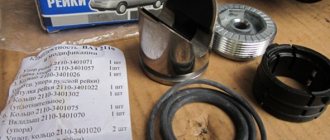
Necessary tools and spare parts for self-repair:
Steering rack repair kit for VAZ 2112
The cheapest repair kit for repairing the steering rack from a VAZ 2110 with your own hands will cost around 200-250 rubles. A more complete and universal set of spare parts will cost us about 500 rubles. It is also recommended to definitely replace the central corrugation (its price is approximately 250 rubles).
In total, it turns out to be at least 500 rubles. At the same time, buying a completely new rack and pinion mechanism will cost about 1,100 rubles. The tools we will definitely need are:
- special key 2110, which is a hollow octagon;
- wrench with long handle and octagonal socket 15 mm;
- ratchet with 10 and 13 mm heads;
- a set of metalwork tools;
- mount;
- jack.
And the following materials:
- penetrating lubricant for rusted bolts or kerosene (in the second case you will also need a syringe);
- diesel fuel, gasoline or other means for washing parts;
- Litol-24 lubricant, ideally FIOL.
Tightening and adjustment
As the practice and experience of VAZ 2114 owners shows, if problems arise with the racks, they can most often be repaired. The only condition is that you have an inspection hole at your disposal.
Full analysis
The first step is to tighten the rack. But how is this done? To do this, simply tighten the adjusting bolt. Adjustment is made with a 17 mm key.
After tightening the bolt, take your car out for a few kilometers to check whether the knocking or play remains. If these symptoms of the problem disappear after you have tightened and adjusted the steering rack, the repair can be considered complete.
But this doesn't always happen. The knock may remain, but the play may go away, or vice versa. In any case, if at least one sign still remains, you will have to begin a full-fledged repair with your own hands. Now you can find a number of useful videos that describe in detail the procedure for repairing this unit. Take a look, it will be useful for you.
Article on the topic: Selecting and replacing brake fluid on a VAZ 2114
The nuances of replacing the assembly assembly
In the case of replacing the VAZ-2114 rack assembly with rods, we proceed somewhat differently.
There is no need to unscrew the rods from the rack during the work. But you will have to disconnect the tips from the stand. This operation will not be difficult if you have a puller.
If it is not available, you can use the folk method;
- Unbend and remove the stopper;
- Unscrew the tip nut;
- We take the pry bar and place it between the rod and the protrusion of the stand, to which the tip is attached;
- We use a pry bar to create a pressing force and at the same time apply sharp blows with a hammer to the protrusion (usually 2-3 blows are enough for the tip to “pop out”).
Next, we do everything identical to what was described: unscrew the fastening nuts and the fixing bolt on the column shaft. Afterwards all that remains is to remove the mechanism and replace it with a new one.
After replacement, it will be necessary to adjust the camber/toe angles of the VAZ-2114 steering, even if the rods were not removed. This operation will definitely not be superfluous.
Also check out
- If you don’t have a tie rod puller with you, you can use a hammer and a powerful pry bar.
Self-replacement of the VAZ 2115 steering rack - step-by-step instructions
- Unscrew the nuts that secure the steering rack.
- Remove the rack on the right.
Self-replacement of the VAZ 2115 steering rack - step-by-step instructions
Self-replacement of the VAZ 2115 steering rack - step-by-step instructions
Self-replacement of the VAZ 2115 steering rack - step-by-step instructions
- Remove the rack from the splines. Usually this does not cause difficulties.
- After removing the rail with lugs, unscrew the lugs and count the number of screws. Thanks to this, after replacement it will be more comfortable to get to the service station.
- Open the side plugs on the new rail. Fill the holes with lithol.
Self-replacement of the VAZ 2115 steering rack - step-by-step instructions
Self-replacement of the VAZ 2115 steering rack - step-by-step instructions
Self-replacement of the VAZ 2115 steering rack - step-by-step instructions
When screwing the tips, it is important not to confuse the sides, because the left one is different from the right one. To install a new rail you will need someone's help. Return the rack back, attach the fasteners on the right
A partner must provide assistance if the steering cardan gets into the splines. To loosen the clamp, drive a chisel into it. After this, the slots will fit in easier.
Worth checking out:
Installation of new front struts on Lada Priora cars
- There is a special groove on the rack in which a locking bolt must be installed.
Reassemble in reverse order. After the VAZ 2115 steering rack has been replaced, make the wheel alignment adjustment.
Lubrication
For VAZ cars, the only steering rack lubricant recommended by the manufacturer is FIOL-1.
1. Lubrication during assembly. First, the rail and the internal cavity of the housing are lubricated.
How to adjust wheel alignment with your own hands? - there is more useful information here.
- A generous coat is then applied to the plastic sleeve.
- Lubricant is placed in the seat for the needle bearing.
- The rail is installed in the housing.
- The steering gear shaft is lubricated.
- Grease gets clogged up in the bearing.
- The stop is lubricated.
- Screws and stoppers are installed.
- The casing and anthers are put on.
2. Lubrication without removing the rack. After cutting through the plastic clamps, the side protective caps are removed.
It is through the side holes in the rack body that lubricant is pumped. It is recommended to carry out this procedure at least once every 150 thousand km.
For convenience and greater efficiency, you can use a syringe with a nozzle made of a rubber hose of such a diameter that you can insert it between the rail and the body. The hose must be pushed from the side where the rod bolts are attached.
You may be interested in this article - When and how is a wheel bearing replaced?
At this point on the bushing there is a cut through which the lubricant will pass into the space behind the bushing and lubricate the steering mechanism.
How to lubricate the steering rack in the absence of FIOL:
- Litol. It is the most suitable lubricant to replace the recommended one. Has good lubricating properties and durability.
- Solid oil. Not recommended due to its tendency to dry out over time and lose its lubricating properties.
- Graphite grease. For the same reason as grease, it is not entirely suitable for lubricating the rack.
DIY repair
First you need to stock up on the necessary set of tools:
- repair kit for the steering rack (as mentioned above, they are sold in three variations);
- bearings;
- lubricant;
- necessary keys and screwdrivers;
- We should talk separately about repair kits.
Minimum basic sets. Such sets usually have only 4 elements:
This set can only fix the simplest faults. Medium priced sets. Here, in addition to the things described above, there are shafts and other bearings. Expensive sets. There may already be entire slats here.
When purchasing, please note that you are purchasing a set specifically for your car (the brand is indicated on the package). Sometimes it happens that a car has a non-original rack, then it is necessary to purchase a repair kit for the car from which this rack was removed
Actually, any repair must begin with disassembling the steering rack. Often the problem is just a small bearing, and the entire rack does not require replacement.
Work order
- Removing the steering rack
- Unscrew the thrust nut using a 17mm hexagon.
- Remove the thrust nut, retaining ring, rack stop and spring.
- Remove the drive gear shaft boot, and then the retaining ring.
- Unscrew the nut holding the steering gear bearing. It goes quite tight - this is normal.
- Press out the drive gear shaft.
- Remove the rail itself from the housing.
- Remove the support sleeve, then lubricate it and insert it into place (this will need to be done with force)
- Replace all bearings. Some will be difficult to get (very difficult), so you can simply chop them with a chisel and pull them out with tongs.
- Inspect all parts for defects, replace broken ones with new ones (from the repair kit), lubricate all moving parts.
- Reassemble the rail in reverse order.
- That's all, if you did everything correctly, then the rack works with a bang. All that remains is to put it in place.
Putting the rack in place
- First, you need to enlist the help of a partner; without him, you won’t be able to do everything quickly and accurately.
- We install the rail in the same place and attach the fasteners.
- With the help of a partner, we insert the rail into the spitz.
- To loosen the clamp, use a chisel.
- We tighten the mounting bolt.
That's all, now the rack is in place, then we put the wheels on, tighten the nuts and remove the car from the jack. Now you know everything you need to repair your steering rack in a timely manner. The main thing to remember is that you shouldn’t delay repairs.
Replacement procedure
Replacing steering wheels will require not only your hands, but also a couple more to help. So, agree in advance with a friend that he will help you solve the problem of faulty steering.
In addition to a helper and new slats, you will also need a set of tools and materials. Be sure to include in this list:
- Set of wrenches;
- Jack;
- 17mm hex wrench;
- Balloon wrench;
- Bricks or similar materials (to support the front of the car without wheels);
- Puller for steering rods (not necessarily needed, you can do without it);
- Dry rags;
- Litol type lubricant;
- The almighty WD40.
Now you can proceed directly to replacing the steering racks. We strongly recommend that you follow the established procedure for conducting operations.
- Place the car on a level surface. No, a simple floor in your garage is enough, it is not necessary to level it with cement.
- Apply the parking brake to keep the car from moving.
- Raise the car on a jack, place logs or bricks under the front, and then remove the wheels.
- Remove the negative cable from your battery for safety reasons. Nobody needs electric shocks today.
- On the driver's side inside the passenger compartment, near the pedal block, unscrew the locking fastening bolt of the cardan of your steering shaft.
- Remove the adsorber directly from the engine compartment. You can put it aside for now.
- Remove the cotter pins, which will allow you to then remove the mounting nuts from the tie rod ends.
- Using a rod puller, the ends are removed from the racks. If for some reason the puller is missing, it can be replaced by gentle, successive blows to the tips. Don't damage their threads just by doing this. They usually lend themselves, so many people do without pullers.
- Treat the rack clamp fixing nuts with an anti-rust agent. Now we are talking about the almighty WD40. Wait a while for the composition to be absorbed.
- Using a wrench, unscrew the fastening nuts. Processing with a Vedash should greatly simplify this task for you. There are four nuts in total.
- Remove the rack by pushing it through the passenger side, that is, the right side of your VAZ 2114.
- We recommend replacing the boot at the same time as replacing the racks. Over time and during the period of operation, the steering boots seriously wear out, so it is hardly worth trusting old boots to work with new racks.
- The tips are removed from the slats. At the same time, try to count the number of turns with which the nuts were tightened. This will allow you to fasten them back as close to precision as possible at the reassembly stage and, with peace of mind, go to the service station, where they will adjust the wheel alignment.
- Take your new rail, remove the plugs from it.
- Next, take Litol or a similar lubricating liquid into your hands and fill the body with this composition as much as possible.
- The ends are mounted back onto the rods. Try not to mix up the places of the nodes, although they are different from each other. However, as practice shows, this does not prevent many do-it-yourself repairmen from confusing them.
- The new rail is placed in its rightful place. To do this, the nuts are attached to the studs of the clamps.
- Now you will need your friend, comrade, assistant. Ask him to help guide the shaft drive gear to the seat located directly on the rack housing. The splines must line up exactly. Be sure to check this moment.
- A locking bolt is fixed on the cardan.
- You can safely perform all other work in the reverse order of the dismantling described above. In this case, each thread must be treated with Litol. This event will allow you to more easily deal with disassembling the elements during subsequent repairs. Or it will be a pleasant surprise for the new owner of your VAZ 2114.
Obviously, replacing steering racks yourself is not the most difficult task, but it must be done clearly, consistently and accurately.
Loading …
Let's summarize
As you can see, the work will require some skill. But, if desired, they can be performed by a beginner who knows how to handle the tool and has common sense. Repeating the operation no longer causes problems.
After repairs, you should perform a wheel alignment procedure or do a simple check. To do this, you need to start the car and drive at a slow speed. If, with the steering wheel in a straight position, the vehicle does not pull to the side, everything is in order.
To protect fasteners with threaded connections from dirt and water, experts recommend using lithol or graphite-based lubricants. Parts must be lubricated carefully. You can further enhance the protection with tubes. They are put on the joints of the steering tips and traction devices (heat shrink can also be used).
Repair kit for rack 2110
The whole problem is in the repair kits. Here you need to keep your ears open, since the repair kit may be either incomplete or of poor quality. It is inexpensive, but the very fact of buying a low-quality spare part that you are counting on is unpleasant. Small repair kit includes:
- rack bushing;
- emphasis;
- o-ring, three pieces;
- thrust nut.
This set costs about 300 rubles. But it’s best to pay another 250 and take the full set, which includes boots and bellows. No matter what condition the old ones are in, it is better to replace them, and here's why.
The fact is that on average, at 120 thousand, depending on operating conditions, subtle cracks and breaks may appear on the stockings and corrugations. It is quite difficult to notice them, and water inevitably gets through them. It will not escape from the rack body and will do its wet job - rust cannot be avoided. Any source of corrosion on the rack is a minus to the service life of both the rack itself and the seal. The chain reaction causes the rack to eventually wear too much and repair may not be possible. Don't skimp on a good repair kit.
Why should you order from us?
Experienced craftsmen
Diagnostics in just 1 hour
Repair in just 1 day
Hunter 3d stand
Guarantee on all work
Your own turning park
Conclusions and recommendations for repairs
Particular attention should be paid to the condition of the support bushing and the worm gear mechanism. Damage to the anthers causes excessive corrosion of the rack, destruction of the gear teeth, destruction of the locking spring and clogging of all parts with dirt.
The parts need to be washed, bearing play checked, and cleaned. Also generously lubricate all mating surfaces. The rack stop and retaining ring must be replaced, as the parts most susceptible to friction and wear.
Replacing the steering rack on a VAZ 2114
Now let's proceed directly to the procedure. If the operation is not carried out on a lift, then you need to hang out the entire front part and use some kind of stands or pedestals. It is imperative that the car is stable.
Next, use a 22mm wrench to unscrew the steering ends, then knock down the bipod with a hammer. If you plan to install the tips in the old places, then under no circumstances should you use all kinds of pullers, because the fork will pull out the finger, and the thread puller will ruin the thread, you will have to either go through it with a hole saw or change the tip.
Now you need to unscrew the four nuts securing the rack to the body. This must be done from under the wheel arch, otherwise you won’t be able to reach it. It is advisable to use a ratchet with a long head of 13. After this, we crawl under the driver’s feet and unscrew the bolt of 13 from the steering shaft. To loosen the clamp, you can insert a sharp chisel and hit it with a hammer several times. At this time, it is advisable to pull the rack from the shaft; this can be done well using a crowbar.
The rack is installed in the reverse order. After replacement, it is imperative to adjust the wheel geometry, otherwise goodbye, tires.
Video: replacing the rack on a VAZ 2114
As you know, the performance of any vehicle depends on the serviceability of each component. If one element is faulty, soon the next one will not function in a chain reaction, and so on until the fault is repaired. If the problem is not resolved in time, it will not only entail additional costs for spare parts, but will also significantly affect traffic safety, on which your life and health depend. Therefore, you should not neglect replacing parts, especially if this VAZ-2114 is no exception: spare parts here fail in the same way as on any other car.
How is this element dismantled and how to adjust it? We will consider the answers to all these questions in our article today.
Preparatory activities
Many experts advise taking certain steps to prepare for the replacement so that everything goes easier and faster. These actions include the following.
- Treat all nuts and fasteners with penetrating liquid. WD40 works great.
- If the tips last longer than one winter, to remove their fist you will need to use a 17 socket to unscrew the nuts.
- If the nuts stick, try heating them with a hair dryer. A gas burner is also suitable, but you need to be as careful as possible with it.
- Prepare tools for removing tips.
Today, two methods are used to dismantle steering tips - modern and traditional. The first involves the use of a special puller, and the second - a sledgehammer.
The traditional dismantling method involves the following actions:
- The steering wheel is turned all the way;
- Several strong blows are applied to the steering knuckle;
- Vibration causes the tip to pop out.
But the method has two serious drawbacks.
- It will take special skill to deliver precise, but at the same time accurate and strong blows.
- This method can reduce the service life of steering racks.
Therefore, the best option is a puller. You can literally buy it for 200-300 rubles, but it will be useful in the future and will significantly preserve the integrity of the remaining parts when replacing the launch vehicle.
Replacement
The replacement procedure is quite simple. Especially if you have prepared the connecting elements in advance and acquired a puller.
- Using a jack, lift one of the sides where you will begin to change the tips.
- Turn the steering wheel to such an extent that it is convenient for you to replace damaged elements.
- Treat the elements again with a penetrating liquid.
- Unscrew the fastening nut.
- Remove the tip from the steering knuckle hole. Here you just need a puller or the traditional old-fashioned method using a sledgehammer.
- Check the condition of the steering rods. Sometimes it is better to replace them in the first couple of wears. Besides, you still got into this knot.
- Replace damaged tips with new ones.
- Perform the reassembly procedure.
- Do the same with the second wheel.
- We recommend that you think additionally about protecting threaded fasteners from moisture and dirt. To do this, the threads can be lubricated with lithol, graphite grease, a tube of a suitable diameter can be put on, or heat shrink can be used.
- After completing the replacement of the steering tips, visit a service station to adjust the wheel alignment.
- If you don’t want to go to a service station, then count in advance the number of revolutions when removing the old tip. The new one is twisted by the same number of revolutions.
- Drive onto a straight road and check whether the car does not skid to the sides when driving in a straight line.
One of the main conditions for a successful replacement is the choice of quality parts.
What to choose
Finally, we will present several options for the most popular steering tips, which are used today when replacing a VAZ 2114. So you can decide for yourself what to choose and which ones are better.
The last two tips are foreign made. This makes their price higher. But the quality is somewhat higher than AvtoVAZ products.
Replacing a LV is not so difficult that you need to go to a service station and pay 500-1000 rubles for the work of the craftsmen. You can easily cope with this task yourself, relying on the video and instructions provided.
VAZ 2114: adjustment and tightening of the steering rack. Replacing tie rod ends
We will answer your questions
Good afternoon. Yes, we can repair it within one day.
No, this shouldn't happen. Regarding self-repair of such important mechanisms, we are always against it. Not only because they are interested in providing services, but also because then we will have to correct your mistakes during independent repairs, and this is much more difficult. When there is a knock in the rack, in order to determine the cause, you must initially completely disassemble it. Only knowing how the mechanism should be designed can you notice its malfunction. Not everyone, even the most experienced driver, is sufficiently knowledgeable about the internal structure of the rack.
We have not yet learned how to conduct remote diagnostics. This can indicate either the situation you first voiced or signal a serious breakdown. In a car service center, in case of temporary wear, you may be offered a rack restoration procedure. In this case, the mechanism is disassembled, and all obsolete parts are replaced with completely new ones. If repairs are necessary, the technician will disassemble the rack and decide what and how to change or repair.
Since you come into contact with its work directly while driving a car, it will not be too difficult to detect a breakdown. If not during the next diagnostic, then while driving the car, you will notice noises or knocking, play in the rack. This serves as a direct signal to visit a car service center.
No, depending on the design of the mechanism, the racks can be electrical, hydraulic or mechanical. In each individual case, the master must understand the mechanism and carry out the repair procedure in accordance with its structure.
Yes, this is a very important component of the car. Scientifically, it is called hydraulic power steering, and its purpose is already clear from the term itself. The rack helps you turn the steering wheel
It is also an important part of the hydraulic system. Now the second part of the answer: do you think that you will be able to drive your car normally if you cannot turn and brake normally? The question of the importance of a working steering rack should not even arise
New or refurbished?
Among car enthusiasts, the question often arises regarding the steering rack - should I purchase a new one for replacement or restore the “original” one? It is impossible to answer unequivocally here.
If the repair was carried out independently and using a high-quality repair kit, then after restoration the rack can serve for quite a long time.
But if you purchase a restored rack or if it is repaired at a service station, there is a high probability that problems will soon arise. After all, it is unknown who, how and with what help carried out the restoration.
As for new units, there are a lot of defective racks on the market.
In general, it is still better to try to repair the rack first, since it is much cheaper. It is worth purchasing a new mechanism only after you have already become convinced that the restoration did not help.