Car steering is one of the most important systems, responsible for the proper movement of the vehicle, the safety of passengers and those moving next to this vehicle. Any knocking sound that occurs in the steering system when turning the steering wheel on a VAZ 2114 indicates a problem that needs to be fixed, and the sooner the better.
From this article, the reader will learn what problems arise in the steering system and related components, how to eliminate the mentioned malfunctions and breakdowns that provoke unwanted knocking when the vehicle is moving.
Steering cardan
Knocks that occur in the steering cardan have spoiled the blood of more than one car owner with its unclear symptoms. It is not always clear where and what is knocking. Drivers begin to rebuild and change brakes, spend money on wheel balancing, change other parts, but the result is zero. You can understand that it is the steering shaft driveshaft that is knocking if you hold the lower part of the steering column near the pedals and rock the steering wheel with your other hand. At the same time, vibration of the steering wheel is felt. Small, within one millimeter. One of our homegrown Kulibins found a simple solution to the problem. A rubber bumper for the front suspension arms is purchased, and a 2x2 cm cube is cut from this rubber part. The rubber is dense, cutting is not easy, but the result is worth it. The cube is inserted into the cardan fork. To make the cube go in easier, lubricate it with WD-40 and push it in with a screwdriver. A steering shaft with such an insert will last for some time. Another option is more expensive and simpler: you need to buy a new steering shaft and install it.
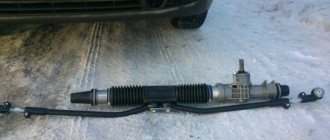
Steering rack device
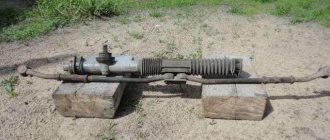
The VAZ 2114 car has a mechanical steering rack without power assistance. It is secured with two clamps and bolts that attract the rack body to the car body.
The rods are attached directly to the rack using hardened bolts with fine threads. The steering gear shaft rotates on two bearings.
The first is needle type. Serves as a lower reference point and at the same time a guide.
The second is a radial ball bearing. Serves as an upper support point and secures the steering shaft in the upper neck of the steering rack housing. The output shank has splines and a wedge groove. Here the shaft connects to the steering column.
A plastic sleeve is placed in the rack body. It is the second reference point when moving the rack. There are several sealing, locking and protective elements.
Checking filters
The fuel system of a modern car is equipped with at least three filters. The first of them is, in fact, just a mesh that serves to trap solid particles. It is placed in the neck of the tank, but it is not capable of becoming clogged to such an extent that fuel does not enter the cylinders. In this regard, this filter cannot be the reason that the VAZ-2114 twitches when driving.
The other element is mounted on the fuel pump, which is submerged in the tank. This is the same grid, only with smaller cells. However, the functions are basically the same - to retain large debris. For this reason, it is also clear that it is also not capable of becoming very clogged.
The third element is located after the fuel pump, and it is this filter (it serves for fine cleaning) that can become so clogged that the pump will one day stop coping with its duties.
At the same time, some models may have several additional filters installed. And they may well cause the car to jerk.
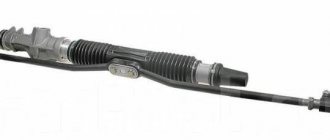
Repair and adjustment of the VAZ 2114 steering rack
The steering rack is the connecting link between the front wheel pair and the steering wheel of the car. The condition of this unit determines the ride quality and degree of controllability of the VAZ 2114. The service life of the steering rack is long, since there are quite a few parts in this unit. This material describes the main malfunctions of the mechanism, as well as methods for eliminating them. Due to its simple design, even a novice motorist can repair the rack.
Good to know! Despite the strength of this unit, steering racks in foreign cars (even budget ones) last longer, and their control is softer. The main difference is the hydraulic booster, which is not included in the design of VAZ 2114 cars.
Main malfunctions and their symptoms
If the following symptoms occur, you should diagnose the steering rack:
- The steering wheel gets jammed while the car is moving, causing difficulties in steering – the steering shaft is damaged or displaced; among auto mechanics this phenomenon is called “biting”.
- A knocking sound appears in the chassis - this requires repair of the rack elements.
- The car pulling to the side, the car wobbling at high speed are signs of play in the steering mechanism. Because of this defect, it is impossible to perform a wheel alignment.
Depending on the degree of damage, the problem can be solved by repair (installation of a factory repair kit), replacement of the entire assembly, or adjustment. This material contains instructions for adjustment and repair.
If you want to repair the steering rack yourself, then you should purchase the following spare parts:
- Tubes for rack.
- 2 tips - they already come with nuts.
- Repair kit.
- 2 silent blocks.
- Cover for the rack.
Repair requires replacement of the above parts even if only the tubes are damaged. The wear of elements must occur simultaneously, so it is not recommended to skimp on parts. You will also need bearing grease, clamps, White Spirit, and a can of WD-40. It is worth preparing rags in advance, as you will need a lot of them. As for tools, repairs require sets of wrenches, screwdrivers, socket heads, and wrench extensions. Special tools include special wrenches for the adjusting nut, as well as a puller for tips.
Rack in disassembled condition
Advice! When the defects in the operation of the steering rack are minor (for example, knocking), then it is better to start with adjustment. If the adjustment does not help, then you should move on to diagnostics and repair.
Before starting repairs, it is recommended to carefully study the structure of the steering rack, which is described in detail in the VAZ 2114 operation and maintenance manual. You should first apply WD-40 to the four nuts that secure the steering rack to the car body. You also need to shed the only tightening nut and the threads of all the tips. After 3-4 hours the work must be repeated. Repairs can only begin the next day.
Rail repair
Repairing the rack must begin with its adjustment. Most likely, after adjustment, all knocking will disappear. If it doesn't help, you'll have to disassemble it and change parts.
Adjustment
You can adjust the VAZ 2114 rack as follows: directly on the car or by removing it. The second method is needed after repairs. The car must be parked on a viewing hole; alternatively, a lift can be used. The adjustment is carried out as follows:
- The VAZ 2114 must be put on the parking brake, locking the rear wheels;
- Next, you should disconnect the negative terminal from the battery and lock the steering wheel;
- The manufacturer has provided a special adjusting nut with which you can quickly adjust the unit. This element is located on the mounting side of the part facing the car body;
- If adjustments are performed rarely, there will be a large layer of dirt on the adjusting nut - this must be removed with a cleaning agent. Adjustment is carried out using a special key.
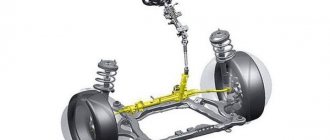
Stabilizer link (eggs)
Stabilizer links are a suspension element responsible for its lateral stability. They are usually installed in the front suspension, but rear struts are also found. Wear of the components of the stabilization strut gives rise to knocking noises and indicates the need for its diagnosis. The knocking sound is heard especially clearly when the car is driving on uneven roads and on turns. Worn and the need to replace the struts is indicated by the car pulling to the side and the need to adjust the steering movement. When the car tilts to one side, this is also one of the signs that the struts are faulty and need to be replaced.
How to disassemble the steering rack of a VAZ 2114 and replace worn parts
In addition to a helper and new slats, you will also need a set of tools and materials. Be sure to include in this list:
- Set of wrenches;
- Jack;
- 17mm hex wrench;
- Balloon wrench;
- Bricks or similar materials (to support the front of the car without wheels);
- Puller for steering rods (not necessarily needed, you can do without it);
- Dry rags;
- Litol type lubricant;
- The almighty WD40.
Now you can proceed directly to replacing the steering racks. We strongly recommend that you follow the established procedure for conducting operations.
- Place the car on a level surface. No, a simple floor in your garage is enough, it is not necessary to level it with cement.
- Apply the parking brake to keep the car from moving.
- Raise the car on a jack, place logs or bricks under the front, and then remove the wheels.
- Remove the negative cable from your battery for safety reasons. Nobody needs electric shocks today.
- On the driver's side inside the passenger compartment, near the pedal block, unscrew the locking fastening bolt of the cardan of your steering shaft.
- Remove the adsorber directly from the engine compartment. You can put it aside for now.
- Remove the cotter pins, which will allow you to then remove the mounting nuts from the tie rod ends.
- Using a rod puller, the ends are removed from the racks. If for some reason the puller is missing, it can be replaced by gentle, successive blows to the tips. Don't damage their threads just by doing this. They usually lend themselves, so many people do without pullers.
- Treat the rack clamp fixing nuts with an anti-rust agent. Now we are talking about the almighty WD40. Wait a while for the composition to be absorbed.
- Using a wrench, unscrew the fastening nuts. Processing with a Vedash should greatly simplify this task for you. There are four nuts in total.
- Remove the rack by pushing it through the passenger side, that is, the right side of your VAZ 2114.
- We recommend replacing the boot at the same time as replacing the racks. Over time and during the period of operation, the steering boots seriously wear out, so it is hardly worth trusting old boots to work with new racks.
- The tips are removed from the slats. At the same time, try to count the number of turns with which the nuts were tightened. This will allow you to fasten them back as close to precision as possible at the reassembly stage and, with peace of mind, go to the service station, where they will adjust the wheel alignment.
- Take your new rail, remove the plugs from it.
- Next, take Litol or a similar lubricating liquid into your hands and fill the body with this composition as much as possible.
- The ends are mounted back onto the rods. Try not to mix up the places of the nodes, although they are different from each other. However, as practice shows, this does not prevent many do-it-yourself repairmen from confusing them.
- The new rail is placed in its rightful place. To do this, the nuts are attached to the studs of the clamps.
- Now you will need your friend, comrade, assistant. Ask him to help guide the shaft drive gear to the seat located directly on the rack housing. The splines must line up exactly. Be sure to check this moment.
- A locking bolt is fixed on the cardan.
You can safely perform all other work in the reverse order of the dismantling described above. In this case, each thread must be treated with Litol. This event will allow you to more easily deal with disassembling the elements during subsequent repairs. Or it will be a pleasant surprise for the new owner of your VAZ 2114.
Repair
To perform the repair, you will still have to disassemble the steering wheel. You can see detailed instructions in the material on replacing the steering rack.
Replacement process
Let's move on directly to the repair procedure.
- Remove the rail from its seat.
- Remove the thrust nut with a 17mm hexagon.
- Remove the thrust nut, remove the retaining ring, spring, and rack stop.
- First, the gear shaft boot is removed, after which you can easily get to the locking ring.
- Remove the nut that holds the gear bearing in place. Be prepared for the fact that it will be quite difficult to unscrew it; use some force. This is fine. It's worse if it practically doesn't hold on.
- The drive gear shaft is pressed out.
- The rail is removed from the housing.
- Next, remove the support sleeve, lubricate it and put it in place. It may take some effort to push it back.
- Replace all bearings present in the assembly. Some are difficult to extract, while others are almost impossible. But it needs to be done. If you cannot remove it at all, then cut the bearing with a chisel and remove it with pliers.
- Examine the condition of all surfaces, parts, and assemblies for any defects or damage.
- If you notice faulty elements, replace them using a repair kit.
- The design will have quite a lot of moving elements. Each of them must be lubricated with high-quality lubricant. Litol will perform well here.
- Reassemble by following the reverse disassembly sequence.
- You will definitely need help for reassembly. Therefore, agree in advance with a friend or someone else who can help you in this matter.
- Place the repaired rail in place and attach its fasteners.
- A rack is inserted into the spitz. This is where you will need an assistant. It is almost impossible to do this yourself.
- Use a chisel to loosen the clamps.
- Tighten all mounting bolts in place.
If you notice typical signs of a rack malfunction, do not delay repairing or replacing it. This can lead to tragic consequences when, at the most inopportune moment, the steering wheel stops responding to your efforts and you lose control of the situation. This is not an attempt to scare you, but a simple fact of life.
Power steering rack VAZ 2114 – is it worth installing?
You can, of course, come across amplifiers that are made in a homemade way. Their appearance is no different from those made by leading manufacturers. It’s just that difficulties may arise during the installation process. Even the mounting holes may simply not match. And the question immediately arises about how strong the iron is, even if the holes in the VAZ 2114 power steering rack are incorrect. Therefore, when choosing, it is best to look at mechanisms from manufacturers that have proven themselves to be the best. Any VAZ power steering rack undergoes tests, during which its advantages become clear.
- Deformation at the crankcase mounting points is reduced several times. But the movement of the pins is halved.
- The crankcase moves less when turning the steering wheel. The steering angle changes by 10-12 degrees.
- The rigidity of the shield becomes higher, and controllability improves.
- The creaking of the dashboard goes away when you turn the steering wheel in place.
- The steering wheel stops shaking when stopping with the engine running.
Steering rack VAZ 2114 - symptoms of failure
The first symptoms of a rack malfunction or the need for tightening are clear:
- Knocking noise under the hood in the area of the engine shield, especially when driving over uneven surfaces.
- Increased steering wheel play.
- Steering wheel rotation is too tight or too free.
- Leakage of lubricant through oil seals and rack casings.
- Sudden biting of the steering rack while driving.
The latter can be considered a glaring signal of malfunction and can lead to serious troubles while driving.
In this case, most likely, tightening the situation will not correct the situation, however, it is too early to draw conclusions, you can try to adjust it. This can be done in two ways - both on the car and with the rack removed.
In the second case, the adjustment is made after replacing the repair kit and completely repairing the mechanism. We will try to make do with little expense and simply adjust the gap in the gear-rack engagement, thereby eliminating backlash and knocking.
Ball joints
Ball joints are suspension elements. The durability of ball joints is affected by:
- The quality of the anthers that protect the assembly from dirt and dampness;
- Climatic conditions;
- Driving style;
- The quality of roads where the car is primarily used.
Naturally, in urban conditions, ball joints last longer.
During operation, the ball joint gradually wears down. And this grinding occurs the faster the sooner sand and other abrasive particles get under the boot. Ball joints must be regularly filled with oil, since the lubricant protects them from grinding and loosening. A knock when driving through holes is the first warning about the need to inspect the supports and replace them. The wobbling of the car when the wheel turns out should serve as a serious warning to the driver to take emergency measures.
Causes of knocking
Knock in the steering rack - where does it come from? Let's look for the root cause.
Yes, the steering rack is a simpler system than the outdated worm type.
As noted above, even on Russian cars it “goes” 80-100 thousand km without causing problems for motorists.
But premature knocking, alas, sometimes occurs.
The reasons are:
- On a VAZ-21099, for example, knocking in the steering rack is often caused by insufficiently tightened mounting bolts. No, they were tightened in good faith, it was our amazing roads, creating vibrations, that eventually unraveled them. The knocking noise here is easy to eliminate - you just need to tighten all the fasteners.
- On the VAZ-2110 and all cars in the tenth row family, the support bushing on one side of the rack often wears out. Since the support bushings are made here from plastic, their rapid wear does not become a miracle when traveling along our ideal, so to speak, roads. Irregularities contribute to the free movement of this element, causing wear to occur at an accelerated pace.
- The situation is much more serious when the covers protecting the steering rack are torn. Then dust and dirt have access to its jagged surfaces, which without unnecessary drama looks like a disaster. The rack will not work for a long time without protection, which is why the unfortunate knock appears.
- Corrosion of a part is generally a fatal problem, because the steering rack will definitely have to be replaced. It is expensive, but not more expensive than finances and, most importantly, life with health.
- Rarely, but there is a manufacturing defect. Here the rack most often knocks on a new car. Fortunately, if the vehicle is listed under warranty, then replacement of a low-quality component can be achieved through the “establishment” of the manufacturer of the car. Factory damage and poor workmanship are the most common cases of manufacturing defects.
- Lath material. As a rule, it is soft and designed for driving on quality roads. When driving through our pits and as a result of constant vibration, metal is gradually removed from the surface of the rack, layer by layer, micron by micron, and this leads to premature wear of the support sleeve. In this case, the problem can be solved in two ways. Either buy a new rail or order the production of a similar one from a more durable metal. Usually people who do this will recommend you the right material.
All motorists, without exception, would like to know how to preserve and extend the life of the steering rack, because this is not just an expensive, but also a vitally important unit, the failure of which often turns into a tragedy.
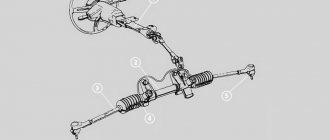
Tie rods or rods
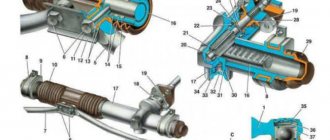
The steering tips in the diagram are indicated by the number 21. There are 2 tips in the steering rack, and they are sold in pairs, so that if one tip breaks, both need to be replaced. This system unit bears a heavy load, and therefore the resource of the unit ranges from 20–80 thousand km (depending on the quality of the part).
Over time, steering tips and rods wear out, knocking and squeaking noises appear. Sometimes the cause of knocking is dirt accumulated in damaged boots. To get rid of it, you need to change the rubber boots and clean the components.
Sometimes the cause of knocking is a loose mounting bolt that was forgotten to be tightened after the wheel alignment. It is enough to tighten it so that the knocking stops. If you do not pay attention to knocking in the steering tips, the cause of which is play and wear of the ball pin socket, then sooner or later the ball pin will jump out, and the car will no longer obey the steering wheel and become uncontrollable.
Repair of rack on VAZ 2113-VAZ 2115
Disassembly
1) First, you need to remove the rack from the car, and we recommend that you read the details of the process in the article: “Replacing the steering mechanism on a VAZ.”
Note! By the way, do not rush to start repairing the rack if you only heard a knock for the first time. The first symptoms can be removed by pulling it up; the top link to the article contains information on this topic.
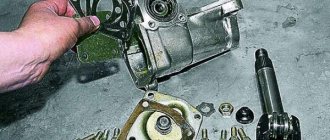
2) Now on the right side, remove the support and spacer ring from the end of the rail, as shown in the first photo. Then use pliers to cut through the clamps holding the protective cover in place (see photo 2, these clamps are disposable), and then remove the cover (photo 3) from the rail. On the other side (from the end), remove another support, now metal, and the protective cap. This operation is shown in the fourth photo.
3) Next, unscrew the special. using a 17 octagonal wrench on the rack stop nut (photo 1) and remove it. There is a spring located immediately behind the nut (photo 3), remove it and put it aside. Using a screwdriver, pry up the retaining ring as shown in the last photo.
4) Next, take the rail in your hands and knock on the board. Knock the crankcase until the stop falls out of the inside, look at photo 1. Then remove the bulkhead seal (photo 2) and use a screwdriver to remove the gear boot (photo 3) and the lock washer (photo 4).
5) Proceed to removing the gear that comes complete with the bearing. It is necessary to remove it from the crankcase by unscrewing the gear bearing mounting nut (photo 1), and then remove it from the shaft (photo 2). Then, taking the mounting blade and using it as a lever for a wrench, use a 14mm wrench to grab the flat of the gear (photo 3) and, leaning the wrench on the blade, remove the gear together with the bearing from the crankcase (photo 4).
Note! By the way, you won’t be able to unscrew the gear fastening nut so easily; you will need a special wrench with a 24-inch octagonal head. Instead, you can use a head with the same size (photo below).
6) Now remove the steering rack from the crankcase by simply tilting the crankcase - the rack will fall out on its own (photo 1). Using a flat-head screwdriver, pry up the support sleeve and remove it from the crankcase (photo 2). Install the new bushing in place of the old one, after putting new damping rings on it (photo 3). During installation, make sure that their thin part is against the cut of the bushing. We put the bushing in place (photo 4). Install the bushing very carefully, making sure that the protrusions do not stick out. Be sure to cut and remove any remaining rubber damping rings.
7) Remove the retaining ring from the worm with pliers (photo 1), and then press out the ball bearing with a special puller, removing it in this way (photo 2). Next, proceed to removing the needle bearing. You will need either a special puller, or stock up on available tools: a hammer and a drill. The required drill bit diameter for a drill is 2 mm. At the end of the crankcase (photo 3), drill two holes through which you will knock out the bearing. Insert nails into the drilled holes and, hitting them with a hammer, remove the needle bearing from the crankcase (last photo).
Why does the steering rack knock on a VAZ 2109?
there is an adjustment unit in it, try adjusting it, if that doesn’t help, then replace the support sleeve
The new rack is also knocking, maybe it’s also not adjusted? how to regulate?
A special octagonal wrench is used to tighten the adjusting nut of the rack stop; it is located at the bottom of the rack and is not visible. Therefore, you have to work by touch
When adjusting, shake the steering wheel and when the knocking disappears, stop tightening
Thank you. Another question, my father has a 99, recently the gearbox rustled, the rustling became more and more, and now the gears are turned on with a crunch and the car in neutral jerks forward, what’s wrong with it?
you need to open it up and look, it’s stupid to make a diagnosis remotely
you need to open it up and look, it’s stupid to make a diagnosis remotely
The oil was checked first of all as soon as the box with the dipstick began to rustle, the level was normal. Maybe the bearings have fallen apart?
if the soles had fallen apart, it would have rumbled unbearably while moving, don’t pull, take it apart
Thank you! We'll start digging tomorrow.
This is only experimental. You pull and you ride. If it bites and the steering wheel does not return after turning, let go a little. You're riding again. If the development is large, a lift will no longer help. It will either knock or bite, especially in extreme positions.
By the way, did you change the steering tips? They may also knock, but not the rack at all. Since you say that the new rack is also knocking, then it is very likely that they are.
Pull the steering rod up and down - is there any play or knocking?
a normal one shouldn't knock.
VAZ 2114, is it possible to install an amplifier yourself?
The work will take no more than two hours if you do everything without haste and with breaks. There is no need to remove the VAZ steering rack; there is no need to even disconnect the rods. You will need a small set of keys: for 10, 13 and 17. The last two are needed. It is advisable to have a good set of tools, since pliers, for example, may be needed at any time.
First you need to remove the left clamp and install the amplifier clamp located on the left on the studs. Moreover, its eye should be facing upward. After this, tighten all the nuts. The clamp on the right side of the steering rack is replaced in the same way. Then you need to put the corner of the rack on a pin located on the cross beam of the car body.
If there is an adsorber tube, remove it first and then install it on top of the corner. The entire structure must be tightened by placing a large washer on the stud. Next, the cross member is installed; its two bolts must be tightened simultaneously.
If there is a gap of about 1 cm in the structure, you will need to rearrange the clamps. Most likely, you mixed them up and installed them incorrectly. This completes the installation, now you can check the VAZ power steering rack in action.
We repair it ourselves
To get started, you will need a set of tools and repair kits.
Replacement kit
Be sure to include the following in your list of tools and materials:
- Repair kit for one of three configurations (more about them below);
- Bearings;
- Lubrication;
- Set of keys and screwdrivers.
Selecting a repair kit
Spare parts
As for repair kits, the standard minimum set includes four elements:
- Washers;
- Nuts;
- Bearings;
- Bushings made of fluoroplastic.
But is it enough for your specific steering rack situation? Let's try to understand the purpose and configuration of each of the three types of repair kits.
- The cheapest repair kit, the contents of which you are already familiar with, allows you to solve the most minor problems that have arisen with your slats.
- The middle kit additionally includes other bearings and shafts. Designed for more serious repair work.
- The most expensive repair kit may consist of whole new slats, that is, it involves not a repair, but a simple replacement of units.
Which braid to choose?
The braid on the steering wheel makes it less slippery and also hides minor defects and abrasions that often appear on the part over time. This accessory can change the appearance of the steering wheel. It gives it a unique look. The product prevents further wear of the element. That's why many car owners buy it.
When purchasing, you need to pay attention to the material, design and method of fastening.
It is important that this accessory makes it comfortable to hold the steering wheel. It shouldn't make your hands sweat when riding for a long time.
It should not be too bulky or fleecy. But many girls prefer covers made of faux fur and similar materials. The product must be selected so that it is in harmony in color and design with the rest of the interior elements. Some car enthusiasts prefer bright braids on the VAZ 2114 steering wheel, which stand out noticeably against the background of the rest of the interior, but this is a matter of taste
It shouldn't make your hands sweat when riding for a long time. It should not be too bulky or fleecy. But many girls prefer covers made of faux fur and similar materials. The product must be selected so that it is in harmony in color and design with the rest of the interior elements. Some car enthusiasts prefer bright braids on the VAZ 2114 steering wheel, which stand out noticeably against the background of the rest of the interior, but this is a matter of taste.
Modern cases have different colors and designs. They are often attached differently. Some products are simply enough to put on the steering wheel. But there are also those that are fixed with special ropes and ribbons. The fastening method usually does not affect the reliability of the fixation. Steering wheel accessories are usually made from the following materials:
- Leather or leatherette. These materials are durable and practical. With them, the steering wheel usually does not slip, and your hands practically do not sweat. Leather steering wheel covers often have a strict, classic design. They are chosen by both men and women. Accessories made from genuine leather are usually not cheap. To save money, you can choose a substitute product.
- Suede, plush or artificial, less often natural, fur. They look shaggy or velvety. They are often painted in bright shades. Therefore, they are often chosen by car ladies. But these materials have significant disadvantages. They often noticeably increase the size of the steering wheel, and therefore it becomes uncomfortable to hold with your hands. In hot weather, hands from such products can become very sweaty, which causes noticeable discomfort when driving.
- Foam rubber. Synthetic material allows you to create bright and original cases of any color and design. They are often marked with funny drawings or inscriptions. Foam products are pleasant to the touch and non-slip. They usually don't make your hands sweat. Such accessories are often chosen by young drivers of both sexes.
Checking the ignition system
In some cases, the car starts to jerk due to some kind of malfunction in the ignition system. As a rule, the problem can be caused by untimely ignition of the fuel mixture. In rare cases, this is due to a weak spark from the spark plug, which in turn is due to low voltage supplied.
Why does the VAZ-2114 jerk when driving? To do this, during diagnostics it is necessary to check:
- First of all, the performance of the ignition coil.
- Serviceability of spark plugs (it is worth noting that if these elements malfunction, they are replaced as a complete set!).
- Pay attention to the condition of high-voltage wires.
- Are there any problems with the distributor (ignition distributor).
- Condition of the camshaft and crankshaft sensors.
And if the problem is the spark plug, then this is a fairly common and mild case. This type of breakdown is harmless and even a beginner can cope with it. Sometimes the problem may be caused by an incorrect gap between the spark plug contacts, which does not meet established standards.
But if the camshaft position sensor is to blame, then you won’t be able to start the engine at all. In this case, qualified assistance from specialists is necessary.
Direct implementation
- First, we disassemble everything, wash it and begin cutting fragments of the required length. A PVC pipe with a diameter of 5 cm will act as a cracker; we will cut it and lay it in four layers. The length of the improvised bushings is 24 cm, so you don’t need to adjust anything, everything is tested from personal experience :).
- In the center of the pipe, it is necessary to remove a strip about 3.5 cm wide. This is necessary so that during installation the cracker can shrink to the shape of the rail.
Read more: Mondeo 4 EGR plug
- When the first fragment is cut out, you can begin installation. We carefully squeeze the cracker and push it inside so that nothing sticks out or sticks out anywhere, since during operation this can create a lot of problems.
4. Cut out the second cracker in the same way.
The only nuance, and it needs to be taken into account, is that each new plastic element will shrink more, so the strip that we cut in the center should be wider than the previous one. After cutting, install the second fragment in place. If necessary, carefully trim everything using a sharp knife. The 3rd and 4th crackers are manufactured and installed in the same way. You should get something similar to the one in the photo. Another important point is to make sure that the edges of the pipe do not protrude into the working window of the rack and do not interfere with the free movement of the steering rods and shaft.
When you install the last fragment, the free play between the housing and the shaft will become exactly what we need, as they say, snugly. For better results, add the required amount of graphite lubricant, change faulty parts (oil seals, tips, etc.), if necessary, and then reassemble in the reverse order.
Many owners of domestic VAZs of the fourteenth model make certain improvements in the design and appearance of their “horses”. For example, modifications to the steering rack, tail lights, heater, locks, cylinder head, throttle body, engine, trunk, cooling system, doors, brakes. Modifying a VAZ-2114 at home is a fun and rewarding process. Useful because the result always pleases the owner. This article will look at a few of these options.
Lifting and adjustment
As the practice and experience of VAZ 2114 owners shows, in case of problems with the struts, they can most often be repaired. The only condition. the presence of an inspection hole at your disposal.
First step. tighten the rail. But how is this done? To do this, simply turn the adjusting bolt. Adjustment is carried out with a 17 mm key.
When tightening the bolt, go into the car and drive a few kilometers to see if there is any knocking or play. If these symptoms of the problem disappear after you have raised and adjusted the steering rack, the repair is complete.
But this doesn't always happen. The knock may remain and the game may disappear, or vice versa. In any case, if at least one sign remains, you will have to begin a full-fledged repair yourself. Now you can find a number of useful ones that detail the procedure for restoring this node. Listen, it will be useful for you.
Steering rack VAZ 2114 - symptoms of failure
The first symptoms of a rack malfunction or the need for tightening are clear:
- Knocking noise under the hood in the area of the engine shield, especially when driving over uneven surfaces.
On a VAZ-2114, a knocking sound when driving through uneven sections of the road may occur due to a loose nut on the bolt that compresses the cardan clamp
- Increased steering wheel play.
- Steering wheel rotation is too tight or too free.
- Leakage of lubricant through oil seals and rack casings.
- Sudden biting of the steering rack while driving.
In this case, most likely, tightening the situation will not correct the situation, however, it is too early to draw conclusions, you can try to adjust it. This can be done in two ways - both on the car and with the rack removed.
Complete disassembly of the steering rack and replacement of the repair kit
In the second case, the adjustment is made after replacing the repair kit and completely repairing the mechanism. We will try to make do with little expense and simply adjust the gap in the gear-rack engagement, thereby eliminating backlash and knocking.
Support bearings
One of the reasons why knocking noises occur when a car is moving on a straight road is wear of the bearings (4 and 6), which are responsible for rotating the shaft located in the engine compartment of the car. Worn bearings lead to radial wobble of the shaft, which causes knocking noises. If the retaining ring (7, 16) breaks or the sealing rings (9, 15) wear out, this leads to axial expansion of the gap and knocking of the shaft along the axis. In some car models, the steering column is non-removable. She changes completely. If the steering column is collapsible, then faulty, worn parts are replaced.
Why is the steering rack knocking?
A car, like any other piece of equipment, is subject to breakdowns. Everyone is used to this, since our roads are not the best, and our driving style leaves much to be desired. What to do if the steering rack starts knocking? It makes sense to say that you shouldn’t plunge into despair and calculations about future expenses, since all this is not as critical as it might seem. First of all, this mechanism is safety; without it, it would be dangerous to be on public roads. This source will tell you what to do if the rack starts to knock and how to extend its service life. The steering rack itself is the name for a mechanism with which you can easily control and maneuver in the car. The word comes from a device called “six rack”; it is installed so that it engages. This mechanism is more applicable in the assembly of current front-wheel drive cars. It is connected to control wheels operating on the steering rod and tip, because of this the mechanism began to be called a gear train.
Reason for knocking
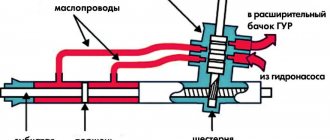
If you turn the steering wheel along its axis, the gear rack of the steering shaft will move it to the area corresponding to self-rotation. At the same time, the rack rotates through the hinge and traction mechanisms, this makes it possible to turn the wheel in the desired direction. Nowadays, most steering racks are made of mechanisms that make the steering wheel easier to spin, mainly when the car is not running. The most common mechanism is the hydraulic booster. In this case, a performer’s device is placed on an ordinary rail, which in turn has a pump distributor. The pump, which is driven by a belt from the crankshafts, usually takes and supplies hydraulic substance from the power steering tank with a pressure of 55 atmospheres. All the liquid that is sucked in eventually comes out into the spool valve. The basis of its work is to monitor the applied stress on the steering wheel and, during its occurrence, help alleviate the driver's applied forces to turn. The main part of the distributor is the control device, which is located in the steering shaft. When the steering wheel is inactive, the torsion bar does not tighten and the outlets do not work, but you can still fill the oil, since the expansion tank is open. And while the steering wheel is rotating, the torsion bar begins to twist; the more effort is applied to the rotation, the faster the process.
How to tighten the steering rack of a VAZ-2114 - step-by-step instructions
Most often, all work on tightening the rack comes down to only selecting the play in the engagement and adjusting the play of the steering wheel. In the event that the wear of the mechanism parts (bushings, the rack itself, the gear, oil seals and anthers) is critical, repair and installation of a repair kit cannot be avoided. However, the easiest way to check this is to tighten the rack directly on the car.
To adjust the rack, you will need a special wrench, which is inserted into the adjusting nut in the steering mechanism housing. You can make this key yourself, but it is sold in any store, it costs a penny, and it never hurts to have it in your arsenal of tools. In addition, it will significantly facilitate the work not only when adjusting, but also when disassembling the rack if necessary.
The VAZ-2114 rack is adjusted as follows:
- It is advisable to install the car either on an overpass or on a lift. You can adjust the rack from under the hood, but you have to work almost by touch.
We install the car on lifts or overpass
- We remove the crankcase protection and the engine mudguard from below.
- We clean the steering rack from dirt and check its condition visually. There should be no grease leaks on it, the anthers should be intact.
- The rack must be firmly fixed to the engine shield, the steering rods must not have any play at the point of attachment to the rack.
- We find the adjusting nut and clean it of dust and dirt. It comes with a plastic plug installed from the factory. It needs to be dismantled.
- Using a special wrench, we tighten the adjusting nut, which is screwed into the steering mechanism housing. The nut can be tightened with a core, so after adjustment it is also necessary to fix it.
Tighten the adjusting nut with a special wrench
- Adjustment is carried out by tightening the nut until it stops, after which the play on the steering wheel is checked. If the force on it is too strong, the nut is released a few degrees.
- After adjustment, the nut must be fixed by rolling, otherwise there is a possibility that it will unscrew spontaneously.
Having chosen the play, we do not hide the tool, but do a test drive, during which we evaluate the operation of the steering mechanism. If the steering wheel rotates freely and there is no play, the adjustment can be considered complete. If the steering wheel turns too tight, it is better to loosen the adjusting nut a little by turning it a few degrees counterclockwise.
The steering rack of the VAZ 2114 is knocking
- Registration
- Entrance
- To the beginning of the forum
- Forum Rules
- Old design
- FAQ
- Search
- Users
- List of forums AUTOLADA.RU
- Family "Samara"
The rack is pressed against the gear by a metal-ceramic stop 44 by spring force. The rack stop is sealed in the crankcase with a rubber ring 41. The spring is pressed against the stop by a nut 43 with a locking ring 42. This ring creates resistance to unscrewing the nut. When assembling the steering mechanism, the nut is installed so that there is a gap of up to 0.12 mm between it and the stop. This gap is necessary to compensate for the thermal expansion of parts so that the steering mechanism does not jam. Additionally, the nut is fixed by opening it in two opposite places. Due to the spring-loaded stop 44, backlash-free engagement of the gear is ensured along the entire length of the latter. It feels like this adjusting bolt is somehow unscrewing itself.
El Diabolo Encarnado wrote: If the play is not removed or you have to pull so that the steering wheel is twisted, the rack is worn out. If there is play back and forth (in the direction of travel), the plastic support sleeve is worn out. +1
If there are signs of wear on the rack teeth, change the rack (not the entire steering mechanism, but only the rack), the plastic bushing definitely needs to be replaced
A friend told me that this gap doesn’t matter, nothing will fall off. And if nothing falls off, why change a rack that costs more than 2 pieces?
And where is the guarantee that the new one will not knock after 10 thousand.
There was a problem as the author. I got a car with a mileage of 49,000 km, it was knocking (you could say the steering rack was knocking), it didn’t bother me much, but by 60,000 km it was already getting really bad (when braking on bumps, there was a knock on the steering wheel and the car could be slightly moved off the trajectory).
I came to the service center - one SPECIALIST came out (younger than me), the verdict - the wear was just terrible (kick-ass), the steering rack was replaced. Price about 2000 rubles. + work 700.
I went to my garage friend Uncle Vasya.
On his advice, I bought a complete repair kit for the rack (it cost about 400 rubles, all its guts were there, I bought it at Autofastener, with the possibility of returning unused spare parts).
We disassembled the rack - and there were defects: the plastic bushing had become loose (its price was 80 rubles), they changed it, lubricated it, reassembled it, now the car has a mileage of 95,000 km. During this time, ONE time I slightly tightened the rack myself and that’s it (and only because I gave the car to my sister so that the extra knocks wouldn’t bother her).
So, there is no need to guess: go to the service center, disassemble the rack, diagnose it and make a decision. If the body is intact, the offal can be sorted out and reassembled conscientiously.
Steering rack repair for VAZ 2113, VAZ 2114, VAZ 2115
The steering rack is a mandatory, indispensable element of the steering of a car. This device converts the driver's efforts on the steering wheel inside the car, ensuring the wheels of the car turn and, accordingly, change the direction of movement. Over time, like any part, it wears out, and an unpleasant knocking noise appears, especially audible when cornering and while driving on uneven roads. This knock, firstly, is annoying, but it clearly makes it clear that something is wrong with the car. You should not ignore the knocking, because one day the rack may simply jam, and the steering wheel will lock in one position, and only braking and a complete stop can save you.
Note! You will need the following tools: a special 17 octagon wrench, a chisel with a hammer, a vice, a set of all kinds of wrenches (spanners, wrenches, socket wrenches) and screwdrivers, and pliers.
When to repair the rack?
In general, the rack is repaired to replace its protective cover or other parts. Let's look at the symptoms of the malfunction: the rack began to knock on bumps and turns, or when turning. Place the steering wheel in the forward direction of travel and try to grab the rack with your hands and shake it. Grab it at the junction of the steering rods, indicated by the arrow in the photo. Before doing this, shake the steering wheel a little until it turns easily.
Note! The rack deteriorates from many things, but most of all from driving on uneven roads. In general, this causes the suspension to fail faster, so avoid bumps if possible and reduce speed on bumps and dirt roads.
CV joint (grenade)
If you hear a knock when turning, and especially when the steering wheel is fully turned, this indicates a malfunction of the outer CV joint - constant velocity joint. The knocking noise occurs when the joint hits the wheel while turning. The inner CV joints crunch and knock without any turning. It is enough to be on an uneven road, or the car is driving at high speed. Characteristic crunching sounds indicate that the grenade is malfunctioning. If the CV joint fails, you should not try to repair it; you should completely replace this unit. If the hinge is in good condition, then it is enough to treat it with lubricant.