How to check
Before you begin replacing the front or rear bearing of your hub, we recommend that you conduct a simple check of the functionality of this unit. This will allow you to accurately determine the culprit of the malfunction and verify the real need to replace the elements.
There are two verification methods, each of which has its own nuances.
| Verification method | What to do |
| After a long ride, touch the area of the wheel where the noise is coming from. | If the area is hot compared to the other side, the bearing needs to be replaced |
| Raise the car, unscrew the wheel bolts, lift the side you are checking. Rock the wheel with more force | If the sound is dull, have a second person apply the brake and repeat the procedure. If there is no noise, the bearing must be replaced |
What to choose?
Rear and front wheel bearings today are produced by both domestic and foreign manufacturers. The choice, as they say, is yours.
But we still want to give some recommendations on this matter.
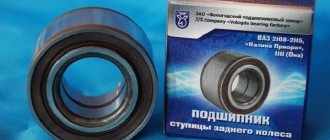
- Chinese analogues. We strongly advise against choosing them to repair your VAZ 2114. They are of dubious quality, although they are the most affordable. Such bearings will not be enough for a long service life.
- Imported, mainly from Europe. The price is higher compared to analogues, but the quality is at the same level. When buying imported bearings, pay attention that they are not successful Chinese counterfeits. There are many of these now, unfortunately.
- Domestic. Pay attention to the parts made by Vologda or Samara craftsmen. The quality is quite high, and the price is affordable and adequate. What you need for the VAZ 2114.
Regardless of whether the bearing you are looking for is a rear or front hub, its size is identical and is 64 by 34 by 47 millimeters.
To work on replacing the element yourself, you will additionally need:
- Special puller for bearings;
- 30mm socket wrench;
- 19 and 17 mm wrenches.
Causes and symptoms of failure
The causes of failure can be very diverse, but basically they are all related to loads, for example:
- Operating a vehicle on bad roads or off-road;
- Transportation of heavy loads;
- Aggressive car handling with sharp acceleration and braking.
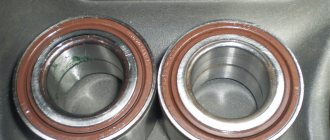
But there are often cases when breakdowns occur due to low-quality spare parts. For example, the previous owner of the car decided to save money before selling it and installed not the original, but a Chinese analog wheel bearing, and they contain the following defects:
- Insufficient amount of lubricant inside the bearing. Because of this, in the future it simply dries out and begins to wear off.
- Faulty rollers or bearing balls. Parts may not be made according to the stated characteristics, but from softer metals, which is why deformation occurs under normal load.
Replacement
First, let's set priorities. If you just want to save money, so you do the work yourself without any experience, then this is a wrong decision that can lead to dire consequences. If you have experience and certain knowledge, you can safely do the repairs yourself.
In any case, we recommend watching the training video instructions, where you will be told in detail about all the nuances of such work. This way you will gain additional experience and useful knowledge.
After this, we proceed directly to the work of replacing the wheel bearings. There are several ways. We will tell you about each of them in more detail, and you will decide for yourself which option suits your skills and capabilities.
- The first method involves carrying out work without removing the steering knuckle from the car. But here you will definitely need a special puller to dismantle the bearings. The advantage of the method is that there is no need for subsequent wheel alignment adjustment. But this is the most inconvenient way. To press out and reinstall the wheel bearing, we recommend driving the car into an inspection hole.
Puller
- The second method will require removing the steering knuckle. A workbench will also be useful for removing the bearing. In this case, you will definitely break the collapse. If you don’t want to go to a service station after repairing yourself, use a couple of tricky tricks:
- Before removing the lower strut and steering knuckle bolt, make marks;
- One mark will allow you to determine the position of the bolt;
- The second mark will be responsible for the position in the steering knuckle strut;
- During the reassembly process, try to ensure that the marks match each other as accurately as possible. This method allows you to simultaneously make adjustments to the chassis and check the condition of the components.
The third method will require removing the bearing along with the stand and dismantling it using a vice. This method is complex compared to others.
It remains to press out the element
Before work, do not forget to turn on the handbrake and place wheel chocks under the wheels to avoid accidental movement of the vehicle.
- Remove the strut, knock out the tie rod ends and unscrew the fasteners of the upper support to the body of your car.
- Position the jack so that it does not become an obstacle during operation. It all depends on your personal understanding of comfort.
- The wheel bolts are unscrewed, after which the nut of the desired bearing is removed using a 13 mm wrench.
- Using a 17 mm wrench, you dismantle the caliper, which is secured with wire to prevent sagging on the brake hose.
Dismantling works
- After this, the brake disc and ball joint are removed.
- The hub will now be knocked out of the steering knuckle, giving you access to the damaged bearing.
- All that remains now is to press out our problematic element using a puller.
- If you do not have a device such as a puller, use a metal tube whose diameter is slightly smaller than the diameter of the bearing.
- Clean the landing site, treat it with lubricant, after which you can install a new spare part.
- Reassemble in reverse order. Do not forget to simultaneously check the condition of various components, lubricate, change gaskets as necessary.
As you can see, there is a lot of work to do. Do not rush to conclusions regarding the ease or difficulty of such a task. If you want to do everything quickly, efficiently, without having any experience, contact the service station. Otherwise, be prepared to spend a whole day, or even more, on repairs.
Chassis design
Front wheel bearing
Before you begin the replacement process itself, you need to see all the structural elements that need to be dismantled. Therefore, first you need to understand the structure of the front part of the suspension, or rather, look at the elements in section and determine the location of the bearing.
Front chassis design
Front suspension assembly: 1 – upper support of the telescopic strut; 2 – upper support cup; 3 – compression stroke buffer with protective casing; 4 – compression buffer support; 5 – suspension spring; 6 – lower spring support cup; 7 – steering rod ball joint; 8 – steering knuckle; 9 – telescopic stand; 10 – eccentric washer; 11 – adjusting bolt; 12 – rack bracket; 13 – steering knuckle; 14 – front brake protective cover; 15 – brake disc; 16 – retaining ring; 17 – wheel hub nut; 18 – splined shank of the wheel drive hinge housing; 19 – guide pin; 20 – wheel hub bearing; 21 – ball joint; 22 – suspension arm; 23 – adjusting washers; 24 – stabilizer strut; 25 – stabilizer bar; 26 – stabilizer bar cushion; 27 – stabilizer bar mounting bracket; 28 – body bracket for mounting the suspension arm; 29 – suspension arm extension; 30 – bracket for fastening the extension; 31 – protective cover of the ball pin; 32 – ball pin bearing; 33 – ball pin; 34 – ball pin body; 35 – suspension strut rod; 36 – outer body of the upper support; 37 – inner body of the upper support; 38 – upper support bearing; 39 – rubber element of the upper support; 40 – travel limiter of the upper support; 41 – protective cap of the upper support; B - zone for monitoring the suspension joint
Another way to replace the hub and wheel bearing
front wheel bearing, made in Slovakia
Front hub
Next, I’ll describe the process of installing all this goodness. There are many ways to change a bearing, I use the method of removing the strut, so that I don’t have to do a wheel alignment after all these manipulations.
While the wheel is not yet removed, unscrew the hub nut by 30, which is located in the center of the wheel. It is advisable for your assistant to press the brake while in the cabin, it will be faster. In our case, the nut came off easily. Then we remove the wheel.
let's proceed to further actions
Next, remove the caliper, unscrew the ball and tip.
to remove the tip and ball I used a universal puller, very good thing
Then we completely unscrew the hub nut and pull out the CV joint. After that, unscrew the three nuts under the hood that hold the strut.
unscrewed
And take out the stand:
what happened
Unscrew the two guide bolts and remove the brake disc.
here is the same hub
If you look closely, you can see that one of the bolt holes is missing threads.
Most likely this is a marriage.
Remove the protective casing and knock out the old hub.
old and new
Usually, if you don’t change the hub, but just change the bearing, then you also need to remove the remains of the old bearing (ring) from the old hub; it can be removed either with a puller (there are special grooves for it on the hub) or knocked out little by little with a chisel. We don't need to go through this procedure, because... We have a new hub.
We are left with a fist in which the bearing sits. To get to it you need to remove the retaining rings on both sides. They can be picked out either with screwdrivers or with a special tool - a retaining ring puller. We have just such a thing.
remove the retaining rings (a very convenient thing)
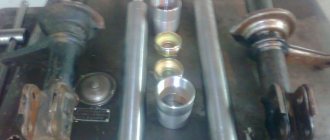
Next we need to remove the old bearing. It is best to use a puller, but I have also tried other methods - using the housing to knock out the old bearing from under the old bearing. I pressed it with it. And nothing bad happened after that, the car ran on this bearing for another 3 years (with me).
This time the old case was not at hand, so we decided to use a puller.
We bought this removable wrench for wheel bearings
And they began to press out the old bearing.
the process has started
After suffering a little, the bearing gave up and came out.
inspect for nicks
Everything is good inside, no nicks or other damage. Wipe everything thoroughly with a cloth, clean the grooves under the rings from dirt and sand. Lubricate the inside with oil and insert a new bearing, evenly without distortions.
ready to fight
We insert one retaining ring and use a puller to press in the new bearing.
let's go
Then insert the second retaining ring
ready
All we have to do is carefully drive the hub into the fist and we can put everything back together.
new girl
Putting everything back together in reverse order. We install a new hub nut.
everything is collected
We put the wheel on and tighten the nut thoroughly, after which it must be coked. OK it's all over Now. Now the wheel does not wobble and it stands on 4 bolts, as it should.
How to change a bearing yourself
Before starting work, you should carefully study all its stages:
- We jack up the car from the side of the faulty bearing, remove the wheel and, having access to the lock nut of the outer CV joint, unscrew it using a 30 mm socket. It is worth considering that when subjected to high loads, the nut can be heavily tightened; in this case, the wheel is put in place, the car is released from the jack, after which we engage first or second gear in the gearbox and with great force and an elongated wrench, it can be torn off.
Next, we proceed to dismantling the brake cylinder, for which we need to unscrew the two bolts that secure it from the inside of the hub with a 17 mm wrench, and using a flat-head screwdriver, carefully pressing the pads away from the disc, we remove this unit to the side.
- We unscrew the nut securing the steering tip from the steering knuckle, and using a specialized puller, squeeze it out of its seat, then we perform a similar operation with the tip of the ball joint located at the bottom of the hub
- The upper part of the steering knuckle is attached to the suspension shock absorber strut with two bolts, the lower of which regulates the vehicle's wheel alignment, mark its position and, after unscrewing these bolts, remove the entire hub assembly. We also remove the brake disc secured with two screws.
- Using a specialized puller, we press the front hub out of the inner race of the bearing, then remove the retaining rings on both sides, and with the same puller, we squeeze the old bearing out of its seat.
- Before installing a new wheel bearing, we clean its seat from old contaminants, carefully inspect it for possible damage, small chips and cracks, and if they are found, the steering knuckle must be changed, otherwise there is a possibility of its rapid breakdown.
- We lubricate the bearing seat in the steering knuckle, which will greatly facilitate its pressing, install one retaining ring and mount the new part using a specialized puller until a characteristic click is heard, after which the second retaining ring is inserted.
- We clean, inspect for damage and, if there is none, lubricate the seat of the front hub. Then, using a puller, we carefully press it into the inside of the new bearing and mount the entire assembly into its seat. After that, we carefully insert the splined flange of the drive, install the brake disc, caliper, ball joint and steering end, after which we tighten the new nut securing the outer CV joint, which comes in the repair kit for new parts, roll its edges into the locking grooves and put the wheel in place.
This completes all work on replacing the front wheel bearing. Also watch the video for a detailed analysis of replacing the front wheel bearing on VAZ 2113, 2114, 2115 cars:
Replacing the front wheel bearing of a VAZ 2114 is another way
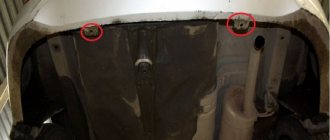
First, you need to place and strengthen the front axle of the car in a suspended state, this is the main disadvantage of a lowered car, because the jack does not fit under the bottom, you had to drive onto the boards to raise the car higher and then jack it up. Also, for greater safety, we place houses or pyramids under the bottom, as anyone calls them.
We remove the wheels.
Next, you need to knock out the locking clip on the hub nut, for this we take some kind of nail and knock it out, and then with the help of a partner we twist this nut (the partner presses on the brake pedal) I can tell you that an incredible amount of force was applied to unscrew it.
This is the 30 nut in the middle of the hub:
Next, remove the caliper.
Remove the brake disc boot. Remove the brake disc.
Next, carefully knock out the hub.
We remove the casing from the old bearing from the hub (well, it flew off the bearing when knocking it out). Next, we knock out the old hub bearing; to do this, you first need to remove the retaining rings from both sides. And carefully knock out the old bearing. (be careful not to damage the boot).
Next, carefully drive the new bearing back, install the retaining rings and install the hub:
It’s also best to replace the ball joints with new ones once you’ve gotten into it.
The 6 hours spent were a great success.
A little about the device and functionality
The main purpose of the part is to ensure uniform rotation of the car wheels. Given the name of the part, it is easy to guess that wheel bearings are the connecting link between the hub and the axle to which the brake disc and wheel are attached.
The design of the part fully corresponds to the classic type of rolling bearings. These are two metal rings into which conical rollers are pressed, protected from the body by a durable rubber insulator.
Unlike foreign competitors, domestic bearings are created using outdated HUB technology. They are quite difficult to install, require very precise tightening torque and require plenty of lubrication.
The operation of the mechanism lasts for several years. It is recommended to change a spare part for a VAZ 2114 approximately once every 100 thousand kilometers.
But negative operating factors can accelerate the wear process:
- Bad roads. The entire force of the shock load falls on this mechanism of the system. Over time, the metal gets tired and the bearing begins to fail.
- Aggressive reagents. In Russia, in order to save money in winter, aggressive chemicals are often used to remove ice from roads.
- Sudden temperature changes. In winter, owners of warm garages unknowingly shorten the service life of many metal parts, for which sudden temperature changes when leaving and entering the garage create a large load.
Types of hair masks
Each hair type needs special care, which is why there are several types of hair masks that are aimed at preventing the problem. For example, dry strands need masks with a moisturizing effect, oily hair, on the contrary, needs drying products, and normal hair types need a balance between nourishing and drying properties. In addition, different types of masks contain certain components that distinguish one product from another.
Hair masks come in the following types:
- Moisturizing.
- Nutritious.
- Restorative.
- Strengthening.
- Carers.
There are also remedies for hair loss and dandruff. Further in the article we will talk about the professional hair mask “Alerana”, the action of which is aimed at intensive nutrition and activation of strand growth.
Wheel bearing diagnostics
Let's talk about how to check a wheel bearing.
An indirect sign that you need to pay attention to the bearing on the VAZ 2114 is the appearance of a characteristic hum or hum from one of the wheels while driving. Typically, the noise increases at high speeds, making it easier to hear on the highway.
The driver, being in the cabin, is not always able to correctly determine the source of the noise. For example, a hum from the left wheel may be perceived as coming from the right. Or vice versa. To accurately determine by ear where the damaged bearing is located, you need to watch how the sound changes when turning when the mechanism is subjected to a higher load. If the sound disappears when turning right, but appears when turning left, the right bearing has worn out.
Diagnostics is carried out in the following way.
- We raise the car so that the wheel being diagnosed is hanging out.
- We rock it with our hands, holding the top part.
- We turn the wheel by hand.
- Pay attention to the smooth deceleration of movement and to extraneous sounds.
- An emerging backlash may also indicate a problem.
How to recognize problems with the hub?
The fact is that the hub is the most important element of any rotating mechanism, including a car wheel. It is the central part of the rotating parts with a hole to allow it to be attached to an axis or shaft. Thus, its main task is to provide rotational motion. To prevent free rotation on the axle, rolling bearings or special plugs are pressed into the hub hole. In addition, it is thanks to the bearings that the hub, as well as the wheel, can rotate.
It is quite easy to notice that the wheel bearing is urgently needed to be replaced; in this case, a characteristic knock occurs in the lower rear part of the body, most often it intensifies when driving on an uneven road or when hitting potholes and bumps. When driving on a relatively flat road surface, a hum may occur. In addition, the brake drum gets very hot.
Instructions for replacing the wheel bearing
Replacing the rear wheel bearing on a VAZ 2114 is carried out as follows:
- Loosen the wheel bolts and wheel locknut before jacking up the vehicle.
- Raise the car using a jack. Tighten the hub nut completely and remove the wheel. Unscrew the mounting bolts on the drum.
- Remove the drum. If it is rusty, pre-treat the joint with WD-40. If after this the drum still does not budge, use long pins. Screw them into the holes and tighten them one by one until the part moves out of place. You can gently help with a hammer by tapping it on the back side.
- Unbend the stopper and unscrew the locknut. If it is tight, use a wrench extension.
- Using a universal puller, press the hub.
- The inner race remains on the shaft, and the outer part of the bearing remains in the housing. If you want to replace the pads at the same time, you need to remove the axle mounts.
- Now it's time to demonstrate the entire mechanism.
- As a rule, the rear part of the axle is attached to the brake shield. To dismantle you will have to use a hammer.
- Remove the wheel bearing race using a universal puller. If the brake system does not need to be changed, this operation can be performed directly on the vehicle's axle shaft.
- We place the hub on bricks or bars, as shown in the photo. Use a hammer to knock out the old rear wheel bearing.
- Be sure to remove dirt and wash the hub in gasoline. Clean the axle shaft in the same way. Use thick lubricant to treat the seating surface. Place the new bearing in the hub bore. Mounting chamfers will help avoid distortions.
- Press the bearing with your hand and press it in about 3 millimeters. Place the old bearing on top.
- Using the side of the hammer, carefully hammer the part inward. If the process is difficult, you can cool the bearing in the freezer and warm up the hub.
- Once the rear hub bearing is in place, you can install the circlip. For this purpose, round nose pliers are used. Don't forget to lubricate the axle first.
- Carefully attach the assembled mechanism to the trunnion. Be careful to avoid distortions. Then place a washer on the threads and screw on the hub locknut.
- Using a nut, press the hub onto the axle. Tightening torque: 220 N*M. Place the drum, secure it and screw the chassis.
As you can see, replacing a bearing is a rather complicated and time-consuming task. You need to have a special tool. Sometimes it’s easier to ask a car service for help.
Total
Tools needed: a set of wrenches and sockets, circlip pliers, cup and two-jaw pullers, hammer, chisel, soft metal drift, screwdriver.
A summary map of the technology for replacing the VAZ 2114 front wheel bearing looks like this:
- loosen the collars and unscrew the nut on the CV joint shaft;
- remove the wheel;
- remove the brake disc and caliper assembly;
- unscrew the ball joint housing;
- press out or knock out the hub through a “soft” drift;
- remove the CV joint;
- remove the retaining ring;
- press out the bearing;
- press in a new support;
- install the hub;
- assemble the brake system;
- install the wheel;
- tighten the hub nut and bend its shoulders.